TileBrush 개요
TileBrush 개체는 이미지, Drawing 또는 Visual로 영역을 그리는 방법을 강력하게 제어할 수 있도록 합니다. 이 항목에서는 TileBrush 기능을 사용하여 ImageBrush, DrawingBrush 또는 VisualBrush가 영역을 그리는 방법을 보다 강력하게 제어하는 방법을 설명합니다.
필수 구성 요소
이 항목을 이해하기 위해 ImageBrush, DrawingBrush 또는 VisualBrush 클래스의 기본 기능을 사용하는 방법을 이해하는 것이 좋습니다. 이러한 형식에 대한 소개를 보려면 이미지, 드로잉 및 시각적 개체로 칠하기를 참조하세요.
타일로 영역 그리기
ImageBrush, DrawingBrush, VisualBrush는 TileBrush 개체의 유형입니다. 타일 브러시는 이미지, 그림 또는 시각적 개체로 영역을 그리는 방법을 강력하게 제어할 수 있도록 합니다. 예를 들어 늘어난 이미지만으로 영역을 그리기보다, 패턴을 만드는 일련의 이미지 타일을 사용하여 영역을 그릴 수 있습니다.
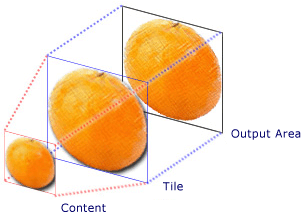
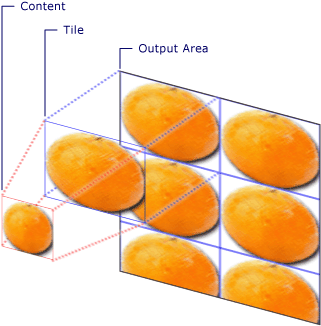
타일 브러시로 영역을 그리려면 세 가지 구성 요소인, 콘텐츠, 기본 타일 및 출력 영역이 필요합니다.

단일 타일이 있는 TileBrush의 구성 요소

TileMode가 Tile인 TileBrush의 구성 요소
출력 영역은 Ellipse의 Fill 또는 Button의 Background와 같이 칠해지는 영역입니다. 다음 섹션에서는 TileBrush의 다른 두 구성 요소에 대해 설명합니다.
브러시 콘텐츠
TileBrush에는 세 가지 형식이 있으며 각각은 다른 형식의 콘텐츠로 칠해집니다.
브러시가 ImageBrush이면 이 콘텐츠는 이미지입니다. ImageSource속성은 ImageBrush의 콘텐츠를 지정합니다.
브러시가 DrawingBrush이면 이 콘텐츠는 그리기입니다. Drawing 속성은 DrawingBrush의 콘텐츠를 지정합니다.
브러시가 VisualBrush이면 이 콘텐츠는 시각적 개체입니다. Visual 속성은 VisualBrush의 콘텐츠를 지정합니다.
Viewbox 속성을 사용하여 TileBrush 콘텐츠의 위치와 크기를 지정할 수 있습니다. 단, Viewbox는 기본값으로 두는 것이 일반적입니다. 기본적으로 Viewbox는 브러시의 콘텐츠를 완전히 포함하도록 구성되어 있습니다. Viewbox 구성에 대한 자세한 내용은 Viewbox 속성 페이지를 참조하세요.
기본 타일
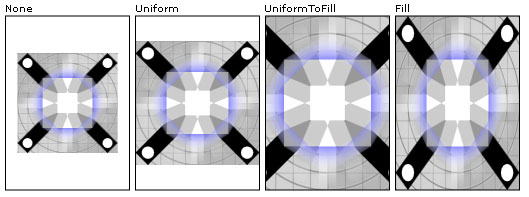
TileBrush는 콘텐츠를 기본 타일에 투영합니다. Stretch 속성은 기본 타일을 채우도록 TileBrush 콘텐츠를 늘리는 방식을 제어합니다. Stretch 속성은 Stretch 열거형으로 정의되는 다음 값을 수락합니다.
None: 브러시의 콘텐츠가 타일을 채우도록 늘어나지 않습니다.
Fill: 브러시의 콘텐츠가 타일에 맞게 크기가 조정됩니다. 콘텐츠의 높이 및 너비가 독립적으로 조정되므로 콘텐츠의 원래 가로 세로 비율이 유지되지 않을 수 있습니다. 즉, 출력 타일을 완전히 채우도록 브러시 콘텐츠를 이동해야 할 수 있습니다.
Uniform: 브러시의 콘텐츠가 타일 내에 완전히 맞도록 크기가 조정됩니다. 콘텐츠의 가로 세로 비율이 유지됩니다.
UniformToFill: 브러시의 콘텐츠가 원래 가로 세로 비율을 유지하면서 출력 영역을 완전히 채우도록 크기가 조정됩니다.
다음 이미지는 다양한 Stretch 설정을 보여줍니다.

다음 예제에서 ImageBrush의 콘텐츠는 출력 영역을 채우도록 늘어나지 않게 설정됩니다.
<Rectangle
  Width="125" Height="175"
  Stroke="Black"
  StrokeThickness="1"
  Margin="0,0,5,0">
  <Rectangle.Fill>
    <ImageBrush
      Stretch="None"
      ImageSource="sampleImages\testImage.gif"/>
  </Rectangle.Fill>
</Rectangle>
// Create a rectangle.
Rectangle myRectangle = new Rectangle();
myRectangle.Width = 125;
myRectangle.Height = 175;
myRectangle.Stroke = Brushes.Black;
myRectangle.StrokeThickness = 1;
myRectangle.Margin = new Thickness(0,5,0,0);

// Load the image.
BitmapImage theImage =
    new BitmapImage(
        new Uri("sampleImages\\testImage.gif", UriKind.Relative));
ImageBrush myImageBrush = new ImageBrush(theImage);

// Configure the brush so that it
// doesn't stretch its image to fill
// the rectangle.
myImageBrush.Stretch = Stretch.None;

// Use the ImageBrush to paint the rectangle's background.
myRectangle.Fill = myImageBrush;
' Create a rectangle.
Dim myRectangle As New Rectangle()
With myRectangle
    .Width = 125
    .Height = 175
    .Stroke = Brushes.Black
    .StrokeThickness = 1
    .Margin = New Thickness(0, 5, 0, 0)
End With

' Load the image.
Dim theImage As New BitmapImage(New Uri("sampleImages\testImage.gif", UriKind.Relative))
Dim myImageBrush As New ImageBrush(theImage)

' Configure the brush so that it
' doesn't stretch its image to fill
' the rectangle.
myImageBrush.Stretch = Stretch.None

' Use the ImageBrush to paint the rectangle's background.
myRectangle.Fill = myImageBrush
기본적으로 TileBrush는 단일 타일(기본 타일)을 생성하고 출력 영역을 완전히 채우도록 해당 타일을 늘입니다. Viewport 및 ViewportUnits 속성을 설정하여 기본 타일의 크기와 위치를 변경할 수 있습니다.
기본 타일 크기
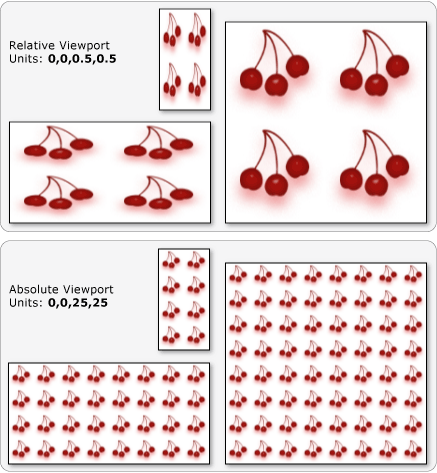
Viewport 속성은 기본 타일의 크기와 위치를 결정하며, ViewportUnits 속성은 Viewport가 절대 좌표 또는 상대 좌표 중 무엇을 사용하여 지정될지를 결정합니다. 상대 좌표인 경우 출력 영역의 크기를 기준으로 합니다. 점 (0,0)은 출력 영역의 왼쪽 위 구석을 나타내고 (1,1)은 출력 영역의 오른쪽 아래 구석을 나타냅니다. Viewport 속성이 절대 좌표를 사용하도록 지정하려면 ViewportUnits 속성을 Absolute로 설정합니다.
다음 그림은 상대 및 절대 ViewportUnits을 사용할 때 TileBrush의 출력 차이를 보여줍니다. 각 그림은 바둑판식 배열 패턴을 보여 줍니다. 다음 섹션에서는 바둑판식 배열 패턴을 지정하는 방법을 설명합니다.

다음 예제에서는 이미지를 사용하여 너비 및 높이가 50%인 타일을 만듭니다. 기본 타일은 출력 영역의 (0,0) 위치에 있습니다.
<Rectangle
 Width="50" Height="100">
  <Rectangle.Fill>

    <!-- Paints an area with 4 tiles. -->
    <ImageBrush ImageSource="sampleImages\cherries_larger.jpg"
      Viewport="0,0,0.5,0.5"
      ViewportUnits="RelativeToBoundingBox"
      TileMode="Tile" />
  </Rectangle.Fill>
</Rectangle>
// Create a rectangle.
Rectangle myRectangle = new Rectangle();
myRectangle.Width = 50;
myRectangle.Height = 100;

// Load the image.
BitmapImage theImage =
    new BitmapImage(
        new Uri("sampleImages\\cherries_larger.jpg", UriKind.Relative));
ImageBrush myImageBrush = new ImageBrush(theImage);

// Create tiles that are 1/4 the size of
// the output area.
myImageBrush.Viewport = new Rect(0,0,0.25,0.25);
myImageBrush.ViewportUnits = BrushMappingMode.RelativeToBoundingBox;

// Set the tile mode to Tile.
myImageBrush.TileMode = TileMode.Tile;

// Use the ImageBrush to paint the rectangle's background.
myRectangle.Fill = myImageBrush;
' Create a rectangle.
Dim myRectangle As New Rectangle()
myRectangle.Width = 50
myRectangle.Height = 100

' Load the image.
Dim theImage As New BitmapImage(New Uri("sampleImages\cherries_larger.jpg", UriKind.Relative))
Dim myImageBrush As New ImageBrush(theImage)

' Create tiles that are 1/4 the size of
' the output area.
myImageBrush.Viewport = New Rect(0, 0, 0.25, 0.25)
myImageBrush.ViewportUnits = BrushMappingMode.RelativeToBoundingBox

' Set the tile mode to Tile.
myImageBrush.TileMode = TileMode.Tile

' Use the ImageBrush to paint the rectangle's background.
myRectangle.Fill = myImageBrush
다음 예제에서는 ImageBrush의 타일을 25x25 디바이스 독립적 픽셀로 설정합니다. ViewportUnits은 절대값이므로 ImageBrush 타일은 칠해지는 영역의 크기에 관계없이 항상 25 x 25픽셀입니다.
<Rectangle
 Width="50" Height="100">
  <Rectangle.Fill>

    <!-- Paints an area with 25 x 25 tiles. -->
    <ImageBrush ImageSource="sampleImages\cherries_larger.jpg"
      Viewport="0,0,25,25"
      ViewportUnits="Absolute"
      TileMode="Tile" />
  </Rectangle.Fill>
</Rectangle>
// Create a rectangle.
Rectangle myRectangle = new Rectangle();
myRectangle.Width = 50;
myRectangle.Height = 100;

// Load the image.
BitmapImage theImage =
    new BitmapImage(
        new Uri("sampleImages\\cherries_larger.jpg", UriKind.Relative));
ImageBrush myImageBrush = new ImageBrush(theImage);

// Create tiles that are 25 x 25, regardless of the size
// of the output area.
myImageBrush.Viewport = new Rect(0, 0, 25, 25);
myImageBrush.ViewportUnits = BrushMappingMode.Absolute;

// Set the tile mode to Tile.
myImageBrush.TileMode = TileMode.Tile;

// Use the ImageBrush to paint the rectangle's background.
myRectangle.Fill = myImageBrush;
' Create a rectangle.
Dim myRectangle As New Rectangle()
myRectangle.Width = 50
myRectangle.Height = 100

' Load the image.
Dim theImage As New BitmapImage(New Uri("sampleImages\cherries_larger.jpg", UriKind.Relative))
Dim myImageBrush As New ImageBrush(theImage)

' Create tiles that are 25 x 25, regardless of the size
' of the output area.
myImageBrush.Viewport = New Rect(0, 0, 25, 25)
myImageBrush.ViewportUnits = BrushMappingMode.Absolute

' Set the tile mode to Tile.
myImageBrush.TileMode = TileMode.Tile

' Use the ImageBrush to paint the rectangle's background.
myRectangle.Fill = myImageBrush
바둑판식 배열 동작
TileBrush는 기본 타일이 출력 영역을 완전히 채우지 못하고 None 이외의 바둑판식 배열 모드가 지정된 경우 바둑판식 배열 패턴을 생성합니다. 타일 브러시의 타일이 출력 영역을 완전히 채우지는 못할 경우 해당 TileMode 속성에 따라 기본 타일이 출력 영역을 채우도록 복제되는지 여부와 기본 파일의 복제 방식이 지정됩니다. TileMode 속성은 TileMode 열거형으로 정의되는 다음 값을 수락합니다.
None: 기본 타일만 그려집니다.
Tile: 기본 타일이 그려지고 기본 타일을 반복해서 한 타일의 오른쪽 가장자리가 다음 타일의 왼쪽 가장자리에 인접하고, 아래 및 위의 경우도 비슷한 방식으로 인접하도록 나머지 영역이 채워집니다.
다음 이미지는 여러 다른 바둑판식 배열 모드를 보여 줍니다.

다음 예제에서는 이미지를 사용하여 너비 및 높이가 100x100픽셀인 사각형을 그립니다. 브러시의 Viewport를 0,0,0.25,0.25로 설정하여 브러시의 기본 타일이 출력 영역의 1/4이 됩니다. 브러시의 TileMode는 FlipXY로 설정됩니다. 이를 통해 타일 행으로 사각형이 채워집니다.
<Rectangle
 Width="100" Height="100" >
  <Rectangle.Fill>
    <ImageBrush ImageSource="sampleImages\triangle.jpg"
      Viewport="0,0,0.25,0.25"
      TileMode="FlipXY"
      />
  </Rectangle.Fill>
</Rectangle>
// Create a rectangle.
Rectangle myRectangle = new Rectangle();
myRectangle.Width = 100;
myRectangle.Height = 100;

// Load the image.
BitmapImage theImage =
    new BitmapImage(
        new Uri("sampleImages\\triangle.jpg", UriKind.Relative));
ImageBrush myImageBrush = new ImageBrush(theImage);

// Create tiles that are 1/4 the size of
// the output area.
myImageBrush.Viewport = new Rect(0,0,0.25,0.25);

// Set the tile mode to FlipXY.
myImageBrush.TileMode = TileMode.FlipXY;

// Use the ImageBrush to paint the rectangle's background.
myRectangle.Fill = myImageBrush;
' Create a rectangle.
Dim myRectangle As New Rectangle()
myRectangle.Width = 100
myRectangle.Height = 100

' Load the image.
Dim theImage As New BitmapImage(New Uri("sampleImages\triangle.jpg", UriKind.Relative))
Dim myImageBrush As New ImageBrush(theImage)

' Create tiles that are 1/4 the size of
' the output area.
myImageBrush.Viewport = New Rect(0, 0, 0.25, 0.25)

' Set the tile mode to FlipXY.
myImageBrush.TileMode = TileMode.FlipXY

' Use the ImageBrush to paint the rectangle's background.
myRectangle.Fill = myImageBrush
참고 항목
.NET Desktop feedback
피드백
출시 예정: 2024년 내내 콘텐츠에 대한 피드백 메커니즘으로 GitHub 문제를 단계적으로 폐지하고 이를 새로운 피드백 시스템으로 바꿀 예정입니다. 자세한 내용은 다음을 참조하세요. https://aka.ms/ContentUserFeedback
다음에 대한 사용자 의견 제출 및 보기
