자체 추적 엔터티 연습
Important
자동 추적 엔터티 템플릿을 더 이상 권장하지 않습니다. 이 템플릿은 기존 애플리케이션을 지원하는 용도로만 제공될 것입니다. 애플리케이션에서 연결이 끊긴 엔터티 그래프를 사용해야 하는 경우 커뮤니티에서 적극적으로 개발한 자동 추적 엔터티와 비슷한 기술인 추적 가능 엔터티 같은 다른 대안을 고려하거나 하위 수준 변경 내용 추적 API를 사용하여 사용자 지정 코드를 작성하는 방법을 고려해 보세요.
이 연습에서는 WCF(Windows Communication Foundation) 서비스에서 엔터티 그래프를 반환하는 작업을 노출하는 시나리오를 보여 줍니다. 다음으로, 클라이언트 애플리케이션에서 해당 그래프를 조작하고 Entity Framework를 사용하여 업데이트의 유효성을 검사하고 데이터베이스에 저장하는 서비스 작업의 수정 내용을 전송합니다.
이 연습을 완료하기 전에 먼저 자체 추적 엔터티 페이지를 읽으세요.
이 연습에서는 다음 작업을 수행합니다.
- 액세스할 데이터베이스를 만듭니다.
- 모델을 포함하는 클래스 라이브러리를 만듭니다.
- 자체 추적 엔터티 생성기 템플릿으로 교환합니다.
- 엔터티 클래스를 별도의 프로젝트로 이동합니다.
- 엔터티를 쿼리하고 저장하는 작업을 노출하는 WCF 서비스를 만듭니다.
- 서비스를 사용하는 클라이언트 애플리케이션(콘솔 및 WPF)을 만듭니다.
이 연습에서는 Database First를 사용하지만 Model First에도 같은 기술이 동일하게 적용됩니다.
필수 구성 요소
이 연습을 완료하려면 최신 버전의 Visual Studio가 필요합니다.
데이터베이스 만들기
설치한 Visual Studio 버전에 따라 Visual Studio와 함께 설치되는 데이터베이스 서버가 다릅니다.
- Visual Studio 2012를 사용하는 경우 LocalDB 데이터베이스를 만듭니다.
- Visual Studio 2010을 사용하는 경우 SQL Express 데이터베이스를 만듭니다.
계속해서 데이터베이스를 생성해 보겠습니다.
- Visual Studio를 엽니다.
- 보기 -> 서버 탐색기를 선택합니다.
- 데이터 연결 -> 연결 추가…를 마우스 오른쪽 단추로 클릭합니다.
- 서버 탐색기에서 데이터베이스에 연결하지 않은 상태라면 데이터 원본으로 Microsoft SQL Server를 선택해야 합니다.
- 설치한 항목에 따라 LocalDB 또는 SQL Express에 연결합니다.
- 데이터베이스 이름으로 STESample을 입력합니다.
- 확인을 선택하고 새 데이터베이스를 만들 것인지 묻는 메시지가 표시되면 예를 선택합니다.
- 이제 새 데이터베이스가 서버 탐색기에 표시됩니다.
- Visual Studio 2012를 사용하는 경우
- 서버 탐색기에서 데이터베이스를 마우스 오른쪽 단추로 클릭하고 새 쿼리를 선택합니다.
- 다음 SQL을 새 쿼리에 복사한 다음, 쿼리를 마우스 오른쪽 단추로 클릭하고 실행을 선택합니다.
- Visual Studio 2010을 사용하는 경우
- 데이터 -> Transact SQL 편집기 -> 새 쿼리 연결...을 선택합니다.
- 서버 이름으로 .\SQLEXPRESS를 입력하고 확인을 클릭합니다.
- 쿼리 편집기의 맨 위에 있는 드롭다운에서 STESample 데이터베이스를 선택합니다.
- 다음 SQL을 새 쿼리에 복사한 다음, 쿼리를 마우스 오른쪽 단추로 클릭하고 SQL 실행을 선택합니다.
    CREATE TABLE [dbo].[Blogs] (
        [BlogId] INT IDENTITY (1, 1) NOT NULL,
        [Name] NVARCHAR (200) NULL,
        [Url]  NVARCHAR (200) NULL,
        CONSTRAINT [PK_dbo.Blogs] PRIMARY KEY CLUSTERED ([BlogId] ASC)
    );

    CREATE TABLE [dbo].[Posts] (
        [PostId] INT IDENTITY (1, 1) NOT NULL,
        [Title] NVARCHAR (200) NULL,
        [Content] NTEXT NULL,
        [BlogId] INT NOT NULL,
        CONSTRAINT [PK_dbo.Posts] PRIMARY KEY CLUSTERED ([PostId] ASC),
        CONSTRAINT [FK_dbo.Posts_dbo.Blogs_BlogId] FOREIGN KEY ([BlogId]) REFERENCES [dbo].[Blogs] ([BlogId]) ON DELETE CASCADE
    );

    SET IDENTITY_INSERT [dbo].[Blogs] ON
    INSERT INTO [dbo].[Blogs] ([BlogId], [Name], [Url]) VALUES (1, N'ADO.NET Blog', N'blogs.msdn.com/adonet')
    SET IDENTITY_INSERT [dbo].[Blogs] OFF
    INSERT INTO [dbo].[Posts] ([Title], [Content], [BlogId]) VALUES (N'Intro to EF', N'Interesting stuff...', 1)
    INSERT INTO [dbo].[Posts] ([Title], [Content], [BlogId]) VALUES (N'What is New', N'More interesting stuff...', 1)
모델 만들기
먼저 모델을 배치할 프로젝트가 필요합니다.
- 파일 -> 새로 만들기 -> 프로젝트...를 선택합니다.
- 왼쪽 창에서 Visual C#을 선택한 다음 클래스 라이브러리를 선택합니다.
- 이름으로 STESample을 입력하고 확인을 클릭합니다.
이제 EF Designer에서 데이터베이스에 액세스하는 간단한 모델을 만들겠습니다.
- 프로젝트 -> 새 항목 추가...를 선택합니다.
- 왼쪽 창에서 데이터를 선택한 다음 ADO.NET 엔터티 데이터 모델을 선택합니다.
- 이름으로 BloggingModel을 입력하고 확인을 클릭합니다.
- 데이터베이스에서 생성을 선택하고 다음을 클릭합니다.
- 이전 섹션에서 만든 데이터베이스의 연결 정보를 입력합니다.
- 연결 문자열의 이름으로 BloggingContext를 입력하고 다음을 클릭합니다.
- 테이블 옆에 있는 확인란을 선택하고 마침을 클릭합니다.
STE 코드 생성으로 교환
이제 기본 코드 생성을 사용하지 않도록 설정하고 자체 추적 엔터티로 전환해야 합니다.
Visual Studio 2012를 사용하는 경우
- 솔루션 탐색기에서 BloggingModel.edmx를 확장하고 BloggingModel.tt와 BloggingModel.Context.tt를 삭제합니다. 이렇게 하면 기본 코드 생성이 비활성화됩니다.
- EF Designer 화면에서 빈 영역을 마우스 오른쪽 단추로 클릭하고 코드 생성 항목 추가...를 선택합니다.
- 왼쪽 창에서 온라인을 선택하고 STE 생성기를 검색합니다.
- C#용 STE 생성기 템플릿을 선택하고 이름으로 STETemplate을 입력한 다음 추가를 클릭합니다.
- STETemplate.tt 및 STETemplate.Context.tt 파일이 BloggingModel.edmx 파일 아래에 중첩되어 추가됩니다.
Visual Studio 2010을 사용하는 경우
- EF Designer 화면에서 빈 영역을 마우스 오른쪽 단추로 클릭하고 코드 생성 항목 추가...를 선택합니다.
- 왼쪽 창에서 코드를 선택한 다음 ADO.NET 자체 추적 엔티티 생성기를 선택합니다.
- 이름으로 STETemplate을 입력하고 추가를 클릭합니다.
- STETemplate.tt 및 STETemplate.Context.tt 파일이 프로젝트에 바로 추가됩니다.
엔터티 형식을 별도의 프로젝트로 이동
자체 추적 엔터티를 사용하려면 클라이언트 애플리케이션이 모델에서 생성된 엔터티 클래스에 액세스해야 합니다. 전체 모델을 클라이언트 애플리케이션에 노출하고 싶지 않으므로 엔터티 클래스를 별도의 프로젝트로 이동하려고 합니다.
첫 번째 단계는 기존 프로젝트에서 엔터티 클래스 생성을 중지하는 것입니다.
- 솔루션 탐색기에서 STETemplate.tt를 마우스 오른쪽 단추로 클릭하고 속성을 선택합니다.
- 속성 창의 CustomTool 속성에서 TextTemplatingFileGenerator를 지웁니다.
- 솔루션 탐색기에서 STETemplate.tt를 확장하고 그 아래에 중첩된 모든 파일을 삭제합니다.
다음으로 새 프로젝트를 추가하고 해당 프로젝트에 엔터티 클래스를 생성합니다.
파일 -> 추가 -> 프로젝트...를 선택합니다.
왼쪽 창에서 Visual C#을 선택한 다음 클래스 라이브러리를 선택합니다.
이름으로 STESample.Entities를 입력하고 확인을 클릭합니다.
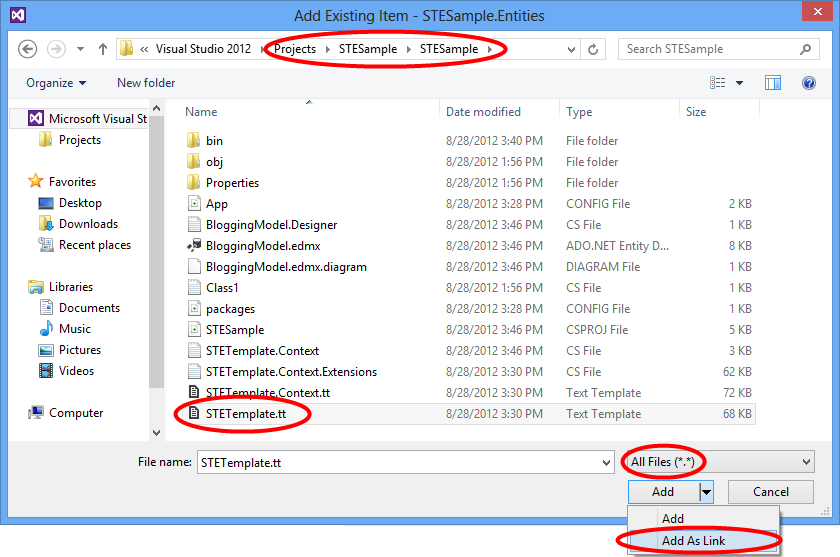
프로젝트 -> 기존 항목 추가...를 선택합니다.
STESample 프로젝트 폴더로 이동합니다.
모든 파일(*.*)을 선택하여 표시합니다.
STETemplate.tt 파일을 선택합니다.
추가 단추 옆에 있는 드롭다운 화살표를 클릭하고 링크로 추가를 선택합니다.
또한 엔터티 클래스가 컨텍스트와 동일한 네임스페이스에서 생성되도록 하려고 합니다. 이렇게 하면 애플리케이션 전체에서 추가해야 하는 using 문의 수가 줄어듭니다.
- 솔루션 탐색기에서 연결된 STETemplate.tt를 마우스 오른쪽 단추로 클릭하고 속성을 선택합니다.
- 속성 창에서 사용자 지정 도구 네임스페이스를 STESample로 설정합니다.
STE 템플릿에서 생성된 코드를 컴파일하려면 System.Runtime.Serialization에 대한 참조가 필요합니다. 이 라이브러리는 직렬화할 수 있는 엔터티 형식에서 사용되는 WCF DataContract 및 DataMember 특성에 필요합니다.
- 솔루션 탐색기에서 STESample.Entities 프로젝트를 마우스 오른쪽 단추로 클릭하고 참조 추가...를 선택합니다.
- Visual Studio 2012 - System.Runtime.Serialization 옆에 있는 확인란을 선택하고 확인을 클릭합니다.
- Visual Studio 2010 - System.Runtime.Serialization을 선택하고 확인을 클릭합니다.
마지막으로 컨텍스트가 포함된 프로젝트에는 엔터티 형식에 대한 참조가 필요합니다.
- 솔루션 탐색기에서 STESample 프로젝트를 마우스 오른쪽 단추로 클릭하고 참조 추가...를 선택합니다.
- Visual Studio 2012 - 왼쪽 창에서 솔루션을 선택하고 STESample.Entities 옆에 있는 확인란을 선택하고 확인을 클릭합니다.
- Visual Studio 2010 - 프로젝트 탭을 선택하고 STESample.Entities를 선택하고 확인을 클릭합니다.
참고 항목
엔터티 형식을 별도의 프로젝트로 이동하는 또 다른 옵션은 템플릿 파일을 기본 위치에서 연결하는 대신 이동하는 것입니다. 이렇게 하면 템플릿에서 inputFile 변수를 업데이트하여 edmx 파일에 대한 상대 경로를 제공해야 합니다(이 예제에서는 ..\BloggingModel.edmx).
WCF 서비스 만들기
이제 데이터를 노출하는 WCF 서비스를 추가해야 합니다. 프로젝트를 만드는 것부터 시작하겠습니다.
- 파일 -> 추가 -> 프로젝트...를 선택합니다.
- 왼쪽 창에서 Visual C#을 선택한 다음, WCF 서비스 애플리케이션을 선택합니다.
- 이름으로 STESample.Service를 입력하고 확인을 클릭합니다.
- System.Data.Entity 어셈블리에 대한 참조를 추가합니다.
- STESample 및 STESample.Entities 프로젝트에 대한 참조를 추가합니다.
런타임 시 찾을 수 있도록 EF 연결 문자열을 이 프로젝트에 복사해야 합니다.
- **STESample** 프로젝트의 App.Config 파일을 열고 connectionStrings 요소를 복사합니다.
- connectionStrings 요소를 STESample.Service 프로젝트의 Web.Config 파일에 있는 configuration 요소의 자식 요소로 붙여넣습니다.
이제 실제 서비스를 구현해야 합니다.
- IService1.cs를 열고 내용을 다음 코드로 바꿉니다.
    using System.Collections.Generic;
    using System.ServiceModel;

    namespace STESample.Service
    {
        [ServiceContract]
        public interface IService1
        {
            [OperationContract]
            List<Blog> GetBlogs();

            [OperationContract]
            void UpdateBlog(Blog blog);
        }
    }
- Service1.svc를 열고 내용을 다음 코드로 바꿉니다.
    using System;
    using System.Collections.Generic;
    using System.Data;
    using System.Linq;

    namespace STESample.Service
    {
        public class Service1 : IService1
        {
            /// <summary>
            /// Gets all the Blogs and related Posts.
            /// </summary>
            public List<Blog> GetBlogs()
            {
                using (BloggingContext context = new BloggingContext())
                {
                    return context.Blogs.Include("Posts").ToList();
                }
            }

            /// <summary>
            /// Updates Blog and its related Posts.
            /// </summary>
            public void UpdateBlog(Blog blog)
            {
                using (BloggingContext context = new BloggingContext())
                {
                    try
                    {
                        // TODO: Perform validation on the updated order before applying the changes.

                        // The ApplyChanges method examines the change tracking information
                        // contained in the graph of self-tracking entities to infer the set of operations
                        // that need to be performed to reflect the changes in the database.
                        context.Blogs.ApplyChanges(blog);
                        context.SaveChanges();

                    }
                    catch (UpdateException)
                    {
                        // To avoid propagating exception messages that contain sensitive data to the client tier
                        // calls to ApplyChanges and SaveChanges should be wrapped in exception handling code.
                        throw new InvalidOperationException("Failed to update. Try your request again.");
                    }
                }
            }
        }
    }
콘솔 애플리케이션에서 서비스 사용
서비스를 사용하는 콘솔 애플리케이션을 만들어 보겠습니다.
- 파일 -> 새로 만들기 -> 프로젝트...를 선택합니다.
- 왼쪽 창에서 Visual C#을 선택한 다음 콘솔 애플리케이션을 선택합니다.
- 이름으로 STESample.ConsoleTest를 입력하고 확인을 클릭합니다.
- STESample.Entities 프로젝트에 대한 참조를 추가합니다.
WCF 서비스에 대한 서비스 참조가 필요합니다.
- 솔루션 탐색기에서 STESample.ConsoleTest 프로젝트를 마우스 오른쪽 단추로 클릭하고 서비스 참조 추가...를 선택합니다.
- 검색을 클릭합니다.
- 네임스페이스로 BloggingService를 입력하고 확인을 클릭합니다.
이제 서비스를 사용하는 코드를 작성할 수 있습니다.
- Program.cs를 열고 내용을 다음 코드로 바꿉니다.
    using STESample.ConsoleTest.BloggingService;
    using System;
    using System.Linq;

    namespace STESample.ConsoleTest
    {
        class Program
        {
            static void Main(string[] args)
            {
                // Print out the data before we change anything
                Console.WriteLine("Initial Data:");
                DisplayBlogsAndPosts();

                // Add a new Blog and some Posts
                AddBlogAndPost();
                Console.WriteLine("After Adding:");
                DisplayBlogsAndPosts();

                // Modify the Blog and one of its Posts
                UpdateBlogAndPost();
                Console.WriteLine("After Update:");
                DisplayBlogsAndPosts();

                // Delete the Blog and its Posts
                DeleteBlogAndPost();
                Console.WriteLine("After Delete:");
                DisplayBlogsAndPosts();

                Console.WriteLine("Press any key to exit...");
                Console.ReadKey();
            }

            static void DisplayBlogsAndPosts()
            {
                using (var service = new Service1Client())
                {
                    // Get all Blogs (and Posts) from the service
                    // and print them to the console
                    var blogs = service.GetBlogs();
                    foreach (var blog in blogs)
                    {
                        Console.WriteLine(blog.Name);
                        foreach (var post in blog.Posts)
                        {
                            Console.WriteLine(" - {0}", post.Title);
                        }
                    }
                }

                Console.WriteLine();
                Console.WriteLine();
            }

            static void AddBlogAndPost()
            {
                using (var service = new Service1Client())
                {
                    // Create a new Blog with a couple of Posts
                    var newBlog = new Blog
                    {
                        Name = "The New Blog",
                        Posts =
                        {
                            new Post { Title = "Welcome to the new blog"},
                            new Post { Title = "What's new on the new blog"}
                        }
                    };

                    // Save the changes using the service
                    service.UpdateBlog(newBlog);
                }
            }

            static void UpdateBlogAndPost()
            {
                using (var service = new Service1Client())
                {
                    // Get all the Blogs
                    var blogs = service.GetBlogs();

                    // Use LINQ to Objects to find The New Blog
                    var blog = blogs.First(b => b.Name == "The New Blog");

                    // Update the Blogs name
                    blog.Name = "The Not-So-New Blog";

                    // Update one of the related posts
                    blog.Posts.First().Content = "Some interesting content...";

                    // Save the changes using the service
                    service.UpdateBlog(blog);
                }
            }

            static void DeleteBlogAndPost()
            {
                using (var service = new Service1Client())
                {
                    // Get all the Blogs
                    var blogs = service.GetBlogs();

                    // Use LINQ to Objects to find The Not-So-New Blog
                    var blog = blogs.First(b => b.Name == "The Not-So-New Blog");

                    // Mark all related Posts for deletion
                    // We need to call ToList because each Post will be removed from the
                    // Posts collection when we call MarkAsDeleted
                    foreach (var post in blog.Posts.ToList())
                    {
                        post.MarkAsDeleted();
                    }

                    // Mark the Blog for deletion
                    blog.MarkAsDeleted();

                    // Save the changes using the service
                    service.UpdateBlog(blog);
                }
            }
        }
    }
이제 애플리케이션을 실행하여 작동하는지 확인할 수 있습니다.
- 솔루션 탐색기에서 STESample.ConsoleTest 프로젝트를 마우스 오른쪽 단추로 클릭하고 디버그 -> 새 인스턴스 시작을 선택합니다.
애플리케이션이 실행되면 다음 출력이 표시됩니다.
Initial Data:
ADO.NET Blog
- Intro to EF
- What is New

After Adding:
ADO.NET Blog
- Intro to EF
- What is New
The New Blog
- Welcome to the new blog
- What's new on the new blog

After Update:
ADO.NET Blog
- Intro to EF
- What is New
The Not-So-New Blog
- Welcome to the new blog
- What's new on the new blog

After Delete:
ADO.NET Blog
- Intro to EF
- What is New

Press any key to exit...
WPF 애플리케이션에서 서비스 사용
서비스를 사용하는 WPF 애플리케이션을 만들어 보겠습니다.
- 파일 -> 새로 만들기 -> 프로젝트...를 선택합니다.
- 왼쪽 창에서 Visual C#을 선택한 다음 WPF 애플리케이션을 선택합니다.
- 이름으로 STESample.WPFTest를 입력하고 확인을 클릭합니다.
- STESample.Entities 프로젝트에 대한 참조를 추가합니다.
WCF 서비스에 대한 서비스 참조가 필요합니다.
- 솔루션 탐색기에서 STESample.WPFTest 프로젝트를 마우스 오른쪽 단추로 클릭하고 서비스 참조 추가...를 선택합니다.
- 검색을 클릭합니다.
- 네임스페이스로 BloggingService를 입력하고 확인을 클릭합니다.
이제 서비스를 사용하는 코드를 작성할 수 있습니다.
- MainWindow.xaml을 열고 내용을 다음 코드로 바꿉니다.
    <Window
        xmlns="http://schemas.microsoft.com/winfx/2006/xaml/presentation"
        xmlns:x="http://schemas.microsoft.com/winfx/2006/xaml"
        xmlns:d="http://schemas.microsoft.com/expression/blend/2008"
        xmlns:mc="http://schemas.openxmlformats.org/markup-compatibility/2006"
        xmlns:STESample="clr-namespace:STESample;assembly=STESample.Entities"
        mc:Ignorable="d" x:Class="STESample.WPFTest.MainWindow"
        Title="MainWindow" Height="350" Width="525" Loaded="Window_Loaded">

        <Window.Resources>
            <CollectionViewSource
                x:Key="blogViewSource"
                d:DesignSource="{d:DesignInstance {x:Type STESample:Blog}, CreateList=True}"/>
            <CollectionViewSource
                x:Key="blogPostsViewSource"
                Source="{Binding Posts, Source={StaticResource blogViewSource}}"/>
        </Window.Resources>

        <Grid DataContext="{StaticResource blogViewSource}">
            <DataGrid AutoGenerateColumns="False" EnableRowVirtualization="True"
                      ItemsSource="{Binding}" Margin="10,10,10,179">
                <DataGrid.Columns>
                    <DataGridTextColumn Binding="{Binding BlogId}" Header="Id" Width="Auto" IsReadOnly="True" />
                    <DataGridTextColumn Binding="{Binding Name}" Header="Name" Width="Auto"/>
                    <DataGridTextColumn Binding="{Binding Url}" Header="Url" Width="Auto"/>
                </DataGrid.Columns>
            </DataGrid>
            <DataGrid AutoGenerateColumns="False" EnableRowVirtualization="True"
                      ItemsSource="{Binding Source={StaticResource blogPostsViewSource}}" Margin="10,145,10,38">
                <DataGrid.Columns>
                    <DataGridTextColumn Binding="{Binding PostId}" Header="Id" Width="Auto"  IsReadOnly="True"/>
                    <DataGridTextColumn Binding="{Binding Title}" Header="Title" Width="Auto"/>
                    <DataGridTextColumn Binding="{Binding Content}" Header="Content" Width="Auto"/>
                </DataGrid.Columns>
            </DataGrid>
            <Button Width="68" Height="23" HorizontalAlignment="Right" VerticalAlignment="Bottom"
                    Margin="0,0,10,10" Click="buttonSave_Click">Save</Button>
        </Grid>
    </Window>
- MainWindow(MainWindow.xaml.cs)의 코드 숨김을 열고 내용을 다음 코드로 바꿉니다.
    using STESample.WPFTest.BloggingService;
    using System.Collections.Generic;
    using System.Linq;
    using System.Windows;
    using System.Windows.Data;

    namespace STESample.WPFTest
    {
        public partial class MainWindow : Window
        {
            public MainWindow()
            {
                InitializeComponent();
            }

            private void Window_Loaded(object sender, RoutedEventArgs e)
            {
                using (var service = new Service1Client())
                {
                    // Find the view source for Blogs and populate it with all Blogs (and related Posts)
                    // from the Service. The default editing functionality of WPF will allow the objects
                    // to be manipulated on the screen.
                    var blogsViewSource = (CollectionViewSource)this.FindResource("blogViewSource");
                    blogsViewSource.Source = service.GetBlogs().ToList();
                }
            }

            private void buttonSave_Click(object sender, RoutedEventArgs e)
            {
                using (var service = new Service1Client())
                {
                    // Get the blogs that are bound to the screen
                    var blogsViewSource = (CollectionViewSource)this.FindResource("blogViewSource");
                    var blogs = (List<Blog>)blogsViewSource.Source;

                    // Save all Blogs and related Posts
                    foreach (var blog in blogs)
                    {
                        service.UpdateBlog(blog);
                    }

                    // Re-query for data to get database-generated keys etc.
                    blogsViewSource.Source = service.GetBlogs().ToList();
                }
            }
        }
    }
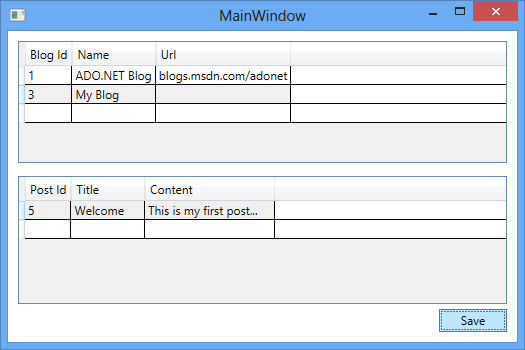
이제 애플리케이션을 실행하여 작동하는지 확인할 수 있습니다.
- 솔루션 탐색기에서 STESample.WPFTest 프로젝트를 마우스 오른쪽 단추로 클릭하고 디버그 -> 새 인스턴스 시작을 선택합니다.
- 화면을 사용하여 데이터를 조작하고 저장 단추를 사용하여 서비스를 통해 저장할 수 있습니다.
.NET
피드백
출시 예정: 2024년 내내 콘텐츠에 대한 피드백 메커니즘으로 GitHub 문제를 단계적으로 폐지하고 이를 새로운 피드백 시스템으로 바꿀 예정입니다. 자세한 내용은 다음을 참조하세요. https://aka.ms/ContentUserFeedback
다음에 대한 사용자 의견 제출 및 보기