연습 - Azure App Service에 웹앱 재배포
이전 연습에서는 Azure App Service용 Maven 플러그인을 사용하도록 웹앱을 구성하는 방법을 알아보았습니다. Maven 프로젝트가 올바르게 구성되고 테스트됩니다. 앱을 반복하고 개선한 다음, Azure에 다시 배포할 수 있습니다. 예를 들어, Azure가 애플리케이션을 배포한 위치에 대한 구체적인 정보를 가져와서 웹앱을 재배포하려고 하는 경우를 가정해 보겠습니다.
이 연습에서는 웹앱이 서버에 대한 정보를 포함하도록 index.jsp 페이지를 업데이트합니다. 변경 사항을 로컬로 테스트한 후에 웹앱을 Azure에 재배포합니다.
웹앱 업데이트 및 테스트
code를 사용하여index.jsp페이지를 편집합니다.code ~/MyWebApp/src/main/webapp/index.jsp이 파일의 콘텐츠를 다음 HTML과 인라인 Java 코드로 바꿉니다.
<%@ page import = "java.io.*,java.util.*, javax.servlet.*, java.net.InetAddress, java.io.File" %> <html> <head><title>Server Status Page</title></head> <body> <h2>Server name: <% out.print(InetAddress.getLocalHost().getHostName());%></h2> <p><strong>Internal IP Address:</strong> <% out.println(InetAddress.getLocalHost().getHostAddress()); %></p> <p><strong>Free disk space:</strong> <% File file = new File("/"); out.println(file.getFreeSpace()); file = null; %> </p> <p><strong>Free memory: </strong> <% out.println(Runtime.getRuntime().freeMemory()); %> </p> <p><strong>Date: </strong> <% Date date = new Date(); out.print(date.toString()); date = null; %> </p> </body> </html>Ctrl+S를 입력하여 변경 내용을 저장합니다.
Ctrl+Q를 입력하여 코드 편집기를 종료합니다.
브라우저에서 로컬 웹 서버를 볼 수 있도록 포트를 열어야 합니다. Cloud Shell에서
curl을 사용합니다.curl -X POST http://localhost:8888/openPort/8000;다음 Maven 명령을 사용하여 앱을 로컬로 실행합니다.
mvn tomcat7:runJSON의 URL에
MyWebApp/을 추가하여 새 브라우저 탭을 엽니다. 새 서버 상태 페이지가 표시됩니다.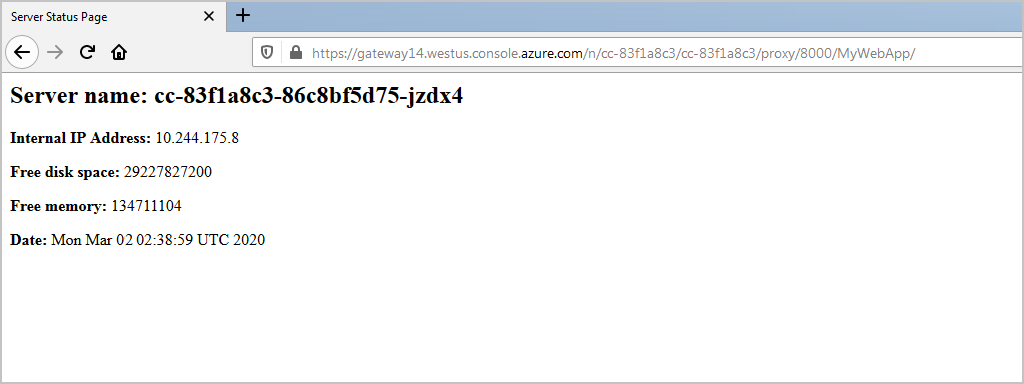
셸에서 URL을 선택하여 배포된 앱을 방문하면 배포된 앱이 App Services에서 실행되고 있는 것을 확인할 수 있습니다.
Ctrl+C를 사용하여 웹앱을 중지합니다.
curl을 사용하여 열려 있는 포트를 닫습니다.curl -X POST http://localhost:8888/closePort/8000;
웹앱 재배포
앱을 다시 빌드하여 재배포합니다.
mvn clean package
mvn azure-webapp:deploy
배포에서 새 인증 구성을 사용했음을 보여 주는 다음 콘솔 출력을 확인할 수 있습니다.
[INFO] Scanning for projects...
[INFO]
[INFO] ------------------------------------------------------------------------
[INFO] Building MyWebApp Maven Webapp 1.0-SNAPSHOT
[INFO] ------------------------------------------------------------------------
[INFO]
[INFO] --- azure-webapp-maven-plugin:1.9.0:deploy (default-cli) @ MyWebApp ---
[INFO] [Correlation ID: 3e5cf479-6732-4c6a-96da-88044cdadcc0] Instance discovery was successful
[INFO] Updating app service plan
[INFO] Updating target Web App...
[INFO] Successfully updated Web App.
[INFO] Using 'UTF-8' encoding to copy filtered resources.
[INFO] Copying 1 resource to /home/~/MyWebApp/target/azure-webapp/MyWebApp-1570214065588
[INFO] Trying to deploy artifact to MyWebApp-1570214065588...
[INFO] Deploying the war file MyWebApp.war...
[INFO] Successfully deployed the artifact to https://MyWebApp-1570214065588.azurewebsites.net
[INFO] ------------------------------------------------------------------------
[INFO] BUILD SUCCESS
[INFO] ------------------------------------------------------------------------
[INFO] Total time: 19.448 s
[INFO] Finished at: 2019-10-09T12:00:15+00:00
[INFO] Final Memory: 40M/324M
[INFO] ------------------------------------------------------------------------
셸에서 URL을 선택하여 배포된 앱에 액세스합니다.
실시간으로 로그 스트리밍
이제 App Service에서 앱을 배포하고 실행했습니다. 문제를 해결해야 하는 경우 다음 Azure CLI 명령을 사용하여 앱에서 실시간 로그 스트리밍을 가져올 수 있습니다.
az webapp log tail -n <app name> -g "<rgn>[sandbox resource group name]</rgn>"
다음 단원에서는 Azure App Service에 대한 웹앱 배포를 인증하는 방법을 알아봅니다.