Power BI Embedded 설정
적용 대상:![]() 앱 소유 데이터
앱 소유 데이터 ![]() 사용자 소유 데이터
사용자 소유 데이터
Power BI Embedded를 사용하여 보고서를 다른 사용자와 공유하려면 Power BI 임베디드 분석 설정 도구를 사용하여 시작합니다. 이 문서에서 그 방법을 보여줍니다.
Power BI 임베디드 분석을 사용하려면 Azure에서 Microsoft Entra 애플리케이션을 등록해야 합니다. Microsoft Entra 앱은 Power BI REST 리소스에 대한 권한을 설정하고 Power BI REST API에 대한 액세스를 허용합니다.
필수 조건
Power BI 임베디드 분석 환경을 설정하려면 다음 중 하나가 필요합니다.
- Microsoft Entra 테넌트 및 조직(마스터) 사용자
- Power BI Pro 계정
시작하기 전에
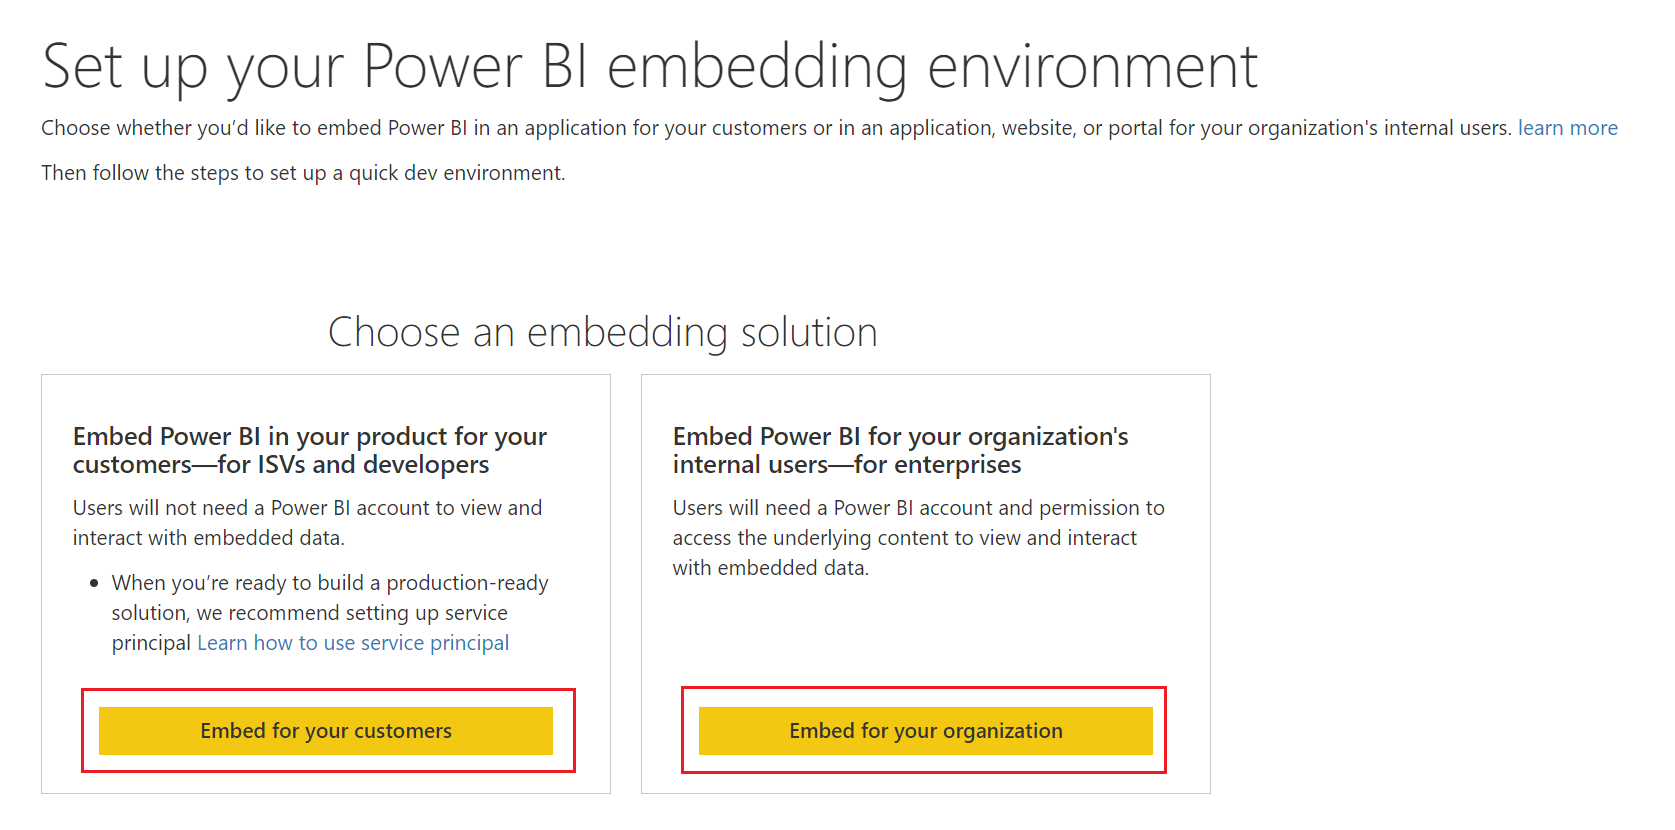
앱을 등록하기 전에 다음 중 요구 사항에 가장 적합한 솔루션을 결정합니다.
고객을 위해 포함
고객을 위해 설계된 앱을 만드는 경우 앱 소유 데이터라고도 하는 고객에 대한 콘텐츠 포함 솔루션을 사용합니다. 사용자는 앱을 사용하기 위해 Power BI에 로그인하거나 Power BI 라이선스를 가질 필요가 없습니다. 앱은 마스터 사용자 계정(Power BI에 로그인하는 데 사용되는 Power BI Pro 라이선스) 또는 서비스 주체를 사용하여 Power BI에 대해 인증합니다.
고객에 대한 콘텐츠 포함 솔루션은 일반적으로 타사를 위한 애플리케이션을 만드는 ISV(독립 소프트웨어 공급업체) 및 개발자에 의해 사용됩니다.
조직을 위해 포함
사용자가 Power BI에 대한 인증을 위해 자격 증명을 사용해야 하는 애플리케이션을 만드는 경우 사용자 소유 데이터라고도 하는 솔루션에 조직에 대한 콘텐츠 포함을 사용합니다.
조직 솔루션에 대한 포함은 일반적으로 기업 및 대규모 조직에서 사용되며 내부 사용자를 위한 것입니다.
두 솔루션에 대한 자세한 내용은 Power BI 임베디드 분석 솔루션이란?을 참조하세요.
환경 설정
두 포함 옵션을 이해한 후에는 설정 도구를 사용하여 Power BI Embedded 환경을 만들 수 있습니다.
환경을 수동으로 설정하려는 경우 다음 섹션의 단계를 건너뜁니다. 대신, 이 문서의 뒷부분에 설명된 수동 등록의 단계를 따릅니다.
Important
GCC를 포함하는 경우 수동 등록의 지침을 따릅니다.
도구를 사용하여 환경을 설정하려면 Power BI 임베디드 분석 설정 도구로 이동합니다. 원하는 포함 옵션을 선택합니다.
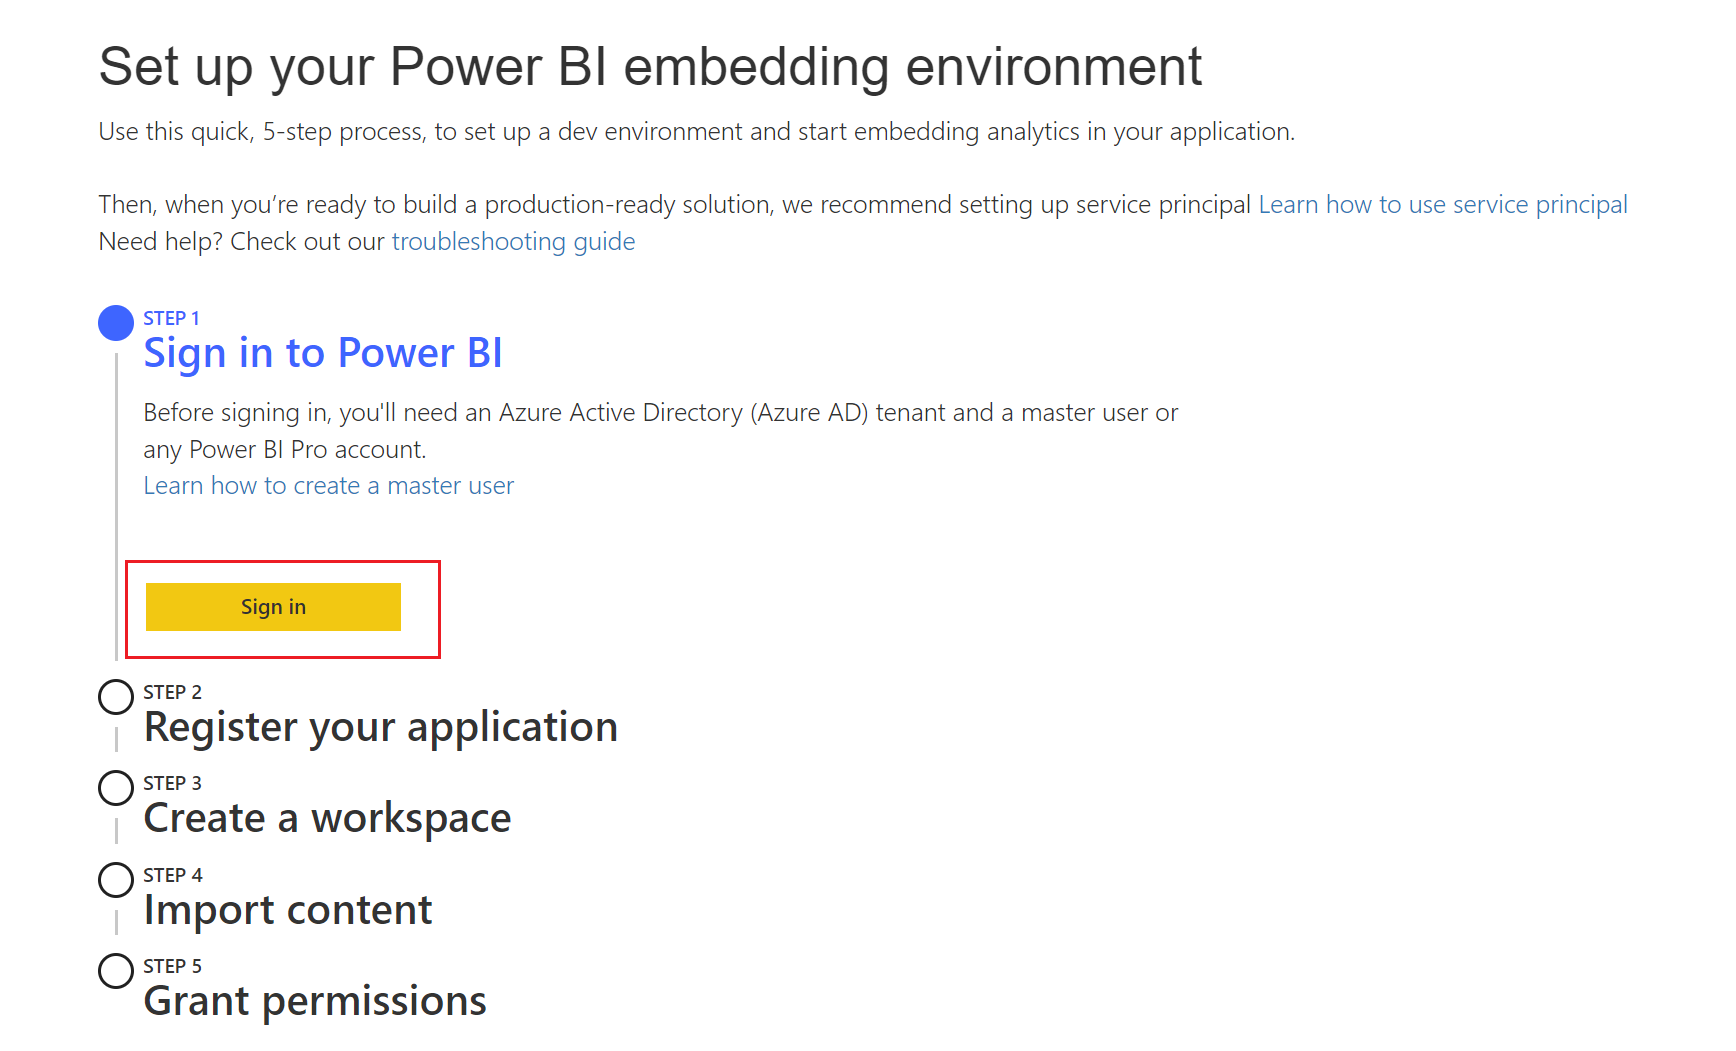
1단계 - Power BI에 로그인
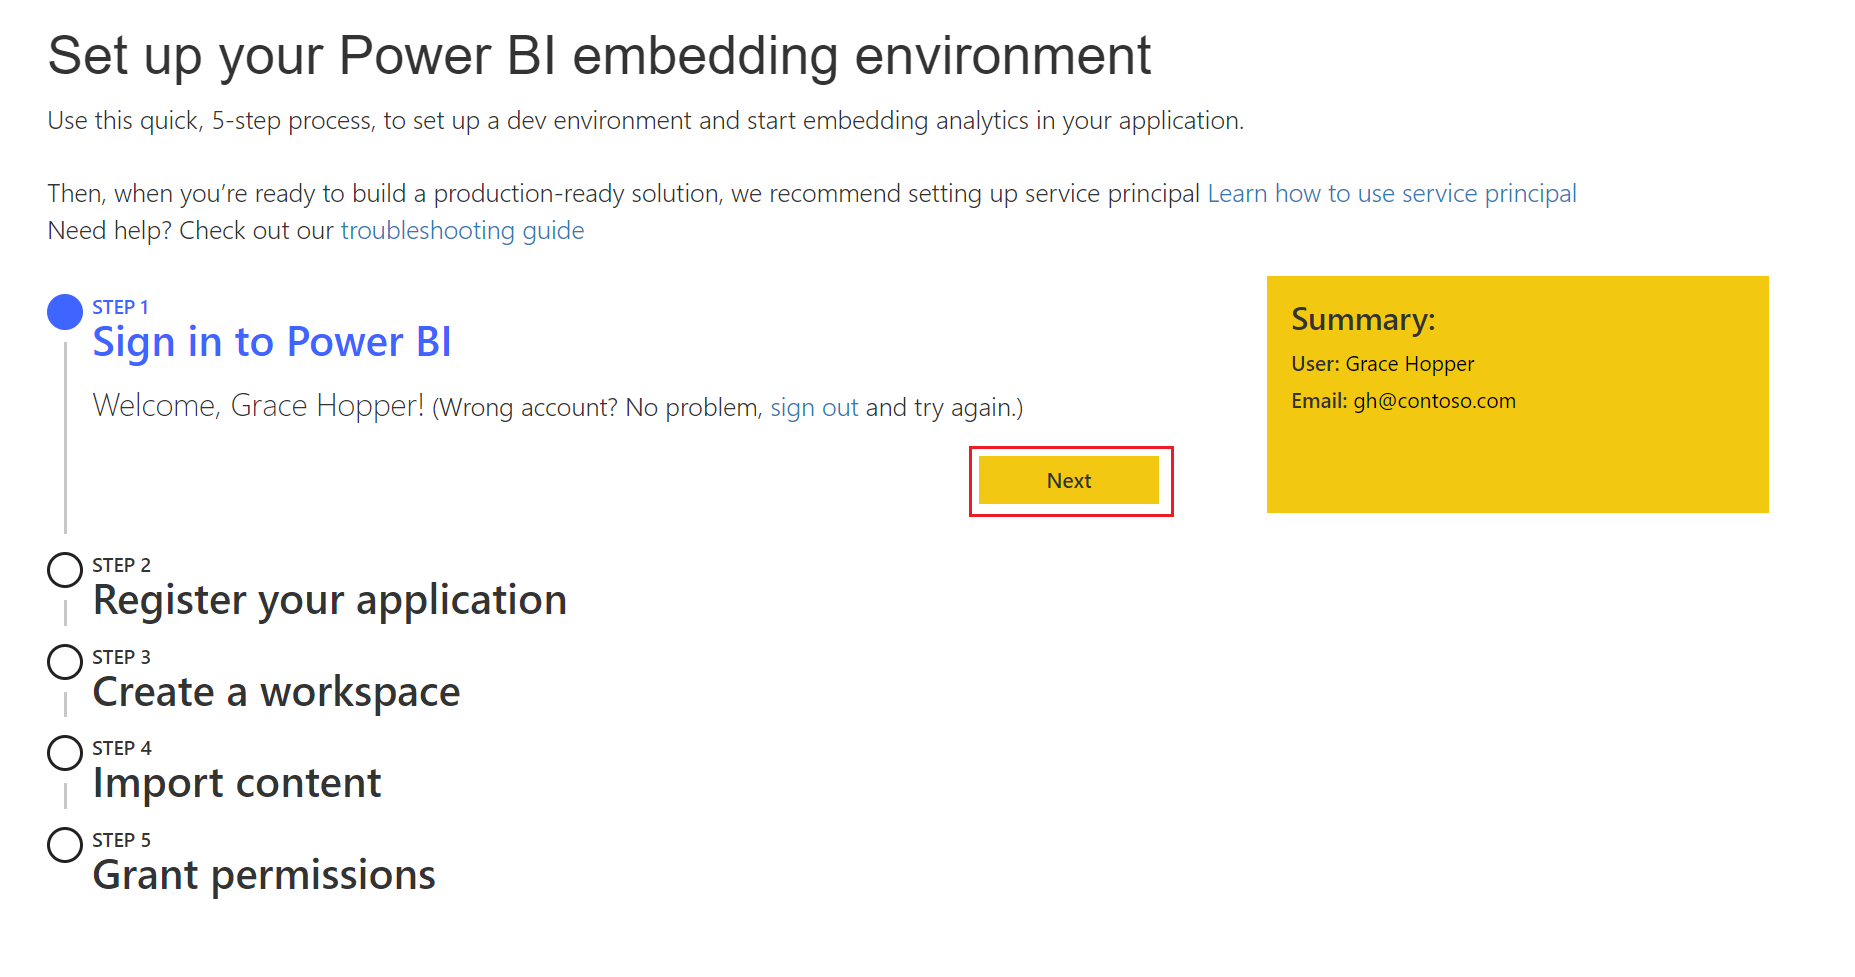
설정 도구의 1단계 에서 로그인을 선택합니다. 이 단계에서는 Power BI에 로그인합니다. 계정을 선택하라는 메시지가 표시되면 Power BI 테넌트에서 속한 사용자로 로그인합니다. 이 사용자 아래에 Microsoft Entra 앱이 등록됩니다.
참고 항목
이미 로그인한 경우 Microsoft Entra 앱을 만드는 데 사용할 사용자로 로그인했는지 확인합니다. 사용자를 변경하려면 로그아웃을 선택합니다. 도구가 다시 시작되면 올바른 사용자로 로그인합니다.
다음을 선택하여 다음 단계로 이동합니다.
2단계 - 애플리케이션 등록
이 단계에서는 Azure에 Microsoft Entra 애플리케이션을 등록합니다. Microsoft Entra 앱은 Power BI REST 리소스에 대한 권한을 설정하고 Power BI REST API에 대한 액세스를 허용합니다. 나중에 언제든지 이러한 설정을 변경할 수 있습니다.
고객을 위해 애플리케이션을 등록하려면 다음 필드를 입력합니다.
애플리케이션 이름 - 애플리케이션에 이름을 지정합니다.
API 액세스 - 애플리케이션에 필요한 Power BI API(범위라고도 함)를 선택합니다. 모두 선택을 선택하여 모든 API를 선택할 수 있습니다. Power BI 액세스 권한에 대한 자세한 내용은 Microsoft ID 플랫폼 엔드포인트의 권한 및 동의를 참조하세요.
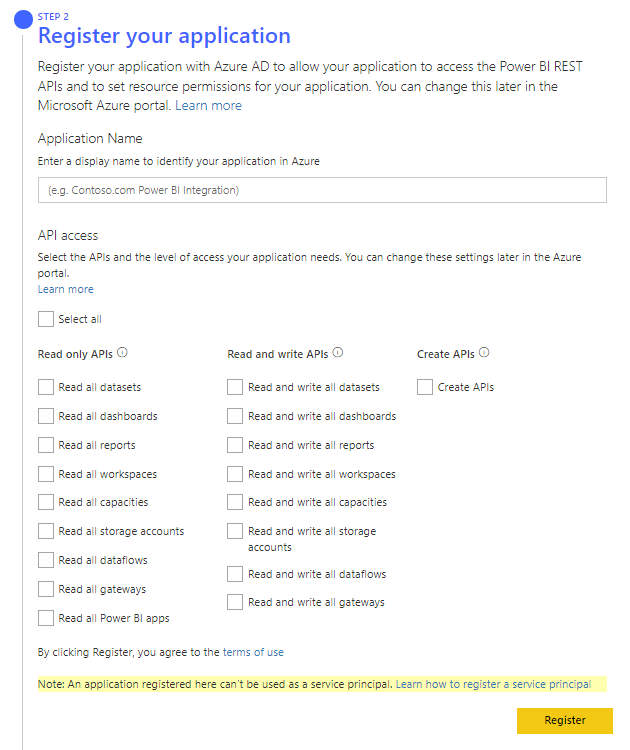
등록을 선택합니다.
Microsoft Entra 앱 응용 프로그램 ID가 요약 상자에 표시됩니다. 나중에 사용하도록 이 값을 복사합니다.

3단계 - 작업 영역 만들기(선택 사항)
Power BI 서비스에서 작업 영역을 만듭니다.
이미 Power BI 작업 영역이 있는 경우 건너뛰기를 선택합니다.
작업 영역을 만들려면 작업 영역의 이름을 입력한 다음, 작업 영역 만들기를 선택합니다. 작업 영역 이름 및 ID가 요약 상자에 나타납니다. 나중에 사용하도록 이 값을 복사합니다.
팁
임베디드 분석 샘플 앱이 예상대로 작동하도록 하려면 도구를 사용하여 작업 영역을 만들어야 합니다.
4단계 - 콘텐츠 가져오기(선택 사항)
다음 옵션 중 하나를 선택합니다.
고유의 Power BI 앱이 있는 경우 건너뛰기를 선택할 수 있습니다.
샘플 보고서를 사용하여 샘플 Power BI 앱을 만들려면 Sample Power BI report(샘플 Power BI 보고서)를 선택한 다음 가져오기를 선택합니다.
고유한 보고서를 사용하여 샘플 Power BI 앱을 만들려면 .pbix 파일 업로드를 선택하고 고유 파일을 검색한 후 가져오기를 선택합니다.
5단계 - 권한 부여(고객에 대한 콘텐츠 포함만)
권한 부여를 선택하고 대화 상자에서 수락을 선택합니다. 이 단계를 통해 Microsoft Entra 앱은 로그인한 사용자로 선택한 API(범위라고도 함)에 액세스할 수 있습니다. 이 사용자는 마스터 사용자라고도 합니다.
샘플 앱 다운로드(선택 사항)
이 도구를 사용하여 Power BI 작업 영역을 만들고 콘텐츠를 업로드한 경우 이제 애플리케이션 예제 다운로드를 선택할 수 있습니다.
참고 항목
선택적 단계를 건너뛴 경우에도 샘플 Power BI 앱을 다운로드할 수 있습니다. 그러나 다운로드한 앱의 코드에는 등록하는 동안 입력한 속성이 없습니다. 예를 들어 작업 영역을 만들지 않은 경우 샘플 앱에는 작업 영역 ID가 포함되지 않습니다.
요약 상자의 모든 정보를 복사해야 합니다. Power BI 포함 환경을 사용할 준비가 된 것입니다.
수동 등록
Power BI 임베디드 분석 설정 도구를 사용하지 않은 경우 이 섹션의 절차를 사용하여 Microsoft Entra 앱을 수동으로 등록합니다. 그러나 다음 솔루션 중 하나를 만드는 경우에만 다음 단계를 수행합니다.
- 조직에 대한 콘텐츠 포함 애플리케이션
- 서비스 주체가 있는 고객에 대한 콘텐츠 포함 애플리케이션
Microsoft Entra ID에서 애플리케이션을 등록하는 방법에 대한 자세한 내용은 Microsoft ID 플랫폼 애플리케이션 등록을 참조하세요.
Azure Portal에 로그인합니다.
페이지의 오른쪽 위 모서리에서 계정을 선택하여 Microsoft Entra 테넌트 선택
앱 등록을 선택합니다. 이 옵션이 표시되지 않는 경우 검색합니다.
앱 등록에서 새 등록을 선택합니다.
다음 필드를 작성합니다.
이름 - 애플리케이션에 이름을 지정합니다.
지원되는 계정 유형 - 애플리케이션을 사용할 수 있는 사용자를 선택합니다.
(선택 사항) 리디렉션 URI 상자에서 리디렉션 URL을 추가합니다.
등록을 선택합니다. 앱이 등록되면 앱의 개요 페이지로 리디렉션됩니다. 여기서 애플리케이션 ID를 가져올 수 있습니다.
관련 콘텐츠
추가 질문이 있으신가요? Power BI 커뮤니티에 질문합니다.
피드백
출시 예정: 2024년 내내 콘텐츠에 대한 피드백 메커니즘으로 GitHub 문제를 단계적으로 폐지하고 이를 새로운 피드백 시스템으로 바꿀 예정입니다. 자세한 내용은 다음을 참조하세요. https://aka.ms/ContentUserFeedback
다음에 대한 사용자 의견 제출 및 보기