Power BI에 서비스 태그 사용
Power BI에 Azure 서비스 태그를 사용하여 Azure SQL MI(Machine Instance)가 Power BI 서비스로부터 들어오는 연결을 허용하도록 설정할 수 있습니다. Azure에서 ‘서비스 태그’는 네트워크 보안 규칙의 업데이트 또는 변경의 복잡성을 최소화하기 위해 그룹으로 자동 관리되도록 구성할 수 있는 정의된 IP 주소 그룹입니다. Power BI 서비스 태그를 사용하면 SQL Managed Instance가 Power BI 서비스로부터 들어오는 연결을 허용하도록 설정할 수 있습니다.
Power BI 서비스에서 엔드포인트를 사용하도록 설정하려면 다음 구성이 필요합니다.
- SQL Managed Instance에서 퍼블릭 엔드포인트 사용.
- 인바운드 트래픽을 허용하는 네트워크 보안 그룹 규칙 만들기.
- Power BI에 자격 증명 입력.
다음 섹션에서는 각 단계를 차례로 살펴봅니다.
퍼블릭 엔드포인트 사용
첫 번째 프로세스는 SQL Managed Instance에서 퍼블릭 엔드포인트를 사용하도록 설정하는 것입니다. 다음 단계를 수행합니다.
Azure Portal에 로그인하고 SQL Managed Instance로 이동합니다.
페이지 왼쪽에서 네트워킹을 선택합니다.
퍼블릭 엔드포인트(데이터)를 사용으로 밀고 최소 TLS 버전을 1.2로 설정합니다. 다음 이미지는 Azure Portal의 화면을 보여 줍니다.

저장을 선택하여 설정을 저장합니다.
네트워크 보안 그룹 규칙 만들기
다음 단계 컬렉션에서는 Power BI 서비스에 인바운드 트래픽을 허용하는 NSG(네트워크 보안 그룹) 규칙을 만들어야 합니다. 이 작업은 Power BI의 "원본 서비스 태그"를 활용하거나 CLI(명령줄 인터페이스) 또는 PowerShell을 사용하여 Azure Portal에서 완료할 수 있습니다.
참고 항목
설정한 규칙의 우선 순위는 4096 deny_all_inbound 규칙보다 높아야 합니다. 즉, 우선 순위 값이 4096보다 낮아야 합니다. 다음 예제에서는 우선 순위 값이 400입니다.
다음 CLI 스크립트는 참조 예제로 제공됩니다. 자세한 내용은 az network nsg 규칙을 참조하세요. 예제가 상황에 맞게 제대로 작동하려면 여러 값을 변경해야 할 수 있습니다. 그런 다음 PowerShell 스크립트가 제공됩니다.
#login to azure
az login

#set subscription that contains SQL MI instance
$subname = "mysubscriptionname"
az account set --subscription $subname

#set NSG rule for inbound PowerBI traffic

#update $RG to your resource group name
$rg = 'myresourcegroup'
#update $nsg to your Network Security Group name
$nsg = 'nsgresourcename'
# Name the NSG rule
$rule = 'allow_inbound_PowerBI'
#set the priority - this must be higher priority (lower number) than the deny_all_inbound rule
$priority = 400
#specifiy the service tag to use
$servicetag = 'PowerBI'
#specify the public endpoint port defined in step 1
$port = 3342
#set the rule to inbound direction
$direction = 'Inbound'
#set the access type to "Allow"
$access = 'Allow'
#Set the protocol as TCP
$protocol = 'tcp'
#Provide a description for the rule
$desc = 'Allow PowerBI Access to SQL MI for Direct Query or Data Refresh.'

#create the NSG rule
az network nsg rule create -g $rg \
--nsg-name $nsg -n $rule --priority $priority \
--source-address-prefixes $servicetag --destination-address-prefixes '*' \
--destination-port-ranges $port --direction $direction --access $access \
--protocol $protocol --description $desc
다음 PowerShell 스크립트는 NSG 규칙을 만들기 위한 또 다른 참조로 제공됩니다. 자세한 내용은 PowerShell에서 네트워크 보안 그룹 규칙 추가를 참조하세요. 예제가 상황에 맞게 제대로 작동하려면 여러 값을 변경해야 할 수 있습니다.
#login to azure
Login-AzAccount

#get your subscription ID
Get-AzSubscription

####
#Script to create Network Security Group Rule
###

#enter your subscription ID
Set-AzContext -SubscriptionId "yoursubscriptionID"

#Provide the resource group for your Network Security Group
$RGname="yourRG"
#Enter the port for the SQL Managed Instance Public Endpoint
$port=3342
#name the NSG rule
$rulename="allow_inbound_PowerBI"
#provide the name of the Network Security Group to add the rule to
$nsgname="yourNSG"
#set direction to inbound to allow PowerBI to access SQL MI
$direction ="Inbound"
#set the priority of the rule. Priority must be higher (ie. lower number) than the deny_all_inbound (4096)
$priority=400
#set the service tags for the source to \u201cPowerBI\u201d
$serviceTag = "PowerBI"

# Get the NSG resource
$nsg = Get-AzNetworkSecurityGroup -Name $nsgname -ResourceGroupName $RGname

# Add the inbound security rule.
$nsg | Add-AzNetworkSecurityRuleConfig -Name $rulename -Description "Allow app port" -Access Allow `
    -Protocol * -Direction $direction -Priority $priority -SourceAddressPrefix $serviceTag -SourcePortRange * `
    -DestinationAddressPrefix * -DestinationPortRange $port

# Update the NSG.
$nsg | Set-AzNetworkSecurityGroup
Power BI에 자격 증명 입력
마지막 프로세스는 Power BI 서비스에 자격 증명을 입력하는 것입니다.
Power BI 서비스에 로그인하고 SQL Managed Instance를 사용하는 데이터 세트가 포함된 작업 영역으로 이동합니다. 다음 예제에서 해당 작업 영역은 ASAdataset이고 데이터 세트는 Contoso SQL MI 데모입니다.
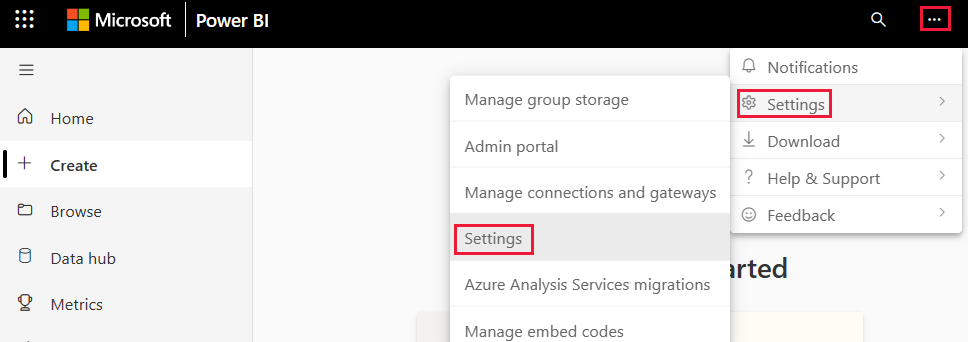
오른쪽 위 모서리에서 설정을 선택한 다음 드롭다운 메뉴에서 설정을 선택합니다.
데이터 세트 아래에서 데이터 원본 자격 증명 섹션을 확장합니다.
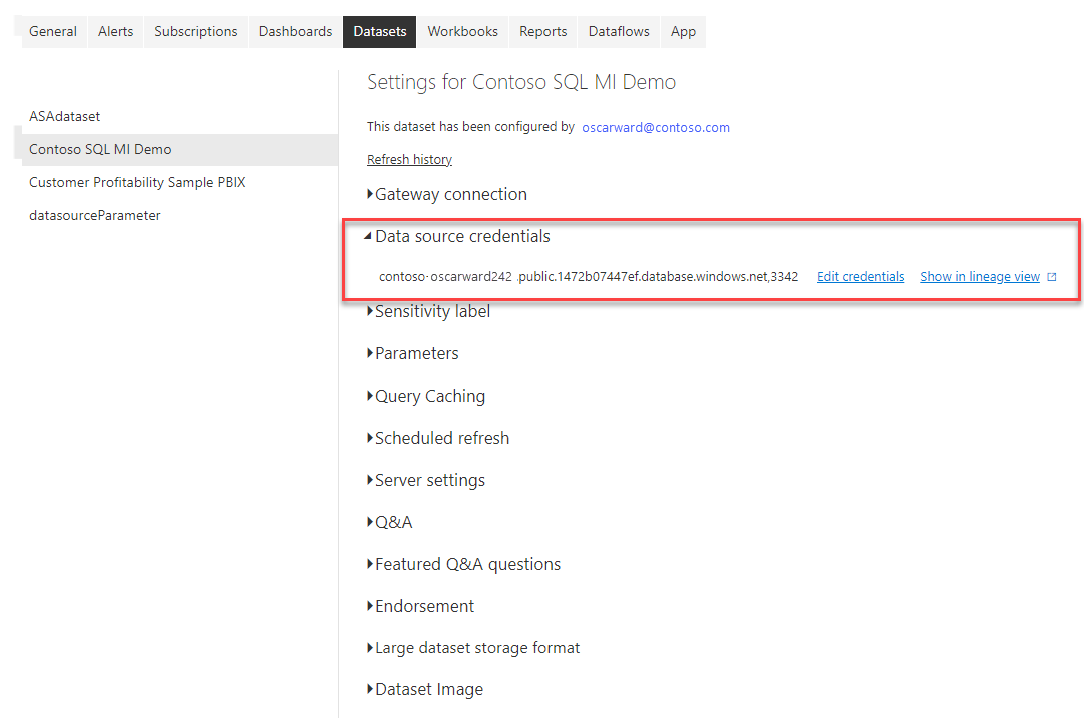
자격 증명 편집 링크를 선택합니다. 표시되는 대화 상자에 유효한 자격 증명을 입력합니다.
설정을 저장하고 종료합니다. 이제 SQL Managed Instance가 Power BI 서비스에서 들어오는 연결을 허용하도록 구성됩니다.
관련 콘텐츠
피드백
출시 예정: 2024년 내내 콘텐츠에 대한 피드백 메커니즘으로 GitHub 문제를 단계적으로 폐지하고 이를 새로운 피드백 시스템으로 바꿀 예정입니다. 자세한 내용은 다음을 참조하세요. https://aka.ms/ContentUserFeedback
다음에 대한 사용자 의견 제출 및 보기