Access policies
Note
Azure Video Analyzer has been retired and is no longer available.
Azure Video Analyzer for Media is not affected by this retirement. It is now rebranded to Azure Video Indexer. Click here to read more.
Access policies define the permissions and duration of access to a given Video Analyzer video resource. These access policies allow for greater control and flexibility by allowing 3rd party (Non AAD Clients) JWT tokens to provide authorization to client API’s that enable:
- access to Video Metadata.
- access to Video streaming.
Access Policy definition
"name": "accesspolicyname1",
"properties": {
    "role": "Reader",
    "authentication": {
        "@type": "#Microsoft.VideoAnalyzer.JwtAuthentication",
        "issuers": [
            "issuer1",
            "issuer2"
        ],
        "audiences": [
            "audience1"
        ],
        "claims": [
            {
                "name":"claimname1",
                "value":"claimvalue1"
            },
            {
                "name":"claimname2",
                "value":"claimvalue2"
            }
        ],
        "keys": [
            {
                "@type": "#Microsoft.VideoAnalyzer.RsaTokenKey",
                "alg": "RS256",
                "kid": "123",
                "n": "YmFzZTY0IQ==",
                "e": "ZLFzZTY0IQ=="
            },
            {
                "@type": "#Microsoft.VideoAnalyzer.EccTokenKey",
                "alg": "ES256",
                "kid": "124",
                "x": "XX==",
                "y": "YY=="
            }
        ]
    }
}
Note
Only one key type is required.
Roles
Currently only reader role is supported.
Issuer Matching Rules
Multiple issues can be specified in the policy, single issuer can be specified in the token. Issuer matches if the token issuer is among the issuers specified in the policy.
Audience Matching Rules
If the audience value is ${System.Runtime.BaseResourceUrlPattern} for the video resource, then the audience that is provided in the JWT token must match the base resource URL. If not, then the token audience must match the audience from the access policy.
Claims Matching Rules
Multiple claims can be specified in the access policy and in the JWT token. All the claims form an access policy must be provided in the token to pass validation, however, the JWT token can have additional claims that are not listed in the access policy.
Keys
Two types of keys are supported these are the RSA and the ECC types.
- @type- #Microsoft.VideoAnalyzer.RsaTokenKey
- alg - Algorithm. Can be 256, 384 or 512
- kid - Key ID
- n - Modulus
- e - Public Exponent
- @type- #Microsoft.VideoAnalyzer.EccTokenKey
- alg - Algorithm. Can be 256, 384 or 512
- kid - Key ID
- x - Coordinate value.
- y - Coordinate value.
Token validation Process
Customers must create their own JWT tokens and will be validated using the following method:
- From the list of policies that match the Key ID we validate:
- Token signature
- Token expiration
- Issuer
- Audience
- Additional claims
Policy Audience and Token Matching Examples:
| Policy Audience | Requested URL | Token URL | Result |
|---|---|---|---|
| (Any literal) | (ANY) | (Match) | Grant |
| (Any Literal) | (ANY) | (Not Match) | Deny |
| ${System.Runtime.BaseResourceUrlPattern} | https://fqdn/videos | https://fqdn/videos/* | Grant |
| ${System.Runtime.BaseResourceUrlPattern} | https://fqdn/videos | https://fqdn/videos/{videoName} | Deny |
| ${System.Runtime.BaseResourceUrlPattern} | https://fqdn/videos/{videoName} | https://fqdn/vid* | Grant |
| ${System.Runtime.BaseResourceUrlPattern} | https://fqdn/videos/{videoName} | https://fqdn/videos/* | Grant |
| ${System.Runtime.BaseResourceUrlPattern} | https://fqdn/videos/{videoName} | https://fqdn/videos/{baseVideoName}* | Grant |
| ${System.Runtime.BaseResourceUrlPattern} | https://fqdn/videos/{videoName} | https://fqdn/videos/{videoName} | Grant |
| ${System.Runtime.BaseResourceUrlPattern} | https://fqdn/videos/{videoName}Suffix | https://fqdn/videos/{videoName} | Deny |
| ${System.Runtime.BaseResourceUrlPattern} | https://fqdn/videos/{otherVideoName} | https://fqdn/videos/{videoName} | Deny |
Note
Video Analyzer supports a maximum of 20 policies. ${System.Runtime.BaseResourceUrlPattern} allows for greater flexibility to access specific resources by using one access policy and multiple tokens. These tokens then allow access to different Video Analyzer resources based on the audience.
Creating a token
In this section, we will create a JWT token that we will use later in the article. We will use a sample application that will generate the JWT token and provide you with all the fields required to create the access policy.
Note
If you are familiar with how to generate a JWT token based on either an RSA or ECC certificate, you can skip this section.
Clone the AVA C# samples repository. Then, go to the JWTTokenIssuer application folder src/jwt-token-issuer and find the JWTTokenIssuer application.
Open Visual Studio Code, and then go to the folder where you downloaded the JWTTokenIssuer application. This folder should contain the *.csproj file.
In the explorer pane, go to the program.cs file.
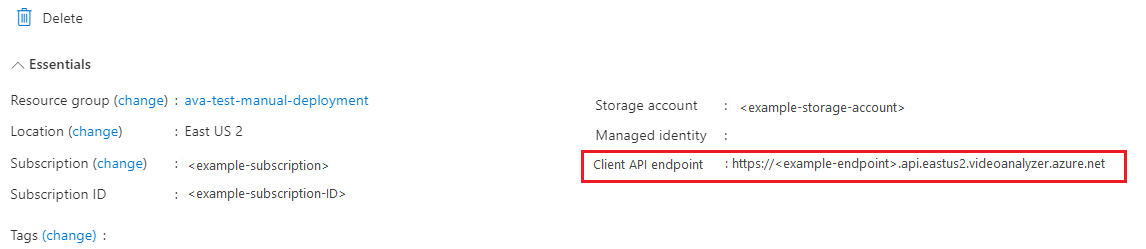
On line 77, change the audience to your Video Analyzer endpoint, followed by /videos/*, so it looks like:
https://{Azure Video Analyzer Account ID}.api.{Azure Long Region Code}.videoanalyzer.azure.net/videos/*Note
The Video Analyzer endpoint can be found in overview section of the Video Analyzer resource in the Azure portal.
On line 78, change the issuer to the issuer value of your certificate. Example:
https://contoso.comSave the file.
Note
You might be prompted with the message
Required assets to build and debug are missing from 'jwt token issuer'. Add them?SelectYes.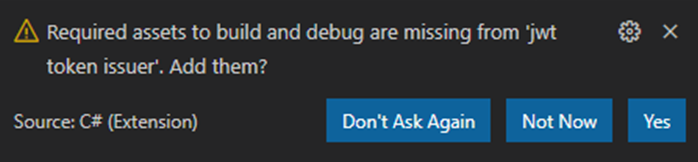
Open a Command Prompt window and go to the folder with the JWTTokenIssuer files. Run the following two commands:
dotnet build, followed bydotnet run. If you have the C# extension on Visual Studio Code, you also can select F5 to run the JWTTokenIssuer application.
The application builds and then executes. After it builds, it creates a self-signed certificate and generates the JWT token information from that certificate. You also can run the JWTTokenIssuer.exe file that's located in the debug folder of the directory where the JWTTokenIssuer built from. The advantage of running the application is that you can specify input options as follows:
JwtTokenIssuer [--audience=<audience>] [--issuer=<issuer>] [--expiration=<expiration>] [--certificatePath=<filepath> --certificatePassword=<password>]
JWTTokenIssuer creates the JWT token and the following needed components:
Issuer,Audience,Key Type,Algorithm,Key Id,RSA Key Modulus,RSA Key Exponent,Token
Be sure to copy these values for later use.
Creating an Access Policy
There are two ways to create an access policy.
In the Azure portal
Sign in to the Azure portal and go to your resource group where your Video Analyzer account is located.
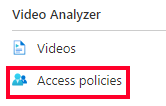
Select the Video Analyzer resource.
Under Video Analyzer, select Access Policies.
Select New and enter the following information:
Note
These values come from the JWTTokenIssuer application created in the previous step.
Access policy name - any name
Issuer - must match the JWT Token Issuer
Audience - Audience for the JWT Token --
${System.Runtime.BaseResourceUrlPattern}is the default.Key Type - RSA
Algorithm - supported values are RS256, RS384, RS512
Key ID - generated from your certificate. For more information, see Create a token.
RSA Key Modulus - generated from your certificate. For more information, see Create a token.
RSA Key Exponent - generated from your certificate. For more information, see Create a token.
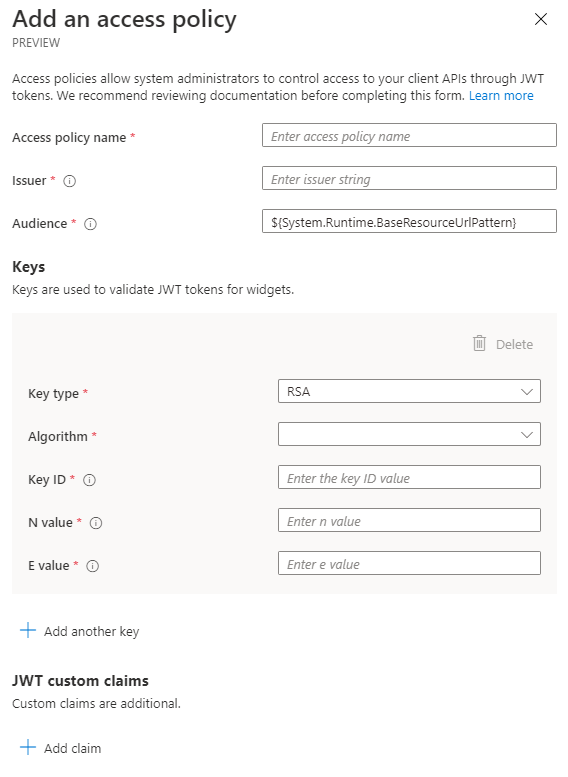
Select Save.
Create Access Policy via API
See Azure Resource Manager (ARM) API