WPF 및 Entity Framework 6을 사용하여 간단한 데이터 애플리케이션 만들기
Warning
Visual Studio 2022를 사용하는 경우 이 자습서에서는 Visual Studio 2022 버전 17.3 미리 보기 3 이상을 사용해야 합니다.
이 연습에서는 Visual Studio에서 기본 "데이터 폼" 애플리케이션을 만드는 방법을 보여 줍니다. 이 앱은 SQL Server LocalDB, Northwind 데이터베이스, (Entity Framework Core 또는 .NET 5 이상이 아닌) Entity Framework 6와 (.NET Core가 아닌) .NET Framework용 Windows Presentation Foundation을 사용합니다. 마스터-세부 정보 뷰를 사용하여 기본적인 데이터 바인딩을 수행하는 방법을 보여 주며, 다음으로 이동, 이전으로 이동, 처음으로 이동, 끝으로 이동, 업데이트와 삭제 버튼이 포함된 사용자 지정 바인딩 탐색기도 제공합니다.
이 문서에서는 Visual Studio에서 데이터 도구를 사용하는 방법을 중점적으로 설명하며, 기반 기술을 심층적으로 설명하지는 않습니다. 여기서는 사용자가 XAML, Entity Framework 및 SQL에 대한 기본적인 지식이 있다고 가정합니다. 또한 이 예제에서는 WPF 애플리케이션의 표준인 MVVM(Model-View-ViewModel) 아키텍처를 시연하지 않습니다. 하지만 이 코드는 약간만 수정하면 사용자의 자체 MVVM 애플리케이션에 복사할 수 있습니다.
이 자습서의 최종 코드는 GitHub의 VS 자습서 샘플 - EF6에서 찾을 수 있습니다.
Northwind에 설치 및 연결
이 예제에서는 SQL Server Express LocalDB 및 Northwind 샘플 데이터베이스를 사용합니다. 제품에 대한 ADO.NET 데이터 공급자가 Entity Framework를 지원하는 경우에는 다른 SQL 데이터베이스 제품에서도 사용할 수 있습니다.
SQL Server Express LocalDB가 없는 경우 Visual Studio 설치 관리자를 통해 설치합니다. Visual Studio 설치 관리자에서 데이터 스토리지 및 처리 워크로드의 일부로 또는 개별 구성 요소로 SQL Server Express LocalDB를 설치할 수 있습니다.
다음 단계에 따라 Northwind 샘플 데이터베이스를 설치합니다.
Visual Studio에서 SQL Server 개체 탐색기 창을 엽니다. (SQL Server 개체 탐색기는 Visual Studio 설치 관리자의 데이터 스토리지 및 처리 워크로드의 일부로 설치됩니다.) SQL Server 노드를 확장합니다. LocalDB 인스턴스를 마우스 오른쪽 단추로 클릭하고 새 쿼리를 선택합니다.
쿼리 편집기 창이 열립니다.
Northwind Transact-SQL 스크립트를 클립보드에 복사합니다. 이 T-SQL 스크립트는 Northwind 데이터베이스를 처음부터 만들고 데이터를 채웁니다.
T-SQL 스크립트를 쿼리 편집기에 붙여넣은 다음, 실행 단추를 선택합니다.
잠시 후 쿼리 실행이 완료되고 Northwind 데이터베이스가 만들어집니다.
Northwind에 대한 새 연결을 추가합니다.
프로젝트 구성
Visual Studio에서 새 C# WPF 앱(.NET Framework) 프로젝트를 만듭니다.
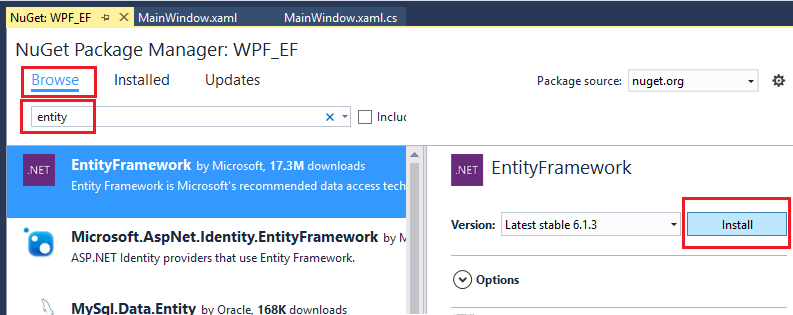
Entity Framework 6의 NuGet 패키지를 추가합니다. 솔루션 탐색기에서 프로젝트 노드를 선택합니다. 주 메뉴에서 프로젝트>NuGet 패키지 관리를 선택합니다.
NuGet 패키지 관리자에서 찾아보기 링크를 클릭합니다. Entity Framework은 목록의 맨 위 패키지에 있을 것입니다. 오른쪽 창에서 설치를 클릭하고 명령을 따릅니다. 출력 창에는 설치 완료 시점이 표시됩니다.

이제 Visual Studio를 사용하여 Northwind 데이터베이스를 기반으로 모델을 만들 수 있습니다.
모델 만들기
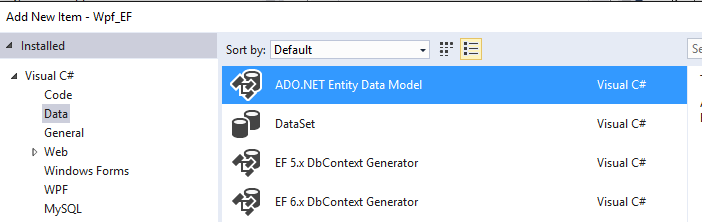
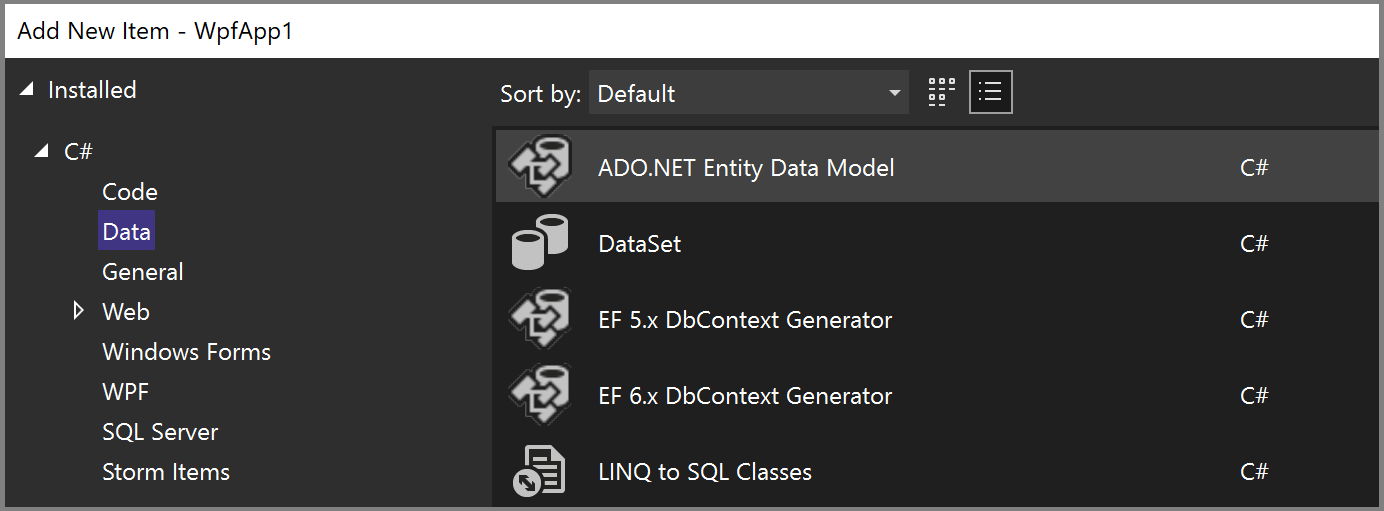
솔루션 탐색기에서 프로젝트 노드를 마우스 오른쪽 단추로 클릭하고 추가>새 항목을 선택합니다. 왼쪽 창의 C# 노드에서 데이터를 선택하고 가운데 창에서 ADO.NET 엔터티 데이터 모델을 선택합니다.
모델
Northwind_model을 호출하고 추가를 선택합니다. 엔터티 데이터 모델 마법사가 열립니다. 데이터베이스의 EF 디자이너를 선택하고 다음을 클릭합니다.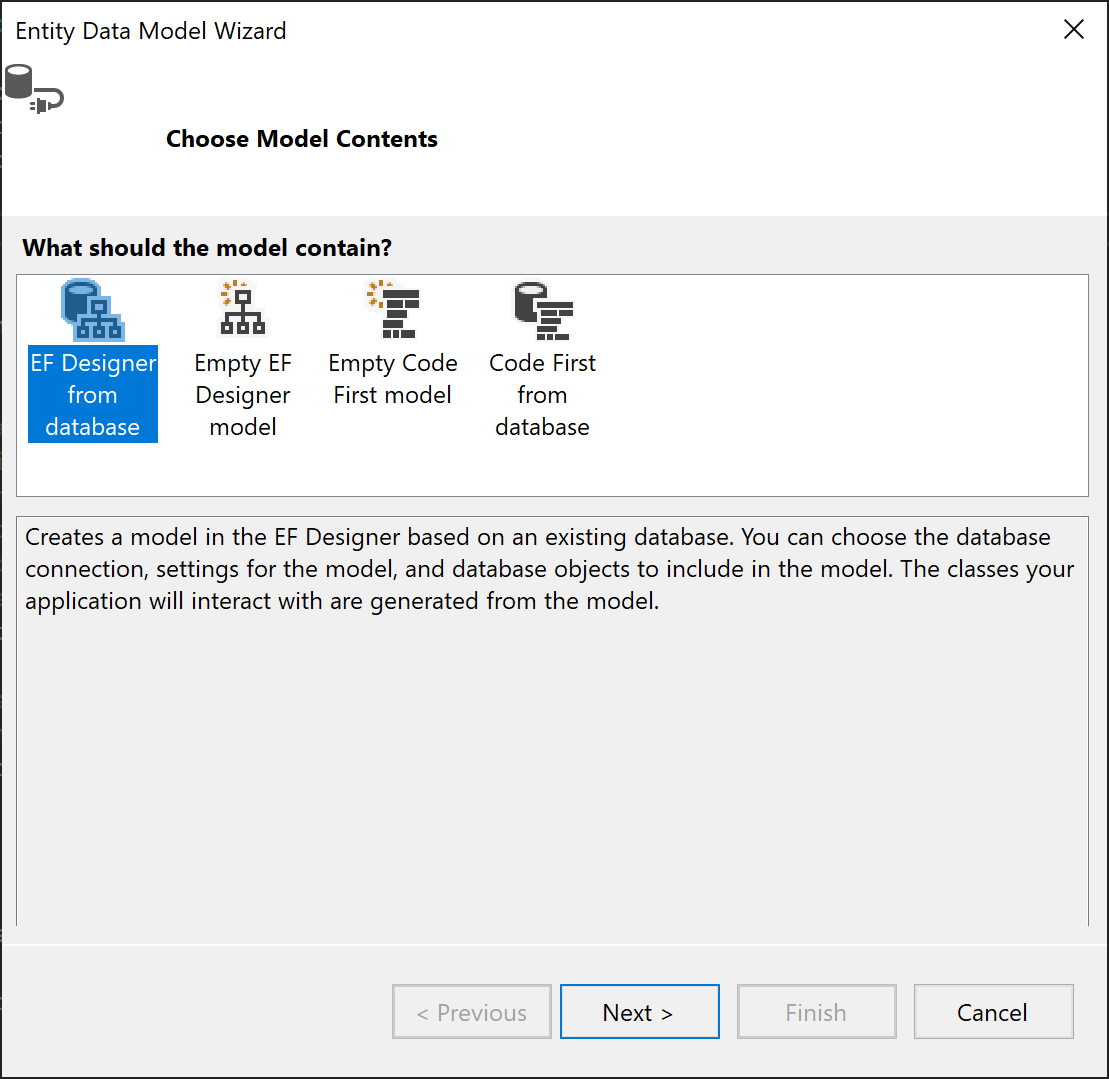
다음 화면에서 LocalDB Northwind 연결(예: (localdb)\MSSQLLocalDB)을 선택하고, Northwind 데이터베이스를 지정한 다음 다음을 클릭합니다.
연결이 표시되지 않으면 새 연결을 선택한 다음 데이터 소스 선택 대화 상자에서 Microsoft SQL Server를 선택하고 계속을 선택한 후, 연결 속성 대화 상자에서
(localdb)\MSSQLLocalDB를 입력하고 데이터베이스 이름 선택 또는 입력 아래에서 Northwind를 선택한 다음 확인을 누릅니다.메시지가 표시되면 사용 중인 Entity Framework 버전을 선택합니다.

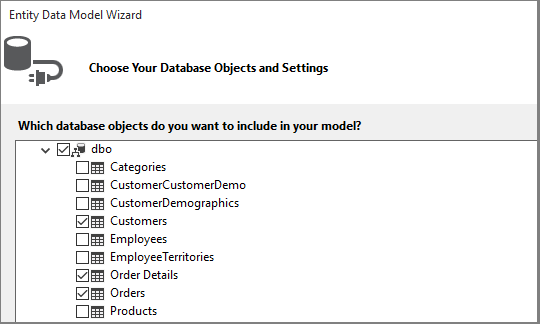
마법사의 다음 페이지에서 Entity Framework 모델에 포함할 테이블, 저장 프로시저 및 기타 데이터베이스 개체를 선택합니다. 트리 뷰에서 dbo 노드를 확장하고 고객, 주문, 주문 세부 정보를 선택합니다. 기본값을 선택된 채로 두고 마침을 클릭합니다.
마법사는 Entity Framework 모델을 나타내는 C# 클래스를 생성합니다. 클래스는 일반 C# 클래스이며, WPF 사용자 인터페이스에 데이터 바인딩하는 항목입니다. 이
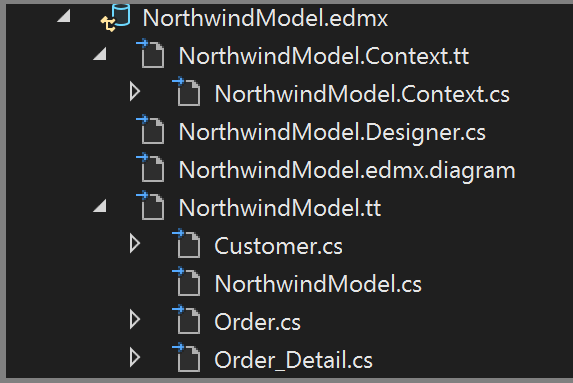
.edmx파일은 클래스를 데이터베이스의 개체와 연결하는 관계 및 기타 메타데이터에 대해 설명합니다. 이.tt파일은 모델에서 작동하는 코드를 생성하고 변경 사항을 데이터베이스에 저장하는 T4 템플릿입니다. 이상의 파일은 Northwind_model 노드의 솔루션 탐색기에서 확인할 수 있습니다.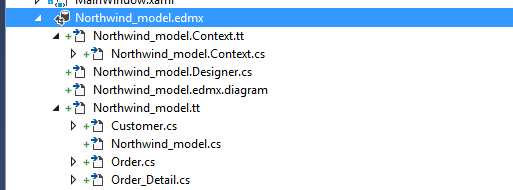
이
.edmx파일의 디자이너 화면 에서는 모델의 일부 속성과 관계를 수정할 수 있습니다. 이 연습에서는 디자이너를 사용하지 않습니다.이
.tt파일은 범용이며 ObservableCollections가 필요한 WPF 데이터 바인딩과 함께 작동하도록 파일 중 하나를 조정해야 합니다. 솔루션 탐색기에서 Northwind_model.tt를 찾을 때까지 Northwind_model 노드를 확장합니다. (이.edmx파일 바로 아래에 있는 .Context.tt 파일에 있지 않은지 확인합니다.)ICollection의 항목 2개를 ObservableCollection<T>으로 바꿉니다.
HashSet<T>의 첫 번째 항목을 줄 51 근처에 있는 ObservableCollection<T>으로 바꿉니다. HashSet의 두 번째 항목은 바꾸지 마세요.
(줄 431 근처에 있는) System.Collections.Generic의 항목만 System.Collections.ObjectModel로 바꿉니다.
F5 키 또는 Ctrl+F5를 눌러 프로젝트를 빌드하고 실행합니다. 애플리케이션을 처음 실행하면 모델 클래스가 데이터 소스 마법사에 표시됩니다.
이제 이 모델을 XAML 페이지에 연결하여 데이터를 보고, 탐색하고, 수정할 수 있습니다.
모델을 XAML 페이지에 데이터 바인딩
사용자 고유의 데이터 바인딩 코드를 작성할 수도 있지만, Visual Studio로 작성하는 방법이 훨씬 쉽습니다.
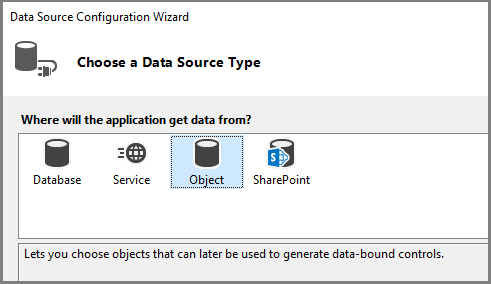
주 메뉴에서 프로젝트>새 데이터 원본 추가를 선택하여 데이터 원본 구성 마법사를 엽니다. 데이터베이스가 아니라 모델 클래스에 바인딩되어 있으므로 개체 를 선택합니다.
프로젝트의 노드를 확장하고 고객을 선택합니다. (주문의 원본은 고객의 Orders 탐색 속성에서 자동으로 생성됩니다.)
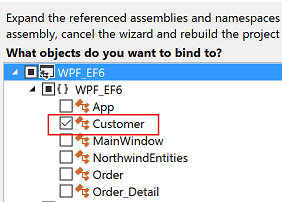

Finish를 클릭합니다.
코드 보기에서 MainWindow.xaml로 이동합니다. 이 예제에서는 목적에 맞게 XAML을 간단하게 유지합니다. MainWindow의 제목을 더 상세한 이름으로 변경하고, 높이와 너비를 600 x 800으로 늘립니다. 나중에 언제든지 변경할 수 있습니다. 이제 세 가지 행 정의, 즉 탐색 단추용 하나, 고객 세부 정보용 하나, 고객 주문을 표시하는 그리드용 하나를 주 그리드에 추가합니다.
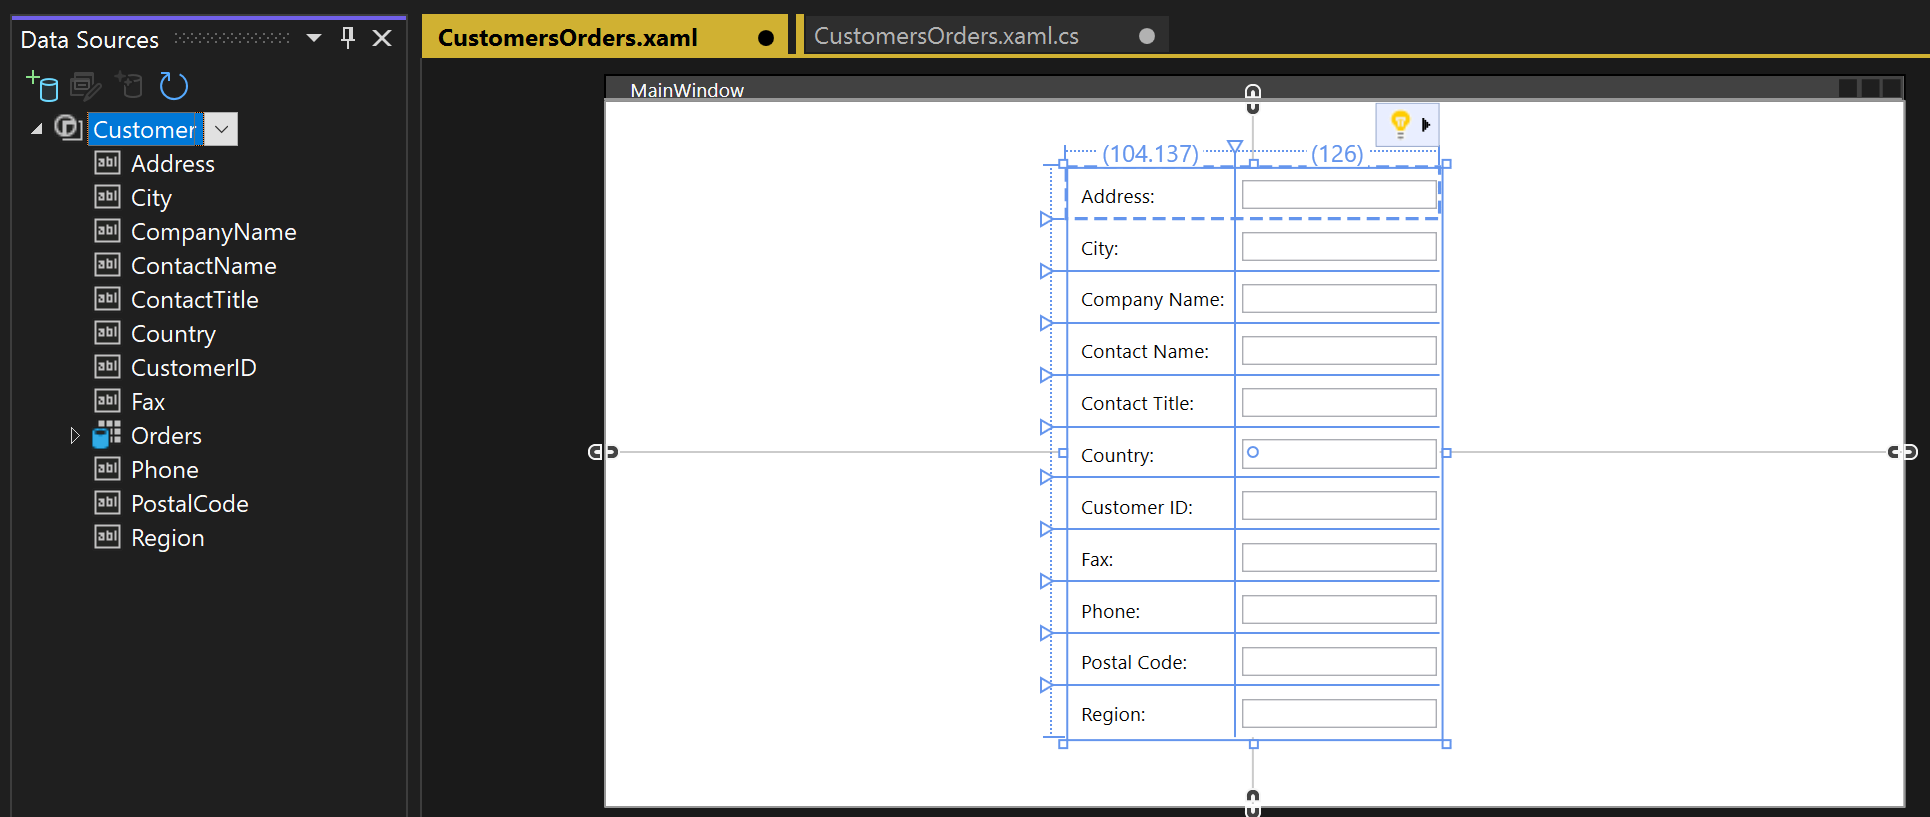
    <Grid.RowDefinitions>
        <RowDefinition Height="auto"/>
        <RowDefinition Height="auto"/>
        <RowDefinition Height="*"/>
    </Grid.RowDefinitions>
디자이너에서 볼 수 있도록 MainWindow.xaml을 엽니다. 이렇게 하면 데이터 원본 창이 도구 상자 옆의 Visual Studio 창 여백에 옵션으로 표시됩니다. 탭을 클릭하여 창을 열거나, Shift+Alt+D를 누르거나, 보기>기타 창>데이터 원본을 선택합니다. Customers 클래스의 각 속성을 자체 개별 텍스트 상자에 표시하려 합니다. 먼저 고객 콤보 상자의 화살표를 클릭하고 세부 정보를 선택합니다. 그런 다음 디자이너 화면의 가운데 부분으로 노드를 끌어다 놓아, 중간 행으로 노드를 옮겨야 한다는 사실을 디자이너에 알립니다. 잘못 배치한 경우에는 나중에 XAML에서 수동으로 행을 지정할 수 있습니다(
Grid.Row="1"). 기본적으로 컨트롤은 그리드 요소에 세로로 배치되지만, 지금은 폼에서 원하는 대로 컨트롤을 정렬할 수 있습니다. 예를 들어 이름 텍스트 상자는 주소 위 상단 부분에 배치하는 것이 적합합니다. 이 문서의 샘플 애플리케이션은 필드의 순서를 다시 지정하고 두 가지 열로 다시 정렬합니다.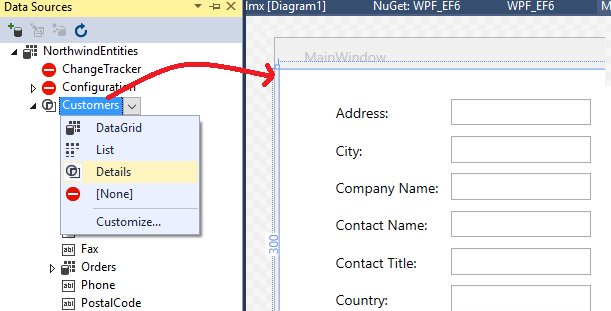
이제 XAML 뷰에서 새로운
Grid요소가 부모 그리드의 행 1(중간 행)에 표시됩니다. 부모 그리드에는Windows.Resources요소에 추가된 CollectionViewSource를 참조하는DataContext특성이 있습니다. 이러한 데이터 컨텍스트에서 첫 번째 텍스트 상자를 주소에 바인딩하면 해당 이름이CollectionViewSource에 있는 현재Customer개체의Address속성에 매핑됩니다.<Grid DataContext="{StaticResource customerViewSource}">고객이 창의 위쪽 절반에 표시되면, 고객의 주문을 아래쪽 절반에 표시하려 합니다. 단일 그리드 뷰 컨트롤에 주문을 표시합니다. 마스터-세부 정보 데이터 바인딩이 정상적으로 작동하려면 별도의 Orders 노드가 아닌 Customers 클래스의 Orders 속성에 바인딩해야 합니다. Customers 클래스의 Orders 속성을 폼의 아래쪽으로 끌어 놓으면 디자이너는 이를 행 2에 배치합니다.


Visual Studio에서 UI 컨트롤을 모델의 이벤트에 연결하는 모든 바인딩 코드를 생성했습니다. 이제 모델을 채우는 코드를 작성하기만 하면 일부 데이터를 확인할 수 있습니다. 먼저 MainWindow.xaml.cs로 이동하고 데이터 멤버를 데이터 컨텍스트의 MainWindow 클래스에 추가합니다. 사용자를 위해 생성된 이 개체는 모델의 변경 내용과 이벤트를 추적하는 컨트롤처럼 작동합니다. 고객과 주문의 CollectionViewSource 데이터 멤버와, 관련 생성자 초기화 논리도 기존 생성자
MainWindow()에 추가하게 됩니다. 클래스 상단은 다음과 같이 보여야 합니다.public partial class MainWindow : Window { NorthwindEntities context = new NorthwindEntities(); CollectionViewSource custViewSource; CollectionViewSource ordViewSource; public MainWindow() { InitializeComponent(); custViewSource = ((CollectionViewSource)(FindResource("customerViewSource"))); ordViewSource = ((CollectionViewSource)(FindResource("customerOrdersViewSource"))); DataContext = this; }아직 없는 경우 System.Data.Entity에 대한
using지시문을 추가하여Load확장 메서드를 다음과 같이 범위로 가져옵니다.using System.Data.Entity;이제 아래로 스크롤하여
Window_Loaded이벤트 처리기를 찾습니다. Visual Studio에서 CollectionViewSource 개체를 추가합니다. 이 개체는 모델을 만들 때 선택한 창의 NorthwindEntities 개체를 나타냅니다. 이미 추가했으니 여기서는 필요 없습니다. 메서드가 다음과 같이 표시되도록Window_Loaded의 코드를 바꿔보겠습니다.private void Window_Loaded(object sender, RoutedEventArgs e) { // Load is an extension method on IQueryable, // defined in the System.Data.Entity namespace. // This method enumerates the results of the query, // similar to ToList but without creating a list. // When used with Linq to Entities, this method // creates entity objects and adds them to the context. context.Customers.Load(); // After the data is loaded, call the DbSet<T>.Local property // to use the DbSet<T> as a binding source. custViewSource.Source = context.Customers.Local; }F5키를 누릅니다. CollectionViewSource로 검색된 첫 번째 고객의 세부 정보가 표시됩니다. 데이터 표에는 이 고객의 관련 주문이 표시됩니다. 서식 지정이 바람직하지 않으니 수정해 보겠습니다. 다른 레코드를 보고 기본적인 CRUD(생성, 읽기, 업데이트, 삭제) 작업을 수행하는 방법을 생성할 수도 있습니다.
새 고객과 주문에 맞게 페이지 디자인 조정 및 그리드 추가
Visual Studio에서 생성하는 기본 정렬이 애플리케이션 적합하지 않으므로, 코드에 복사할 최종 XAML을 여기에 제공하겠습니다. 사용자가 새 고객이나 주문을 추가할 수 있게 하는 일부 "양식"(실제로는 그리드)이 필요합니다. 새 고객과 주문을 추가할 수 있으려면 CollectionViewSource에 데이터 바인딩되지 않은 별도의 텍스트 상자 집합이 필요합니다. 처리기 메서드에서 Visible 속성을 설정하여, 사용자가 언제든지 볼 수 있는 그리드를 제어하는 작업도 합니다. 마지막으로, Orders 그리드에 있는 각 행에 삭제 단추를 추가하여 사용자가 개별 주문을 삭제할 수 있게 합니다.
먼저 이러한 스타일을 MainWindow.xaml의 Windows.Resources 요소에 추가합니다.
<Style x:Key="Label" TargetType="{x:Type Label}" BasedOn="{x:Null}">
    <Setter Property="HorizontalAlignment" Value="Left"/>
    <Setter Property="VerticalAlignment" Value="Center"/>
    <Setter Property="Margin" Value="3"/>
    <Setter Property="Height" Value="23"/>
</Style>
<Style x:Key="CustTextBox" TargetType="{x:Type TextBox}" BasedOn="{x:Null}">
    <Setter Property="HorizontalAlignment" Value="Right"/>
    <Setter Property="VerticalAlignment" Value="Center"/>
    <Setter Property="Margin" Value="3"/>
    <Setter Property="Height" Value="26"/>
    <Setter Property="Width" Value="120"/>
</Style>
그런 다음 전체 외부 그리드를 이 태그로 바꿉니다.
<Grid>
     <Grid.RowDefinitions>
         <RowDefinition Height="auto"/>
         <RowDefinition Height="auto"/>
         <RowDefinition Height="*"/>
     </Grid.RowDefinitions>
     <Grid x:Name="existingCustomerGrid" Grid.Row="1" HorizontalAlignment="Left" Margin="5" Visibility="Visible" VerticalAlignment="Top" Background="AntiqueWhite" DataContext="{StaticResource customerViewSource}">
         <Grid.ColumnDefinitions>
             <ColumnDefinition Width="Auto" MinWidth="233"/>
             <ColumnDefinition Width="Auto" MinWidth="397"/>
         </Grid.ColumnDefinitions>
         <Grid.RowDefinitions>
             <RowDefinition Height="Auto"/>
             <RowDefinition Height="Auto"/>
             <RowDefinition Height="Auto"/>
             <RowDefinition Height="Auto"/>
             <RowDefinition Height="Auto"/>
             <RowDefinition Height="Auto"/>
         </Grid.RowDefinitions>
         <Label Content="Customer ID:" Grid.Row="0" Style="{StaticResource Label}"/>
         <TextBox x:Name="customerIDTextBox" Grid.Row="0" Style="{StaticResource CustTextBox}"
                  Text="{Binding CustomerID, Mode=TwoWay, NotifyOnValidationError=true, ValidatesOnExceptions=true}"/>
         <Label Content="Company Name:" Grid.Row="1" Style="{StaticResource Label}"/>
         <TextBox x:Name="companyNameTextBox" Grid.Row="1" Style="{StaticResource CustTextBox}"
                  Text="{Binding CompanyName, Mode=TwoWay, NotifyOnValidationError=true, ValidatesOnExceptions=true}"/>
         <Label Content="Contact Name:" Grid.Row="2" Style="{StaticResource Label}"/>
         <TextBox x:Name="contactNameTextBox" Grid.Row="2" Style="{StaticResource CustTextBox}"
                  Text="{Binding ContactName, Mode=TwoWay, NotifyOnValidationError=true, ValidatesOnExceptions=true}"/>
         <Label Content="Contact title:" Grid.Row="3" Style="{StaticResource Label}"/>
         <TextBox x:Name="contactTitleTextBox" Grid.Row="3" Style="{StaticResource CustTextBox}"
                  Text="{Binding ContactTitle, Mode=TwoWay, NotifyOnValidationError=true, ValidatesOnExceptions=true}"/>
         <Label Content="Address:" Grid.Row="4" Style="{StaticResource Label}"/>
         <TextBox x:Name="addressTextBox" Grid.Row="4" Style="{StaticResource CustTextBox}"
                  Text="{Binding Address, Mode=TwoWay, NotifyOnValidationError=true, ValidatesOnExceptions=true}"/>
         <Label Content="City:" Grid.Column="1" Grid.Row="0" Style="{StaticResource Label}"/>
         <TextBox x:Name="cityTextBox" Grid.Column="1" Grid.Row="0" Style="{StaticResource CustTextBox}"
                  Text="{Binding City, Mode=TwoWay, NotifyOnValidationError=true, ValidatesOnExceptions=true}"/>
         <Label Content="Country:" Grid.Column="1" Grid.Row="1" Style="{StaticResource Label}"/>
         <TextBox x:Name="countryTextBox" Grid.Column="1" Grid.Row="1" Style="{StaticResource CustTextBox}"
                  Text="{Binding Country, Mode=TwoWay, NotifyOnValidationError=true, ValidatesOnExceptions=true}"/>
         <Label Content="Fax:" Grid.Column="1" Grid.Row="2" Style="{StaticResource Label}"/>
         <TextBox x:Name="faxTextBox" Grid.Column="1" Grid.Row="2" Style="{StaticResource CustTextBox}"
                  Text="{Binding Fax, Mode=TwoWay, NotifyOnValidationError=true, ValidatesOnExceptions=true}"/>
         <Label Content="Phone:" Grid.Column="1" Grid.Row="3" Style="{StaticResource Label}"/>
         <TextBox x:Name="phoneTextBox" Grid.Column="1" Grid.Row="3" Style="{StaticResource CustTextBox}"
                  Text="{Binding Phone, Mode=TwoWay, NotifyOnValidationError=true, ValidatesOnExceptions=true}"/>
         <Label Content="Postal Code:" Grid.Column="1" Grid.Row="4" VerticalAlignment="Center" Style="{StaticResource Label}"/>
         <TextBox x:Name="postalCodeTextBox" Grid.Column="1" Grid.Row="4" Style="{StaticResource CustTextBox}"
                  Text="{Binding PostalCode, Mode=TwoWay, NotifyOnValidationError=true, ValidatesOnExceptions=true}"/>
         <Label Content="Region:" Grid.Column="1" Grid.Row="5" Style="{StaticResource Label}"/>
         <TextBox x:Name="regionTextBox" Grid.Column="1" Grid.Row="5" Style="{StaticResource CustTextBox}"
                  Text="{Binding Region, Mode=TwoWay, NotifyOnValidationError=true, ValidatesOnExceptions=true}"/>
     </Grid>
     <Grid x:Name="newCustomerGrid" Grid.Row="1" HorizontalAlignment="Left" VerticalAlignment="Top" Margin="5" DataContext="{Binding RelativeSource={RelativeSource FindAncestor, AncestorType={x:Type Window}}, Path=newCustomer, UpdateSourceTrigger=Explicit}" Visibility="Collapsed" Background="CornflowerBlue">
         <Grid.ColumnDefinitions>
             <ColumnDefinition Width="Auto" MinWidth="233"/>
             <ColumnDefinition Width="Auto" MinWidth="397"/>
         </Grid.ColumnDefinitions>
         <Grid.RowDefinitions>
             <RowDefinition Height="Auto"/>
             <RowDefinition Height="Auto"/>
             <RowDefinition Height="Auto"/>
             <RowDefinition Height="Auto"/>
             <RowDefinition Height="Auto"/>
             <RowDefinition Height="Auto"/>
         </Grid.RowDefinitions>
         <Label Content="Customer ID:" Grid.Row="0" Style="{StaticResource Label}"/>
         <TextBox x:Name="add_customerIDTextBox" Grid.Row="0" Style="{StaticResource CustTextBox}"
                  Text="{Binding CustomerID, Mode=TwoWay, NotifyOnValidationError=true, ValidatesOnExceptions=true}"/>
         <Label Content="Company Name:" Grid.Row="1" Style="{StaticResource Label}"/>
         <TextBox x:Name="add_companyNameTextBox" Grid.Row="1" Style="{StaticResource CustTextBox}"
                  Text="{Binding CompanyName, Mode=TwoWay, NotifyOnValidationError=true, ValidatesOnExceptions=true }"/>
         <Label Content="Contact Name:" Grid.Row="2" Style="{StaticResource Label}"/>
         <TextBox x:Name="add_contactNameTextBox" Grid.Row="2" Style="{StaticResource CustTextBox}"
                  Text="{Binding ContactName, Mode=TwoWay, NotifyOnValidationError=true, ValidatesOnExceptions=true}"/>
         <Label Content="Contact title:" Grid.Row="3" Style="{StaticResource Label}"/>
         <TextBox x:Name="add_contactTitleTextBox" Grid.Row="3" Style="{StaticResource CustTextBox}"
                  Text="{Binding ContactTitle, Mode=TwoWay, NotifyOnValidationError=true, ValidatesOnExceptions=true}"/>
         <Label Content="Address:" Grid.Row="4" Style="{StaticResource Label}"/>
         <TextBox x:Name="add_addressTextBox" Grid.Row="4" Style="{StaticResource CustTextBox}"
                  Text="{Binding Address, Mode=TwoWay, NotifyOnValidationError=true, ValidatesOnExceptions=true}"/>
         <Label Content="City:" Grid.Column="1" Grid.Row="0" Style="{StaticResource Label}"/>
         <TextBox x:Name="add_cityTextBox" Grid.Column="1" Grid.Row="0" Style="{StaticResource CustTextBox}"
                  Text="{Binding City, Mode=TwoWay, NotifyOnValidationError=true, ValidatesOnExceptions=true}"/>
         <Label Content="Country:" Grid.Column="1" Grid.Row="1" Style="{StaticResource Label}"/>
         <TextBox x:Name="add_countryTextBox" Grid.Column="1" Grid.Row="1" Style="{StaticResource CustTextBox}"
                  Text="{Binding Country, Mode=TwoWay, NotifyOnValidationError=true, ValidatesOnExceptions=true}"/>
         <Label Content="Fax:" Grid.Column="1" Grid.Row="2" Style="{StaticResource Label}"/>
         <TextBox x:Name="add_faxTextBox" Grid.Column="1" Grid.Row="2" Style="{StaticResource CustTextBox}"
                  Text="{Binding Fax, Mode=TwoWay, NotifyOnValidationError=true, ValidatesOnExceptions=true}"/>
         <Label Content="Phone:" Grid.Column="1" Grid.Row="3" Style="{StaticResource Label}"/>
         <TextBox x:Name="add_phoneTextBox" Grid.Column="1" Grid.Row="3" Style="{StaticResource CustTextBox}"
                  Text="{Binding Phone, Mode=TwoWay, NotifyOnValidationError=true, ValidatesOnExceptions=true}"/>
         <Label Content="Postal Code:" Grid.Column="1" Grid.Row="4" VerticalAlignment="Center" Style="{StaticResource Label}"/>
         <TextBox x:Name="add_postalCodeTextBox" Grid.Column="1" Grid.Row="4" Style="{StaticResource CustTextBox}"
                  Text="{Binding PostalCode, Mode=TwoWay, NotifyOnValidationError=true, ValidatesOnExceptions=true}"/>
         <Label Content="Region:" Grid.Column="1" Grid.Row="5" Style="{StaticResource Label}"/>
         <TextBox x:Name="add_regionTextBox" Grid.Column="1" Grid.Row="5" Style="{StaticResource CustTextBox}"
                  Text="{Binding Region, Mode=TwoWay, NotifyOnValidationError=true, ValidatesOnExceptions=true}"/>
     </Grid>
     <Grid x:Name="newOrderGrid" Grid.Row="1" HorizontalAlignment="Left" VerticalAlignment="Top" Margin="5" DataContext="{Binding Path=newOrder, Mode=TwoWay}" Visibility="Collapsed" Background="LightGreen">
         <Grid.ColumnDefinitions>
             <ColumnDefinition Width="Auto" MinWidth="233"/>
             <ColumnDefinition Width="Auto" MinWidth="397"/>
         </Grid.ColumnDefinitions>
         <Grid.RowDefinitions>
             <RowDefinition Height="Auto"/>
             <RowDefinition Height="Auto"/>
             <RowDefinition Height="Auto"/>
             <RowDefinition Height="Auto"/>
             <RowDefinition Height="Auto"/>
             <RowDefinition Height="Auto"/>
             <RowDefinition Height="Auto"/>
         </Grid.RowDefinitions>
         <Label Content="New Order Form" FontWeight="Bold"/>
         <Label Content="Employee ID:"  Grid.Row="1" Style="{StaticResource Label}"/>
         <TextBox x:Name="add_employeeIDTextBox" Grid.Row="1" Style="{StaticResource CustTextBox}"
                  Text="{Binding EmployeeID, Mode=TwoWay, NotifyOnValidationError=true, ValidatesOnExceptions=true}"/>
         <Label Content="Order Date:"  Grid.Row="2" Style="{StaticResource Label}"/>
         <DatePicker x:Name="add_orderDatePicker" Grid.Row="2"  HorizontalAlignment="Right" Width="120"
                 SelectedDate="{Binding OrderDate, Mode=TwoWay, NotifyOnValidationError=true, ValidatesOnExceptions=true, UpdateSourceTrigger=PropertyChanged}"/>
         <Label Content="Required Date:" Grid.Row="3" Style="{StaticResource Label}"/>
         <DatePicker x:Name="add_requiredDatePicker" Grid.Row="3" HorizontalAlignment="Right" Width="120"
                  SelectedDate="{Binding RequiredDate, Mode=TwoWay, NotifyOnValidationError=true, ValidatesOnExceptions=true, UpdateSourceTrigger=PropertyChanged}"/>
         <Label Content="Shipped Date:"  Grid.Row="4"  Style="{StaticResource Label}"/>
         <DatePicker x:Name="add_shippedDatePicker"  Grid.Row="4"  HorizontalAlignment="Right" Width="120"
                 SelectedDate="{Binding ShippedDate, Mode=TwoWay, NotifyOnValidationError=true, ValidatesOnExceptions=true, UpdateSourceTrigger=PropertyChanged}"/>
         <Label Content="Ship Via:"  Grid.Row="5" Style="{StaticResource Label}"/>
         <TextBox x:Name="add_ShipViaTextBox"  Grid.Row="5" Style="{StaticResource CustTextBox}"
                  Text="{Binding ShipVia, Mode=TwoWay, NotifyOnValidationError=true, ValidatesOnExceptions=true}"/>
         <Label Content="Freight"  Grid.Row="6" Style="{StaticResource Label}"/>
         <TextBox x:Name="add_freightTextBox" Grid.Row="6" Style="{StaticResource CustTextBox}"
                  Text="{Binding Freight, Mode=TwoWay, NotifyOnValidationError=true, ValidatesOnExceptions=true}"/>
     </Grid>
     <DataGrid x:Name="ordersDataGrid" SelectionUnit="Cell" SelectionMode="Single" AutoGenerateColumns="False" CanUserAddRows="false" IsEnabled="True" EnableRowVirtualization="True" Width="auto" ItemsSource="{Binding Source={StaticResource customerOrdersViewSource}}" Margin="10,10,10,10" Grid.Row="2" RowDetailsVisibilityMode="VisibleWhenSelected">
         <DataGrid.Columns>
             <DataGridTemplateColumn>
                 <DataGridTemplateColumn.CellTemplate>
                     <DataTemplate>
                         <Button Content="Delete" Command="{StaticResource DeleteOrderCommand}" CommandParameter="{Binding}"/>
                     </DataTemplate>
                 </DataGridTemplateColumn.CellTemplate>
             </DataGridTemplateColumn>
             <DataGridTextColumn x:Name="customerIDColumn" Binding="{Binding CustomerID}" Header="Customer ID" Width="SizeToHeader"/>
             <DataGridTextColumn x:Name="employeeIDColumn" Binding="{Binding EmployeeID}" Header="Employee ID" Width="SizeToHeader"/>
             <DataGridTextColumn x:Name="freightColumn" Binding="{Binding Freight}" Header="Freight" Width="SizeToHeader"/>
             <DataGridTemplateColumn x:Name="orderDateColumn" Header="Order Date" Width="SizeToHeader">
                 <DataGridTemplateColumn.CellTemplate>
                     <DataTemplate>
                         <DatePicker SelectedDate="{Binding OrderDate, Mode=TwoWay, NotifyOnValidationError=true, ValidatesOnExceptions=true, UpdateSourceTrigger=PropertyChanged}"/>
                     </DataTemplate>
                 </DataGridTemplateColumn.CellTemplate>
             </DataGridTemplateColumn>
             <DataGridTextColumn x:Name="orderIDColumn" Binding="{Binding OrderID}" Header="Order ID" Width="SizeToHeader"/>
             <DataGridTemplateColumn x:Name="requiredDateColumn" Header="Required Date" Width="SizeToHeader">
                 <DataGridTemplateColumn.CellTemplate>
                     <DataTemplate>
                         <DatePicker SelectedDate="{Binding RequiredDate, Mode=TwoWay, NotifyOnValidationError=true, ValidatesOnExceptions=true, UpdateSourceTrigger=PropertyChanged}"/>
                     </DataTemplate>
                 </DataGridTemplateColumn.CellTemplate>
             </DataGridTemplateColumn>
             <DataGridTextColumn x:Name="shipAddressColumn" Binding="{Binding ShipAddress}" Header="Ship Address" Width="SizeToHeader"/>
             <DataGridTextColumn x:Name="shipCityColumn" Binding="{Binding ShipCity}" Header="Ship City" Width="SizeToHeader"/>
             <DataGridTextColumn x:Name="shipCountryColumn" Binding="{Binding ShipCountry}" Header="Ship Country" Width="SizeToHeader"/>
             <DataGridTextColumn x:Name="shipNameColumn" Binding="{Binding ShipName}" Header="Ship Name" Width="SizeToHeader"/>
             <DataGridTemplateColumn x:Name="shippedDateColumn" Header="Shipped Date" Width="SizeToHeader">
                 <DataGridTemplateColumn.CellTemplate>
                     <DataTemplate>
                         <DatePicker SelectedDate="{Binding ShippedDate, Mode=TwoWay, NotifyOnValidationError=true, ValidatesOnExceptions=true, UpdateSourceTrigger=PropertyChanged}"/>
                     </DataTemplate>
                 </DataGridTemplateColumn.CellTemplate>
             </DataGridTemplateColumn>
             <DataGridTextColumn x:Name="shipPostalCodeColumn" Binding="{Binding ShipPostalCode}" Header="Ship Postal Code" Width="SizeToHeader"/>
             <DataGridTextColumn x:Name="shipRegionColumn" Binding="{Binding ShipRegion}" Header="Ship Region" Width="SizeToHeader"/>
             <DataGridTextColumn x:Name="shipViaColumn" Binding="{Binding ShipVia}" Header="Ship Via" Width="SizeToHeader"/>
         </DataGrid.Columns>
     </DataGrid>
 </Grid>
탐색, 추가, 업데이트 및 삭제 단추 추가
Windows Forms 애플리케이션에서는 데이터베이스의 행을 탐색하고 기본 CRUD 작업을 수행하는 단추가 포함된 BindingNavigator 개체가 제공됩니다. WPF는 BindingNavigator를 제공하지 않지만 이 요소는 쉽게 만들 수 있습니다. 수평 StackPanel 안에 있는 단추를 사용하고, 단추를 코드 숨김의 메서드에 바인딩된 명령과 연결하면 됩니다.
명령 논리는 (1) 명령, (2) 바인딩, (3) 단추 및 (4) 코드 숨김의 명령 처리기라는 네 부분으로 구성됩니다.
XAML에 명령, 바인딩 및 단추 추가
먼저
Windows.Resources요소에 있는 MainWindow.xaml 파일에 명령을 추가합니다.<RoutedUICommand x:Key="FirstCommand" Text="First"/> <RoutedUICommand x:Key="LastCommand" Text="Last"/> <RoutedUICommand x:Key="NextCommand" Text="Next"/> <RoutedUICommand x:Key="PreviousCommand" Text="Previous"/> <RoutedUICommand x:Key="DeleteCustomerCommand" Text="Delete Customer"/> <RoutedUICommand x:Key="DeleteOrderCommand" Text="Delete Order"/> <RoutedUICommand x:Key="UpdateCommand" Text="Update"/> <RoutedUICommand x:Key="AddCommand" Text="Add"/> <RoutedUICommand x:Key="CancelCommand" Text="Cancel"/>CommandBinding은
RoutedUICommand이벤트를 코드 숨김의 메서드에 매핑합니다. 이CommandBindings요소를Windows.Resources닫는 태그 뒤에 추가합니다.<Window.CommandBindings> <CommandBinding Command="{StaticResource FirstCommand}" Executed="FirstCommandHandler"/> <CommandBinding Command="{StaticResource LastCommand}" Executed="LastCommandHandler"/> <CommandBinding Command="{StaticResource NextCommand}" Executed="NextCommandHandler"/> <CommandBinding Command="{StaticResource PreviousCommand}" Executed="PreviousCommandHandler"/> <CommandBinding Command="{StaticResource DeleteCustomerCommand}" Executed="DeleteCustomerCommandHandler"/> <CommandBinding Command="{StaticResource DeleteOrderCommand}" Executed="DeleteOrderCommandHandler"/> <CommandBinding Command="{StaticResource UpdateCommand}" Executed="UpdateCommandHandler"/> <CommandBinding Command="{StaticResource AddCommand}" Executed="AddCommandHandler"/> <CommandBinding Command="{StaticResource CancelCommand}" Executed="CancelCommandHandler"/> </Window.CommandBindings>이제 탐색, 추가, 삭제 및 업데이트 단추를 사용하여
StackPanel을 추가합니다. 먼저 이 스타일을Windows.Resources에 추가합니다.<Style x:Key="NavButton" TargetType="{x:Type Button}" BasedOn="{x:Null}"> <Setter Property="FontSize" Value="24"/> <Setter Property="FontFamily" Value="Segoe UI Symbol"/> <Setter Property="Margin" Value="2,2,2,0"/> <Setter Property="Width" Value="40"/> <Setter Property="Height" Value="auto"/> </Style>그런 다음 이 코드를 외부
Grid요소의RowDefinitions바로 뒤, XAML 페이지의 맨 위에 붙여넣습니다.<StackPanel Orientation="Horizontal" Margin="2,2,2,0" Height="36" VerticalAlignment="Top" Background="Gainsboro" DataContext="{StaticResource customerViewSource}" d:LayoutOverrides="LeftMargin, RightMargin, TopMargin, BottomMargin"> <Button Name="btnFirst" Content="|◄" Command="{StaticResource FirstCommand}" Style="{StaticResource NavButton}"/> <Button Name="btnPrev" Content="◄" Command="{StaticResource PreviousCommand}" Style="{StaticResource NavButton}"/> <Button Name="btnNext" Content="►" Command="{StaticResource NextCommand}" Style="{StaticResource NavButton}"/> <Button Name="btnLast" Content="►|" Command="{StaticResource LastCommand}" Style="{StaticResource NavButton}"/> <Button Name="btnDelete" Content="Delete Customer" Command="{StaticResource DeleteCustomerCommand}" FontSize="11" Width="120" Style="{StaticResource NavButton}"/> <Button Name="btnAdd" Content="New Customer" Command="{StaticResource AddCommand}" FontSize="11" Width="80" Style="{StaticResource NavButton}"/> <Button Content="New Order" Name="btnNewOrder" FontSize="11" Width="80" Style="{StaticResource NavButton}" Click="NewOrder_click"/> <Button Name="btnUpdate" Content="Commit" Command="{StaticResource UpdateCommand}" FontSize="11" Width="80" Style="{StaticResource NavButton}"/> <Button Content="Cancel" Name="btnCancel" Command="{StaticResource CancelCommand}" FontSize="11" Width="80" Style="{StaticResource NavButton}"/> </StackPanel>
MainWindow 클래스에 명령 처리기 추가
코드 숨김은 추가 및 삭제 메서드가 아닌 곳에서는 최소화됩니다. 탐색은 CollectionViewSource의 View 속성에서 메서드를 호출하여 수행됩니다. DeleteOrderCommandHandler에서는 주문의 하위 삭제를 수행하는 방법을 확인할 수 있습니다. 먼저 여기에 연결된 Order_Details를 삭제해야 합니다. UpdateCommandHandler는 컬렉션에 새 고객 또는 주문을 추가하거나, 사용자가 텍스트 상자에서 변경한 내용을 이용해 기존 고객 또는 주문을 업데이트합니다.
이러한 처리기 메서드를 MainWindow.xaml.cs의 MainWindow 클래스에 추가합니다. Customers 테이블의 CollectionViewSource의 이름이 다르다면, 각 메서드에서 이름을 수정해야 합니다.
private void LastCommandHandler(object sender, ExecutedRoutedEventArgs e)
{
    custViewSource.View.MoveCurrentToLast();
}

private void PreviousCommandHandler(object sender, ExecutedRoutedEventArgs e)
{
    custViewSource.View.MoveCurrentToPrevious();
}

private void NextCommandHandler(object sender, ExecutedRoutedEventArgs e)
{
    custViewSource.View.MoveCurrentToNext();
}

private void FirstCommandHandler(object sender, ExecutedRoutedEventArgs e)
{
    custViewSource.View.MoveCurrentToFirst();
}

private void DeleteCustomerCommandHandler(object sender, ExecutedRoutedEventArgs e)
{
    // If existing window is visible, delete the customer and all their orders.
    // In a real application, you should add warnings and allow the user to cancel the operation.
    var cur = custViewSource.View.CurrentItem as Customer;

    var cust = (from c in context.Customers
                where c.CustomerID == cur.CustomerID
                select c).FirstOrDefault();

    if (cust != null)
    {
        foreach (var ord in cust.Orders.ToList())
        {
            Delete_Order(ord);
        }
        context.Customers.Remove(cust);
    }
    context.SaveChanges();
    custViewSource.View.Refresh();
}

// Commit changes from the new customer form, the new order form,
// or edits made to the existing customer form.
private void UpdateCommandHandler(object sender, ExecutedRoutedEventArgs e)
{
    if (newCustomerGrid.IsVisible)
    {
        // Create a new object because the old one
        // is being tracked by EF now.
        Customer newCustomer = new Customer
        {
            Address = add_addressTextBox.Text,
            City = add_cityTextBox.Text,
            CompanyName = add_companyNameTextBox.Text,
            ContactName = add_contactNameTextBox.Text,
            ContactTitle = add_contactTitleTextBox.Text,
            Country = add_countryTextBox.Text,
            CustomerID = add_customerIDTextBox.Text,
            Fax = add_faxTextBox.Text,
            Phone = add_phoneTextBox.Text,
            PostalCode = add_postalCodeTextBox.Text,
            Region = add_regionTextBox.Text
        };

        // Perform very basic validation
        if (newCustomer.CustomerID.Length == 5)
        {
            // Insert the new customer at correct position:
            int len = context.Customers.Local.Count();
            int pos = len;
            for (int i = 0; i < len; ++i)
            {
                if (String.CompareOrdinal(newCustomer.CustomerID, context.Customers.Local[i].CustomerID) < 0)
                {
                    pos = i;
                    break;
                }
            }
            context.Customers.Local.Insert(pos, newCustomer);
            custViewSource.View.Refresh();
            custViewSource.View.MoveCurrentTo(newCustomer);
        }
        else
        {
            MessageBox.Show("CustomerID must have 5 characters.");
        }

        newCustomerGrid.Visibility = Visibility.Collapsed;
        existingCustomerGrid.Visibility = Visibility.Visible;
    }
    else if (newOrderGrid.IsVisible)
    {
        // Order ID is auto-generated so we don't set it here.
        // For CustomerID, address, etc we use the values from current customer.
        // User can modify these in the datagrid after the order is entered.

        Customer currentCustomer = (Customer)custViewSource.View.CurrentItem;

        Order newOrder = new Order()
        {
            OrderDate = add_orderDatePicker.SelectedDate,
            RequiredDate = add_requiredDatePicker.SelectedDate,
            ShippedDate = add_shippedDatePicker.SelectedDate,
            CustomerID = currentCustomer.CustomerID,
            ShipAddress = currentCustomer.Address,
            ShipCity = currentCustomer.City,
            ShipCountry = currentCustomer.Country,
            ShipName = currentCustomer.CompanyName,
            ShipPostalCode = currentCustomer.PostalCode,
            ShipRegion = currentCustomer.Region
        };

        try
        {
            newOrder.EmployeeID = Int32.Parse(add_employeeIDTextBox.Text);
        }
        catch
        {
            MessageBox.Show("EmployeeID must be a valid integer value.");
            return;
        }

        try
        {
            // Exercise for the reader if you are using Northwind:
            // Add the Northwind Shippers table to the model.

            // Acceptable ShipperID values are 1, 2, or 3.
            if (add_ShipViaTextBox.Text == "1" || add_ShipViaTextBox.Text == "2"
                || add_ShipViaTextBox.Text == "3")
            {
                newOrder.ShipVia = Convert.ToInt32(add_ShipViaTextBox.Text);
            }
            else
            {
                MessageBox.Show("Shipper ID must be 1, 2, or 3 in Northwind.");
                return;
            }
        }
        catch
        {
            MessageBox.Show("Ship Via must be convertible to int");
            return;
        }

        try
        {
            newOrder.Freight = Convert.ToDecimal(add_freightTextBox.Text);
        }
        catch
        {
            MessageBox.Show("Freight must be convertible to decimal.");
            return;
        }

        // Add the order into the EF model
        context.Orders.Add(newOrder);
        ordViewSource.View.Refresh();
    }

    // Save the changes, either for a new customer, a new order
    // or an edit to an existing customer or order.
    context.SaveChanges();
}

// Sets up the form so that user can enter data. Data is later
// saved when user clicks Commit.
private void AddCommandHandler(object sender, ExecutedRoutedEventArgs e)
{
    existingCustomerGrid.Visibility = Visibility.Collapsed;
    newOrderGrid.Visibility = Visibility.Collapsed;
    newCustomerGrid.Visibility = Visibility.Visible;

    // Clear all the text boxes before adding a new customer.
    foreach (var child in newCustomerGrid.Children)
    {
        var tb = child as TextBox;
        if (tb != null)
        {
            tb.Text = "";
        }
    }
}

private void NewOrder_click(object sender, RoutedEventArgs e)
{
    var cust = custViewSource.View.CurrentItem as Customer;
    if (cust == null)
    {
        MessageBox.Show("No customer selected.");
        return;
    }

    existingCustomerGrid.Visibility = Visibility.Collapsed;
    newCustomerGrid.Visibility = Visibility.Collapsed;
    newOrderGrid.UpdateLayout();
    newOrderGrid.Visibility = Visibility.Visible;
}

// Cancels any input into the new customer form
private void CancelCommandHandler(object sender, ExecutedRoutedEventArgs e)
{
    add_addressTextBox.Text = "";
    add_cityTextBox.Text = "";
    add_companyNameTextBox.Text = "";
    add_contactNameTextBox.Text = "";
    add_contactTitleTextBox.Text = "";
    add_countryTextBox.Text = "";
    add_customerIDTextBox.Text = "";
    add_faxTextBox.Text = "";
    add_phoneTextBox.Text = "";
    add_postalCodeTextBox.Text = "";
    add_regionTextBox.Text = "";

    existingCustomerGrid.Visibility = Visibility.Visible;
    newCustomerGrid.Visibility = Visibility.Collapsed;
    newOrderGrid.Visibility = Visibility.Collapsed;
}

private void Delete_Order(Order order)
{
    // Find the order in the EF model.
    var ord = (from o in context.Orders.Local
               where o.OrderID == order.OrderID
               select o).FirstOrDefault();

    // Delete all the order_details that have
    // this Order as a foreign key
    foreach (var detail in ord.Order_Details.ToList())
    {
        context.Order_Details.Remove(detail);
    }

    // Now it's safe to delete the order.
    context.Orders.Remove(ord);
    context.SaveChanges();

    // Update the data grid.
    ordViewSource.View.Refresh();
}

private void DeleteOrderCommandHandler(object sender, ExecutedRoutedEventArgs e)
{
    // Get the Order in the row in which the Delete button was clicked.
    Order obj = e.Parameter as Order;
    Delete_Order(obj);
}
애플리케이션 실행
디버깅을 시작하려면 F5 키를 누릅니다. 표에 고객 및 주문 데이터가 입력되어 있으며, 탐색 단추가 정상적으로 작동할 것입니다. 데이터를 입력한 후 새 고객 또는 주문을 모델에 추가하려면 커밋을 클릭합니다. 데이터를 저장하지 않고 새 고객 또는 새 주문 양식으로 돌아가려면 취소를 클릭합니다. 텍스트 상자에서 기존 고객과 주문을 직접 편집할 수 있으며, 이러한 변경 내용은 자동으로 모델에 기록됩니다.
관련 콘텐츠
피드백
출시 예정: 2024년 내내 콘텐츠에 대한 피드백 메커니즘으로 GitHub 문제를 단계적으로 폐지하고 이를 새로운 피드백 시스템으로 바꿀 예정입니다. 자세한 내용은 다음을 참조하세요. https://aka.ms/ContentUserFeedback
다음에 대한 사용자 의견 제출 및 보기