Run unit tests with Test Explorer
Applies to: ![]() Visual Studio
Visual Studio ![]() Visual Studio for Mac
Visual Studio for Mac
Note
This article applies to Visual Studio 2017. If you're looking for the latest Visual Studio documentation, see Visual Studio documentation. We recommend upgrading to the latest version of Visual Studio. Download it here
Use Test Explorer to run unit tests from Visual Studio or third-party unit test projects. You can also use Test Explorer to group tests into categories, filter the test list, and create, save, and run playlists of tests. You can also use Test Explorer to debug unit tests and, in Visual Studio Enterprise, to analyze code coverage.
Test Explorer can run tests from multiple test projects in a solution and from test classes that are part of the production code projects. Test projects can use different unit test frameworks. When the code under test is written for .NET, the test project can be written in any language that also targets .NET, regardless of the language of the target code. Native C/C++ code projects must be tested by using a C++ unit test framework.
Build your test project
If you do not already have a test project set up in your Visual Studio solution, you must first create and build a test project.
Visual Studio includes the Microsoft unit testing frameworks for both managed and native code. However, Test Explorer can also run any unit test framework that has implemented a Test Explorer adapter. For more information about installing third-party unit test frameworks, see Install third-party unit test frameworks
Run tests in Test Explorer
When you build the test project, the tests appear in Test Explorer. If Test Explorer is not visible, choose Test on the Visual Studio menu, choose Windows, and then choose Test Explorer (or press Ctrl + E, T).
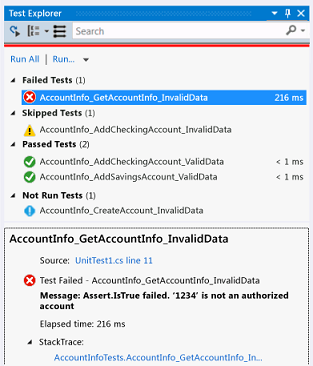
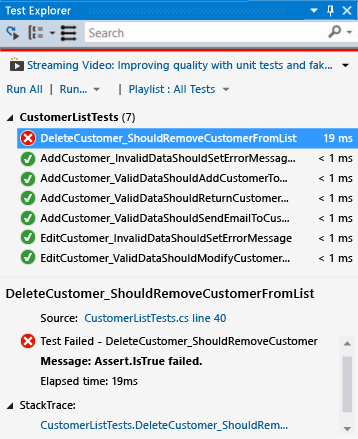
As you run, write, and rerun your tests, Test Explorer displays the results in default groups of Failed Tests, Passed Tests, Skipped Tests and Not Run Tests. You can change the way Test Explorer groups your tests.
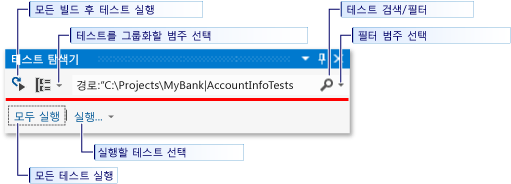
You can perform much of the work of finding, organizing and running tests from the Test Explorer toolbar.
Run tests
You can run all the tests in the solution, all the tests in a group, or a set of tests that you select. Do one of the following:
To run all the tests in a solution, choose Run All (or press Ctrl + R, V).
To run all the tests in a default group, choose Run and then choose the group on the menu.
Select the individual tests that you want to run, open the right-click menu for a selected test and then choose Run Selected Tests (or press Ctrl + R, T).
If individual tests have no dependencies that prevent them from being run in any order, turn on parallel test execution with the
 toggle button on the toolbar. This can noticeably reduce the time taken to run all the tests.
The pass/fail bar at the top of the Test Explorer window is animated as the tests run. At the conclusion of the test run, the pass/fail bar turns green if all tests passed or turns red if any test failed.
Run tests after every build
| Button | Description |
|---|---|
 |
To run your unit tests after each local build, choose Test on the standard menu, and then choose Run Tests After Build on the Test Explorer toolbar. |
Note
Running unit tests after each build requires Visual Studio 2017 Enterprise or Visual Studio 2019. In Visual Studio 2019 it is included in Community and Professional as well as Enterprise.
View test results
As you run, write, and rerun your tests, Test Explorer displays the results in groups of Failed Tests, Passed Tests, Skipped Tests and Not Run Tests. The details pane at the bottom or side of the Test Explorer displays a summary of the test run.
View test details
To view the details of an individual test, select the test.
The test details pane displays the following information:
The source file name and the line number of the test method.
The status of the test.
The elapsed time that the test method took to run.
If the test fails, the details pane also displays:
The message returned by the unit test framework for the test.
The stack trace at the time the test failed.
View the source code of a test method
To display the source code for a test method in the Visual Studio editor, select the test and then choose Open Test on the right-click menu (or press F12).
Group and filter the test list
Test Explorer lets you group your tests into predefined categories. Most unit test frameworks that run in Test Explorer let you define your own categories and category/value pairs to group your tests. You can also filter the list of tests by matching strings against test properties.
Group tests in the test list
To change the way that tests are organized, choose the down arrow next to the Group By button  and select a new grouping criteria.

Test Explorer groups
| Group | Description |
|---|---|
| Duration | Groups test by execution time: Fast, Medium, and Slow. |
| Outcome | Groups tests by execution results: Failed Tests, Skipped Tests, Passed Tests. |
| Traits | Groups test by category/value pairs that you define. The syntax to specify trait categories and values is defined by the unit test framework. |
| Project | Groups test by the name of the projects. |
Traits
A trait is usually a category name/value pair, but it can also be a single category. Traits can be assigned to methods that are identified as a test method by the unit test framework. A unit test framework can define trait categories. You can add values to the trait categories to define your own category name/value pairs. The syntax to specify trait categories and values is defined by the unit test framework.
Traits in the Microsoft Unit Testing Framework for Managed Code
In the Microsoft unit test framework for managed apps, you define a trait name/ value pair in a TestPropertyAttribute attribute. The test framework also contains these predefined traits:
| Trait | Description |
|---|---|
| OwnerAttribute | The Owner category is defined by the unit test framework and requires you to provide a string value of the owner. |
| PriorityAttribute | The Priority category is defined by the unit test framework and requires you to provide an integer value of the priority. |
| TestCategoryAttribute | The TestCategory attribute enables you to specify the category of a unit test. |
| TestPropertyAttribute | The TestProperty attribute enables you to define trait category/value pair. |
Traits in the Microsoft Unit Testing Framework for C++
See How to use the Microsoft Unit Testing Framework for C++.
Create custom playlists
You can create and save a list of tests that you want to run or view as a group. When you select a playlist, the tests in the list are displayed in Test Explorer. You can add a test to more than one playlist, and all tests in your project are available when you choose the default All Tests playlist.

To create a playlist, choose one or more tests in Test Explorer. On the right-click menu, choose Add to Playlist > NewPlaylist. Save the file with the name and location that you specify in the Create New Playlist dialog box.
To add tests to a playlist, choose one or more tests in Test Explorer. On the right-click menu, choose Add to Playlist, and then choose the playlist that you want to add the tests to.
To open a playlist, choose Test > Playlist from the Visual Studio menu, and either choose from the list of recently used playlists, or choose Open Playlist to specify the name and location of the playlist.
If individual tests have no dependencies that prevent them from being run in any order, turn on parallel test execution with the toggle button on the toolbar. This can noticeably reduce the time taken to run all the tests.
Search and filter the test list
You can also use Test Explorer search filters to limit the test methods in your projects that you view and run.
When you type a string in the Test Explorer search box and choose Enter, the test list is filtered to display only those tests whose fully qualified names contain the string.
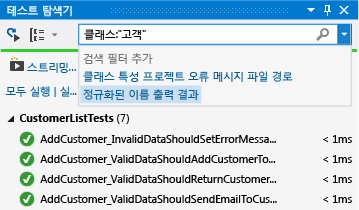
To filter by a different criteria:
Open the drop-down list to the right of the search box.
Choose a new criteria.
Enter the filter value between the quotation marks. If you want to search for an exact match on the string instead of a containing match use an equals sign (=) instead of the colon (:).
Note
Searches are case insensitive and match the specified string to any part of the criteria value.
| Qualifier | Description |
|---|---|
| Trait | Searches both trait category and value for matches. The syntax to specify trait categories and values are defined by the unit test framework. |
| Project | Searches the test project names for matches. |
| Error Message | Searches the user-defined error messages returned by failed asserts for matches. |
| File Path | Searches the fully qualified file name of test source files for matches. |
| Fully Qualified Name | Searches the fully qualified name of test namespaces, classes, and methods for matches. |
| Output | Searches the user-defined error messages that are written to standard output (stdout) or standard error (stderr). The syntax to specify output messages are defined by the unit test framework. |
| Outcome | Searches the Test Explorer category names for matches: Failed Tests, Skipped Tests, Passed Tests. |
To exclude a subset of the results of a filter, use the following syntax:
FilterName:"Criteria" -FilterName:"SubsetCriteria"
For example, FullName:"MyClass" - FullName:"PerfTest" returns all tests that include "MyClass" in their name, except tests that also include "PerfTest" in their name.
Analyze unit test code coverage
You can determine the amount of product code that is actually being tested by your unit tests by using the Visual Studio code coverage tool that's available in Visual Studio Enterprise edition. You can run code coverage on selected tests or on all tests in a solution.
To run code coverage for test methods in a solution:
Choose Test on the top menu bar and then choose Analyze code coverage.
Choose one of the following commands from the sub-menu:
Selected tests runs the test methods that you have selected in Test Explorer.
All tests runs all the test methods in the solution.
The Code Coverage Results window displays the percentage of the blocks of product code that were exercised by line, function, class, namespace and module.
For more information, see Use code coverage to determine how much code is being tested.
Test shortcuts
Tests can be run from Test Explorer by right-clicking in the code editor on a test and selecting Run test or by using the default Test Explorer shortcuts in Visual Studio. Some of the shortcuts are context-based. This means that they run or debug tests based on where your cursor is in the code editor. If your cursor is inside a test method, then that test method runs. If your cursor is at the class level, then all the tests in that class run. This is the same for the namespace level as well.
| Frequent Commands | Keyboard Shortcuts |
|---|---|
| TestExplorer.DebugAllTestsInContext | Ctrl+R, Ctrl+T |
| TestExplorer.RunAllTestsInContext | Ctrl+R, T |
| TestExplorer.RunAllTests | Ctrl+R, A |
| TestExplorer.RepeatLastRun | Ctrl+R, L |
Note
You can't run a test in an abstract class, because tests are only defined in abstract classes and not instantiated. To run tests in abstract classes, create a class that derives from the abstract class.