필기 보기를 사용한 텍스트 입력
참고 항목
필기 보기는 Windows 앱 SDK의 텍스트 컨트롤에서 지원되지 않습니다. 이 문서는 UWP 앱에만 적용됩니다.

TextBox, RichEditBox, AutoSuggestBox 같은 UWP 텍스트 입력 컨트롤에 기본 제공되는 필기 보기(잉크-텍스트 입력용)를 사용자 지정합니다.
개요
UWP 텍스트 입력 컨트롤은 사용자가 펜을 사용하여 텍스트 입력 상자를 탭할 때 필기 표면으로 변환하여 Windows Ink를 사용하여 펜 입력을 지원합니다.
사용자가 필기 표면의 아무 곳에 필기하면 텍스트가 인식되고, 후보 창에 인식 결과가 표시됩니다. 사용자는 결과를 터치하여 선택하거나 필기를 계속하여 제안된 후보를 수락할 수 있습니다. 리터럴(글자별) 인식 결과가 후보 창에 포함되므로 인식 범위가 사전의 단어로 제한되지 않습니다. 사용자가 필기하면 수락된 텍스트 입력이 스크립트 글꼴로 변환되므로 자연스럽게 필기하는 느낌이 유지됩니다.
참고 항목
필기 보기는 기본적으로 사용하도록 설정되지만, 컨트롤마다 사용하지 않도록 설정하고 텍스트 입력 패널로 되돌릴 수 있습니다.
다음과 같이 사용자는 표준 제스처 및 작업을 사용하여 텍스트를 편집할 수 있습니다.
- 취소선 또는 지우기 - 단어나 단어의 일부를 삭제하는 관통선 그리기
- 조인 - 단어 사이에 호를 그려서 단어 간 공백 삭제
- 삽입 - 캐럿 기호를 그려서 공백 삽입
- 덮어쓰기 - 기존 텍스트 위에 써서 기존 텍스트를 대체
필기 보기 사용 안 함
기본 필기 보기는 기본적으로 사용됩니다.
애플리케이션에서 이미 동일한 잉크-텍스트 변환 기능을 제공하고 있거나 텍스트 입력 환경이 필기를 통해 사용할 수 없는 형식 지정 또는 특수 문자를 사용하는 경우에는 필기 보기를 사용하지 않도록 설정할 수 있습니다.
이 예에서는 TextBox 컨트롤의 IsHandwritingViewEnabled 속성을 false로 설정하여 필기 보기를 사용하지 않겠습니다. 필기 보기를 지원하는 모든 텍스트 컨트롤은 비슷한 속성을 지원합니다.
<TextBox Name="SampleTextBox"
Height="50" Width="500"
FontSize="36" FontFamily="Segoe UI"
PlaceholderText="Try taping with your pen"
IsHandwritingViewEnabled="False">
</TextBox>
필기 보기의 맞춤 지정
필기 보기는 기본 텍스트 컨트롤 위에 있으며 사용자의 필기 기본 설정에 맞게 크기가 조정됩니다(설정 -> Bluetooth & 디바이스 -> 펜 & Windows Ink -> 필기 -> 글꼴 크기 참조). 이 보기는 자동으로 앱 내의 텍스트 컨트롤 및 위치를 기준으로 맞춰집니다.
애플리케이션 UI는 더 큰 컨트롤에 맞게 재배치되지 않으므로 중요한 UI를 가릴 수 있습니다.
다음 코드 조각은 TextBoxHandwritingView의 PlacementAlignment 속성을 사용하여 기본 텍스트 컨트롤의 어떤 앵커를 필기 보기 맞춤에 사용할 것인지 지정하는 방법을 보여줍니다.
<TextBox Name="SampleTextBox"
Height="50" Width="500"
FontSize="36" FontFamily="Segoe UI"
PlaceholderText="Try taping with your pen">
<TextBox.HandwritingView>
<HandwritingView PlacementAlignment="TopLeft"/>
</TextBox.HandwritingView>
</TextBox>
자동 완성 후보 사용 안 함
텍스트 제안 팝업은 기본적으로 사용하도록 설정되어 있습니다. 기본 후보가 올바르지 않은 경우 사용자가 선택할 수 있는 상위 잉크 인식 후보 목록을 제공합니다.
애플리케이션에서 이미 강력한 사용자 지정 인식 기능을 제공하는 경우 다음 예처럼 AreCandidatesEnabled 속성을 사용하여 기본 제안을 사용하지 않도록 설정할 수 있습니다.
<TextBox Name="SampleTextBox"
Height="50" Width="500"
FontSize="36" FontFamily="Segoe UI"
PlaceholderText="Try taping with your pen">
<TextBox.HandwritingView>
<HandwritingView AreCandidatesEnabled="False"/>
</TextBox.HandwritingView>
</TextBox>
필기 글꼴 기본 설정 사용
사용자는 잉크 인식에 따라 미리 정의된 필기 기반 글꼴 컬렉션에서 텍스트를 렌더링할 때 사용할 글꼴을 선택할 수 있습니다(설정 -> Bluetooth & 디바이스 -> 펜 & Windows Ink -> 필기 -> 글꼴).
앱은 이 설정에 액세스하여 텍스트 컨트롤에서 인식된 텍스트에 대해 선택된 글꼴을 사용할 수 있습니다.
이 예에서는 TextBox의 TextChanged 이벤트를 수신 대기하다가 텍스트 변경이 HandwritingView에서 시작한 경우 사용자가 선택한 글꼴을 적용합니다(그렇지 않으면 기본 글꼴 적용).
private void SampleTextBox_TextChanged(object sender, TextChangedEventArgs e)
{
((TextBox)sender).FontFamily =
((TextBox)sender).HandwritingView.IsOpen ?
new FontFamily(PenAndInkSettings.GetDefault().FontFamilyName) :
new FontFamily("Segoe UI");
}
복합 컨트롤에서 HandwritingView 액세스
TextBox 또는 RichEditBox 컨트롤(예: AutoSuggestBox)을 사용하는 복합 컨트롤도 HandwritingView를 지원합니다.
복합 컨트롤의 HandwritingView에 액세스하려면 VisualTreeHelper API를 사용합니다.
다음 XAML 코드 조각은 AutoSuggestBox 컨트롤을 표시합니다.
<AutoSuggestBox Name="SampleAutoSuggestBox"
Height="50" Width="500"
PlaceholderText="Auto Suggest Example"
FontSize="16" FontFamily="Segoe UI"
Loaded="SampleAutoSuggestBox_Loaded">
</AutoSuggestBox>
해당 코드 숨김에서는 AutoSuggestBox에서 HandwritingView를 해제하는 방법을 보여줍니다.
먼저 요소의 Loaded 이벤트를 처리하고
FindInnerTextBox함수를 호출하여 시각적 트리 순회를 시작합니다.private void SampleAutoSuggestBox_Loaded(object sender, RoutedEventArgs e) { if (FindInnerTextBox((AutoSuggestBox)sender)) autoSuggestInnerTextBox.IsHandwritingViewEnabled = false; }FindInnerTextBox함수에서FindVisualChildByName함수를 호출하여 시각적 트리(AutoSuggestBox에서 시작)를 반복합니다.private bool FindInnerTextBox(AutoSuggestBox autoSuggestBox) { if (autoSuggestInnerTextBox == null) { // Cache textbox to avoid multiple tree traversals. autoSuggestInnerTextBox = (TextBox)FindVisualChildByName<TextBox>(autoSuggestBox); } return (autoSuggestInnerTextBox != null); } ```마지막으로,
FindVisualChildByName함수는 TextBox가 검색될 때까지 시각적 트리를 반복합니다.private FrameworkElement FindVisualChildByName<T>(DependencyObject obj) { FrameworkElement element = null; int childrenCount = VisualTreeHelper.GetChildrenCount(obj); for (int i = 0; (i < childrenCount) && (element == null); i++) { FrameworkElement child = (FrameworkElement)VisualTreeHelper.GetChild(obj, i); if ((child.GetType()).Equals(typeof(T)) || (child.GetType().GetTypeInfo().IsSubclassOf(typeof(T)))) { element = child; } else { element = FindVisualChildByName<T>(child); } } return (element); } ```
HandwritingView 위치 변경
HandwritingView의 범위에 UI 요소가 포함되는지 확인하고, 그렇지 않으면 포함해야 하는 경우가 있습니다.
여기서는 받아쓰기를 지원하는 TextBox를 만듭니다(StackPanel에 TextBox와 받아쓰기 단추를 배치하여 구현).

이제 StackPanel이 TextBox보다 크기 때문에 HandwritingView가 모든 복합 컨트롤을 가리지는 않을 것입니다.

이 문제를 해결하려면 HandwritingView의 PlacementTarget 속성을 맞춰야 하는 UI 요소로 설정합니다.
<StackPanel Name="DictationBox"
Orientation="Horizontal"
VerticalAlignment="Top"
HorizontalAlignment="Left"
BorderThickness="1" BorderBrush="DarkGray"
Height="55" Width="500" Margin="50">
<TextBox Name="DictationTextBox"
Width="450" BorderThickness="0"
FontSize="24" VerticalAlignment="Center">
<TextBox.HandwritingView>
<HandwritingView PlacementTarget="{Binding ElementName=DictationBox}"/>
</TextBox.HandwritingView>
</TextBox>
<Button Name="DictationButton"
Height="48" Width="48"
FontSize="24"
FontFamily="Segoe MDL2 Assets"
Content=""
Background="White" Foreground="DarkGray" Tapped="DictationButton_Tapped" />
</StackPanel>
HandwritingView 크기 조정
HandwritingView의 크기를 설정할 수도 있습니다. 보기가 중요한 UI를 가리지 않아야 할 때 유용한 기능입니다.
이전 예제와 마찬가지로, 받아쓰기를 지원하는 TextBox를 만듭니다(StackPanel에 TextBox와 받아쓰기 단추를 배치하여 구현).
이 경우 받아쓰기 단추가 표시되도록 HandwritingView의 크기를 조정합니다.

그러기 위해 HandwritingView의 MaxWidth 속성을 가려야 하는 UI 요소의 너비로 바인딩합니다.
<StackPanel Name="DictationBox"
Orientation="Horizontal"
VerticalAlignment="Top"
HorizontalAlignment="Left"
BorderThickness="1"
BorderBrush="DarkGray"
Height="55" Width="500"
Margin="50">
<TextBox Name="DictationTextBox"
Width="450"
BorderThickness="0"
FontSize="24"
VerticalAlignment="Center">
<TextBox.HandwritingView>
<HandwritingView
PlacementTarget="{Binding ElementName=DictationBox}"
MaxWidth="{Binding ElementName=DictationTextBox, Path=Width"/>
</TextBox.HandwritingView>
</TextBox>
<Button Name="DictationButton"
Height="48" Width="48"
FontSize="24"
FontFamily="Segoe MDL2 Assets"
Content=""
Background="White" Foreground="DarkGray"
Tapped="DictationButton_Tapped" />
</StackPanel>
사용자 지정 UI 위치 변경
정보 팝업처럼 텍스트 입력에 응답하여 나타나는 사용자 지정 UI가 있는 경우 필기 보기를 가리지 않도록 UI 위치를 변경해야 할 수도 있습니다.
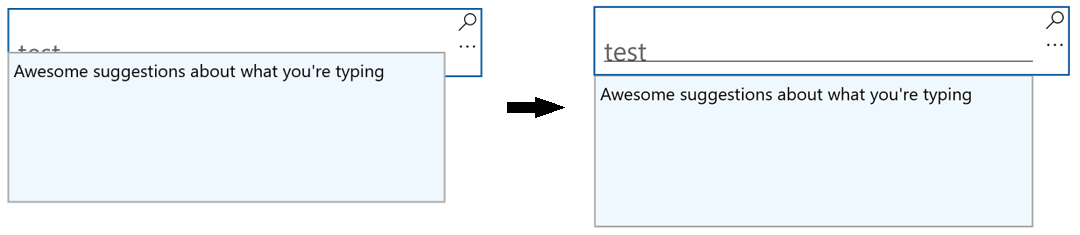
다음 예제에서는 Popup의 위치를 설정하기 위해 HandwritingView의 Opened, Closed 및 SizeChanged 이벤트를 수신 대기하는 방법을 보여줍니다.
private void Search_HandwritingViewOpened(
HandwritingView sender, HandwritingPanelOpenedEventArgs args)
{
UpdatePopupPositionForHandwritingView();
}
private void Search_HandwritingViewClosed(
HandwritingView sender, HandwritingPanelClosedEventArgs args)
{
UpdatePopupPositionForHandwritingView();
}
private void Search_HandwritingViewSizeChanged(
object sender, SizeChangedEventArgs e)
{
UpdatePopupPositionForHandwritingView();
}
private void UpdatePopupPositionForHandwritingView()
{
if (CustomSuggestionUI.IsOpen)
CustomSuggestionUI.VerticalOffset = GetPopupVerticalOffset();
}
private double GetPopupVerticalOffset()
{
if (SearchTextBox.HandwritingView.IsOpen)
return (SearchTextBox.Margin.Top + SearchTextBox.HandwritingView.ActualHeight);
else
return (SearchTextBox.Margin.Top + SearchTextBox.ActualHeight);
}
HandwritingView 컨트롤의 템플릿 다시 작성
모든 XAML 프레임워크 컨트롤과 마찬가지로, 요구 사항에 맞게 HandwritingView의 시각적 구조와 시각적 동작을 사용자 지정할 수 있습니다.
사용자 지정 템플릿을 만드는 전체 예는 사용자 지정 전송 컨트롤 만들기 방법 또는 사용자 지정 편집 컨트롤 샘플을 확인하세요.

Windows developer
피드백
출시 예정: 2024년 내내 콘텐츠에 대한 피드백 메커니즘으로 GitHub 문제를 단계적으로 폐지하고 이를 새로운 피드백 시스템으로 바꿀 예정입니다. 자세한 내용은 다음을 참조하세요. https://aka.ms/ContentUserFeedback
다음에 대한 사용자 의견 제출 및 보기