특수화된 조각 클래스
조각 API는 애플리케이션에서 찾아볼 수 있는 보다 일반적인 기능이 일부 포함된 다른 서브클래스를 제공합니다. 이러한 서브클래스는 다음과 같습니다.
ListFragment – 이 조각은 배열 또는 커서와 같은 데이터 원본에 바인딩된 항목 목록을 표시하는 데 사용됩니다.
DialogFragment – 이 조각은 대화 상자 주위의 래퍼로 사용됩니다. 이 조각은 해당 작업 위에 대화 상자를 표시합니다.
PreferenceFragment – 이 조각은 기본 설정 개체를 목록으로 표시하는 데 사용됩니다.
ListFragment
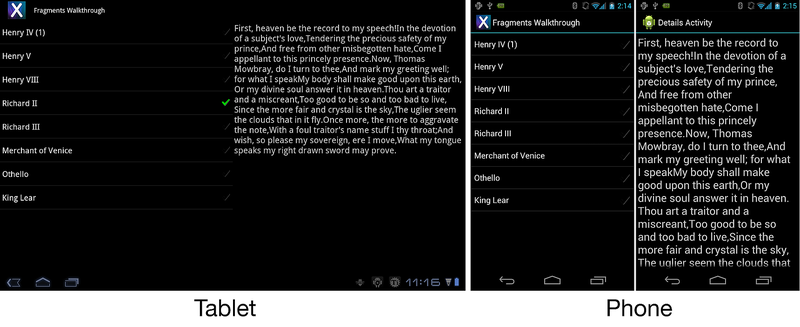
ListFragment는 개념과 기능이 ListActivity와 매우 비슷하며, 조각에서 ListView를 호스트하는 래퍼입니다. 아래 이미지는 태블릿 및 휴대폰에서 실행되는 ListFragment를 보여줍니다.
ListAdapter로 데이터 바인딩
ListFragment 클래스가 이미 기본 레이아웃을 제공하므로 ListFragment 콘텐츠를 표시하도록 OnCreateView를 재정의할 필요가 없습니다. ListView는 ListAdapter 구현을 사용하여 데이터에 바인딩됩니다. 다음 예에서는 간단한 문자열 배열을 사용해서 이를 수행하는 방법을 보여줍니다.
public override void OnActivityCreated(Bundle savedInstanceState)
{
    base.OnActivityCreated(savedInstanceState);
    string[] values = new[] { "Android", "iPhone", "WindowsMobile",
                "Blackberry", "WebOS", "Ubuntu", "Windows7", "Max OS X",
                "Linux", "OS/2" };
    this.ListAdapter = new ArrayAdapter<string>(Activity, Android.Resource.Layout.SimpleExpandableListItem1, values);
}
ListAdapter를 설정할 때는 ListView.ListAdapter 속성이 아닌 ListFragment.ListAdapter 속성을 사용하는 것이 중요합니다. ListView.ListAdapter를 사용하면 중요한 초기화 코드를 건너뜁니다.
사용자 선택에 응답
사용자 선택에 응답하기 위해서는 애플리케이션이 OnListItemClick 메서드를 재정의해야 합니다. 다음 예에서는 한 가지 가능한 방법을 보여줍니다.
public override void OnListItemClick(ListView l, View v, int index, long id)
{
    // We can display everything in place with fragments.
    // Have the list highlight this item and show the data.
    ListView.SetItemChecked(index, true);

    // Check what fragment is shown, replace if needed.
    var details = FragmentManager.FindFragmentById<DetailsFragment>(Resource.Id.details);
    if (details == null || details.ShownIndex != index)
    {
        // Make new fragment to show this selection.
        details = DetailsFragment.NewInstance(index);

        // Execute a transaction, replacing any existing
        // fragment with this one inside the frame.
        var ft = FragmentManager.BeginTransaction();
        ft.Replace(Resource.Id.details, details);
        ft.SetTransition(FragmentTransit.FragmentFade);
        ft.Commit();
    }
}
위 코드에서 사용자가 ListFragment에서 항목을 선택하면 새 조각이 호스팅 작업에 표시되어, 선택된 항목에 대한 추가 세부 정보가 표시됩니다.
DialogFragment
DialogFragment는 작업의 창 위에 표시되는 부동 조각 내에 대화 상자 개체를 표시하기 위해 사용되는 조각입니다. 이 조각은 관리되는 대화 상자 API 대신 사용됩니다(Android 3.0에서 시작). 다음 스크린샷은 DialogFragment의 예제를 보여줍니다.
DialogFragment는 조각과 대화상자 사이의 상태가 일관되게 유지되도록 보장합니다. 대화 상자 개체에 대한 모든 상호 작용 및 제어는 DialogFragment API를 통해 수행되어야 하며, 대화 상자 개체에서 직접 호출로 수행되지 않아야 합니다. DialogFragment API는 각 인스턴스에 조각을 표시하기 위해 사용되는 Show() 메서드를 제공합니다. 조각을 없애는 방법은 두 가지입니다.
인스턴스를 호출
DialogFragment.Dismiss()합니다DialogFragment.다른
DialogFragment를 표시합니다.
DialogFragment를 만들기 위해서는 클래스가 Android.App.DialogFragment,에서 상속을 받은 후, 다음 두 메서드 중 하나를 재정의합니다.
OnCreateView – 뷰를 만들고 반환합니다.
OnCreateDialog – 사용자 지정 대화 상자를 만듭니다. 일반적으로 AlertDialog를 표시하기 위해 사용됩니다. 이 메서드를 재정의할 때는
OnCreateView를 재정의할 필요가 없습니다.
간단한 DialogFragment
다음 스크린샷은 TextView 1개와 Button 2개가 포함된 간단한 DialogFragment를 보여줍니다.
TextView는 DialogFragment에서 사용자가 하나의 단추를 클릭한 횟수를 보여줍니다. 다른 버튼을 클릭하면 이 조각이 닫힙니다. DialogFragment 코드는 다음과 같습니다.
public class MyDialogFragment : DialogFragment
{
    private int _clickCount;
    public override void OnCreate(Bundle savedInstanceState)
    {
        _clickCount = 0;
    }

    public override View OnCreateView(LayoutInflater inflater, ViewGroup container, Bundle savedInstanceState)
    {
        base.OnCreate(savedInstanceState)

        var view = inflater.Inflate(Resource.Layout.dialog_fragment_layout, container, false);
        var textView = view.FindViewById<TextView>(Resource.Id.dialog_text_view);

        view.FindViewById<Button>(Resource.Id.dialog_button).Click += delegate
            {
                textView.Text = "You clicked the button " + _clickCount++ + " times.";
            };

        // Set up a handler to dismiss this DialogFragment when this button is clicked.
        view.FindViewById<Button>(Resource.Id.dismiss_dialog_button).Click += (sender, args) => Dismiss();
        return view;
        }
    }
}
조각 표시
모든 조각과 마찬가지로 DialogFragment는 FragmentTransaction의 컨텍스트로 표시됩니다.
DialogFragment의 Show() 메서드는 FragmentTransaction 및 string을 입력으로 사용합니다. 이 대화 상자가 작업에 추가되고 FragmentTransaction이 커밋됩니다.
다음 코드는 한 작업이 Show() 메서드를 사용하여 DialogFragment를 표시할 수 있는 한 가지 가능한 방법을 보여줍니다.
public void ShowDialog()
{
    var transaction = FragmentManager.BeginTransaction();
    var dialogFragment = new MyDialogFragment();
    dialogFragment.Show(transaction, "dialog_fragment");
}
조각 해제
DialogFragment의 인스턴스에서 Dismiss()를 호출하면 작업에서 조각이 제거되고 해당 트랜잭션이 커밋됩니다.
조각 삭제와 관련된 표준 조각 수명 주기 메서드가 호출됩니다.
경고 대화 상자
OnCreateView를 재정의하는 대신 DialogFragment가 OnCreateDialog를 재정의할 수 있습니다. 이렇게 하면 애플리케이션이 조각으로 관리되는 AlertDialog를 만들 수 있습니다. 다음 코드는 Dialog를 만들기 위해 AlertDialog.Builder를 사용하는 예입니다.
public class AlertDialogFragment : DialogFragment
{
    public override Dialog OnCreateDialog(Bundle savedInstanceState)
    {
        EventHandler<DialogClickEventArgs> okhandler;
        var builder = new AlertDialog.Builder(Activity)
            .SetMessage("This is my dialog.")
            .SetPositiveButton("Ok", (sender, args) =>
                                         {
                                             // Do something when this button is clicked.
                                         })
            .SetTitle("Custom Dialog");
        return builder.Create();
    }
}
PreferenceFragment
기본 설정 관리를 돕기 위해 조각 API는 PreferenceFragment 서브클래스를 제공합니다. PreferenceActivity PreferenceFragment 와 유사합니다. 조각에서 사용자에게 기본 설정 계층 구조를 표시합니다. 사용자가 기본 설정과 상호 작용하면 SharedPreferences에 자동으로 저장됩니다.
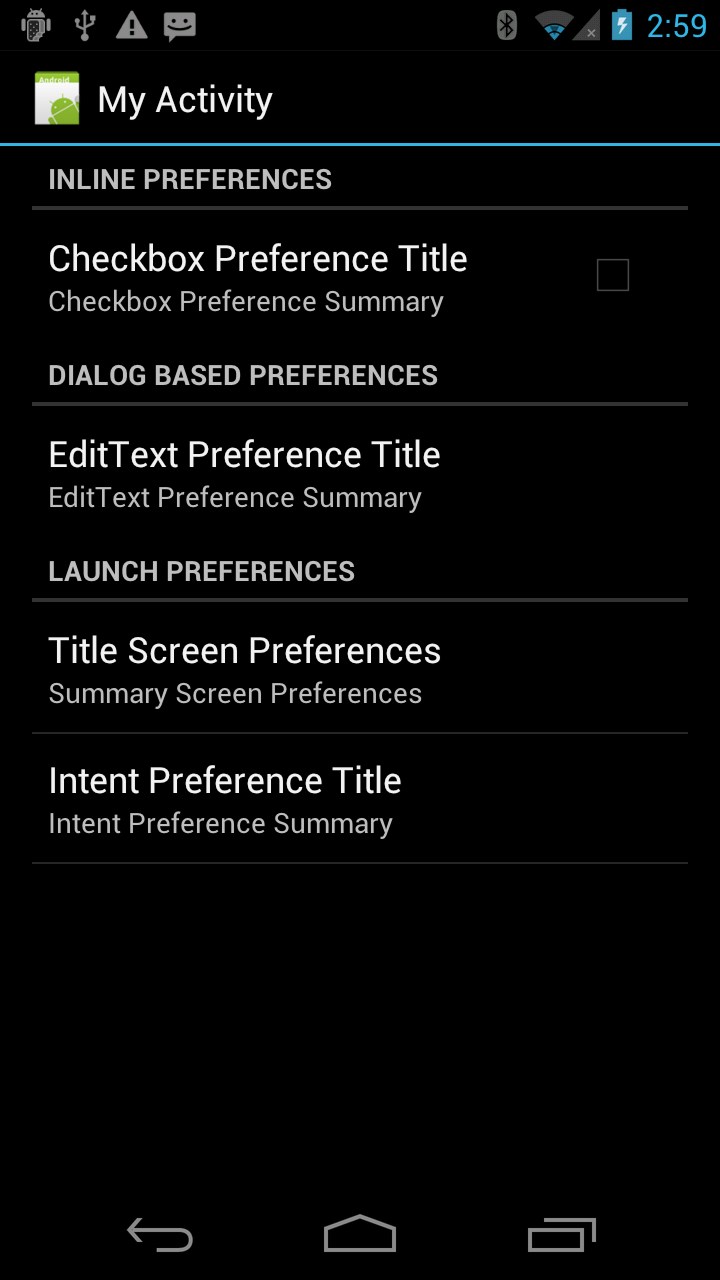
Android 3.0 이상 애플리케이션에서는 PreferenceFragment를 사용하여 애플리케이션의 기본 설정을 처리합니다. 다음 그림은 PreferenceFragment의 예를 보여줍니다.
리소스에서 기본 설정 조각 만들기
기본 설정 조각은 PreferenceFragment.AddPreferencesFromResource 메서드를 사용하여 XML 리소스 파일로부터 확장될 수 있습니다. 조각의 수명 주기에서 이 메서드를 호출하기 위한 논리적 위치는 OnCreate 메서드 내부입니다.
위에 표시된 PreferenceFragment는 XML에서 리소스를 로드하여 생성되었습니다. 이 리소스 파일은 다음과 같습니다.
<?xml version="1.0" encoding="utf-8"?>

<PreferenceScreen xmlns:android="http://schemas.android.com/apk/res/android">

  <PreferenceCategory android:title="Inline Preferences">
    <CheckBoxPreference android:key="checkbox_preference"
                        android:title="Checkbox Preference Title"
                        android:summary="Checkbox Preference Summary" />

  </PreferenceCategory>

  <PreferenceCategory android:title="Dialog Based Preferences">

    <EditTextPreference android:key="edittext_preference"
                        android:title="EditText Preference Title"
                        android:summary="EditText Preference Summary"
                        android:dialogTitle="Edit Text Preferrence Dialog Title" />

  </PreferenceCategory>

  <PreferenceCategory android:title="Launch Preferences">

    <!-- This PreferenceScreen tag serves as a screen break (similar to page break
             in word processing). Like for other preference types, we assign a key
             here so it is able to save and restore its instance state. -->
    <PreferenceScreen android:key="screen_preference"
                      android:title="Title Screen Preferences"
                      android:summary="Summary Screen Preferences">

      <!-- You can place more preferences here that will be shown on the next screen. -->

      <CheckBoxPreference android:key="next_screen_checkbox_preference"
                          android:title="Next Screen Toggle Preference Title"
                          android:summary="Next Screen Toggle Preference Summary" />

    </PreferenceScreen>

    <PreferenceScreen android:title="Intent Preference Title"
                      android:summary="Intent Preference Summary">

      <intent android:action="android.intent.action.VIEW"
              android:data="http://www.android.com" />

    </PreferenceScreen>

  </PreferenceCategory>

</PreferenceScreen>
기본 설정 조각의 코드는 다음과 같습니다.
public class PrefFragment : PreferenceFragment
{
    public override void OnCreate(Bundle savedInstanceState)
    {
        base.OnCreate(savedInstanceState);
        AddPreferencesFromResource(Resource.Xml.preferences);
    }
}
작업 쿼리로 기본 설정 조각 만들기
PreferenceFragment를 만들기 위한 또 다른 방법에는 작업 쿼리가 포함됩니다. 각 활동은 XML 리소스 파일을 가리키는 METADATA_KEY_PREFERENCE 특성을 사용할 수 있습니다. Xamarin.Android에서 이 작업은 작업에 MetaDataAttribute를 포함하고 사용할 리소스 파일을 지정하여 수행됩니다. PreferenceFragment 클래스는 이 XML 리소스를 찾고 기본 설정 계층을 확장하기 위한 작업을 쿼리하기 위해 사용될 수 있는 AddPreferenceFromIntent 메서드를 제공합니다.
이 프로세스의 예는 AddPreferencesFromIntent를 사용하여 PreferenceFragment를 만드는 다음 코드 조각에 제공되어 있습니다.
public class MyPreferenceFragment : PreferenceFragment
{
    public override void OnCreate(Bundle savedInstanceState)
    {
        base.OnCreate(savedInstanceState);
        var intent = new Intent(this.Activity, typeof (MyActivityWithPreferences));
        AddPreferencesFromIntent(intent);
    }
}
Android가 MyActivityWithPreference 클래스를 확인합니다. 다음 코드 조각에 표시된 것처럼 클래스에 MetaDataAttribute,을 포함해야 합니다.
[Activity(Label = "My Activity with Preferences")]
[MetaData(PreferenceManager.MetadataKeyPreferences, Resource = "@xml/preference_from_intent")]
public class MyActivityWithPreferences : Activity
{
    protected override void OnCreate(Bundle bundle)
    {
        base.OnCreate(bundle);
        // This is deliberately blank
    }
}
MetaDataAttribute는 기본 설정 계층 구조 확장을 위해 PreferenceFragment에 사용되는 XML 리소스 파일을 선언합니다. MetatDataAttribute가 제공되지 않았으면 런타임에 예외가 throw됩니다. 이 코드가 실행되면 다음 스크린샷에서와 같이 PreferenceFragment가 표시됩니다.


