Xamarin.iOS에서 경고 표시
iOS 8부터 UIAlertController는 대체된 UIActionSheet 및 UIAlertView를 완료했으며, 이 둘 다 이제 더 이상 사용되지 않습니다.
UIView의 하위 클래스인 대체된 클래스와 달리 UIAlertController는 UIViewController의 하위 클래스입니다.
표시할 경고 유형을 나타내는 데 사용합니다 UIAlertControllerStyle . 이러한 경고 유형은 다음과 같습니다.
- UIAlertControllerStyleActionSheet
- iOS 8 이전은 UIActionSheet였을 것입니다.
- UIAlertControllerStyleAlert
- iOS 8 이전은 UIAlertView였을 것입니다.
경고 컨트롤러를 만들 때 수행해야 하는 세 가지 단계는 다음과 같습니다.
다음을 사용하여 경고를 만들고 구성합니다.
- title
- message
- preferredStyle
(선택 사항) 텍스트 필드 추가
필수 작업 추가
뷰 컨트롤러 표시
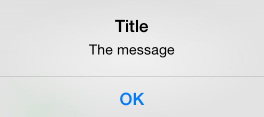
이 스크린샷에 표시된 것처럼 가장 간단한 경고에는 단일 단추가 포함됩니다.
간단한 경고를 표시하는 코드는 다음과 같습니다.
okayButton.TouchUpInside += (sender, e) => {

    //Create Alert
    var okAlertController = UIAlertController.Create ("Title", "The message", UIAlertControllerStyle.Alert);

    //Add Action
    okAlertController.AddAction (UIAlertAction.Create ("OK", UIAlertActionStyle.Default, null));

    // Present Alert
    PresentViewController (okAlertController, true, null);
};
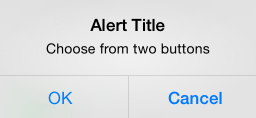
여러 옵션을 사용하여 경고를 표시하는 작업은 비슷한 방식으로 수행되지만 두 가지 작업을 추가합니다. 예를 들어 다음 스크린샷은 두 개의 단추가 있는 경고를 보여 줍니다.
okayCancelButton.TouchUpInside += ((sender, e) => {

    //Create Alert
    var okCancelAlertController = UIAlertController.Create("Alert Title", "Choose from two buttons", UIAlertControllerStyle.Alert);

    //Add Actions
    okCancelAlertController.AddAction(UIAlertAction.Create("OK", UIAlertActionStyle.Default, alert => Console.WriteLine ("Okay was clicked")));
    okCancelAlertController.AddAction(UIAlertAction.Create("Cancel", UIAlertActionStyle.Cancel, alert => Console.WriteLine ("Cancel was clicked")));

    //Present Alert
    PresentViewController(okCancelAlertController, true, null);
});
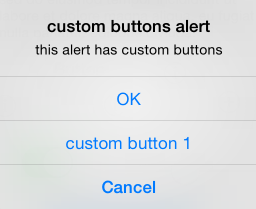
경고는 아래 스크린샷과 유사한 작업 시트를 표시할 수도 있습니다.
단추는 다음과 같은 방법으로 경고에 AddAction 추가됩니다.
actionSheetButton.TouchUpInside += ((sender, e) => {

    // Create a new Alert Controller
    UIAlertController actionSheetAlert = UIAlertController.Create("Action Sheet", "Select an item from below", UIAlertControllerStyle.ActionSheet);

    // Add Actions
    actionSheetAlert.AddAction(UIAlertAction.Create("OK",UIAlertActionStyle.Default, (action) => Console.WriteLine ("Item One pressed.")));

    actionSheetAlert.AddAction(UIAlertAction.Create("custom button 1",UIAlertActionStyle.Default, (action) => Console.WriteLine ("Item Two pressed.")));

    actionSheetAlert.AddAction(UIAlertAction.Create("Cancel",UIAlertActionStyle.Cancel, (action) => Console.WriteLine ("Cancel button pressed.")));

    // Required for iPad - You must specify a source for the Action Sheet since it is
    // displayed as a popover
    UIPopoverPresentationController presentationPopover = actionSheetAlert.PopoverPresentationController;
    if (presentationPopover!=null) {
        presentationPopover.SourceView = this.View;
        presentationPopover.PermittedArrowDirections = UIPopoverArrowDirection.Up;
    }

    // Display the alert
    this.PresentViewController(actionSheetAlert,true,null);
});