SkiaSharp의 3D 회전
비아핀 변환을 사용하여 3D 공간에서 2D 개체를 회전합니다.
비아핀 변환의 일반적인 애플리케이션 중 하나는 3D 공간에서 2D 개체의 회전을 시뮬레이션하는 것입니다.

이 작업에는 3차원 회전을 사용한 다음 이러한 3D 회전을 수행하는 비아핀 SKMatrix 변환을 파생하는 작업이 포함됩니다.
2차원 내에서만 작동하는 이 SKMatrix 변환을 개발하기는 어렵습니다. 이 3x3 행렬이 3D 그래픽에 사용되는 4x4 행렬에서 파생되면 작업이 훨씬 쉬워집니다. SkiaSharp에는 이러한 목적을 위한 클래스가 포함되어 SKMatrix44 있지만 3D 회전 및 4x4 변환 매트릭스를 이해하려면 3D 그래픽의 일부 배경이 필요합니다.
3차원 좌표계는 Z라는 세 번째 축을 추가합니다. 개념적으로 Z축은 화면에 직각입니다. 3D 공간의 좌표점은 세 개의 숫자(x, y, z)로 표시됩니다. 이 문서에 사용된 3D 좌표계에서 X의 값을 늘리면 2차원과 마찬가지로 Y의 값이 감소합니다. 양수 Z 값을 늘리면 화면이 나타납니다. 원점은 2D 그래픽과 마찬가지로 왼쪽 위 모서리입니다. 화면을 이 평면의 직각으로 Z축이 있는 XY 평면으로 생각할 수 있습니다.
이를 왼쪽 좌표계라고 합니다. 왼손의 집게 손가락이 양수 X 좌표의 방향(오른쪽)으로 가리키고 가운데 손가락이 Y 좌표(아래쪽)를 증가시키는 방향으로 가리키면 엄지 손가락이 Z 좌표를 늘리는 방향으로 가리키고 화면에서 확장됩니다.
3D 그래픽에서 변환은 4x4 행렬을 기반으로 합니다. 다음은 4-by-4 ID 행렬입니다.
|  1  0  0  0  |
|  0  1  0  0  |
|  0  0  1  0  |
|  0  0  0  1  |
4-by-4 행렬을 사용하는 경우 행 및 열 번호로 셀을 식별하는 것이 편리합니다.
|  M11  M12  M13  M14  |
|  M21  M22  M23  M24  |
|  M31  M32  M33  M34  |
|  M41  M42  M43  M44  |
그러나 SkiaSharp Matrix44 클래스는 약간 다릅니다. 개별 셀 값을 SKMatrix44 설정하거나 가져오는 유일한 방법은 인덱서 사용입니다 Item . 행 및 열 인덱스는 1부터 시작하는 것이 아니라 0부터 시작하며 행과 열이 교환됩니다. 위 다이어그램의 M14 셀은 개체의 인덱서 [3, 0] 로 SKMatrix44 액세스됩니다.
3D 그래픽 시스템에서 3D 점(x, y, z)은 4x4 변환 행렬을 곱하기 위해 1x4 행렬로 변환됩니다.
                 |  M11  M12  M13  M14  |
| x  y  z  1 | × |  M21  M22  M23  M24  | = | x'  y'  z'  w' |
                 |  M31  M32  M33  M34  |
                 |  M41  M42  M43  M44  |
3차원에서 발생하는 2D 변환과 유사하게 3D 변환은 4차원으로 수행되는 것으로 간주됩니다. 네 번째 차원은 W라고 하며, 3D 공간은 W 좌표가 1인 4D 공간 내에 있는 것으로 간주됩니다. 변환 수식은 다음과 같습니다.
x' = M11·x + M21·y + M31·z + M41
y' = M12·x + M22·y + M32·z + M42
z' = M13·x + M23·y + M33·z + M43
w' = M14·x + M24·y + M34·z + M44
변환 수식에서 셀 M11M22M33 은 X, Y 및 Z 방향의 배율 인수이며 M41M42X, Y 및 M43 Z 방향의 변환 요소임을 분명히 알 수 있습니다.
이러한 좌표를 W가 1인 3D 공간으로 다시 변환하려면 x', y' 및 z' 좌표가 모두 w'로 나뉩니다.
x" = x' / w'
y" = y' / w'
z" = z' / w'
w" = w' / w' = 1
w'로 나눠서 3D 공간의 관점을 제공합니다. w'가 1이면 큐브 뷰가 발생하지 않습니다.
3D 공간의 회전은 매우 복잡할 수 있지만 가장 간단한 회전은 X, Y 및 Z 축 주위의 회전입니다. X축을 중심으로 α 각도의 회전은 다음 행렬입니다.
|  1     0       0     0  |
|  0   cos(α)  sin(α)  0  |
|  0  –sin(α)  cos(α)  0  |
|  0     0       0     1  |
X의 값은 이 변환을 적용할 때와 기본 동일합니다. Y축을 중심으로 회전하면 Y 값이 변경되지 않습니다.
|  cos(α)  0  –sin(α)  0  |
|    0     1     0     0  |
|  sin(α)  0   cos(α)  0  |
|    0     0     0     1  |
Z축을 중심으로 회전하는 것은 2D 그래픽과 동일합니다.
|  cos(α)  sin(α)  0  0  |
| –sin(α)  cos(α)  0  0  |
|    0       0     1  0  |
|    0       0     0  1  |
회전 방향은 좌표계의 손수에 의해 암시됩니다. 이는 왼손 시스템이므로 왼손 엄지손가락을 특정 축의 값 증가쪽으로 가리키면 X축을 중심으로 회전하기 위해 오른쪽으로, Y축을 중심으로 회전하기 위해 아래로, Z축을 중심으로 회전하도록 하려면 다른 손가락의 곡선이 양수 각도의 회전 방향을 나타냅니다.
SKMatrix44 에는 일반화된 정적 CreateRotation 및 CreateRotationDegrees 회전이 발생하는 축을 지정할 수 있는 메서드가 있습니다.
public static SKMatrix44 CreateRotationDegrees (Single x, Single y, Single z, Single degrees)
X축을 중심으로 회전하려면 처음 세 개의 인수를 1, 0, 0으로 설정합니다. Y축을 중심으로 회전하려면 0, 1, 0으로 설정하고 Z축을 중심으로 회전하려면 0, 0, 1로 설정합니다.
4 by 4의 네 번째 열은 큐브 뷰용입니다. 큐브 SKMatrix44 뷰 변환을 만드는 메서드는 없지만 다음 코드를 사용하여 직접 만들 수 있습니다.
SKMatrix44 perspectiveMatrix = SKMatrix44.CreateIdentity();
perspectiveMatrix[3, 2] = -1 / depth;
인수 이름의 depth 이유는 곧 알 수 있습니다. 이 코드는 행렬을 만듭니다.
|  1  0  0      0     |
|  0  1  0      0     |
|  0  0  1  -1/depth  |
|  0  0  0      1     |
변환 수식은 다음과 같이 w'를 계산합니다.
w' = –z / depth + 1
이는 Z 값이 0보다 작은 경우(개념적으로 XY 평면 뒤에) X 및 Y 좌표를 줄이고 Z의 양수 값에 대해 X 및 Y 좌표를 늘리는 역할을 합니다. Z 좌표가 depth같으면 w'는 0이고 좌표는 무한이 됩니다. 3차원 그래픽 시스템은 카메라 은유를 중심으로 제작되며 depth , 여기서 값은 좌표계의 원점에서 카메라의 거리를 나타냅니다. 그래픽 개체에 원점의 단위인 depth Z 좌표가 있는 경우 개념적으로 카메라의 렌즈를 터치하고 무한히 커집니다.
회전 행렬과 함께 이 perspectiveMatrix 값을 사용할 수 있습니다. 회전 중인 그래픽 개체의 X 또는 Y 좌표가 depth3D 공간에서 이 개체의 회전보다 큰 depthZ 좌표를 포함할 가능성이 높습니다. 이 작업은 피해야 합니다. 만들 perspectiveMatrix 때 그래픽 개체의 모든 좌표에 대해 회전 방법에 관계없이 충분히 큰 값으로 설정 depth 하려고 합니다. 이렇게 하면 0으로 나눠서는 안 됩니다.
3D 회전과 큐브 뷰를 결합하려면 4-4 매트릭스를 함께 곱해야 합니다. 이를 위해 SKMatrix44 연결 메서드를 정의합니다. 개체이고 B 개체인 경우 A 다음 코드는 SKMatrix44 A를 A × B와 동일하게 설정합니다.
A.PostConcat(B);
2D 그래픽 시스템에서 4x4 변환 매트릭스를 사용하면 2D 개체에 적용됩니다. 이러한 개체는 평평하며 Z 좌표가 0인 것으로 간주됩니다. 변환 곱셈은 앞에서 보여 준 변환보다 약간 더 간단합니다.
                 |  M11  M12  M13  M14  |
| x  y  0  1 | × |  M21  M22  M23  M24  | = | x'  y'  z'  w' |
                 |  M31  M32  M33  M34  |
                 |  M41  M42  M43  M44  |
z 값이 0이면 행렬의 세 번째 행에 셀이 포함되지 않은 변환 수식이 생성됩니다.
x' = M11·x + M21·y + M41
y' = M12·x + M22·y + M42
z' = M13·x + M23·y + M43
w' = M14·x + M24·y + M44
또한 z의 좌표는 여기에서도 관련이 없습니다. 2D 그래픽 시스템에 3D 개체가 표시되면 Z 좌표 값을 무시하여 2차원 개체로 축소됩니다. 변환 수식은 실제로 다음 두 가지입니다.
x" = x' / w'
y" = y' / w'
즉, 4-by-4 행렬의 세 번째 행 과 세 번째 열은 무시될 수 있습니다.
그렇다면 4-by-4 행렬이 애초에 필요한 이유는 무엇일까요?
4 x 4의 세 번째 행과 세 번째 열은 2차원 변환과는 관련이 없지만, 세 번째 행과 열은 다양한 SKMatrix44 값을 함께 곱하기 전에 역할을 수행합니다. 예를 들어 원근 변환을 사용하여 Y축을 중심으로 회전을 곱한다고 가정합니다.
|  cos(α)  0  –sin(α)  0  |   |  1  0  0      0     |   |  cos(α)  0  –sin(α)   sin(α)/depth  |
|    0     1     0     0  | × |  0  1  0      0     | = |    0     1     0           0        |
|  sin(α)  0   cos(α)  0  |   |  0  0  1  -1/depth  |   |  sin(α)  0   cos(α)  -cos(α)/depth  |
|    0     0     0     1  |   |  0  0  0      1     |   |    0     0     0           1        |
제품에서 셀 M14 에 큐브 뷰 값이 포함됩니다. 해당 행렬을 2D 개체에 적용하려면 세 번째 행과 열이 제거되어 3-by-3 행렬로 변환됩니다.
|  cos(α)  0  sin(α)/depth  |
|    0     1       0        |
|    0     0       1        |
이제 2D 지점을 변환하는 데 사용할 수 있습니다.
                |  cos(α)  0  sin(α)/depth  |
|  x  y  1  | × |    0     1       0        | = |  x'  y'  z'  |
                |    0     0       1        |
변환 수식은 다음과 같습니다.
x' = cos(α)·x
y' = y
z' = (sin(α)/depth)·x + 1
이제 모든 항목을 z로 나눕니다.'
x" = cos(α)·x / ((sin(α)/depth)·x + 1)
y" = y / ((sin(α)/depth)·x + 1)
2D 개체가 Y축을 중심으로 양수 각도로 회전하면 양수 X 값이 백그라운드로 물러나고 음수 X 값은 전경으로 이동합니다. Y축에서 가장 먼 좌표가 뷰어에서 더 멀리 이동하거나 뷰어에 가까워지면 X 값이 Y축(코사인 값에 의해 제어됨)에 더 가깝게 이동하는 것처럼 보입니다.
사용하는 SKMatrix44경우 다양한 SKMatrix44 값을 곱하여 모든 3D 회전 및 큐브 뷰 작업을 수행합니다. 그런 다음 클래스의 속성을 사용하여 Matrix 4 x 4 행렬에서 2 차원 3 x 3 행렬을 SKMatrix44 추출 할 수 있습니다. 이 속성은 익숙한 SKMatrix 값을 반환합니다.
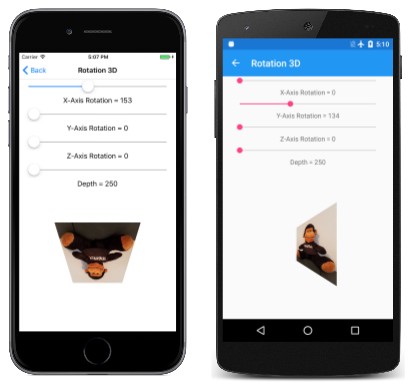
회전 3D 페이지에서는 3D 회전을 실험할 수 있습니다. Rotation3DPage.xaml 파일은 4개의 슬라이더를 인스턴스화하여 X, Y 및 Z 축을 중심으로 회전을 설정하고 깊이 값을 설정합니다.
<ContentPage xmlns="http://xamarin.com/schemas/2014/forms"
             xmlns:x="http://schemas.microsoft.com/winfx/2009/xaml"
             xmlns:skia="clr-namespace:SkiaSharp.Views.Forms;assembly=SkiaSharp.Views.Forms"
             x:Class="SkiaSharpFormsDemos.Transforms.Rotation3DPage"
             Title="Rotation 3D">
    <Grid>
        <Grid.RowDefinitions>
            <RowDefinition Height="Auto" />
            <RowDefinition Height="Auto" />
            <RowDefinition Height="Auto" />
            <RowDefinition Height="Auto" />
            <RowDefinition Height="Auto" />
            <RowDefinition Height="Auto" />
            <RowDefinition Height="Auto" />
            <RowDefinition Height="Auto" />
            <RowDefinition Height="*" />
        </Grid.RowDefinitions>

        <Grid.Resources>
            <ResourceDictionary>
                <Style TargetType="Label">
                    <Setter Property="HorizontalTextAlignment" Value="Center" />
                </Style>

                <Style TargetType="Slider">
                    <Setter Property="Margin" Value="20, 0" />
                    <Setter Property="Maximum" Value="360" />
                </Style>
            </ResourceDictionary>
        </Grid.Resources>

        <Slider x:Name="xRotateSlider"
                Grid.Row="0"
                ValueChanged="OnSliderValueChanged" />

        <Label Text="{Binding Source={x:Reference xRotateSlider},
                              Path=Value,
                              StringFormat='X-Axis Rotation = {0:F0}'}"
               Grid.Row="1" />

        <Slider x:Name="yRotateSlider"
                Grid.Row="2"
                ValueChanged="OnSliderValueChanged" />

        <Label Text="{Binding Source={x:Reference yRotateSlider},
                              Path=Value,
                              StringFormat='Y-Axis Rotation = {0:F0}'}"
               Grid.Row="3" />

        <Slider x:Name="zRotateSlider"
                Grid.Row="4"
                ValueChanged="OnSliderValueChanged" />

        <Label Text="{Binding Source={x:Reference zRotateSlider},
                              Path=Value,
                              StringFormat='Z-Axis Rotation = {0:F0}'}"
               Grid.Row="5" />

        <Slider x:Name="depthSlider"
                Grid.Row="6"
                Maximum="2500"
                Minimum="250"
                ValueChanged="OnSliderValueChanged" />

        <Label Grid.Row="7"
               Text="{Binding Source={x:Reference depthSlider},
                              Path=Value,
                              StringFormat='Depth = {0:F0}'}" />

        <skia:SKCanvasView x:Name="canvasView"
                           Grid.Row="8"
                           PaintSurface="OnCanvasViewPaintSurface" />
    </Grid>
</ContentPage>
값이 depthSlider 250으로 Minimum 초기화됩니다. 즉, 여기에서 회전하는 2D 개체에는 원점 주위의 250픽셀 반경으로 정의된 원으로 제한된 X 및 Y 좌표가 있습니다. 3D 공간에서 이 개체를 회전하면 항상 좌표 값이 250보다 작습니다.
Rotation3DPage.cs 코드 숨김 파일은 300픽셀 정사각형 비트맵으로 로드됩니다.
public partial class Rotation3DPage : ContentPage
{
    SKBitmap bitmap;

    public Rotation3DPage()
    {
        InitializeComponent();

        string resourceID = "SkiaSharpFormsDemos.Media.SeatedMonkey.jpg";
        Assembly assembly = GetType().GetTypeInfo().Assembly;

        using (Stream stream = assembly.GetManifestResourceStream(resourceID))
        {
            bitmap = SKBitmap.Decode(stream);
        }
    }

    void OnSliderValueChanged(object sender, ValueChangedEventArgs args)
    {
        if (canvasView != null)
        {
            canvasView.InvalidateSurface();
        }
    }
    ...
}
3D 변환이 이 비트맵의 가운데에 있는 경우 X 및 Y 좌표의 범위는 –150에서 150 사이이고 모서리는 중심에서 212픽셀이므로 모든 것이 250픽셀 반경 내에 있습니다.
PaintSurface 처리기는 슬라이더를 기반으로 개체를 만들고 SKMatrix44 을 사용하여 PostConcat함께 곱합니다. 최종 SKMatrix44 개체에서 추출된 값은 SKMatrix 변환으로 묶여서 회전을 화면 가운데에 배치합니다.
public partial class Rotation3DPage : ContentPage
{
    SKBitmap bitmap;

    public Rotation3DPage()
    {
        InitializeComponent();

        string resourceID = "SkiaSharpFormsDemos.Media.SeatedMonkey.jpg";
        Assembly assembly = GetType().GetTypeInfo().Assembly;

        using (Stream stream = assembly.GetManifestResourceStream(resourceID))
        {
            bitmap = SKBitmap.Decode(stream);
        }
    }

    void OnSliderValueChanged(object sender, ValueChangedEventArgs args)
    {
        if (canvasView != null)
        {
            canvasView.InvalidateSurface();
        }
    }

    void OnCanvasViewPaintSurface(object sender, SKPaintSurfaceEventArgs args)
    {
        SKImageInfo info = args.Info;
        SKSurface surface = args.Surface;
        SKCanvas canvas = surface.Canvas;

        canvas.Clear();

        // Find center of canvas
        float xCenter = info.Width / 2;
        float yCenter = info.Height / 2;

        // Translate center to origin
        SKMatrix matrix = SKMatrix.MakeTranslation(-xCenter, -yCenter);

        // Use 3D matrix for 3D rotations and perspective
        SKMatrix44 matrix44 = SKMatrix44.CreateIdentity();
        matrix44.PostConcat(SKMatrix44.CreateRotationDegrees(1, 0, 0, (float)xRotateSlider.Value));
        matrix44.PostConcat(SKMatrix44.CreateRotationDegrees(0, 1, 0, (float)yRotateSlider.Value));
        matrix44.PostConcat(SKMatrix44.CreateRotationDegrees(0, 0, 1, (float)zRotateSlider.Value));

        SKMatrix44 perspectiveMatrix = SKMatrix44.CreateIdentity();
        perspectiveMatrix[3, 2] = -1 / (float)depthSlider.Value;
        matrix44.PostConcat(perspectiveMatrix);

        // Concatenate with 2D matrix
        SKMatrix.PostConcat(ref matrix, matrix44.Matrix);

        // Translate back to center
        SKMatrix.PostConcat(ref matrix,
            SKMatrix.MakeTranslation(xCenter, yCenter));

        // Set the matrix and display the bitmap
        canvas.SetMatrix(matrix);
        float xBitmap = xCenter - bitmap.Width / 2;
        float yBitmap = yCenter - bitmap.Height / 2;
        canvas.DrawBitmap(bitmap, xBitmap, yBitmap);
    }
}
네 번째 슬라이더를 실험할 때 다른 깊이 설정이 개체를 뷰어에서 멀리 이동하지 않고 큐브 뷰어 효과의 범위를 변경한다는 것을 알 수 있습니다.
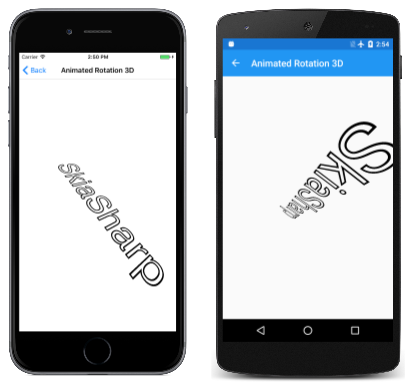
애니메이션 회전 3D는 3D 공간에서 텍스트 문자열에 애니메이션을 적용하는 데도 사용됩니다 SKMatrix44 . textPaint 필드로 설정된 개체는 생성자에서 텍스트의 범위를 결정하는 데 사용됩니다.
public class AnimatedRotation3DPage : ContentPage
{
    SKCanvasView canvasView;
    float xRotationDegrees, yRotationDegrees, zRotationDegrees;
    string text = "SkiaSharp";
    SKPaint textPaint = new SKPaint
    {
        Style = SKPaintStyle.Stroke,
        Color = SKColors.Black,
        TextSize = 100,
        StrokeWidth = 3,
    };
    SKRect textBounds;

    public AnimatedRotation3DPage()
    {
        Title = "Animated Rotation 3D";

        canvasView = new SKCanvasView();
        canvasView.PaintSurface += OnCanvasViewPaintSurface;
        Content = canvasView;

        // Measure the text
        textPaint.MeasureText(text, ref textBounds);
    }
    ...
}
재정의는 OnAppearing 서로 다른 속도로 필드yRotationDegrees와 zRotationDegrees 애니메이션 효과를 주도록 xRotationDegrees세 Xamarin.FormsAnimation 개의 개체를 정의합니다. 이러한 애니메이션의 마침표는 소수(5초, 7초 및 11초)로 설정되므로 전체 조합은 385초마다 또는 10분 이상 반복됩니다.
public class AnimatedRotation3DPage : ContentPage
{
    ...
    protected override void OnAppearing()
    {
        base.OnAppearing();

        new Animation((value) => xRotationDegrees = 360 * (float)value).
            Commit(this, "xRotationAnimation", length: 5000, repeat: () => true);

        new Animation((value) => yRotationDegrees = 360 * (float)value).
            Commit(this, "yRotationAnimation", length: 7000, repeat: () => true);

        new Animation((value) =>
        {
            zRotationDegrees = 360 * (float)value;
            canvasView.InvalidateSurface();
        }).Commit(this, "zRotationAnimation", length: 11000, repeat: () => true);
    }

    protected override void OnDisappearing()
    {
        base.OnDisappearing();
        this.AbortAnimation("xRotationAnimation");
        this.AbortAnimation("yRotationAnimation");
        this.AbortAnimation("zRotationAnimation");
    }
    ...
}
이전 프로그램과 PaintCanvas 마찬가지로 처리기는 회전 및 원근에 대한 값을 만들고 SKMatrix44 곱합니다.
public class AnimatedRotation3DPage : ContentPage
{
    ...
    void OnCanvasViewPaintSurface(object sender, SKPaintSurfaceEventArgs args)
    {
        SKImageInfo info = args.Info;
        SKSurface surface = args.Surface;
        SKCanvas canvas = surface.Canvas;

        canvas.Clear();

        // Find center of canvas
        float xCenter = info.Width / 2;
        float yCenter = info.Height / 2;

        // Translate center to origin
        SKMatrix matrix = SKMatrix.MakeTranslation(-xCenter, -yCenter);

        // Scale so text fits
        float scale = Math.Min(info.Width / textBounds.Width,
                               info.Height / textBounds.Height);
        SKMatrix.PostConcat(ref matrix, SKMatrix.MakeScale(scale, scale));

        // Calculate composite 3D transforms
        float depth = 0.75f * scale * textBounds.Width;

        SKMatrix44 matrix44 = SKMatrix44.CreateIdentity();
        matrix44.PostConcat(SKMatrix44.CreateRotationDegrees(1, 0, 0, xRotationDegrees));
        matrix44.PostConcat(SKMatrix44.CreateRotationDegrees(0, 1, 0, yRotationDegrees));
        matrix44.PostConcat(SKMatrix44.CreateRotationDegrees(0, 0, 1, zRotationDegrees));

        SKMatrix44 perspectiveMatrix = SKMatrix44.CreateIdentity();
        perspectiveMatrix[3, 2] = -1 / depth;
        matrix44.PostConcat(perspectiveMatrix);

        // Concatenate with 2D matrix
        SKMatrix.PostConcat(ref matrix, matrix44.Matrix);

        // Translate back to center
        SKMatrix.PostConcat(ref matrix,
            SKMatrix.MakeTranslation(xCenter, yCenter));

        // Set the matrix and display the text
        canvas.SetMatrix(matrix);
        float xText = xCenter - textBounds.MidX;
        float yText = yCenter - textBounds.MidY;
        canvas.DrawText(text, xText, yText, textPaint);
    }
}
이 3D 회전은 여러 2D 변환으로 둘러싸여 회전 중심을 화면 가운데로 이동하고 텍스트 문자열의 크기를 조정하여 화면과 너비가 같도록 합니다.
 샘플 다운로드
