Xamarin.Forms RelativeLayout
 샘플 다운로드
A RelativeLayout 는 레이아웃 또는 형제 요소의 속성을 기준으로 자식의 위치를 지정하고 크기를 조정하는 데 사용됩니다. 이렇게 하면 디바이스 크기에 비례하여 스케일링되는 UI를 만들 수 있습니다. 또한 다른 레이아웃 클래스와 RelativeLayout 달리 자식을 배치하여 겹칠 수 있습니다.
RelativeLayout 클래스는 다음 속성을 정의합니다.
XConstraint자식의 X 위치에 대한 제약 조건을 나타내는 연결된 속성인 형식Constraint의 입니다.YConstraint- 자식의 Y 위치에 대한 제약 조건을 나타내는 연결된 속성인 형식Constraint입니다.WidthConstraint자식의 너비에 대한 제약 조건을 나타내는 연결된 속성인 형식Constraint의 입니다.HeightConstraint- 자식의 높이에 대한 제약 조건을 나타내는 연결된 속성인 형식Constraint입니다.BoundsConstraint- 자식의 위치 및 크기에 대한 제약 조건을 나타내는 연결된 속성인 형식BoundsConstraint입니다. 이 속성은 XAML에서 쉽게 사용할 수 없습니다.
이러한 속성은 개체에 의해 BindableProperty 지원됩니다. 즉, 속성이 데이터 바인딩의 대상이 될 수 있으며 스타일이 지정될 수 있습니다. 연결된 속성에 대한 자세한 내용은 연결된 속성을 참조 Xamarin.Forms 하세요.
참고 항목
자식 및 연결된 속성 대신 자식 및 속성을 통해 자식 RelativeLayout 의 WidthRequest 너비와 HeightConstraintHeightRequest 높이를 WidthConstraint 지정할 수도 있습니다.
클래스는 RelativeLayout 형식IList<T>의 Layout<T> 속성을 정의하는 클래스에서 파생됩니다Children. 속성은 ChildrenContentProperty 클래스이므로 Layout<T> XAML에서 명시적으로 설정할 필요가 없습니다.
팁
가능한 경우 RelativeLayout을 사용하지 마세요. 그러면 CPU가 훨씬 더 많은 작업을 수행해야 합니다.
제약 조건
내에서 RelativeLayout자식의 위치와 크기는 절대값 또는 상대 값을 사용하는 제약 조건으로 지정됩니다. 제약 조건을 지정하지 않으면 자식이 레이아웃의 왼쪽 위 모서리에 배치됩니다.
다음 표에서는 XAML 및 C#에서 제약 조건을 지정하는 방법을 보여 줍니다.
| XAML | C# | |
|---|---|---|
| 절대값 | 절대 제약 조건은 연결된 속성을 double 값으로 RelativeLayout 설정하여 지정합니다. |
절대 제약 조건은 메서드 또는 인수가 필요한 오버로드를 Children.Add 사용하여 지정 Constraint.Constant 됩니다Func<Rectangle>. |
| 상대 값 | 상대 제약 조건은 태그 확장에서 RelativeLayout 반환 ConstraintExpression 되는 개체로 Constraint 연결된 속성을 설정하여 지정합니다. |
상대 제약 조건은 클래스의 메서드에 의해 반환되는 개체에 Constraint 의해 Constraint 지정됩니다. |
절대값을 사용하여 제약 조건을 지정하는 방법에 대한 자세한 내용은 절대 위치 지정 및 크기 조정을 참조 하세요. 상대 값을 사용하여 제약 조건을 지정하는 방법에 대한 자세한 내용은 상대 위치 지정 및 크기 조정을 참조 하세요.
C#에서는 세 Add 개의 오버로드로 RelativeLayout 자식을 추가할 수 있습니다. 첫 번째 오버로드는 자식의 위치와 크기를 지정해야 합니다 Expression<Func<Rectangle>> . 두 번째 오버로드에는 , 및 인수에 x대한 선택적 Expression<Func<double>> 개체가 heightwidthy필요합니다. 세 번째 오버로드에는 , 및 인수에 x대한 선택적 Constraint 개체가 heightwidthy필요합니다.
, 및 SetWidthConstraint메서드를 사용하여 자식 SetYConstraintSetXConstraintRelativeLayout 의 위치와 SetHeightConstraint 크기를 변경할 수 있습니다. 이러한 각 메서드에 대한 첫 번째 인수는 자식이고 두 번째 인수는 개체입니다 Constraint . 또한 이 메서드를 SetBoundsConstraint 사용하여 자식의 위치와 크기를 변경할 수도 있습니다. 이 메서드의 첫 번째 인수는 자식이고 두 번째 인수는 개체입니다 BoundsConstraint .
절대 위치 지정 및 크기 조정
A는 RelativeLayout 레이아웃에 자식을 배치할 위치를 명시적으로 정의하는 장치 독립적 단위로 지정된 절대값을 사용하여 자식의 위치를 지정하고 크기를 조정할 수 있습니다. 이 작업은 자식을 Children 컬렉션에 추가하고 각 자식의 RelativeLayout , WidthConstraintYConstraint및 연결된 속성을 절대 위치 및HeightConstraint/또는 크기 값으로 설정XConstraint하여 수행됩니다.
Warning
디바이스의 화면 크기와 해상도가 다르기 때문에 자식의 위치 지정 및 크기 조정에 절대값을 사용하는 것은 문제가 될 수 있습니다. 따라서 한 디바이스의 화면 가운데에 대한 좌표는 다른 디바이스에서 오프셋될 수 있습니다.
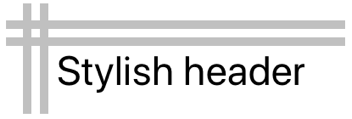
다음 XAML은 절대값을 RelativeLayout 사용하여 자식이 배치되는 것을 보여 있습니다.
<ContentPage xmlns="http://xamarin.com/schemas/2014/forms"
             xmlns:x="http://schemas.microsoft.com/winfx/2009/xaml"
             x:Class="RelativeLayoutDemos.Views.StylishHeaderDemoPage"
             Title="Stylish header demo">
    <RelativeLayout Margin="20">
        <BoxView Color="Silver"
                 RelativeLayout.XConstraint="0"
                 RelativeLayout.YConstraint="10"
                 RelativeLayout.WidthConstraint="200"
                 RelativeLayout.HeightConstraint="5" />
        <BoxView Color="Silver"
                 RelativeLayout.XConstraint="0"
                 RelativeLayout.YConstraint="20"
                 RelativeLayout.WidthConstraint="200"
                 RelativeLayout.HeightConstraint="5" />
        <BoxView Color="Silver"
                 RelativeLayout.XConstraint="10"
                 RelativeLayout.YConstraint="0"
                 RelativeLayout.WidthConstraint="5"
                 RelativeLayout.HeightConstraint="65" />
        <BoxView Color="Silver"
                 RelativeLayout.XConstraint="20"
                 RelativeLayout.YConstraint="0"
                 RelativeLayout.WidthConstraint="5"
                 RelativeLayout.HeightConstraint="65" />
        <Label Text="Stylish header"
               FontSize="24"
               RelativeLayout.XConstraint="30"
               RelativeLayout.YConstraint="25" />
    </RelativeLayout>
</ContentPage>
이 예제에서는 각 BoxView 개체의 위치는 연결된 속성에 XConstraintYConstraint 지정된 값을 사용하여 정의됩니다. 각 BoxView 크기는 연결된 속성에 WidthConstraintHeightConstraint 지정된 값을 사용하여 정의됩니다. 개체의 Label 위치는 연결된 속성에 XConstraintYConstraint 지정된 값을 사용하여 정의됩니다. 그러나 크기 값은 해당 값에 Label대해 지정되지 않으므로 제약이 없으며 크기 자체입니다. 모든 경우에 절대값은 디바이스 독립적 단위를 나타냅니다.
다음 스크린샷은 결과 레이아웃을 보여줍니다.
해당하는 C# 코드는 다음과 같습니다.
public class StylishHeaderDemoPageCS : ContentPage
{
    public StylishHeaderDemoPageCS()
    {
        RelativeLayout relativeLayout = new RelativeLayout
        {
            Margin = new Thickness(20)
        };

        relativeLayout.Children.Add(new BoxView
        {
            Color = Color.Silver
        }, () => new Rectangle(0, 10, 200, 5));

        relativeLayout.Children.Add(new BoxView
        {
            Color = Color.Silver
        }, () => new Rectangle(0, 20, 200, 5));

        relativeLayout.Children.Add(new BoxView
        {
            Color = Color.Silver
        }, () => new Rectangle(10, 0, 5, 65));

        relativeLayout.Children.Add(new BoxView
        {
            Color = Color.Silver
        }, () => new Rectangle(20, 0, 5, 65));

        relativeLayout.Children.Add(new Label
        {
            Text = "Stylish Header",
            FontSize = 24
        }, Constraint.Constant(30), Constraint.Constant(25));

        Title = "Stylish header demo";
        Content = relativeLayout;
    }
}
이 예제 BoxView 에서는 개체가 각 자식의 RelativeLayout 위치와 크기를 지정해야 Expression<Func<Rectangle>> 하는 오버로드를 사용하여 Add 추가됩니다. 이 경우 메서드에서 Label 만든 선택적 Constraint 개체가 필요한 오버로드를 사용하여 Add 위치가 Constraint.Constant 정의됩니다.
참고 항목
절대값을 사용하는 A RelativeLayout 는 자식이 레이아웃의 범위 내에 맞지 않도록 자식의 위치를 지정하고 크기를 지정할 수 있습니다.
상대 위치 지정 및 크기 조정
A RelativeLayout 는 레이아웃 또는 형제 요소의 속성에 상대적인 값을 사용하여 자식의 위치를 지정하고 크기를 조정할 수 있습니다. 이는 자식을 Children 컬렉션에 추가하고 개체를 사용하여 Constraint 각 자식의 RelativeLayout , YConstraintWidthConstraint및 HeightConstraint 연결된 속성을 상대 값으로 설정XConstraint하여 수행됩니다.
제약 조건은 상수이거나, 부모를 기준으로 하거나, 형제를 기준으로 할 수 있습니다. 제약 조건의 형식은 다음 멤버를 ConstraintType 정의하는 열거형으로 표시됩니다.
RelativeToParent- 부모를 기준으로 하는 제약 조건을 나타냅니다.RelativeToView뷰(또는 형제)를 기준으로 하는 제약 조건을 나타냅니다.Constant상수 제약 조건을 나타냅니다.
제약 조건 태그 확장
XAML에서는 태그 확장으로 Constraint 개체를 ConstraintExpression 만들 수 있습니다. 이 태그 확장은 일반적으로 부모 또는 형제에 내 RelativeLayout 자식의 위치와 크기를 연결 하는 데 사용 됩니다.
ConstraintExpression 클래스는 다음 속성을 정의합니다.
Constant제약 조건 상수 값을 나타내는 형식double의 입니다.ElementName제약 조건을 계산할 원본 요소의 이름을 나타내는 형식string의 입니다.Factor소스 요소를 기준으로 제한된 차원의 크기를 조정할 요소를 나타내는 형식double의 입니다. 이 속성의 기본값은 1입니다.Property제약 조건 계산에 사용할 원본 요소의 속성 이름을 나타내는 형식string의 입니다.Type- 제약 조건의ConstraintType형식을 나타내는 형식입니다.
Xamarin.Forms 태그 확장에 대한 자세한 내용은 XAML 태그 확장을 참조하세요.
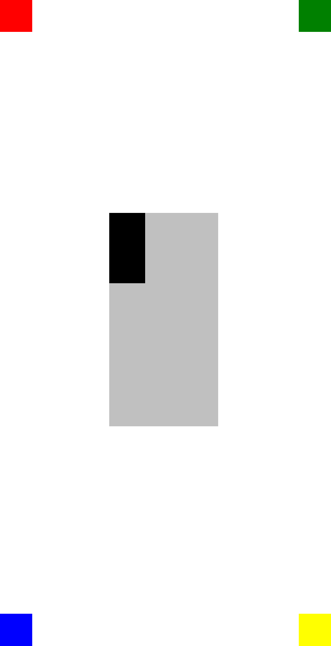
다음 XAML은 태그 확장에 RelativeLayout 의해 자식이 제한되는 것을 ConstraintExpression 보여 줍니다.
<ContentPage xmlns="http://xamarin.com/schemas/2014/forms"
             xmlns:x="http://schemas.microsoft.com/winfx/2009/xaml"
             x:Class="RelativeLayoutDemos.Views.RelativePositioningAndSizingDemoPage"
             Title="RelativeLayout demo">
    <RelativeLayout>
        <BoxView Color="Red"
                 RelativeLayout.XConstraint="{ConstraintExpression Type=Constant, Constant=0}"
                 RelativeLayout.YConstraint="{ConstraintExpression Type=Constant, Constant=0}" />
        <BoxView Color="Green"
                 RelativeLayout.XConstraint="{ConstraintExpression Type=RelativeToParent, Property=Width, Constant=-40}"
                 RelativeLayout.YConstraint="{ConstraintExpression Type=Constant, Constant=0}" />
        <BoxView Color="Blue"
                 RelativeLayout.XConstraint="{ConstraintExpression Type=Constant, Constant=0}"
                 RelativeLayout.YConstraint="{ConstraintExpression Type=RelativeToParent, Property=Height, Constant=-40}" />
        <BoxView Color="Yellow"
                 RelativeLayout.XConstraint="{ConstraintExpression Type=RelativeToParent, Property=Width, Constant=-40}"
                 RelativeLayout.YConstraint="{ConstraintExpression Type=RelativeToParent, Property=Height, Constant=-40}" />

        <!-- Centered and 1/3 width and height of parent -->
        <BoxView x:Name="oneThird"
                 Color="Silver"
                 RelativeLayout.XConstraint="{ConstraintExpression Type=RelativeToParent, Property=Width, Factor=0.33}"
                 RelativeLayout.YConstraint="{ConstraintExpression Type=RelativeToParent, Property=Height, Factor=0.33}"
                 RelativeLayout.WidthConstraint="{ConstraintExpression Type=RelativeToParent, Property=Width, Factor=0.33}"
                 RelativeLayout.HeightConstraint="{ConstraintExpression Type=RelativeToParent, Property=Height, Factor=0.33}" />

        <!-- 1/3 width and height of previous -->
        <BoxView Color="Black"
                 RelativeLayout.XConstraint="{ConstraintExpression Type=RelativeToView, ElementName=oneThird, Property=X}"
                 RelativeLayout.YConstraint="{ConstraintExpression Type=RelativeToView, ElementName=oneThird, Property=Y}"
                 RelativeLayout.WidthConstraint="{ConstraintExpression Type=RelativeToView, ElementName=oneThird, Property=Width, Factor=0.33}"
                 RelativeLayout.HeightConstraint="{ConstraintExpression Type=RelativeToView, ElementName=oneThird, Property=Height, Factor=0.33}" />
    </RelativeLayout>
</ContentPage>
이 예제에서는 각 BoxView 개체의 위치는 연결된 속성을 설정 XConstraintYConstraint 하여 정의됩니다. 첫 번째 BoxView 항목에는 XConstraint 해당 속성과 YConstraint 연결된 속성이 절대값인 상수로 설정됩니다. 다시 기본 BoxView 개체는 모두 하나 이상의 상대 값을 사용하여 해당 위치를 설정합니다. 예를 들어 노란색 BoxView 개체는 연결된 속성을 부모(RelativeLayout)의 너비에서 40을 뺀 값으로 설정합니다XConstraint. 마찬가지로 연결된 BoxView 속성을 부모 높이에서 40을 뺀 값으로 설정합니다 YConstraint . 이렇게 하면 화면의 오른쪽 아래 모서리에 노란색 BoxView 이 표시됩니다.
참고 항목
BoxView 크기를 지정하지 않는 개체의 크기는 자동으로 40x40으로 Xamarin.Forms조정됩니다.
명명 oneThird 된 은 BoxView 은 부모를 기준으로 중앙에 배치됩니다. 또한 너비와 높이의 3분의 1인 부모를 기준으로 크기가 조정됩니다. 이는 부모(RelativeLayout)의 너비에 WidthConstraint 연결된 속성을 0.33을 곱하여 수행 XConstraint 됩니다. 마찬가지로 연결된 YConstraint 속성은 HeightConstraint 부모의 높이로 설정되고 0.33을 곱합니다.
검정 BoxView 은 위치가 지정되고 크기를 기준으로 크기가 조정됩니다 oneThirdBoxView. 이는 형제 요소의 값 및 값에 X 각각 해당 XConstraint 속성과 YConstraintY 연결된 속성을 설정하여 수행됩니다. 마찬가지로 해당 크기는 형제 요소의 너비와 높이의 3분의 1로 설정됩니다. 이는 각각 형제 요소의 값과 해당 속성 및 HeightConstraintHeight 연결된 속성을 Width 설정한 WidthConstraint 다음 0.33을 곱하여 수행됩니다.
다음 스크린샷은 결과 레이아웃을 보여 줍니다.
제약 조건 개체
클래스는 Constraint 개체를 반환 Constraint 하는 다음 공용 정적 메서드를 정의합니다.
Constant- 자식이 .로 지정된 크기로 제한됩니다double.FromExpression- 람다 식을 사용하여 자식을 제한합니다.RelativeToParent- 부모의 크기를 기준으로 자식이 제한됩니다.RelativeToView- 뷰의 크기를 기준으로 자식이 제한됩니다.
또한 클래스는 BoundsConstraint 단일 메서드를 정의합니다. 이 메서드FromExpression는 자식의 위치와 크기를 1로 제한하는 메서드를 Expression<Func<Rectangle>>반환 BoundsConstraint 합니다. 이 메서드를 사용하여 연결된 속성을 설정할 BoundsConstraint 수 있습니다.
다음 C# 코드는 자식이 개체에 의해 Constraint 제한되는 것을 보여 RelativeLayout 줍니다.
public class RelativePositioningAndSizingDemoPageCS : ContentPage
{
    public RelativePositioningAndSizingDemoPageCS()
    {
        RelativeLayout relativeLayout = new RelativeLayout();

        // Four BoxView's
        relativeLayout.Children.Add(
            new BoxView { Color = Color.Red },
            Constraint.Constant(0),
            Constraint.Constant(0));

        relativeLayout.Children.Add(
            new BoxView { Color = Color.Green },
            Constraint.RelativeToParent((parent) =>
            {
                return parent.Width - 40;
            }), Constraint.Constant(0));

        relativeLayout.Children.Add(
            new BoxView { Color = Color.Blue },
            Constraint.Constant(0),
            Constraint.RelativeToParent((parent) =>
            {
                return parent.Height - 40;
            }));

        relativeLayout.Children.Add(
            new BoxView { Color = Color.Yellow },
            Constraint.RelativeToParent((parent) =>
            {
                return parent.Width - 40;
            }),
            Constraint.RelativeToParent((parent) =>
            {
                return parent.Height - 40;
            }));

        // Centered and 1/3 width and height of parent
        BoxView silverBoxView = new BoxView { Color = Color.Silver };
        relativeLayout.Children.Add(
            silverBoxView,
            Constraint.RelativeToParent((parent) =>
            {
                return parent.Width * 0.33;
            }),
            Constraint.RelativeToParent((parent) =>
            {
                return parent.Height * 0.33;
            }),
            Constraint.RelativeToParent((parent) =>
            {
                return parent.Width * 0.33;
            }),
            Constraint.RelativeToParent((parent) =>
            {
                return parent.Height * 0.33;
            }));

        // 1/3 width and height of previous
        relativeLayout.Children.Add(
            new BoxView { Color = Color.Black },
            Constraint.RelativeToView(silverBoxView, (parent, sibling) =>
            {
                return sibling.X;
            }),
            Constraint.RelativeToView(silverBoxView, (parent, sibling) =>
            {
                return sibling.Y;
            }),
            Constraint.RelativeToView(silverBoxView, (parent, sibling) =>
            {
                return sibling.Width * 0.33;
            }),
            Constraint.RelativeToView(silverBoxView, (parent, sibling) =>
            {
                return sibling.Height * 0.33;
            }));

        Title = "RelativeLayout demo";
        Content = relativeLayout;
    }
}
이 예제에서 자식은 , y및 widthheight 인수에 Add 대한 x선택적 Constraint 개체가 필요한 오버로드를 사용하여 추가 RelativeLayout 됩니다.
참고 항목
상대 값을 사용하는 A RelativeLayout 는 자식이 레이아웃의 범위 내에 맞지 않도록 자식의 위치를 지정하고 크기를 조정할 수 있습니다.