Quickstart: Find available rooms by using Azure Digital Twins
Important
A new version of the Azure Digital Twins service has been released. In light of the new service's expanded capabilities, the original Azure Digital Twins service (described in this documentation set) has been retired.
To view the documentation for the new service, visit the active Azure Digital Twins Documentation.
The Azure Digital Twins service allows you to re-create a digital image of your physical environment. You can then get notified by events in your environment and customize your responses to them.
This quickstart uses a pair of .NET samples to digitize an imaginary office building. It shows you how to find available rooms in that building. With Digital Twins, you can associate many sensors with your environment. You also can find out if the air quality of your available room is optimal with the help of a simulated sensor for carbon dioxide. One of the sample applications generates random sensor data to help you visualize this scenario.
The following video summarizes the quickstart setup:
Prerequisites
If you don't have an Azure account, create a free account before you begin.
The two console applications you run in this quickstart are written by using C#. Install the .NET Core SDK version 2.1.403 or above on your development machine. If you have the .NET Core SDK installed, verify the current version of C# on your development machine. Run
dotnet --versionin a command prompt.Download the sample C# project. Extract the digital-twins-samples-csharp-master.zip archive.
Create a Digital Twins instance
Create a new instance of Digital Twins in the portal by following the steps in this section.
Sign in to the Azure portal.
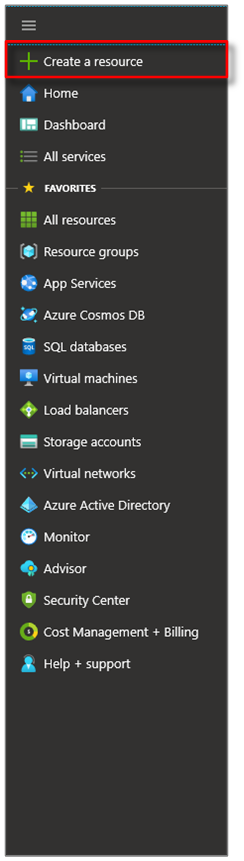
Select the home side-bar, then + Create a resource.
Search for Digital Twins, and select Digital Twins.
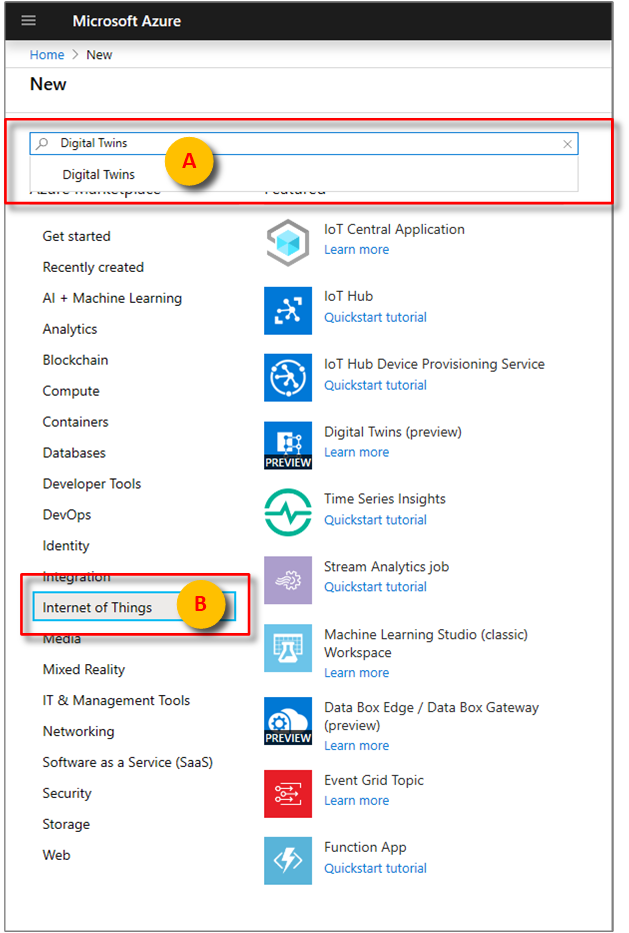
Alternatively, select Internet of Things, and select Digital Twins (preview).
Select Create to start the deployment process.

In the Digital Twins pane, enter the following information:
Resource Name: Create a unique name for your Digital Twins instance.
Subscription: Choose the subscription that you want to use to create this Digital Twins instance.
Resource group: Select or create a resource group for the Digital Twins instance.
Location: Select the closest location to your devices.

Review your Digital Twins information, and then select Create. Your Digital Twins instance might take a few minutes to be created. You can monitor the progress in the Notifications pane.
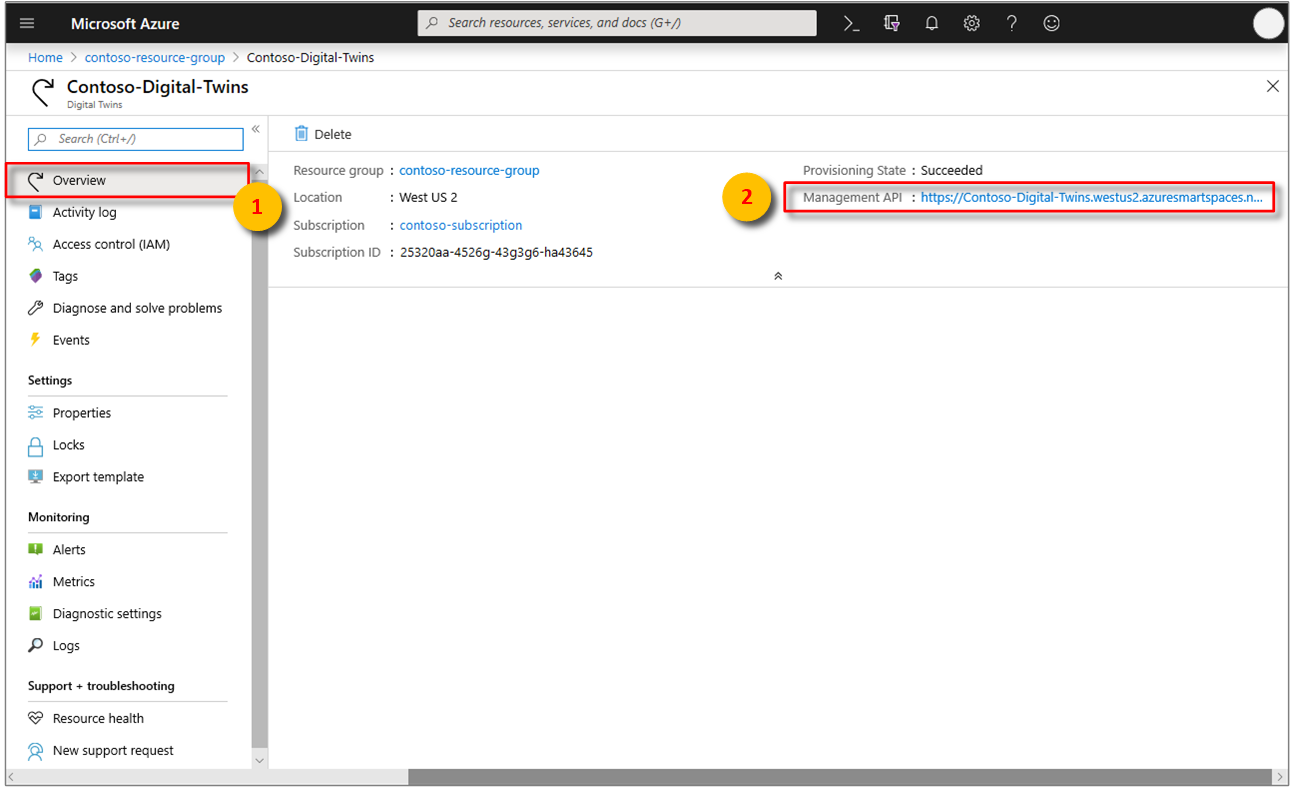
Open the Overview pane of your Digital Twins instance. Note the link under Management API. The Management API URL is formatted as:
https://yourDigitalTwinsName.yourLocation.azuresmartspaces.net/management/swaggerThis URL takes you to the Azure Digital Twins REST API documentation that applies to your instance. Read How to use Azure Digital Twins Swagger to learn how to read and use this API documentation. Copy and modify the Management API URL to this format:
https://yourDigitalTwinsName.yourLocation.azuresmartspaces.net/management/api/v1.0/Your application will use the modified URL as the base URL to access your instance. Copy this modified URL to a temporary file. You'll need this in the next section.


Set permissions for your app
This section registers your sample application to Azure Active Directory (Azure AD) so that it can access your Digital Twins instance. If you already have an Azure AD app registration, reuse it for your sample. Make sure that it's configured as described in this section.
Note
This section provides instructions for Azure AD app registration.
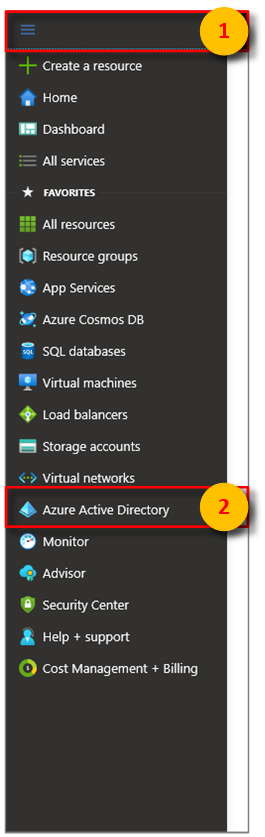
In the Azure portal, open Azure Active Directory from the expandable left menu, and then open the App registrations pane.
Select the + New registration button.

Give a friendly name for this app registration in the Name box.
Under Redirect URI (optional) section, enter
https://microsoft.comin the textbox.Verify which accounts and tenants are supported by your Azure Active Directory app.
Select Register.

The Authentication blade specifies important authentication configuration settings.
Add Redirect URIs and configure Access Tokens by selecting + Add a platform.
Select Yes to specify that the app is a public client.
Verify which accounts and tenants are supported by your Azure Active Directory app.
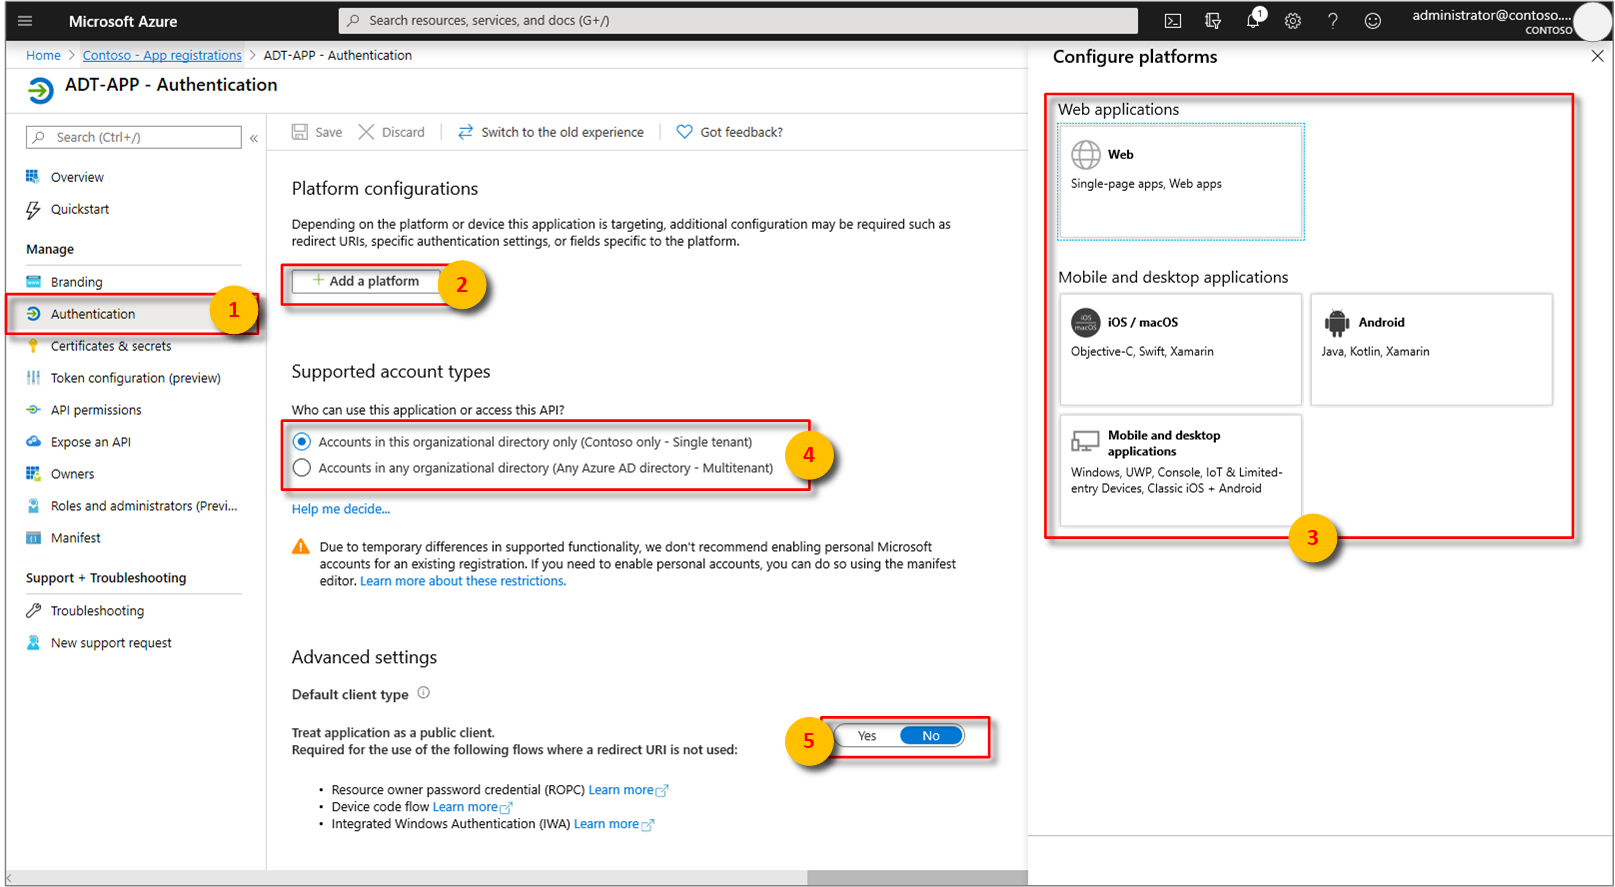
After selecting the appropriate platform, configure your Redirect URIs and Access Tokens in the side panel to the right of the user interface.
Redirect URIs must match the address supplied by the authentication request:
- For apps hosted in a local development environment, select Public client (mobile & desktop). Make sure to set public client to Yes.
- For Single-Page Apps hosted on Azure App Service, select Web.
Determine whether a Logout URL is appropriate.
Enable the implicit grant flow by checking Access tokens or ID tokens.
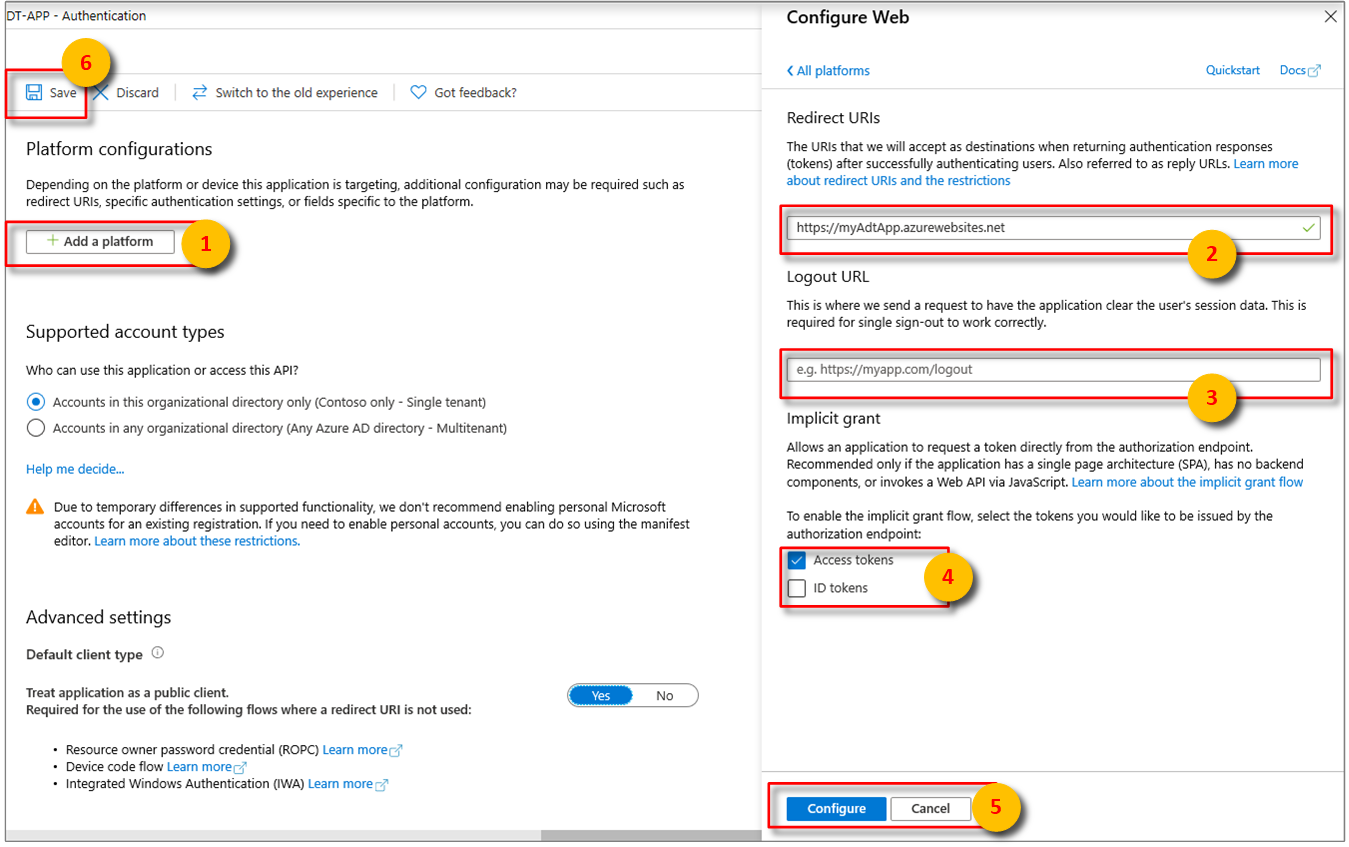
Click Configure, then Save.
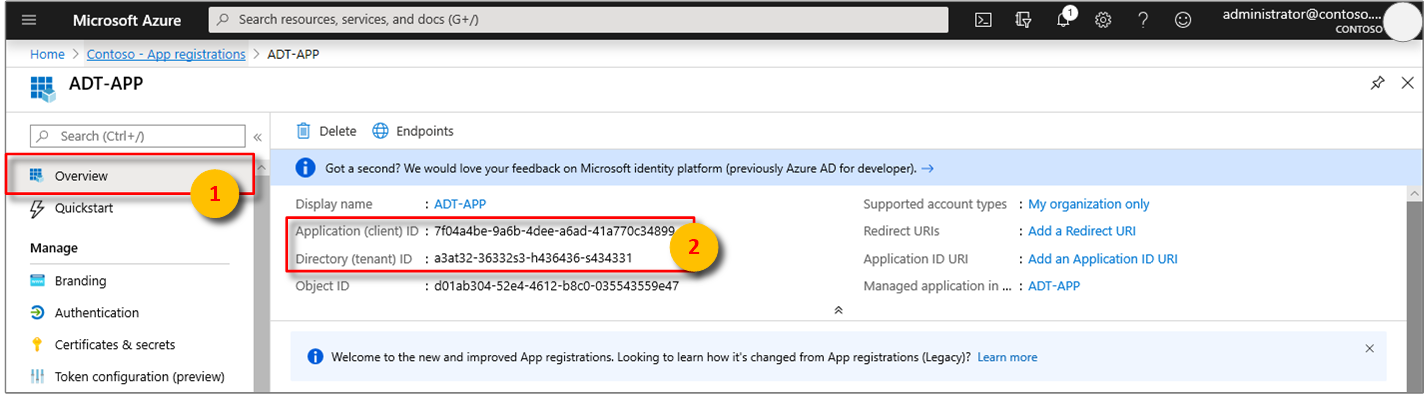
Open the Overview pane of your registered app, and copy the values of the following entities to a temporary file. You'll use these values to configure your sample application in the following sections.
- Application (client) ID
- Directory (tenant) ID
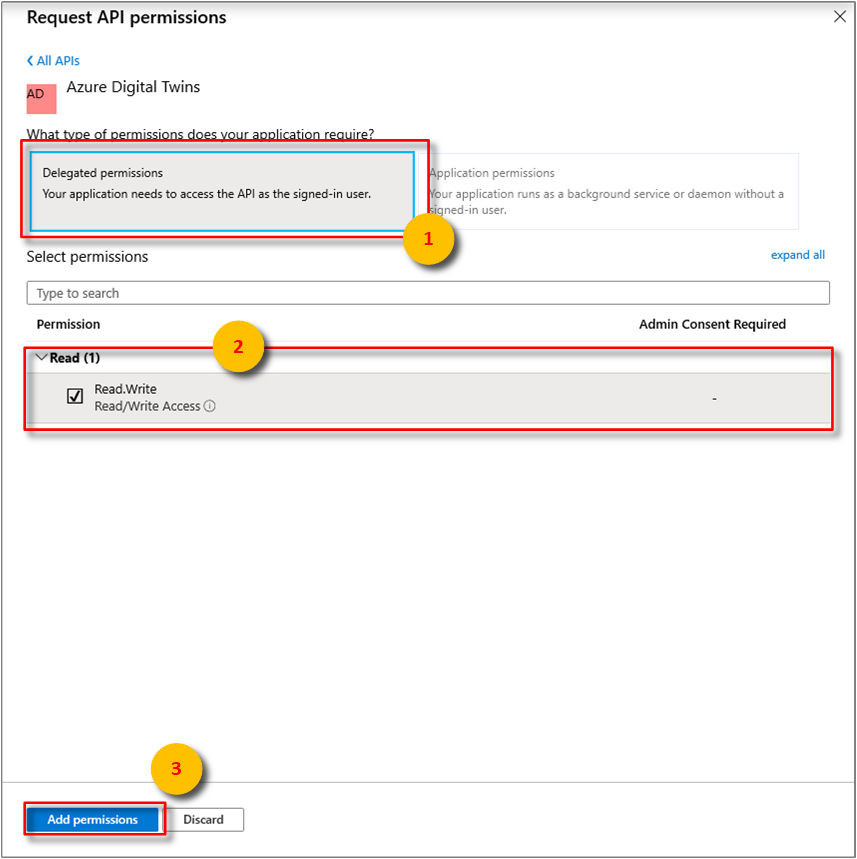
Open the API permissions pane for your app registration. Select + Add a permission button. In the Request API permissions pane, select the APIs my organization uses tab, and then search for one of the following:
Azure Digital Twins. Select the Azure Digital Twins API.
Alternatively, search for
Azure Smart Spaces Service. Select the Azure Smart Spaces Service API.
Important
The Azure AD API name and ID that will appear depends on your tenant:
- Test tenant and customer accounts should search for
Azure Digital Twins. - Other Microsoft accounts should search for
Azure Smart Spaces Service.
Either API will appear as Azure Digital Twins in the same Request API permissions pane once selected. Select the Read drop-down option, and then select the Read.Write checkbox. Select the Add permissions button.
Depending on your organization's settings, you might need to take additional steps to grant admin access to this API. Contact your administrator for more information. Once the admin access is approved, the Admin Consent Required column in the API permissions pane will display your permissions.
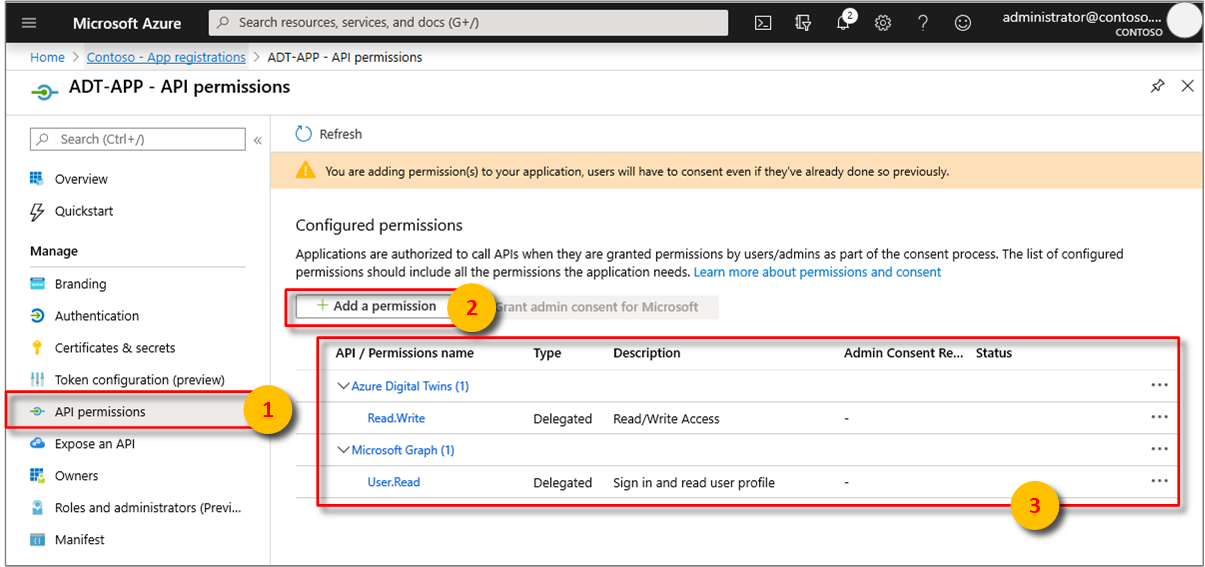
Verify that Azure Digital Twins appears.


Build application
Build the occupancy application by following these steps.
Open a command prompt. Go to the folder where your
digital-twins-samples-csharp-master.zipfiles were extracted.Run
cd occupancy-quickstart/src.Run
dotnet restore.Edit appSettings.json to update the following variables:
- ClientId: Enter the Application ID of your Azure AD app registration, noted in the preceding section.
- Tenant: Enter the Directory ID of your Azure AD tenant, also noted in the previous section.
- BaseUrl: The Management API URL of your Digital Twins instance is in the format
https://yourDigitalTwinsName.yourLocation.azuresmartspaces.net/management/api/v1.0/. Replace the placeholders in this URL with values for your instance from the previous section.
Save the updated file.
Provision graph
This step provisions your Digital Twins spatial graph with:
- Several spaces.
- One device.
- Two sensors.
- A custom function.
- One role assignment.
The spatial graph is provisioned by using the provisionSample.yaml file.
Run
dotnet run ProvisionSample.Note
The Device Login Azure CLI tool is used to authenticate the user to Azure AD. The user must enter a given code to authenticate by using the Microsoft login page. After the code is entered, follow the steps to authenticate. The user must authenticate when the tool is running.
Tip
When you run this step, make sure your variables were copied properly if the following error message appears:
EXIT: Unexpected error: The input is not a valid Base-64 string ...The provisioning step might take a few minutes. It also provisions an IoT Hub within your Digital Twins instance. It loops through until the IoT Hub shows Status=
Running.
At the end of the execution, copy the
ConnectionStringof the device for use in the device simulator sample. Copy only the string outlined in this image.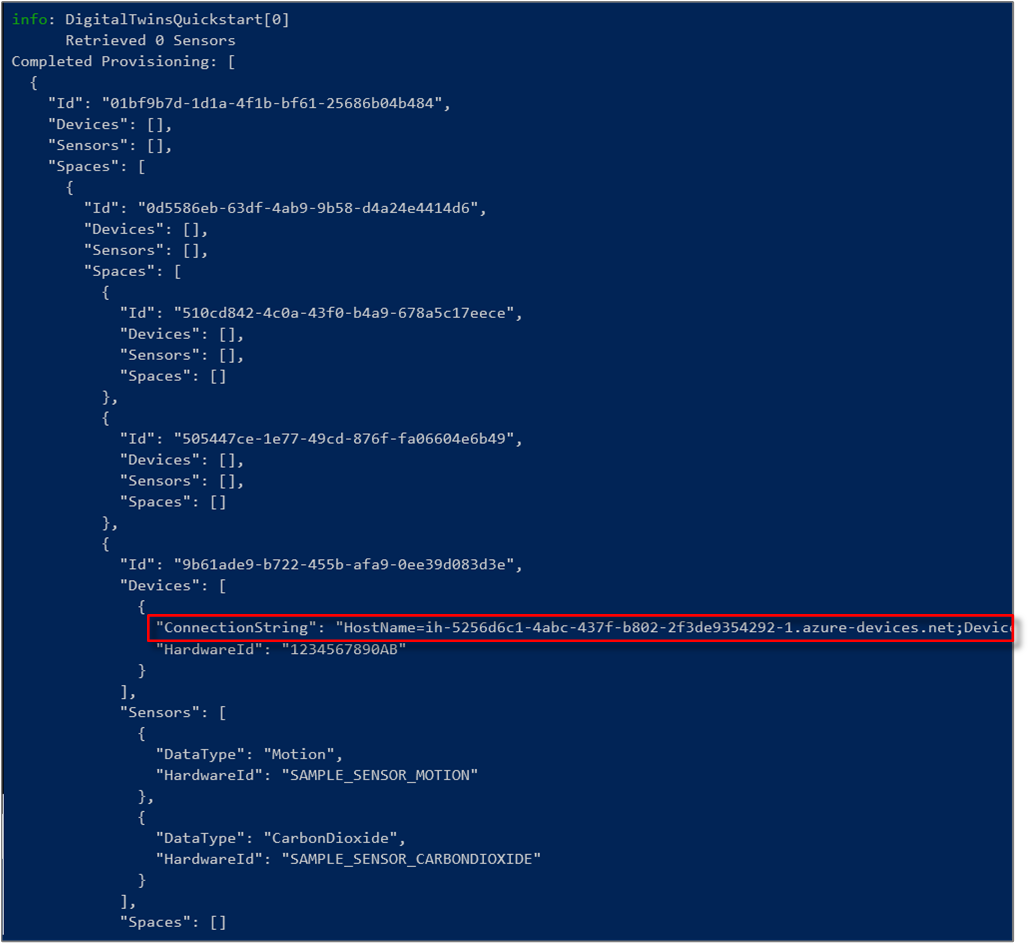
Tip
You can view and modify your spatial graph using the Azure Digital Twins Graph Viewer.


Keep the console window open for use again later.
Send sensor data
Build and run the sensor simulator device application by following these steps.
Open a new command prompt. Go to the project you downloaded in the
digital-twins-samples-csharp-masterfolder.Run
cd device-connectivity.Run
dotnet restore.Edit appsettings.json to update DeviceConnectionString with the previous
ConnectionString. Save the updated file.Run
dotnet runto start sending sensor data. It will be sent to Azure Digital Twins as shown in the following image.
Let this simulator run so that you can view results side by side with the next step action. This window shows you the simulated sensor data sent to Digital Twins. The next step queries in real time to find available rooms with fresh air.
Tip
When you run this step, make sure
DeviceConnectionStringwas copied properly if the following error message appears:EXIT: Unexpected error: The input is not a valid Base-64 string ...

Find available spaces with fresh air
The sensor sample simulates random data values for two sensors. They're motion and carbon dioxide. Available spaces with fresh air are defined in the sample by no presence in the room. They're also defined by a carbon dioxide level under 1,000 ppm. If the condition isn't fulfilled, the space isn't available or the air quality is poor.
Open the command prompt you used to run the provisioning step earlier.
Run
dotnet run GetAvailableAndFreshSpaces.Look at this command prompt and the sensor data command prompt side by side.
The sensor data command prompt sends simulated motion and carbon dioxide data to Digital Twins every five seconds. The other command prompt reads the graph in real time to find out available rooms with fresh air based on random simulated data. It displays one of these conditions in near real time based on the sensor data that was sent last:
Room is available and air is freshRoom is not available or air quality is poor

To understand what happened in this quickstart and what APIs were called, open Visual Studio Code with the code workspace project found in digital-twins-samples-csharp. Use the following command:
<path>\occupancy-quickstart\src>code ..\..\digital-twins-samples.code-workspace
The tutorials go deep into the code. They teach you how to modify configuration data and what APIs are called. For more information on Management APIs, go to your Digital Twins Swagger page:
https://YOUR_INSTANCE_NAME.YOUR_LOCATION.azuresmartspaces.net/management/swagger
| Name | Replace with |
|---|---|
| YOUR_INSTANCE_NAME | The name of your Digital Twins instance |
| YOUR_LOCATION | The server region where your instance is hosted |
Or for convenience, browse to Digital Twins Swagger.
Clean up resources
The tutorials go into detail about how to:
- Build an application for facility managers to increase occupant productivity.
- Operate the building more efficiently.
To continue to the tutorials, don't clean up the resources created in this quickstart. If you don't plan to continue, delete all the resources created by this quickstart.
Delete the folder that was created when you downloaded the sample repository.
From the menu on the left in the Azure portal, select All resources. Then select your Digital Twins resource. At the top of the All resources pane, select Delete.
Tip
If you previously experienced trouble deleting your Digital Twins instance, a service update has been rolled out with the fix. Please retry deleting your instance.
Next steps
This quickstart used a simple scenario and sample applications to show how Digital Twins can be used to find rooms with good working conditions. For in-depth analysis of this scenario, read this tutorial: