Use C/C++ libraries with Xamarin
Overview
Xamarin enables developers to create cross-platform native mobile apps with Visual Studio. Generally, C# bindings are used to expose existing platform components to developers. However, there are times when Xamarin apps need to work with existing codebases. Sometimes teams simply don't have the time, budget, or resources to port a large, well-tested, and highly optimized codebase to C#.
Visual C++ for cross-platform mobile development enables the C/C++ and C# code to be built as part of the same solution, offering many advantages including a unified debugging experience. Microsoft has used C/C++ and Xamarin in this way to deliver apps such as Hyperlapse Mobile and Pix Camera.
However, in some cases there is a desire (or requirement) to keep existing C/C++ tools and processes in place and to keep the library code decoupled from the application, treating the library as if it were similar to a third-party component. In these situations, the challenge is not only exposing the relevant members to C# but managing the library as a dependency. And, of course, automating as much of this process as possible.
This post outlines a high-level approach for this scenario and walks through a simple example.
Background
C/C++ is considered a cross-platform language, but great care must be taken to ensure that the source code is indeed cross-platform, using only C/C++ supported by all target compilers and containing little or no conditionally-included platform or compiler-specific code.
Ultimately the code must compile and run successfully on all target platforms therefore this boils down to the commonality across the platforms (and compilers) being targeted. Issues may still arise from minor differences between compilers and so thorough testing (preferably automated) on each target platform becomes increasingly important.
High-level approach
The illustration below represents the four-stage approach used to transform C/C++ source code into a cross-platform Xamarin library that is shared via NuGet and then is consumed in a Xamarin.Forms app.
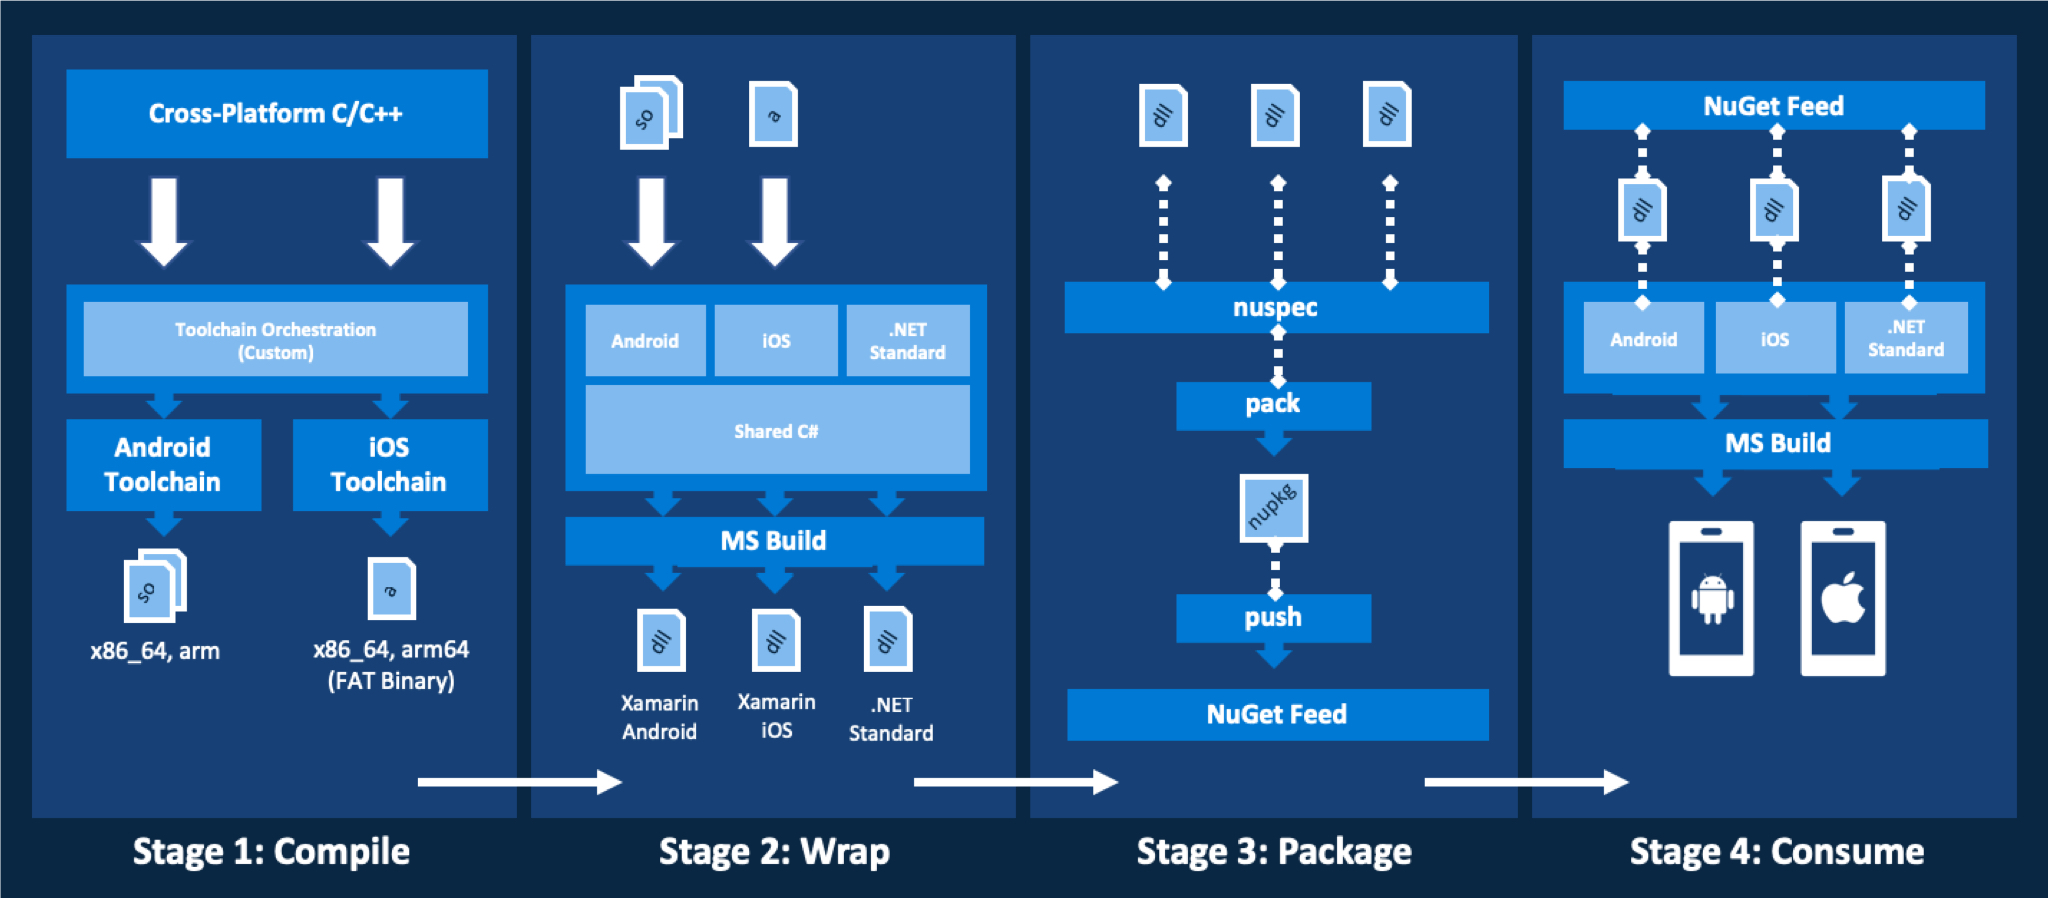
The 4 stages are:
- Compiling the C/C++ source code into platform-specific native libraries.
- Wrapping the native libraries with a Visual Studio solution.
- Packing and pushing a NuGet package for the .NET wrapper.
- Consuming the NuGet package from a Xamarin app.
Stage 1: Compiling the C/C++ source code into platform-specific native libraries
The goal of this stage is to create native libraries that can be called by the C# wrapper. This may or may not be relevant depending on your situation. The many tools and processes that can be brought to bear in this common scenario are beyond the scope of this article. Key considerations are keeping the C/C++ codebase in sync with any native wrapper code, sufficient unit testing, and build automation.
The libraries in the walk-through were created using Visual Studio Code with an accompanying shell script. An extended version of this walk-through can be found in the Mobile CAT GitHub repository that discusses this part of the sample in greater depth. The native libraries are being treated as a third-party dependency in this case however this stage is illustrated for context.
For simplicity, the walkthrough targets only a subset of architectures. For iOS, it uses the lipo utility to create a single fat binary from the individual architecture-specific binaries. Android will use dynamic binaries with a .so extension and iOS will use a static fat binary with a .a extension.
Stage 2: Wrapping the native libraries with a Visual Studio solution
The next stage is to wrap the native libraries so that they are easily used from .NET. This is done with a Visual Studio solution with four projects. A shared project contains the common code. Projects targeting each of Xamarin.Android, Xamarin.iOS, and .NET Standard allow the library to be referenced in a platform-agnostic manner.
The wrapper uses 'the bait and switch trick,'. This is not the only way, but it makes it easy to reference the library and it avoids the need to explicitly manage platform-specific implementations within the consuming application itself. The trick is essentially ensuring that the targets (.NET Standard, Android, iOS) share the same namespace, assembly name, and class structure. Since NuGet will always prefer a platform-specific library, the .NET Standard version is never used at runtime.
Most of the work in this step will focus on using P/Invoke to call the native library methods and managing the references to the underlying objects. The goal is to expose the library’s functionality to the consumer while abstracting out any complexity. The Xamarin.Forms developers do not need to have working knowledge on the inner workings of the unmanaged library. It should feel like they are using any other managed C# library.
Ultimately, the output of this stage is a set of .NET libraries, one per target, along with a nuspec document that contains the information required in order to build the package in the next step.
Stage 3: Packing and pushing a NuGet package for the .NET wrapper
The third stage is creating a NuGet package using the build artifacts from the previous step. The outcome from this step is a NuGet package that can be consumed from a Xamarin app. The walkthrough uses a local directory to serve as the NuGet feed. In production, this step should publish a package to a public or private NuGet feed and should be fully automated.
Stage 4: Consuming the NuGet package from a Xamarin.Forms app
The final step is to reference and use the NuGet package from a Xamarin.Forms app. This requires configuring the NuGet feed in Visual Studio to use the feed defined in the previous step.
Once the feed is configured, the package needs to be referenced from each project in the cross-platform Xamarin.Forms app. ‘The bait-and-switch trick’ provides identical interfaces, so the native library functionality can be called using code defined in a single location.
The source code repository contains a list of further reading that includes articles on how to set up a private NuGet feed on Azure DevOps and how to push the package to that feed. While requiring a little more setup time than a local directory, this type of feed is better in a team development environment.
Walk-through
The steps provided are specific to Visual Studio for Mac, but the structure works in Visual Studio 2017 as well.
Prerequisites
In order to follow along, the developer will need:
Note
An active Apple Developer Account is required in order to deploy apps to an iPhone.
Creating the native libraries (Stage 1)
The native library functionality is based on the example from Walkthrough: Creating and Using a Static Library (C++).
This walkthrough skips the first stage, building the native libraries, since the library is provided as a third-party dependency in this scenario. The precompiled native libraries are included alongside the sample code or can be downloaded directly.
Working with the native library
The original MathFuncsLib example includes a single class called MyMathFuncs with the following definition:
namespace MathFuncs
{
    class MyMathFuncs
    {
    public:
        double Add(double a, double b);
        double Subtract(double a, double b);
        double Multiply(double a, double b);
        double Divide(double a, double b);
    };
}
An additional class defines wrapper functions that allow a .NET consumer to create, dispose, and interact with the underlying native MyMathFuncs class.
#include "MyMathFuncs.h"
using namespace MathFuncs;

extern "C" {
    MyMathFuncs* CreateMyMathFuncsClass();
    void DisposeMyMathFuncsClass(MyMathFuncs* ptr);
    double MyMathFuncsAdd(MyMathFuncs *ptr, double a, double b);
    double MyMathFuncsSubtract(MyMathFuncs *ptr, double a, double b);
    double MyMathFuncsMultiply(MyMathFuncs *ptr, double a, double b);
    double MyMathFuncsDivide(MyMathFuncs *ptr, double a, double b);
}
It will be these wrapper functions that are used on the Xamarin side.
Wrapping the native library (Stage 2)
This stage requires the precompiled libraries described in the previous section.
Creating the Visual Studio solution
In Visual Studio for Mac, click New Project (from the Welcome Page) or New Solution (from the File menu).
From the New Project window, choose Shared Project (from within Multiplatform > Library) and then click Next.
Update the following fields then click Create:
- Project Name: MathFuncs.Shared
- Solution Name: MathFuncs
- Location: Use the default save location (or pick an alternative)
- Create a project within the solution directory: Set this to checked
From Solution Explorer, double-click on the MathFuncs.Shared project and navigate to Main Settings.
Remove .Shared from the Default Namespace so it is set to MathFuncs only, then click OK.
Open MyClass.cs (created by the template), then rename both the class and the filename to MyMathFuncsWrapper and change the namespace to MathFuncs.
CONTROL + CLICK on the solution MathFuncs, then choose Add New Project... from the Add menu.
From the New Project window, choose .NET Standard Library (from within Multiplatform > Library) and then click Next.
Choose .NET Standard 2.0 and then click Next.
Update the following fields then click Create:
- Project Name: MathFuncs.Standard
- Location: Use the same save location as the shared project
From Solution Explorer, double-click on the MathFuncs.Standard project.
Navigate to Main Settings, then update Default Namespace to MathFuncs.
Navigate to the Output settings, then update Assembly name to MathFuncs.
Navigate to the Compiler settings, change the Configuration to Release, setting Debug information to Symbols Only then click OK.
Delete Class1.cs/Getting Started from the project (if one of these has been included as part of the template).
CONTROL + CLICK on the project Dependencies/References folder, then choose Edit References.
Select MathFuncs.Shared from the Projects tab, then click OK.
Repeat steps 7-17 (ignoring step 9) using the following configurations:
PROJECT NAME TEMPLATE NAME NEW PROJECT MENU MathFuncs.Android Class Library Android > Library MathFuncs.iOS Binding Library iOS > Library From Solution Explorer, double-click on the MathFuncs.Android project, then navigate to the Compiler settings.
With the Configuration set to Debug, edit Define Symbols to include Android;.
Change the Configuration to Release, then edit Define Symbols to also include Android;.
Repeat steps 19-20 for MathFuncs.iOS, editing Define Symbols to include iOS; instead of Android; in both cases.
Build the solution in Release configuration (CONTROL + COMMAND + B) and validate that all three output assemblies (Android, iOS, .NET Standard) (in the respective project bin folders) share the same name MathFuncs.dll.
At this stage, the solution should have three targets, one apiece for Android, iOS and .NET Standard, and a shared project that is referenced by each of the three targets. These should be configured to use the same default namespace and output assemblies with the same name. This is necessary for the 'bait and switch' approach mentioned previously.
Adding the native libraries
The process of adding the native libraries to the wrapper solution varies slightly between Android and iOS.
Native references for MathFuncs.Android
CONTROL + CLICK on the MathFuncs.Android project, then choose New Folder from the Add menu naming it lib.
For each ABI (Application Binary Interface), CONTROL + CLICK on the lib folder, then choose New Folder from the Add menu, naming it after that respective ABI. In this case:
- arm64-v8a
- armeabi-v7a
- x86
- x86_64
Note
For a more detailed overview, see the Architectures and CPUs topic from the NDK developer guide, specifically the section on addressing native code in app packages.
Verify the folder structure:
- lib
    - arm64-v8a
    - armeabi-v7a
    - x86
    - x86_64
Add the corresponding .so libraries to each of the ABI folders based on the following mapping:
arm64-v8a: lib/Android/arm64
armeabi-v7a: lib/Android/arm
x86: lib/Android/x86
x86_64: lib/Android/x86_64
Note
To add files, CONTROL + CLICK on the folder representing the respective ABI, then choose Add Files... from the Add menu. Choose the appropriate library (from the PrecompiledLibs directory) then click Open and then click OK leaving the default option to Copy the file to the directory.
For each of the .so files, CONTROL + CLICK then choose the EmbeddedNativeLibrary option from the Build Action menu.
Now the lib folder should appear as follows:
- lib
    - arm64-v8a
        - libMathFuncs.so
    - armeabi-v7a
        - libMathFuncs.so
    - x86
        - libMathFuncs.so
    - x86_64
        - libMathFuncs.so
Native references for MathFuncs.iOS
CONTROL + CLICK on the MathFuncs.iOS project, then choose Add Native Reference from the Add menu.
Choose the libMathFuncs.a library (from libs/ios under the PrecompiledLibs directory) then click Open
CONTROL + CLICK on the libMathFuncs file (within the Native References folder, then choose the Properties option from the menu
Configure the Native Reference properties so they are checked (showing a tick icon) in the Properties Pad:
- Force Load
- Is C++
- Smart Link
Note
Using a binding library project type along with a native reference embeds the static library and enables it to be automatically linked with the Xamarin.iOS app that references it (even when it is included via a NuGet package).
Open ApiDefinition.cs, deleting the templated commented code (leaving only the
MathFuncsnamespace), then perform the same step for Structs.csNote
A Binding library project requires these files (with the ObjCBindingApiDefinition and ObjCBindingCoreSource build actions) in order to build. However, we will write the code, to call our native library, outside of these files in a way that can be shared between both Android and iOS library targets using standard P/Invoke.
Writing the managed library code
Now, write the C# code to call the native library. The goal is to hide any underlying complexity. The consumer should not need any working knowledge of the native library internals or of P/Invoke concepts.
Creating a SafeHandle
CONTROL + CLICK on the MathFuncs.Shared project, then choose Add File... from the Add menu.
Choose Empty Class from the New File window, name it MyMathFuncsSafeHandle and then click New
Implement the MyMathFuncsSafeHandle class:
using System;
using Microsoft.Win32.SafeHandles;

namespace MathFuncs
{
    internal class MyMathFuncsSafeHandle : SafeHandleZeroOrMinusOneIsInvalid
    {
        public MyMathFuncsSafeHandle() : base(true) { }

        public IntPtr Ptr => handle;

        protected override bool ReleaseHandle()
        {
            // TODO: Release the handle here
            return true;
        }
    }
}
Note
A SafeHandle is the preferred way to work with unmanaged resources in managed code. This abstracts away a lot of boilerplate code related to critical finalization and object lifecycle. The owner of this handle can subsequently treat it like any other managed resource and will not have to implement the full Disposable pattern.
Creating the internal wrapper class
Open MyMathFuncsWrapper.cs, changing it to an internal static class
namespace MathFuncs
{
    internal static class MyMathFuncsWrapper
    {
    }
}
In the same file, add the following conditional statement to the class:
#if Android
    const string DllName = "libMathFuncs.so";
#else
    const string DllName = "__Internal";
#endif
Note
This sets the DllName constant value based on whether the library is being built for Android or iOS. This is to address the different naming conventions used by each respective platform but also the type of library being used in this case. Android is using a dynamic library and so expects a filename including extension. For iOS, '__Internal' is required since we are using a static library.
Add a reference to System.Runtime.InteropServices at the top of the MyMathFuncsWrapper.cs file
using System.Runtime.InteropServices;Add the wrapper methods to handle the creation and disposal of the MyMathFuncs class:
[DllImport(DllName, EntryPoint = "CreateMyMathFuncsClass")]
internal static extern MyMathFuncsSafeHandle CreateMyMathFuncs();

[DllImport(DllName, EntryPoint = "DisposeMyMathFuncsClass")]
internal static extern void DisposeMyMathFuncs(MyMathFuncsSafeHandle ptr);
Note
We are passing in our constant DllName to the DllImport attribute along with the EntryPoint which explicitly tells the .NET runtime the name of the function to call within that library. Technically, we do not need to provide the EntryPoint value if our managed method names were identical to the unmanaged one. If one is not provided, the managed method name would be used as the EntryPoint instead. However, it is better to be explicit.
Add the wrapper methods to enable us to work with the MyMathFuncs class using the following code:
[DllImport(DllName, EntryPoint = "MyMathFuncsAdd")]
internal static extern double Add(MyMathFuncsSafeHandle ptr, double a, double b);

[DllImport(DllName, EntryPoint = "MyMathFuncsSubtract")]
internal static extern double Subtract(MyMathFuncsSafeHandle ptr, double a, double b);

[DllImport(DllName, EntryPoint = "MyMathFuncsMultiply")]
internal static extern double Multiply(MyMathFuncsSafeHandle ptr, double a, double b);

[DllImport(DllName, EntryPoint = "MyMathFuncsDivide")]
internal static extern double Divide(MyMathFuncsSafeHandle ptr, double a, double b);
Note
We're using simple types for the parameters in this example. Since marshalling is a bitwise-copy in this case it requires no additional work on our part. Also notice the use of the MyMathFuncsSafeHandle class instead of the standard IntPtr. The IntPtr is automatically mapped to the SafeHandle as part of the marshalling process.
Verify that the finished MyMathFuncsWrapper class appears as below:
using System.Runtime.InteropServices;

namespace MathFuncs
{
    internal static class MyMathFuncsWrapper
    {
        #if Android
            const string DllName = "libMathFuncs.so";
        #else
            const string DllName = "__Internal";
        #endif

        [DllImport(DllName, EntryPoint = "CreateMyMathFuncsClass")]
        internal static extern MyMathFuncsSafeHandle CreateMyMathFuncs();

        [DllImport(DllName, EntryPoint = "DisposeMyMathFuncsClass")]
        internal static extern void DisposeMyMathFuncs(MyMathFuncsSafeHandle ptr);

        [DllImport(DllName, EntryPoint = "MyMathFuncsAdd")]
        internal static extern double Add(MyMathFuncsSafeHandle ptr, double a, double b);

        [DllImport(DllName, EntryPoint = "MyMathFuncsSubtract")]
        internal static extern double Subtract(MyMathFuncsSafeHandle ptr, double a, double b);

        [DllImport(DllName, EntryPoint = "MyMathFuncsMultiply")]
        internal static extern double Multiply(MyMathFuncsSafeHandle ptr, double a, double b);

        [DllImport(DllName, EntryPoint = "MyMathFuncsDivide")]
        internal static extern double Divide(MyMathFuncsSafeHandle ptr, double a, double b);
    }
}
Completing the MyMathFuncsSafeHandle class
Open the MyMathFuncsSafeHandle class, navigate to the placeholder TODO comment within the ReleaseHandle method:
// TODO: Release the handle hereReplace the TODO line:
MyMathFuncsWrapper.DisposeMyMathFuncs(this);
Writing the MyMathFuncs class
Now that the wrapper is complete, create a MyMathFuncs class that will manage the reference to the unmanaged C++ MyMathFuncs object.
CONTROL + CLICK on the MathFuncs.Shared project, then choose Add File... from the Add menu.
Choose Empty Class from the New File window, name it MyMathFuncs and then click New
Add the following members to the MyMathFuncs class:
readonly MyMathFuncsSafeHandle handle;Implement the constructor for the class so it creates and stores a handle to the native MyMathFuncs object when the class is instantiated:
public MyMathFuncs()
{
    handle = MyMathFuncsWrapper.CreateMyMathFuncs();
}
Implement the IDisposable interface using the following code:
public class MyMathFuncs : IDisposable
{
    ...

    protected virtual void Dispose(bool disposing)
    {
        if (handle != null && !handle.IsInvalid)
            handle.Dispose();
    }

    public void Dispose()
    {
        Dispose(true);
        GC.SuppressFinalize(this);
    }

    // ...
}
Implement the MyMathFuncs methods using the MyMathFuncsWrapper class to perform the real work under the hood by passing in the pointer we have stored to the underlying unmanaged object. The code should be as follows:
public double Add(double a, double b)
{
    return MyMathFuncsWrapper.Add(handle, a, b);
}

public double Subtract(double a, double b)
{
    return MyMathFuncsWrapper.Subtract(handle, a, b);
}

public double Multiply(double a, double b)
{
    return MyMathFuncsWrapper.Multiply(handle, a, b);
}

public double Divide(double a, double b)
{
    return MyMathFuncsWrapper.Divide(handle, a, b);
}
Creating the nuspec
In order to have the library packaged and distributed via NuGet, the solution needs a nuspec file. This will identify which of the resulting assemblies will be included for each supported platform.
CONTROL + CLICK on the solution MathFuncs, then choose Add Solution Folder from the Add menu naming it SolutionItems.
CONTROL + CLICK on the SolutionItems folder, then choose New File... from the Add menu.
Choose Empty XML File from the New File window, name it MathFuncs.nuspec and then click New.
Update MathFuncs.nuspec with the basic package metadata to be displayed to the NuGet consumer. For example:
<?xml version="1.0"?>
<package>
    <metadata>
        <id>MathFuncs</id>
        <version>$version$</version>
        <authors>Microsoft Mobile Customer Advisory Team</authors>
        <description>Sample C++ Wrapper Library</description>
        <requireLicenseAcceptance>false</requireLicenseAcceptance>
        <copyright>Copyright 2018</copyright>
    </metadata>
</package>
Note
See the nuspec reference document for further detail on the schema used for this manifest.
Add a
<files>element as a child of the<package>element (just below<metadata>), identifying each file with a separate<file>element:<files> <!-- Android --> <!-- iOS --> <!-- netstandard2.0 --> </files>Note
When a package is installed into a project, and where there are multiple assemblies specified by the same name, NuGet will effectively choose the assembly that is most specific to the given platform.
Add the
<file>elements for the Android assemblies:<file src="MathFuncs.Android/bin/Release/MathFuncs.dll" target="lib/MonoAndroid81/MathFuncs.dll" /> <file src="MathFuncs.Android/bin/Release/MathFuncs.pdb" target="lib/MonoAndroid81/MathFuncs.pdb" />Add the
<file>elements for the iOS assemblies:<file src="MathFuncs.iOS/bin/Release/MathFuncs.dll" target="lib/Xamarin.iOS10/MathFuncs.dll" /> <file src="MathFuncs.iOS/bin/Release/MathFuncs.pdb" target="lib/Xamarin.iOS10/MathFuncs.pdb" />Add the
<file>elements for the netstandard2.0 assemblies:<file src="MathFuncs.Standard/bin/Release/netstandard2.0/MathFuncs.dll" target="lib/netstandard2.0/MathFuncs.dll" /> <file src="MathFuncs.Standard/bin/Release/netstandard2.0/MathFuncs.pdb" target="lib/netstandard2.0/MathFuncs.pdb" />Verify the nuspec manifest:
<?xml version="1.0"?>
<package>
<metadata>
    <id>MathFuncs</id>
    <version>$version$</version>
    <authors>Microsoft Mobile Customer Advisory Team</authors>
    <description>Sample C++ Wrapper Library</description>
    <requireLicenseAcceptance>false</requireLicenseAcceptance>
    <copyright>Copyright 2018</copyright>
</metadata>
<files>

    <!-- Android -->
    <file src="MathFuncs.Android/bin/Release/MathFuncs.dll" target="lib/MonoAndroid81/MathFuncs.dll" />
    <file src="MathFuncs.Android/bin/Release/MathFuncs.pdb" target="lib/MonoAndroid81/MathFuncs.pdb" />

    <!-- iOS -->
    <file src="MathFuncs.iOS/bin/Release/MathFuncs.dll" target="lib/Xamarin.iOS10/MathFuncs.dll" />
    <file src="MathFuncs.iOS/bin/Release/MathFuncs.pdb" target="lib/Xamarin.iOS10/MathFuncs.pdb" />

    <!-- netstandard2.0 -->
    <file src="MathFuncs.Standard/bin/Release/netstandard2.0/MathFuncs.dll" target="lib/netstandard2.0/MathFuncs.dll" />
    <file src="MathFuncs.Standard/bin/Release/netstandard2.0/MathFuncs.pdb" target="lib/netstandard2.0/MathFuncs.pdb" />

</files>
</package>
Note
This file specifies the assembly output paths from a Release build, so be sure to build the solution using that configuration.
At this point, the solution contains 3 .NET assemblies and a supporting nuspec manifest.
Distributing the .NET wrapper with NuGet
The next step is to package and distribute the NuGet package so it may be easily consumed by the app and managed as a dependency. The wrapping and consumption could all be done within a single solution, but distributing the library via NuGet aids in decoupling and enables us to manage these codebases independently.
Preparing a local packages directory
The simplest form of NuGet feed is a local directory:
- In Finder, navigate to a convenient directory. For example, /Users.
- Choose New Folder from the File menu, providing a meaningful name such as local-nuget-feed.
Creating the package
Set the Build Configuration to Release, and execute a build using COMMAND + B.
Open Terminal and change directory to the folder containing the nuspec file.
In Terminal, execute the nuget pack command specifying the nuspec file, the Version (for example, 1.0.0), and the OutputDirectory using the folder created in the previous step, that is, local-nuget-feed. For example:
nuget pack MathFuncs.nuspec -Version 1.0.0 -OutputDirectory ~/local-nuget-feedConfirm that MathFuncs.1.0.0.nupkg has been created in the local-nuget-feed directory.
[OPTIONAL] Using a private NuGet feed with Azure DevOps
A more robust technique is described in Get started with NuGet packages in Azure DevOps, which shows how to create a private feed and push the package (generated in the previous step) to that feed.
It is ideal to have this workflow fully automated, for example using Azure Pipelines. For more information, see Get started with Azure Pipelines.
Consuming the .NET wrapper from a Xamarin.Forms app
To complete the walkthrough, create a Xamarin.Forms app to consume the package just published to the local NuGet feed.
Creating the Xamarin.Forms project
Open a new instance of Visual Studio for Mac. This can be done from Terminal:
open -n -a "Visual Studio"In Visual Studio for Mac, click New Project (from the Welcome Page) or New Solution (from the File menu).
From the New Project window, choose Blank Forms App (from within Multiplatform > App) and then click Next.
Update the following fields then click Next:
- App Name: MathFuncsApp.
- Organization Identifier: Use a reverse namespace, for example, com.{your_org}.
- Target Platforms: Use the default (both Android and iOS targets).
- Shared Code: Set this to .NET Standard (a “Shared Library” solution is possible, but beyond the scope of this walkthrough).
Update the following fields then click Create:
- Project Name: MathFuncsApp.
- Solution Name: MathFuncsApp.
- Location: Use the default save location (or pick an alternative).
In Solution Explorer, CONTROL + CLICK on the target (MathFuncsApp.Android or MathFuncs.iOS) for initial testing, then choose Set As Startup Project.
Choose the preferred device or Simulator/Emulator.
Run the solution (COMMAND + RETURN) to validate that the templated Xamarin.Forms project builds and runs okay.
Note
iOS (specifically the simulator) tends to have the fastest build/deploy time.
Adding the local NuGet feed to the NuGet configuration
In Visual Studio, choose Preferences (from the Visual Studio menu).
Choose Sources from under the NuGet section, then click Add.
Update the following fields then click Add Source:
- Name: Provide a meaningful name, for example, Local-Packages.
- Location: Specify the local-nuget-feed folder created in the previous step.
Note
In this case there is no need to specify a Username and Password.
Click OK.
Referencing the package
Repeat the following steps for each project (MathFuncsApp, MathFuncsApp.Android, and MathFuncsApp.iOS).
- CONTROL + CLICK on the project, then choose Add NuGet Packages... from the Add menu.
- Search for MathFuncs.
- Verify the Version of the package is 1.0.0 and the other details appear as expected such as the Title and Description, that is, MathFuncs and Sample C++ Wrapper Library.
- Select the MathFuncs package, then click Add Package.
Using the library functions
Now, with a reference to the MathFuncs package in each of the projects, the functions are available to the C# code.
Open MainPage.xaml.cs from within the MathFuncsApp common Xamarin.Formsproject (referenced by both MathFuncsApp.Android and MathFuncsApp.iOS).
Add using statements for System.Diagnostics and MathFuncs at the top of the file:
using System.Diagnostics;
using MathFuncs;
Declare an instance of the
MyMathFuncsclass at the top of theMainPageclass:MyMathFuncs myMathFuncs;Override the
OnAppearingandOnDisappearingmethods from theContentPagebase class:protected override void OnAppearing() { base.OnAppearing(); } protected override void OnDisappearing() { base.OnDisappearing(); }Update the
OnAppearingmethod to initialize themyMathFuncsvariable declared previously:protected override void OnAppearing() { base.OnAppearing(); myMathFuncs = new MyMathFuncs(); }Update the
OnDisappearingmethod to call theDisposemethod onmyMathFuncs:protected override void OnDisappearing() { base.OnAppearing(); myMathFuncs.Dispose(); }Implement a private method called TestMathFuncs as follows:
private void TestMathFuncs()
{
    var numberA = 1;
    var numberB = 2;

    // Test Add function
    var addResult = myMathFuncs.Add(numberA, numberB);

    // Test Subtract function
    var subtractResult = myMathFuncs.Subtract(numberA, numberB);

    // Test Multiply function
    var multiplyResult = myMathFuncs.Multiply(numberA, numberB);

    // Test Divide function
    var divideResult = myMathFuncs.Divide(numberA, numberB);

    // Output results
    Debug.WriteLine($"{numberA} + {numberB} = {addResult}");
    Debug.WriteLine($"{numberA} - {numberB} = {subtractResult}");
    Debug.WriteLine($"{numberA} * {numberB} = {multiplyResult}");
    Debug.WriteLine($"{numberA} / {numberB} = {divideResult}");
}
Finally, call
TestMathFuncsat the end of theOnAppearingmethod:TestMathFuncs();Run the app on each target platform and validate the output in the Application Output Pad appears as follows:
1 + 2 = 3
1 - 2 = -1
1 * 2 = 2
1 / 2 = 0.5
Note
If you encounter a 'DLLNotFoundException' when testing on Android, or a build error on iOS, be sure to check that the CPU architecture of the device/emulator/simulator you are using is compatible with the subset that we chose to support.
Summary
This article explained how to create a Xamarin.Forms app that uses native libraries through a common .NET wrapper distributed via a NuGet package. The example provided in this walkthrough is intentionally very simplistic to more easily demonstrate the approach. A real application will have to deal with complexities such as exception handling, callbacks, the marshalling of more complex types, and linking with other dependency libraries. A key consideration is the process by which the evolution of the C++ code is coordinated and synced with the wrapper and client applications. This process may vary depending on whether one or both of those concerns are the responsibility of a single team. Either way, automation is a real benefit. Below are some resources providing further reading around some of the key concepts along with the relevant downloads.
Downloads
Examples
- Hyperlapse cross-platform mobile development with C++
- Microsoft Pix (C++ and Xamarin)
- Mono San Angeles Sample Port