Manage Configuration Manager console extensions
Applies to: Configuration Manager (current branch)
Starting in Configuration Manager 2103, the Console extensions node allows you to start managing the approval and installation of console extensions used in your environment. Having extensions in the console doesn't make them immediately available. From a high level, the steps are:
- An administrator has to approve an extension for the site
- The administrator has to enable notifications for the extension.
- The console users can then install the extension to their local console.
After you approve an extension, when you open the console, you'll see a console notification. From the notification, you can start the extension installer, or use the Install option from the Console extensions node. After the installer completes, the console restarts automatically, and you can use the extension.
The old style of console extensions will start being phased out in favor of the new style since they're more secure and centrally managed. The new style of console extensions has the following benefits:
- Centralized management of console extensions for the site instead of manually placing binaries on individual consoles.
- A clear separation of console extensions from different extension providers.
- The ability for admins to have more control over which console extensions are loaded and used in the environment, to keep them more secure.
- A hierarchy setting that allows for only using the new style of console extension.
Important
If this setting is used, your old style extensions that aren't approved through the Console Extensions node will no longer be able to be used. The setting, Only allow console extensions that are approved for the hierarchy, is
enabledby default if you installed from the 2103 baseline image. The setting remainsdisabledby default, if you upgraded from a version prior to 2103. If the setting was enabled in error, disabling the setting allows the old style extensions to be used again.
Prerequisites
The Configuration Manager console needs to be able to connect to the administration service and the administration service needs to be functional.
About the Console Extensions node
(Introduced in version 2103)
The Console Extensions node is located under Administration > Overview > Updates and Servicing. Actions for console extensions are grouped in the ribbon and the right-click menu. Console extensions downloaded from Community hub will be shown here.

Actions for Console Extensions group:
- Refresh: Refreshes the node
- Import Console Extension: Launches the Import Console Extension wizard (added in 2111)
Actions for All Sites group:
- Approve Installation: Approves the console extension for installation across all sites. An extension must be approved before notifications are enabled.
- Revoke Approval:
- Revokes the ability to install the extension from the Console Extensions node.
- Notifies then uninstalls existing instances of the extension across the hierarchy at the next launch of a locally installed console.
- Allows for reapproval of the extension at a later date.
- Enable Notifications: Upon next launch of the console, notifies users within the security scope that the extension can be installed.
- Disable Notifications: Disables the console notification messages for the extension. Users within the security scope can still install approved extensions from the Console Extensions node.
- Require Extension (added in 2111): Automatically installs the extension for users within the security scope on the next launch before connecting to the site. The user launching the console needs local administrator privileges for the extension installation.
- Make Optional (added in 2111): Removes the requirement for an extension. Console users can still install the extension locally from the Console Extensions node.
- Delete:
- Revokes the ability to install the extension from the Console Extensions node.
- Notifies then uninstalls existing instances of the extension across the hierarchy at the next launch of a locally installed console.
- Removes the extension from the Console Extensions node so it can't be reapproved later.
Classify group:
- Set Security Scopes: Set the security scopes to secure the object and limit access.
Local Extension group:
- Install: Installs the selected extension for the current local console
- Uninstall: Uninstalls the selected extension from the current local console
Note
- The WebView2 console extension is approved by default to enable using Community hub. The files are automatically downloaded from
https://developer.microsoft.com/en-us/microsoft-edge/webview2/#download-sectionwith the other redistributable files. - When you upgrade to Configuration Manager 2107, you will be prompted to install the WebView2 console extension again.
Enable hierarchy approved console extensions
- In the Configuration Manager console, go to the Administration workspace, expand Site Configuration, and select Sites.
- Select Hierarchy Settings from the ribbon.
- On the General tab, enable or disable the Only allow console extensions that are approved for the hierarchy option.
- Select Ok when done to close the Hierarchy Settings Properties.
Warning
If this setting is enabled, your old style extensions that aren't approved through the Console Extensions node will no longer be able to be used. The setting, Only allow console extensions that are approved for the hierarchy, is enabled by default if you installed from the 2103 baseline image. The setting remains disabled by default, if you upgraded from a version prior to 2103. If the setting was enabled in error, disabling the setting allows the old style extensions to be used again.
Get console extensions
There are three ways to get the new style of hierarchy approved console extensions into Configuration Manager:
- An extension may come with Configuration Manager, such as WebView2
- Download console extensions from Community hub
- Import console extensions
Install and test an extension on a local console
Change the security scope for the extension. Changing the security scope is recommended for initial testing of an extension.
- Go to the Console Extensions node under Administration > Overview > Updates and Servicing.
- Select the extension, then select Set Security Scopes from the ribbon.
- Remove the Default security scope and add a scope that only contains one or two admins for initial testing.
- Choose OK to save the security scope for the extension.
Approve the extension by selecting Approve Installation from the ribbon or right-click menu.
- If the extension isn't approved, you won't be able to install it or enable in-console notifications for it.
- If you restart your console at this point, a notification about the available extension won't occur since you haven't enabled the option yet.
Install the extension on the local console by choosing Install.
Once the extension is installed, verify it displays and you can use it from the local console.
Enable user notifications for extension installation
- If needed, modify the security scopes for the extension to allow access by more admins. These admins will be targeted with the in-console notification for installing the extension.
- Select Enable Notifications.
- Launch a Configuration Manager console that doesn't have the extension installed. Ideally, use a test account that you gave access to when you modified the security scope.
- Verify that the notification for the extension occurs and that you can install the extension.
Allow unsigned console extensions for the hierarchy
(Applies to Configuration Manager version 2107 or later)
Starting in Configuration Manager version 2107, you can choose to allow unsigned hierarchy approved console extensions. It's a best practice to always used signed extensions to minimize security risks and to confirm the authenticity of a console extension. However, in some cases you may need to allow unsigned console extensions due to an unsigned internally developed extension, or for testing your own custom extension in a lab. To allow import and install of unsigned hierarchy approved console extensions, you'll enable a hierarchy setting.
- In the Configuration Manager console, go to the Administration workspace, expand Site Configuration, and select Sites.
- Select Hierarchy Settings from the ribbon.
- On the General tab, enable the Hierarchy approved console extensions can be unsigned option.
- Select Ok when done to close the Hierarchy Settings Properties.
Note
Currently, when an unsigned extension isn't enabled for user notification, in the Console Extensions node, the Required column remains blank instead of populating a value of No.
Require installation of a console extension
(Introduced in 2111)
Starting in Configuration Manager version 2111, you can require a console extension to be installed before it connects to the site. After you require an extension, it automatically installs for the local console the next time an admin launches it. To require the installation of a console extension:
- In the Configuration Manager console, go to the Administration workspace.
- Expand Updates and Servicing and select the Console Extensions node.
- Select the extension, then select Require Extension from either the right-click menu or the ribbon.
- Selecting Make Optional for an extension removes the extension requirement. Console users can still install it locally from the Console Extensions node.
- The next time the console is launched by a user within the extension's security scope, installation starts automatically.
- The user launching the console needs local administrator privileges for the extension installation.
Console extension installation user notifications
Users are notified when console extensions are approved for installation. These notifications occur for users in the following scenarios:
- The Configuration Manager console requires a built-in extension, such as WebView2, to be installed or updated.
- Console extensions are approved and notifications are enabled from Administration > Overview > Updates and Servicing > Console Extensions.
- When notifications are enabled, users within the security scope for the extension receive the following prompts:
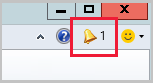
In the upper-right corner of the console, select the bell icon to display Configuration Manager console notifications.
The notification will say New custom console extensions are available.
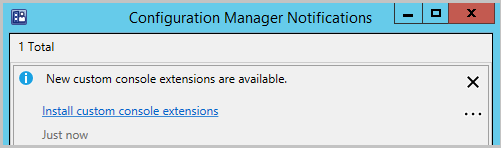
Select the link Install custom console extensions to launch the install.
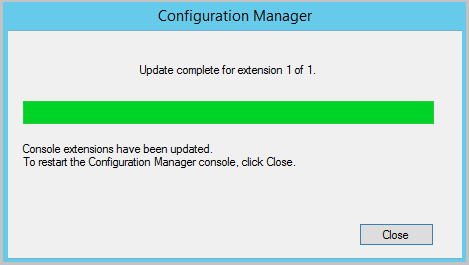
When the install completes, select Close to restart the console and enable the new extension.
Note
When you upgrade to Configuration Manager 2107, you will be prompted to install the WebView2 console extension again. For more information about the WebView2 installation, see the WebView2 installation section if the Community hub article.
Status messages for console extensions
(Introduced in 2111)
Starting in version 2111, the site creates status messages for events related to console extensions. Status messages improve the visibility and transparency of console extensions that are used with your site. Use these status messages to make sure your site uses known and trusted console extensions. The status messages have IDs from 54201 to 54208. They all include the following information:
- The user that made the change
- The ID of the extension
- The version of the extension
There are four categories of message events:
- Required or optional
- Approve or disapprove
- Enable or disable
- Tombstone or untombstone
For example, the description of status message ID 54201 is User "%1" made console extension with ID "%2" and version "%3" required.
Next steps
Feedback
Coming soon: Throughout 2024 we will be phasing out GitHub Issues as the feedback mechanism for content and replacing it with a new feedback system. For more information see: https://aka.ms/ContentUserFeedback.
Submit and view feedback for