Use a VPN and per-app VPN policy on Android Enterprise devices in Microsoft Intune
Virtual private networks (VPN) allow users to access organization resources remotely, including from home, hotels, cafes, and more. In Microsoft Intune, you can configure VPN client apps on Android Enterprise devices using an app configuration policy. Then, deploy this policy with its VPN configuration to devices in your organization.
You can also create VPN policies that are used by specific apps. This feature is called per-app VPN. When the app is active, it can connect to the VPN, and access resources through the VPN. When the app isn't active, the VPN isn't used.
This feature applies to:
- Android Enterprise
There are two ways to build the app configuration policy for your VPN client app:
- Configuration designer
- JSON data
This article shows you how to create a per-app VPN and VPN app configuration policy using both options.
Note
Many of the VPN client configuration parameters are similar. But, each app has its unique keys and options. Consult with your VPN vendor if you have questions.
Before you begin
Android doesn't automatically trigger a VPN client connection when an app opens. The VPN connection must be started manually. Or, you can use always-on VPN to start the connection.
The following VPN clients support Intune app configuration policies:
- Cisco AnyConnect
- Citrix SSO
- F5 Access
- Palo Alto Networks GlobalProtect
- Pulse Secure
- SonicWall Mobile Connect
When you create the VPN policy in Intune, you'll select different keys to configure. These key names vary with the different VPN client apps. So, the key names in your environment may be different than the examples in this article.
The Configuration designer and JSON data can successfully use certificate-based authentication. If VPN authentication requires client certificates, then create the certificate profiles before you create the VPN policy. The VPN app configuration policies use the values from the certificate profiles.
Android Enterprise personally owned work profile devices support SCEP and PKCS certificates. Android Enterprise fully managed, dedicated, and corporate-owned work profile devices only support SCEP certificates. For more information, see Use certificates for authentication in Microsoft Intune.
Per-app VPN overview
When creating and testing per-app VPN, the basic flow includes the following steps:
- Select the VPN client application. Before you begin (in this article) lists the supported apps.
- Get the application package IDs of the apps that will use the VPN connection. Get the app package ID (in this article) shows you how.
- If you use certificates to authenticate the VPN connection, then create and deploy the certificate profiles before you deploy the VPN policy. Make sure the certificate profiles deploy successfully. For more information, see Use certificates for authentication in Microsoft Intune.
- Add the VPN client application to Intune, and deploy the app to your users and devices.
- Create the VPN app configuration policy. Use the app package IDs and certificate information in the policy.
- Deploy the new VPN policy.
- Confirm the VPN client app successfully connects to your VPN server.
- When the app is active, confirm that traffic from your app successfully goes through the VPN.
Get the app package ID
Get the package ID for each application that will use the VPN. For publicly available applications, you can get the app package ID in the Google Play store. The displayed URL for each application includes the package ID.
In the following example, the package ID of the Microsoft Edge browser app is com.microsoft.emmx. The package ID is part of the URL:

For Line of Business (LOB) apps, get the package ID from the vendor or application developer.
Certificates
This article assumes your VPN connection uses certificate-based authentication. It also assumes you successfully deployed all the certificates in the chain needed for clients to successfully authenticate. Typically, this certificate chain includes the client certificate, any intermediate certificates, and the root certificate.
For more information on certificates, see Use certificates for authentication in Microsoft Intune.
When your client authentication certificate profile is deployed, it creates a certificate token in the certificate profile. This token is used to create the VPN app configuration policy.
If you’re not familiar with creating app configuration policies, see Add app configuration policies for managed Android Enterprise devices.
Use the Configuration Designer
Sign in to the Microsoft Intune admin center.
Select Apps > App configuration policies > Add > Managed devices.
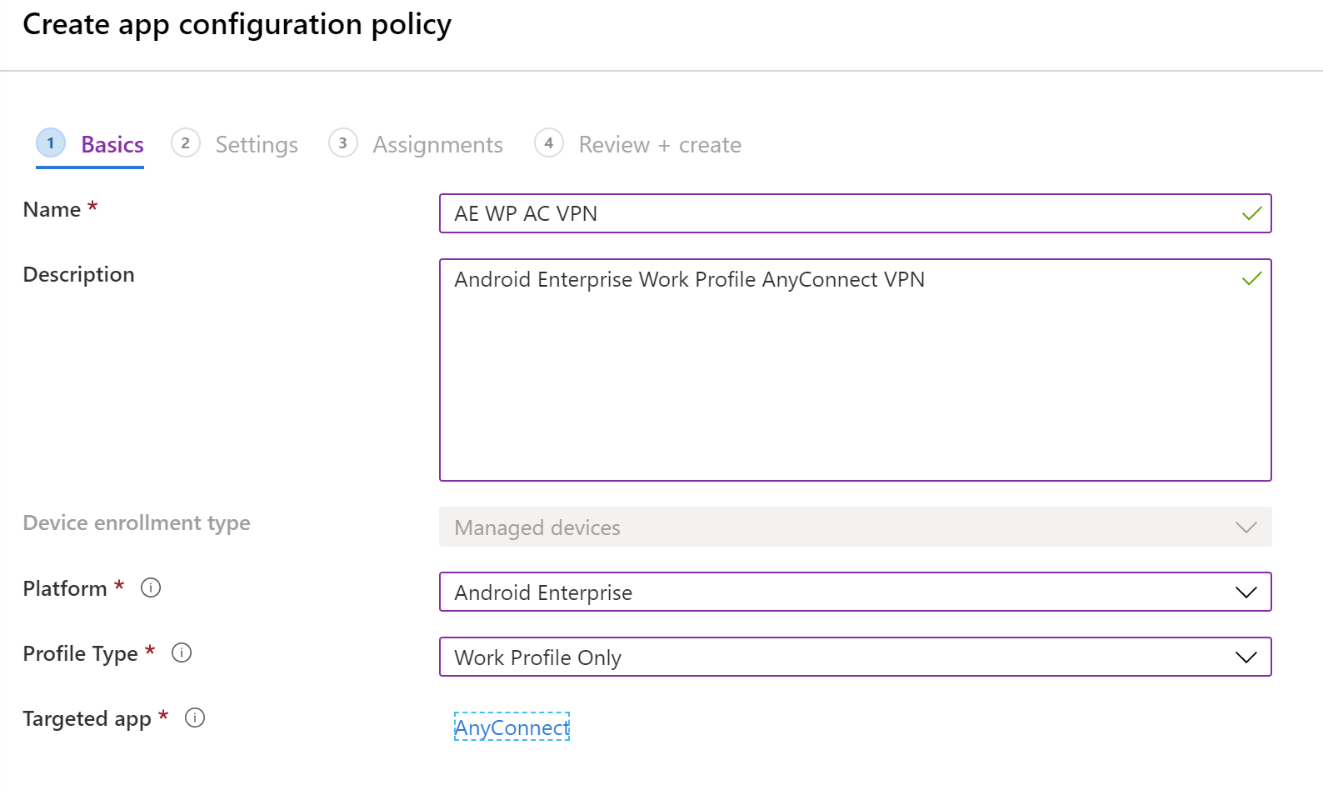
In Basics, enter the following properties:
Name: Enter a descriptive name for the policy. Name your policies so you can easily identify them later. For example, a good policy name is App config policy: Cisco AnyConnect VPN policy for Android Enterprise work profile devices.
Description: Enter a description for the policy. This setting is optional, but recommended.
Platform: Select Android Enterprise.
Profile type: Your options:
- All Profile Types: This option supports username and password authentication. If you use certificate-based authentication, don't use this option.
- Fully Managed, Dedicated, and Corporate-Owned Work Profile Only: This option supports certificate-based authentication, and username and password authentication.
- Personally-Owned Work Profile Only: This option supports certificate-based authentication, and username and password authentication.
Targeted app: Select the VPN client app you previously added. In the following example, the Cisco AnyConnect VPN client app is used:
Select Next.
In Settings, enter the following properties:
Configuration settings format: Select Use Configuration designer:
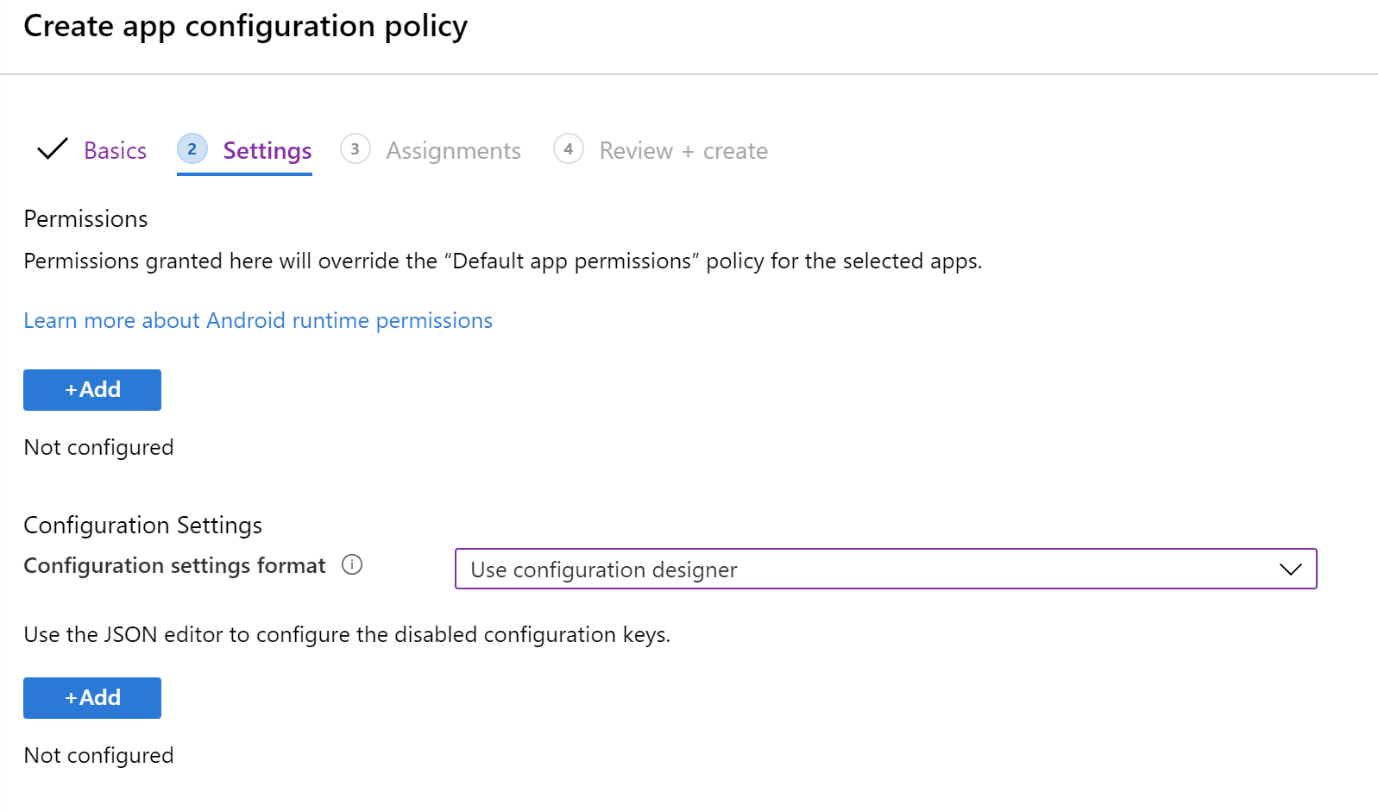
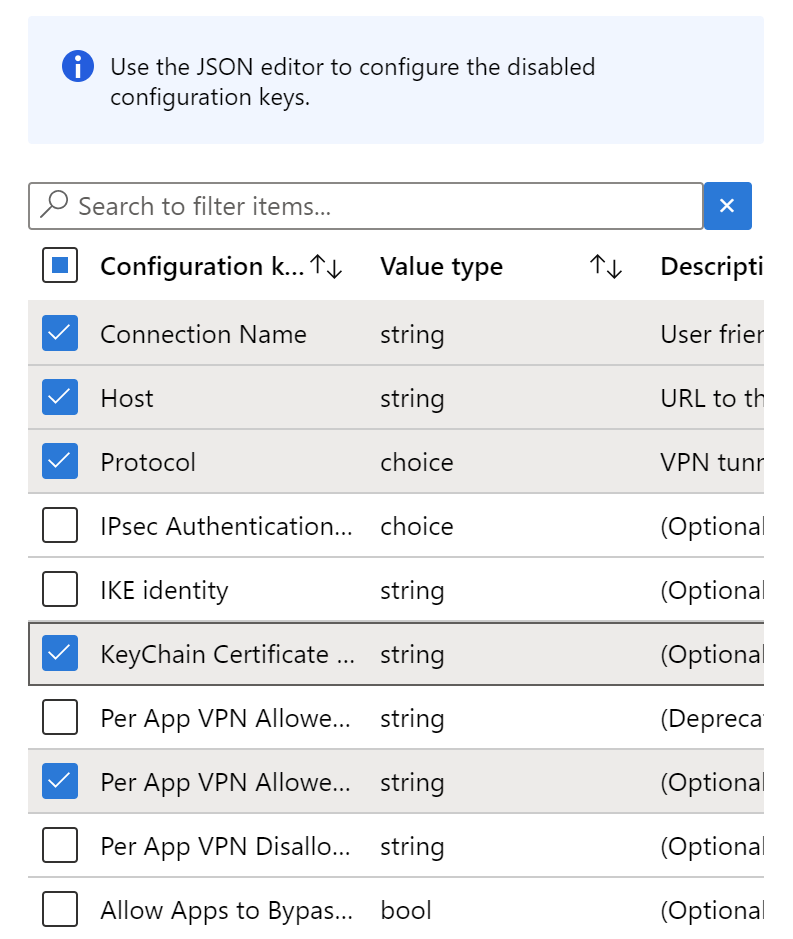
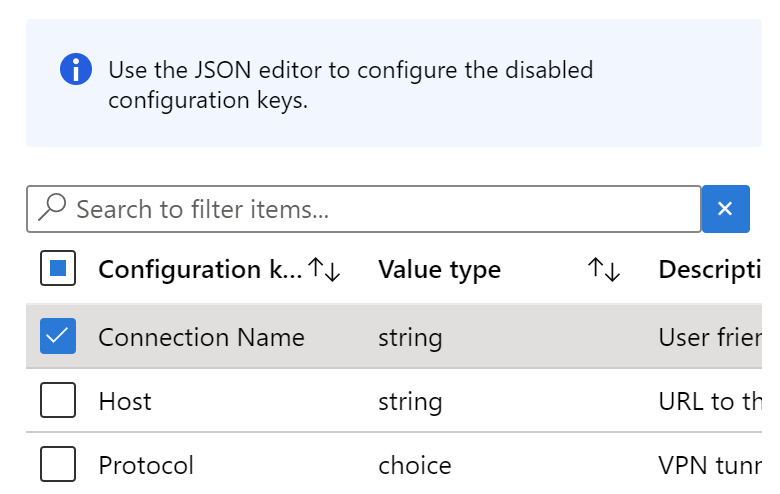
Add: Shows the list of configuration keys. Select all the configuration keys needed for your configuration > OK.
In the following example, we selected a minimal list for AnyConnect VPN, including certificate-based authentication and per-app VPN:
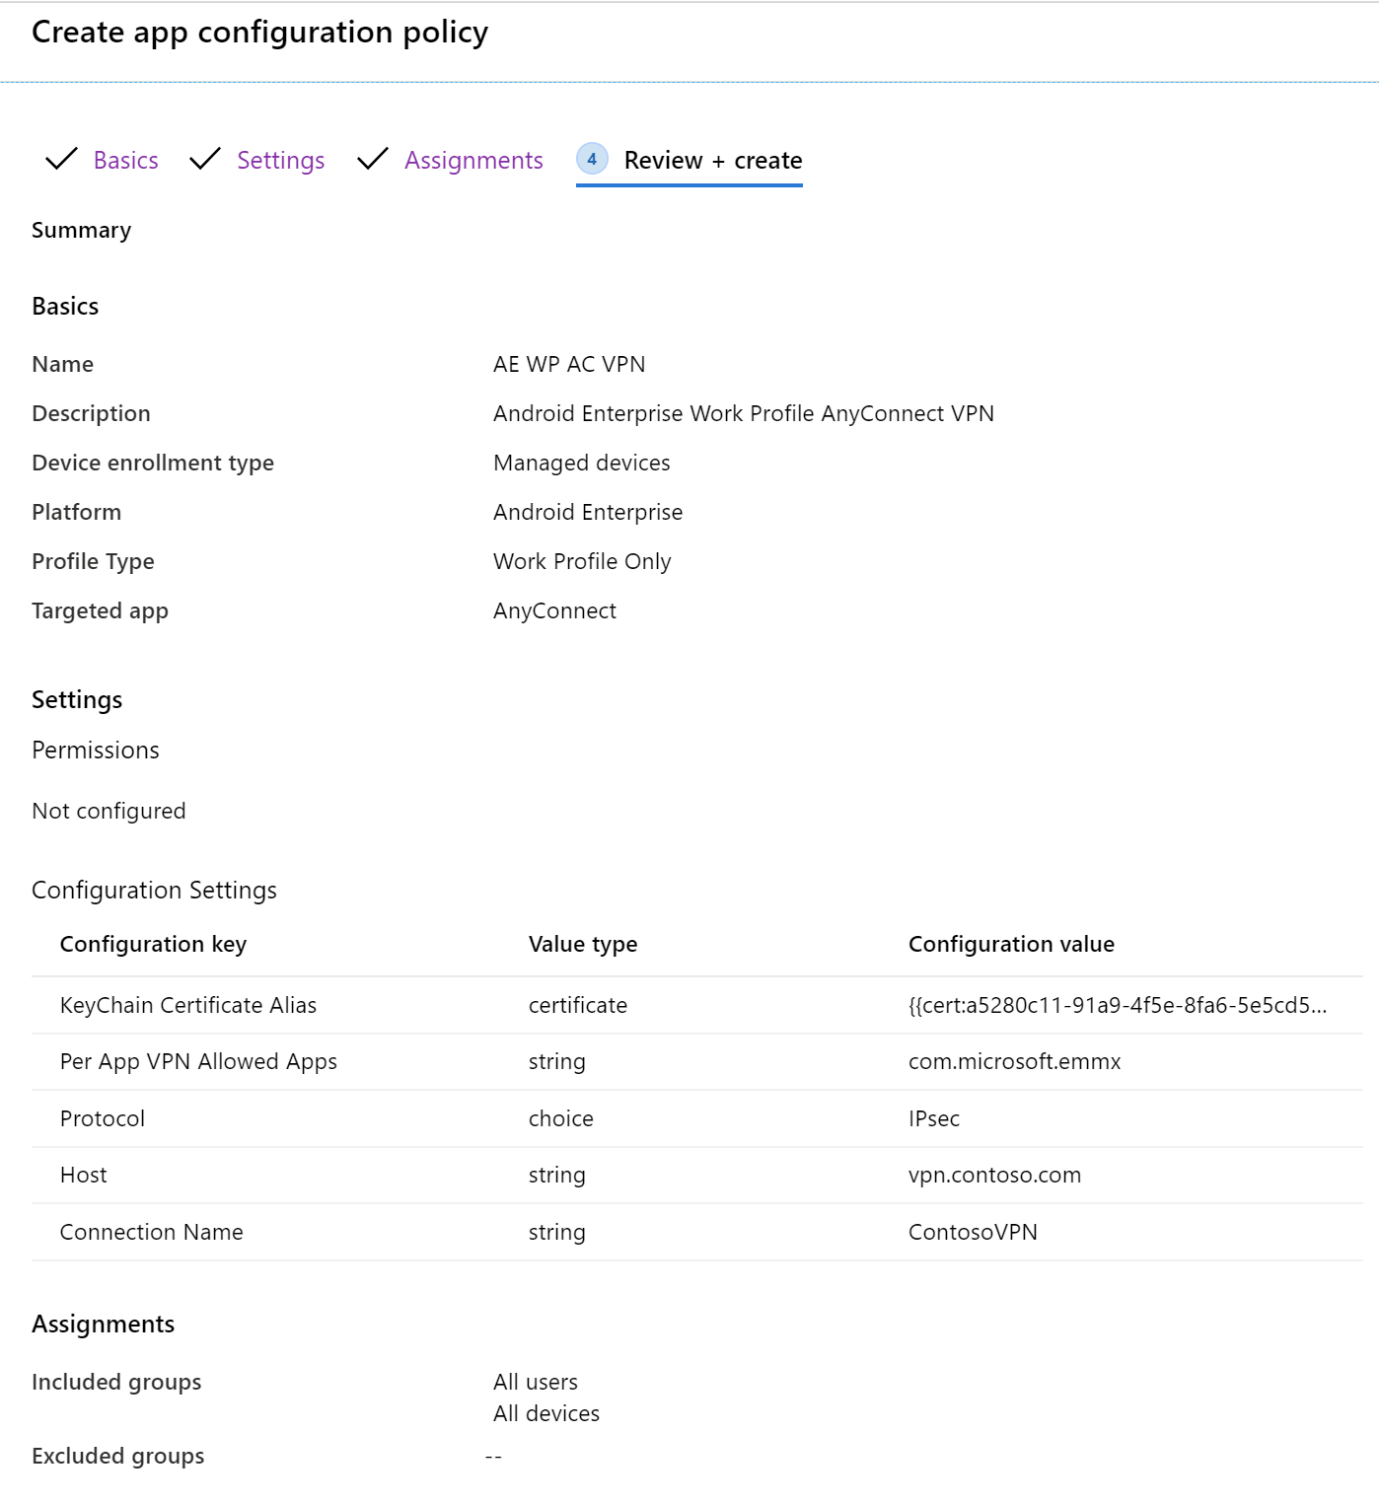
Configuration value: Enter the values for the configuration keys you selected. Remember, the key names vary depending on the VPN Client app you're using. In the keys selected in our example:
Per App VPN Allowed Apps: Enter the application package ID(s) you collected earlier. For example:

KeyChain Certificate Alias (optional): Change the Value type from string to certificate. Select the client certificate profile to use with VPN authentication. For example:

Protocol: Select the SSL or IPsec tunnel protocol of the VPN.
Connection Name: Enter a user friendly name for the VPN connection. Users see this connection name on their devices. For example, enter
ContosoVPN.Host: Enter the host name URL to the headend router. For example, enter
vpn.contoso.com.
Select Next.
In Assignments, select the groups to assign the VPN app configuration policy.
Select Next.
In Review + create, review your settings. When you select Create, your changes are saved, and the policy is deployed to your groups. The policy is also shown in the app configuration policies list.
Use JSON
Use this option if you don't have, or don't know all the required VPN settings used in the Configuration designer. If you need help, consult your VPN vendor.
Get the certificate token
In these steps, create a temporary policy. The policy won't be saved. The intent is to copy the certificate token. You'll use this token when creating the VPN policy using JSON (next section).
In the Microsoft Intune admin center, select Apps > App configuration policies > Add > Managed devices.
In Basics, enter the following properties:
- Name: Enter any name. This policy is temporary, and won't be saved.
- Platform: Select Android Enterprise.
- Profile type: Select Personally-Owned Work Profile Only.
- Targeted app: Select the VPN client app you previously added.
Select Next.
In Settings, enter the following properties:
Configuration settings format: Select Use configuration designer.
Add: Shows the list of configuration keys. Select any key with a Value type of string. Select OK.
Change the Value type from string to certificate. This step lets you select the correct client certificate profile that authenticates the VPN:

Immediately change the Value type back to string. The Configuration value changes to a token
{{cert:GUID}}:
Copy and paste this certificate token to another file, such as a text editor.
Discard this policy. Don't save it. The only purpose is to copy and paste the certificate token.
Create the VPN policy using JSON
In the Microsoft Intune admin center, select Apps > App configuration policies > Add > Managed devices.
In Basics, enter the following properties:
- Name: Enter a descriptive name for the policy. Name your policies so you can easily identify them later. For example, a good policy name is App config policy: JSON Cisco AnyConnect VPN policy for Android Enterprise work profile devices in entire company.
- Description: Enter a description for the policy. This setting is optional, but recommended.
- Platform: Select Android Enterprise.
- Profile type: Your options:
- All profile types: This option supports username and password authentication. If you use certificate-based authentication, don't use this option.
- Fully Managed, Dedicated, and Corporate-Owned work profile only: This option supports certificate-based authentication, and username and password authentication.
- Personally-Owned Work Profile Only: This option supports certificate-based authentication, and username and password authentication.
- Targeted app: Select the VPN client app you previously added.
Select Next.
In Settings, enter the following properties:
- Configuration settings format: Select Enter JSON data. You can edit the JSON directly.
- Download JSON template: Use this option to download, and update the template in any external editor. Be careful with text editors that use Smart quotes, as they may create invalid JSON.
After you enter the values needed for your configuration, remove all settings that have
"STRING_VALUE"orSTRING_VALUE.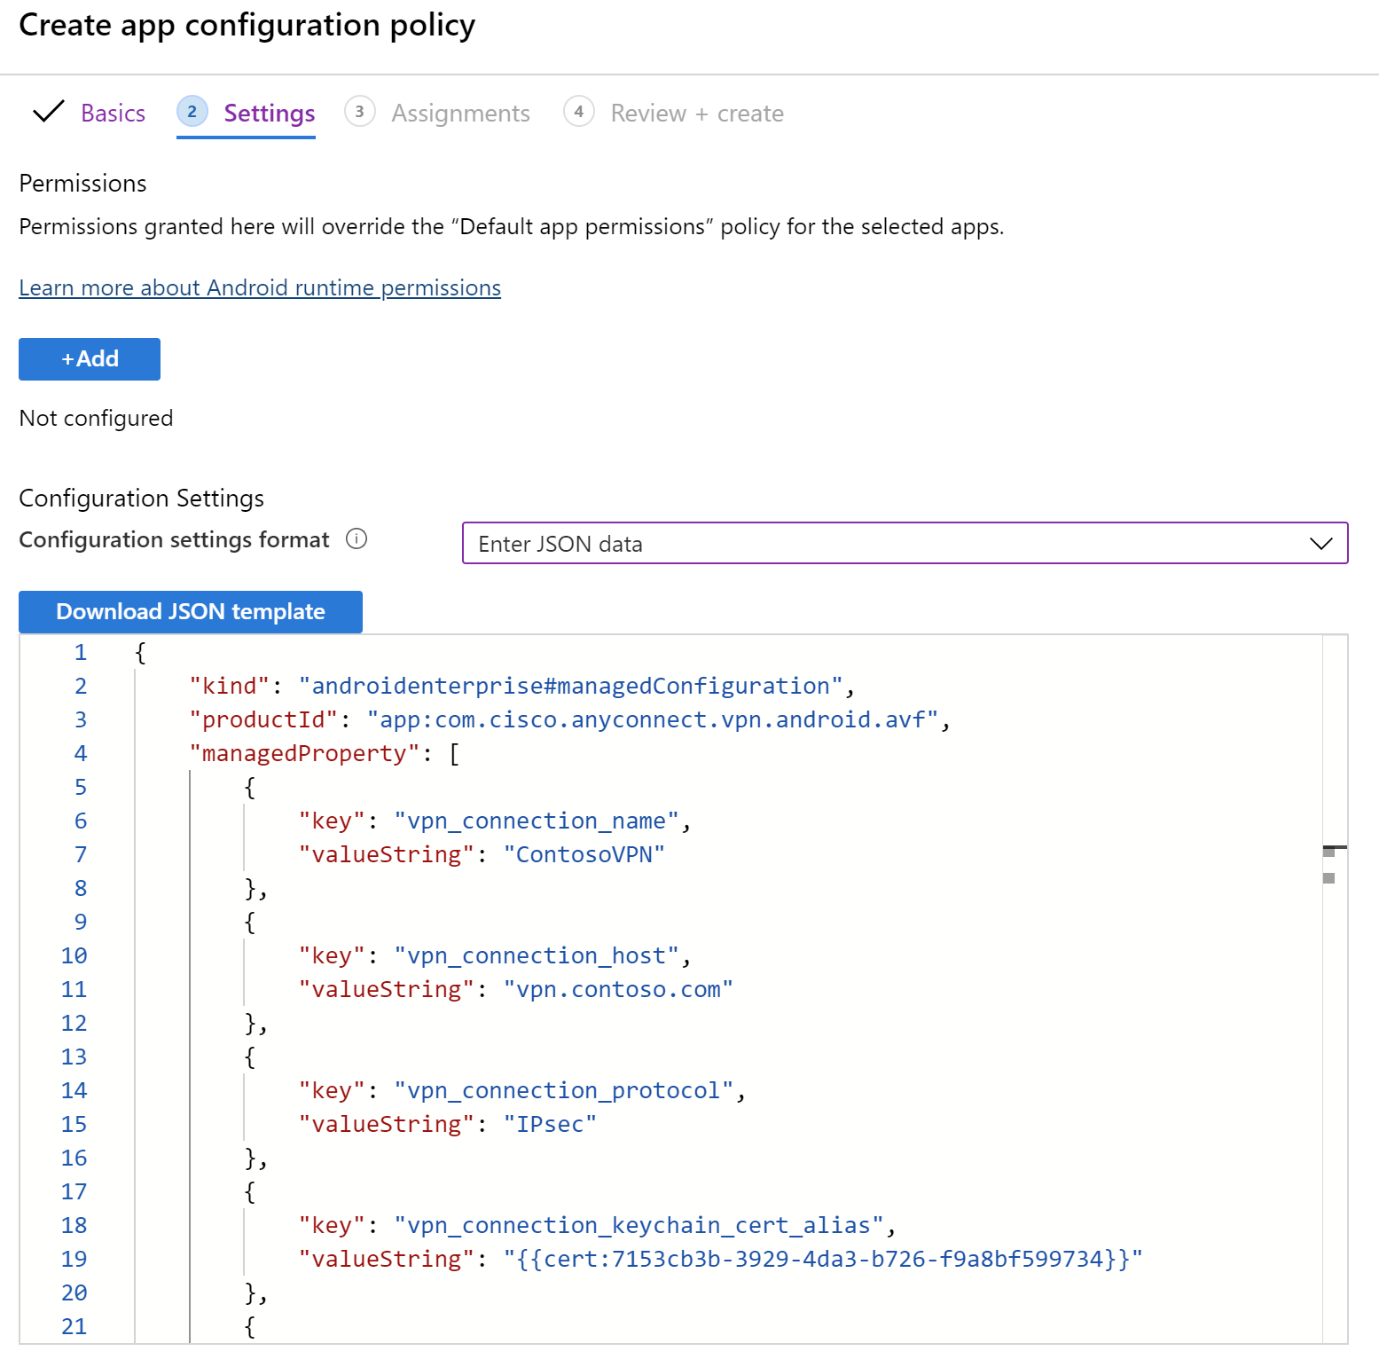
Select Next.
In Assignments, select the groups to assign the VPN app configuration policy.
Select Next.
In Review + create, review your settings. When you select Create, your changes are saved, and the policy is deployed to your groups. The policy is also shown in the app configuration policies list.
JSON example for F5 Access VPN
{
    "kind": "androidenterprise#managedConfiguration",
    "productId": "app:com.f5.edge.client_ics",
    "managedProperty": [
        {
            "key": "disallowUserConfig",
            "valueBool": false
        },
        {
            "key": "vpnConfigurations",
            "valueBundleArray": [
                {
                    "managedProperty": [
                        {
                            "key": "name",
                            "valueString": "MyCorpVPN"
                        },
                        {
                            "key": "server",
                            "valueString": "vpn.contoso.com"
                        },
                        {
                            "key": "weblogonMode",
                            "valueBool": false
                        },
                        {
                            "key": "fipsMode",
                            "valueBool": false
                        },
                        {
                            "key": "clientCertKeychainAlias",
                            "valueString": "{{cert:77333880-14e9-0aa0-9b2c-a1bc6b913829}}"
                        },
                        {
                            "key": "allowedApps",
                            "valueString": "com.microsoft.emmx"
                        },
                        {
                            "key": "mdmAssignedId",
                            "valueString": ""
                        },
                        {
                            "key": "mdmInstanceId",
                            "valueString": ""
                        },
                        {
                            "key": "mdmDeviceUniqueId",
                            "valueString": ""
                        },
                        {
                            "key": "mdmDeviceWifiMacAddress",
                            "valueString": ""
                        },
                        {
                            "key": "mdmDeviceSerialNumber",
                            "valueString": ""
                        },
                        {
                            "key": "allowBypass",
                            "valueBool": false
                        }
                    ]
                }
            ]
        }
    ]
}
Additional information
- Add app configuration policies for managed Android Enterprise devices
- Android Enterprise device settings to configure VPN in Intune
Next steps
Feedback
Coming soon: Throughout 2024 we will be phasing out GitHub Issues as the feedback mechanism for content and replacing it with a new feedback system. For more information see: https://aka.ms/ContentUserFeedback.
Submit and view feedback for