Tutorial: Use a Linux VM system-assigned identity to access Azure Storage via a SAS credential
Managed identities for Azure resources is a feature of Microsoft Entra ID. Each of the Azure services that support managed identities for Azure resources are subject to their own timeline. Make sure you review the availability status of managed identities for your resource and known issues before you begin.
This tutorial shows you how to use a system-assigned managed identity for a Linux virtual machine (VM) to obtain a storage Shared Access Signature (SAS) credential. Specifically, a Service SAS credential.
Note
The SAS key generated in this tutorial will not be restricted/bound to the VM.
A Service SAS grants limited access to objects in a storage account without exposing an account access key. Access can be granted for a limited time and a specific service. You can use a SAS credential as usual when doing storage operations, for example when using the Storage SDK. For this tutorial, we demonstrate uploading and downloading a blob using Azure Storage CLI. You'll learn how to:
- Create a storage account
- Create a blob container in the storage account
- Grant your VM access to a storage account SAS in Resource Manager
- Get an access token using your VM's identity, and use it to retrieve the SAS from Resource Manager
Prerequisites
- If you're not familiar with the managed identities for Azure resources feature, see this overview.
- If you don't have an Azure account, sign up for a free account before you continue.
- To perform the required resource creation and role management, your account needs "Owner" permissions at the appropriate scope (your subscription or resource group). If you need assistance with role assignment, see Assign Azure roles to manage access to your Azure subscription resources.
Create a storage account
If you don't already have one, you'll now create a storage account. You can also skip this step and grant your VM system-assigned managed identity access to the keys of an existing storage account.
Select the +/Create new service button found on the upper left-hand corner of the Azure portal.
Select Storage, then Storage Account, and a new "Create storage account" panel will display.
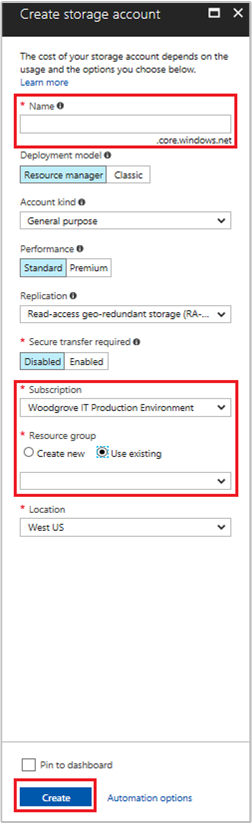
Enter a Name for the storage account, which you'll use later.
Deployment model and Account kind should be set to "Resource Manager" and "General purpose", respectively.
Ensure the Subscription and Resource Group match the ones you specified when you created your VM in the previous step.
Select Create.
Create a blob container in the storage account
Later we'll upload and download a file to the new storage account. Because files require blob storage, we need to create a blob container in which to store the file.
Navigate back to your newly created storage account.
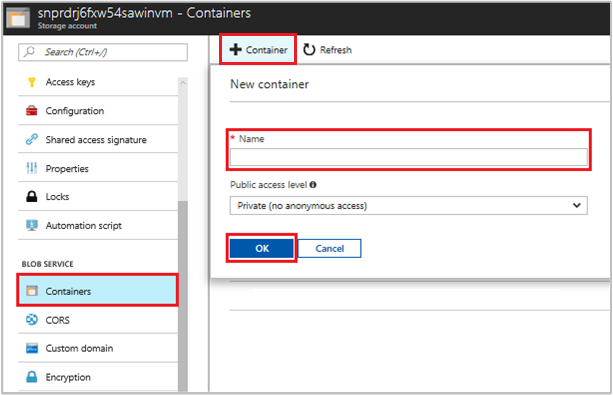
Select the Containers link in the left panel, under "Blob service."
Select + Container on the top of the page, and a "New container" panel slides out.
Give the container a name, select an access level, then select OK. The name you specified will be used later in the tutorial.
Grant your VM's system-assigned managed identity access to use a storage SAS
Azure Storage natively supports Microsoft Entra authentication, so you can use your VM's system-assigned managed identity to retrieve a storage SAS from Resource Manager, then use the SAS to access storage. In this step, you grant your VM's system-assigned managed identity access to your storage account SAS. Assign the Storage Account Contributor role to the managed-identity at the scope of the resource group that contains your storage account.
For detailed steps, see Assign Azure roles using the Azure portal.
Note
For more information on the various roles that you can use to grant permissions to storage review Authorize access to blobs and queues using Microsoft Entra ID.
Get an access token using the VM's identity and use it to call Azure Resource Manager
For the remainder of the tutorial, we'll work from the VM we created earlier.
You need an SSH client to complete these steps. If you're using Windows, you can use the SSH client in the Windows Subsystem for Linux. If you need assistance configuring your SSH client's keys, see:
- How to Use SSH keys with Windows on Azure
- How to create and use an SSH public and private key pair for Linux VMs in Azure.
Now that you have your SSH client continue to the steps below:
In the Azure portal, navigate to Virtual Machines, go to your Linux virtual machine, then from the Overview page select Connect at the top. Copy the string to connect to your VM.
Connect to your VM using your SSH client.
Next, you'll be prompted to enter in your Password you added when creating the Linux VM. You should then be successfully signed in.
Use CURL to get an access token for Azure Resource Manager.
The CURL request and response for the access token is below:
curl 'http://169.254.169.254/metadata/identity/oauth2/token?api-version=2018-02-01&resource=https%3A%2F%2Fmanagement.azure.com%2F' -H Metadata:trueNote
In the previous request, the value of the "resource" parameter must be an exact match for what is expected by Microsoft Entra ID. When using the Azure Resource Manager resource ID, you must include the trailing slash on the URI. In the following response, the access_token element has been shortened for brevity.
{
  "access_token":"eyJ0eXAiOiJ...",
  "refresh_token":"",
  "expires_in":"3599",
  "expires_on":"1504130527",
  "not_before":"1504126627",
  "resource":"https://management.azure.com",
  "token_type":"Bearer"
}
Get a SAS credential from Azure Resource Manager to make storage calls
Now use CURL to call Resource Manager using the access token we retrieved in the previous section, to create a storage SAS credential. Once we have the SAS credential, we can call storage upload/download operations.
For this request, we'll use the following HTTP request parameters to create the SAS credential:
{
    "canonicalizedResource":"/blob/<STORAGE ACCOUNT NAME>/<CONTAINER NAME>",
    "signedResource":"c",              // The kind of resource accessible with the SAS, in this case a container (c).
    "signedPermission":"rcw",          // Permissions for this SAS, in this case (r)ead, (c)reate, and (w)rite.  Order is important.
    "signedProtocol":"https",          // Require the SAS be used on https protocol.
    "signedExpiry":"<EXPIRATION TIME>" // UTC expiration time for SAS in ISO 8601 format, for example 2017-09-22T00:06:00Z.
}
These parameters are included in the POST body of the request for the SAS credential. For more information on the parameters for creating a SAS credential, see the List Service SAS REST reference.
Use the following CURL request to get the SAS credential. Be sure to replace the <SUBSCRIPTION ID>, <RESOURCE GROUP>, <STORAGE ACCOUNT NAME>, <CONTAINER NAME>, and <EXPIRATION TIME> parameter values with your own values. Replace the <ACCESS TOKEN> value with the access token you retrieved earlier:
curl https://management.azure.com/subscriptions/<SUBSCRIPTION ID>/resourceGroups/<RESOURCE GROUP>/providers/Microsoft.Storage/storageAccounts/<STORAGE ACCOUNT NAME>/listServiceSas/?api-version=2017-06-01 -X POST -d "{\"canonicalizedResource\":\"/blob/<STORAGE ACCOUNT NAME>/<CONTAINER NAME>\",\"signedResource\":\"c\",\"signedPermission\":\"rcw\",\"signedProtocol\":\"https\",\"signedExpiry\":\"<EXPIRATION TIME>\"}" -H "Authorization: Bearer <ACCESS TOKEN>"
Note
The text in the prior URL is case sensitive, so ensure if you are using upper-lowercase for your Resource Groups to reflect it accordingly. Additionally, it’s important to know that this is a POST request not a GET request.
The CURL response returns the SAS credential:
{"serviceSasToken":"sv=2015-04-05&sr=c&spr=https&st=2017-09-22T00%3A10%3A00Z&se=2017-09-22T02%3A00%3A00Z&sp=rcw&sig=QcVwljccgWcNMbe9roAJbD8J5oEkYoq%2F0cUPlgriBn0%3D"}
On a Linux VM, create a sample blob file to upload to your blob storage container using the following command:
echo "This is a test file." > test.txt
Next, authenticate with the CLI az storage command using the SAS credential, and upload the file to the blob container. For this step, you'll need to install the latest Azure CLI on your VM, if you haven't already.
 az storage blob upload --container-name
                        --file
                        --name
                        --account-name
                        --sas-token
Response:
Finished[#############################################################]  100.0000%
{
  "etag": "\"0x8D4F9929765C139\"",
  "lastModified": "2017-09-21T03:58:56+00:00"
}
Additionally, you can download the file using the Azure CLI and authenticating with the SAS credential.
Request:
az storage blob download --container-name
                         --file
                         --name
                         --account-name
                         --sas-token
Response:
{
  "content": null,
  "metadata": {},
  "name": "testblob",
  "properties": {
    "appendBlobCommittedBlockCount": null,
    "blobType": "BlockBlob",
    "contentLength": 16,
    "contentRange": "bytes 0-15/16",
    "contentSettings": {
      "cacheControl": null,
      "contentDisposition": null,
      "contentEncoding": null,
      "contentLanguage": null,
      "contentMd5": "Aryr///Rb+D8JQ8IytleDA==",
      "contentType": "text/plain"
    },
    "copy": {
      "completionTime": null,
      "id": null,
      "progress": null,
      "source": null,
      "status": null,
      "statusDescription": null
    },
    "etag": "\"0x8D4F9929765C139\"",
    "lastModified": "2017-09-21T03:58:56+00:00",
    "lease": {
      "duration": null,
      "state": "available",
      "status": "unlocked"
    },
    "pageBlobSequenceNumber": null,
    "serverEncrypted": false
  },
  "snapshot": null
}
Next steps
In this tutorial, you learned how to use a Linux VM system-assigned managed identity to access Azure Storage using a SAS credential. To learn more about Azure Storage SAS, see:
Tilbakemeldinger
Kommer snart: Gjennom 2024 faser vi ut GitHub Issues som tilbakemeldingsmekanisme for innhold, og erstatter det med et nytt system for tilbakemeldinger. Hvis du vil ha mer informasjon, kan du se: https://aka.ms/ContentUserFeedback.
Send inn og vis tilbakemelding for