In Azure SQL Managed Instance, you can configure a long-term backup retention policy (LTR). This allows you to automatically retain database backups in separate Azure Blob storage containers for up to 10 years. You can then recover a database using these backups with the Azure portal and PowerShell.
The following sections show you how to use the Azure portal, PowerShell, and Azure CLI to configure the long-term backup retention, view backups in Azure SQL storage, and restore from a backup in Azure SQL storage.
If you prefer to run CLI reference commands locally, install the Azure CLI. If you're running on Windows or macOS, consider running Azure CLI in a Docker container. For more information, see How to run the Azure CLI in a Docker container.
If you're using a local installation, sign in to the Azure CLI by using the az login command. To finish the authentication process, follow the steps displayed in your terminal. For other sign-in options, see Sign in with the Azure CLI.
When you're prompted, install the Azure CLI extension on first use. For more information about extensions, see Use extensions with the Azure CLI.
Run az version to find the version and dependent libraries that are installed. To upgrade to the latest version, run az upgrade.
Prepare your environment for PowerShell.
Note
This article uses the Azure Az PowerShell module, which is the recommended PowerShell module for interacting with Azure. To get started with the Az PowerShell module, see Install Azure PowerShell. To learn how to migrate to the Az PowerShell module, see Migrate Azure PowerShell from AzureRM to Az.
Important
The PowerShell Azure Resource Manager module is still supported by Azure SQL Database, however, future development will be done in the Az.Sql module. For these cmdlets, see AzureRM.Sql. The arguments for the commands in the Az module and in the AzureRm modules are substantially identical.
For Get-AzSqlInstanceDatabaseLongTermRetentionBackup and Restore-AzSqlInstanceDatabase, you need to be a member of one of the following roles:
The SQL Managed Instance Contributor role does not have permission to delete LTR backups.
Azure role-based access control (RBAC) permissions could be granted in either subscription or resource group scope. However, to access LTR backups that belong to a dropped instance, the permission must be granted in the subscription scope of that instance.
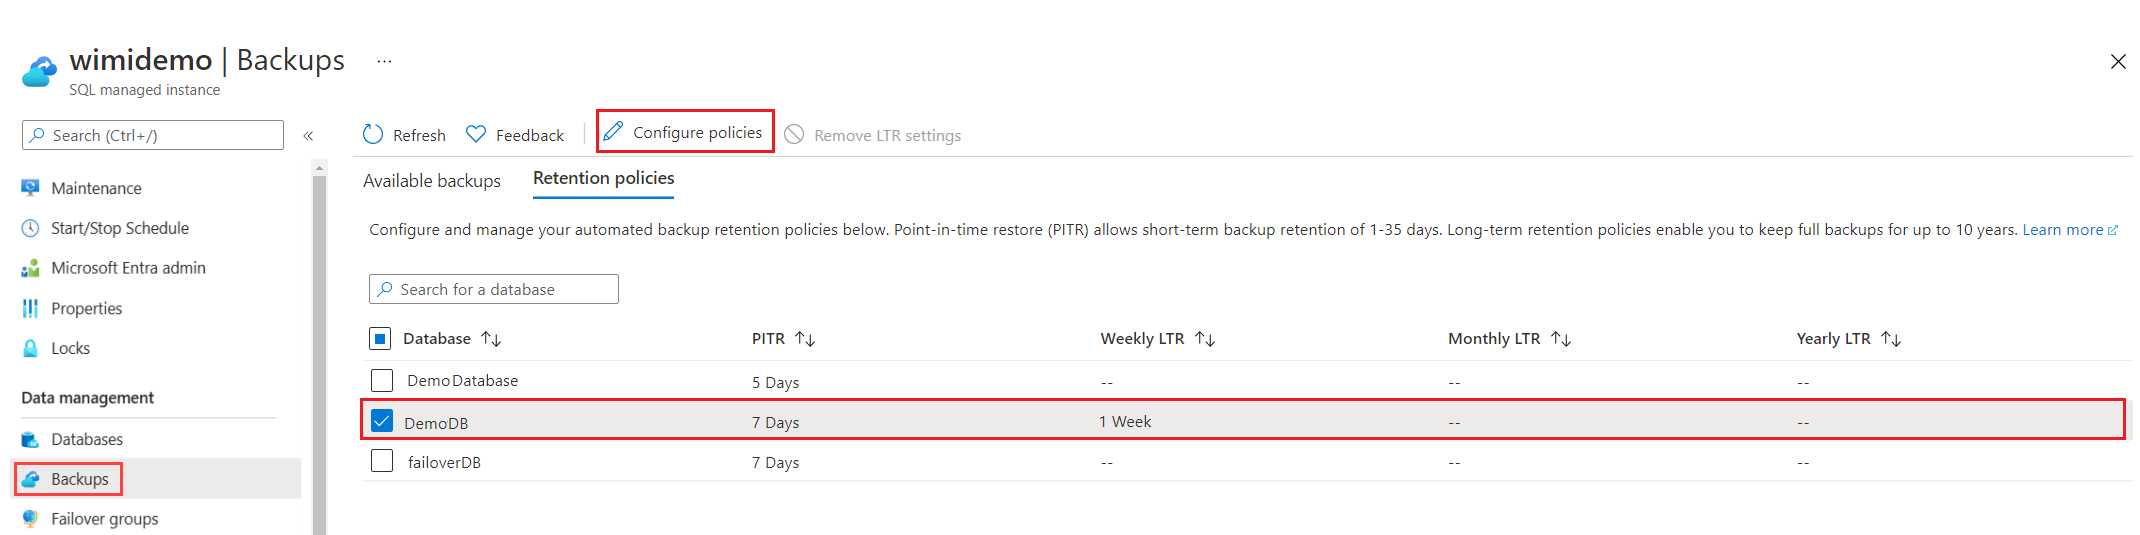
In the Azure portal, select your managed instance and then select Backups. On the Retention policies tab, select the database(s) on which you want to set or modify long-term backup retention policies. Changes will not apply to any databases left unselected.
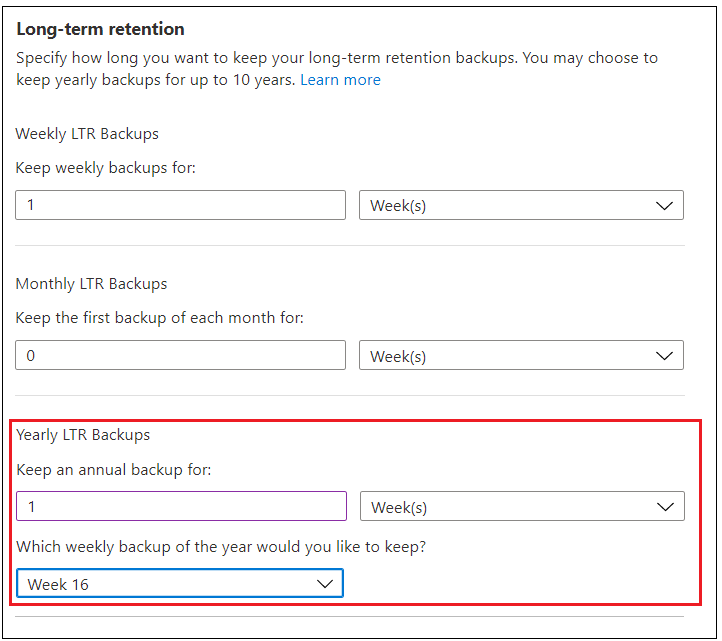
In the Configure policies pane, specify your desired retention period for weekly, monthly, or yearly backups. Choose a retention period of '0' to indicate that no long-term backup retention should be set.
When complete, select Apply.
Important
When you enable a long-term backup retention policy, it may take up to 7 days for the first backup to become visible and available to restore. For details of the LTR backup cadence, see long-term backup retention.
Run the az sql midb show command to get the details for the SQL Managed Instance database.
az sql midb show /
--resource-group mygroup /
--managed-instance myinstance /
--name mymanageddb /
--subscription mysubscription
Run the az sql midb ltr-policy set command to create an LTR policy. The following example sets a long-term retention policy for 12 weeks for the weekly backup.
az sql midb ltr-policy set /
--resource-group mygroup /
--managed-instance myinstance /
--name mymanageddb /
--weekly-retention "P12W"
This example sets a retention policy for 12 weeks for the weekly backup, 5 years for the yearly backup, and the week of April 15 in which to take the yearly LTR backup.
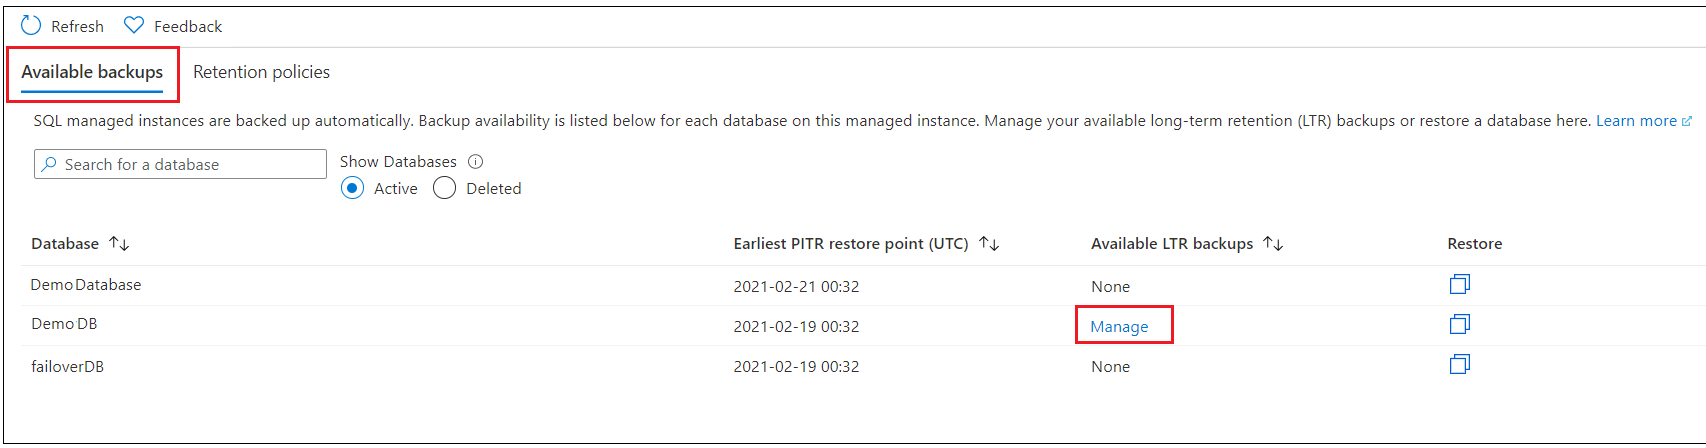
To view available long-term backups from the Azure portal, follow these steps:
In the Azure portal, select your managed instance and then select Backups. On the Available backups tab, select the database for which you want to see available backups. Select Manage.
In the Manage backups pane, review the available backups.
You can also restore from this page by choosing the backup and selecting Restore.
Alternatively, to restore a backup from long-term retention by using the Azure portal, follow these steps:
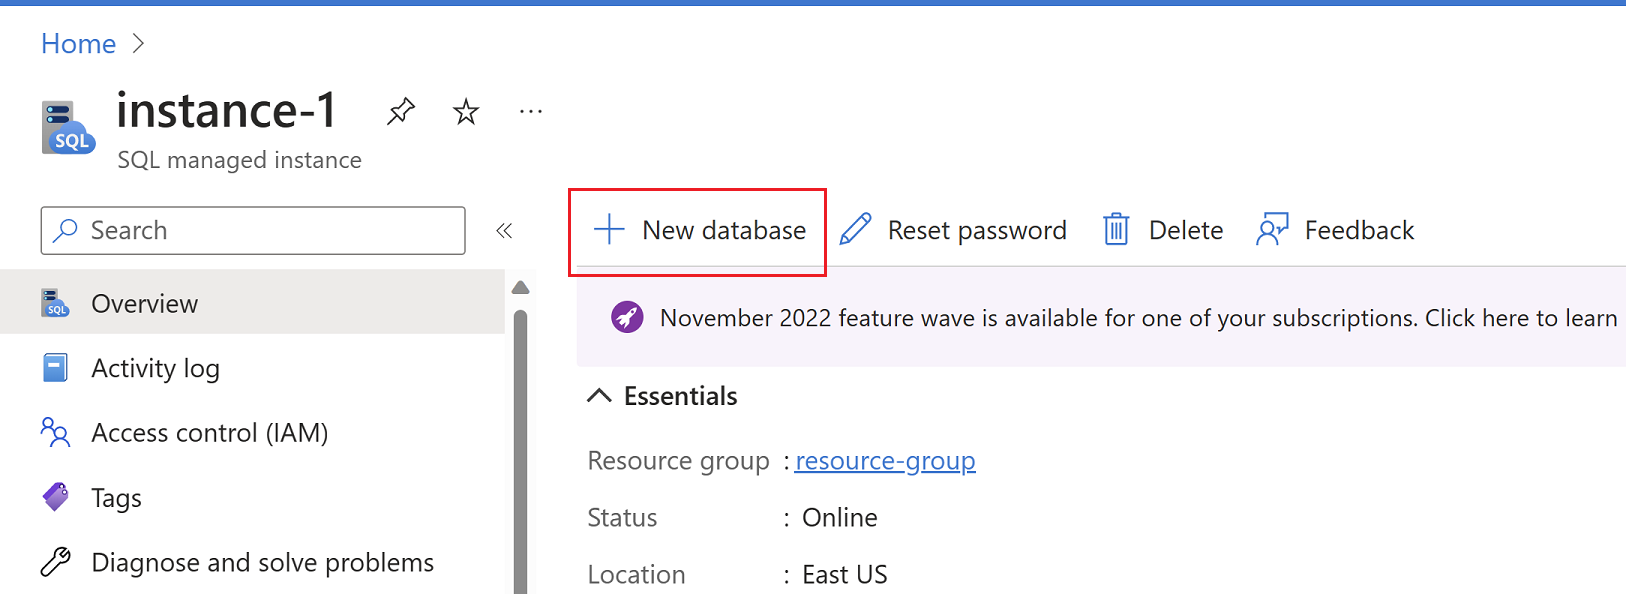
Go to the target SQL Managed Instance where you plan to restore your database to.
On the Overview page, choose + New database to open the Create Azure SQL Managed Database page.
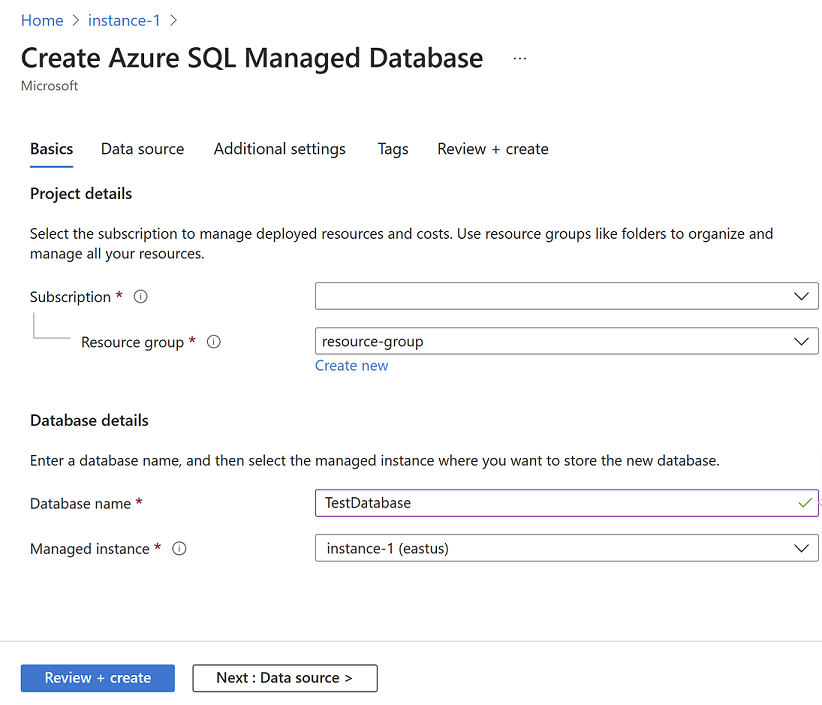
On the Basics tab of the Create Azure SQL Managed Database page, provide subscription and resource group details under Project details. Then, under Database details provide the new name of the database you plan to restore. Confirm the correct managed instance is listed in the dropdown list. Then select Next: Data source >
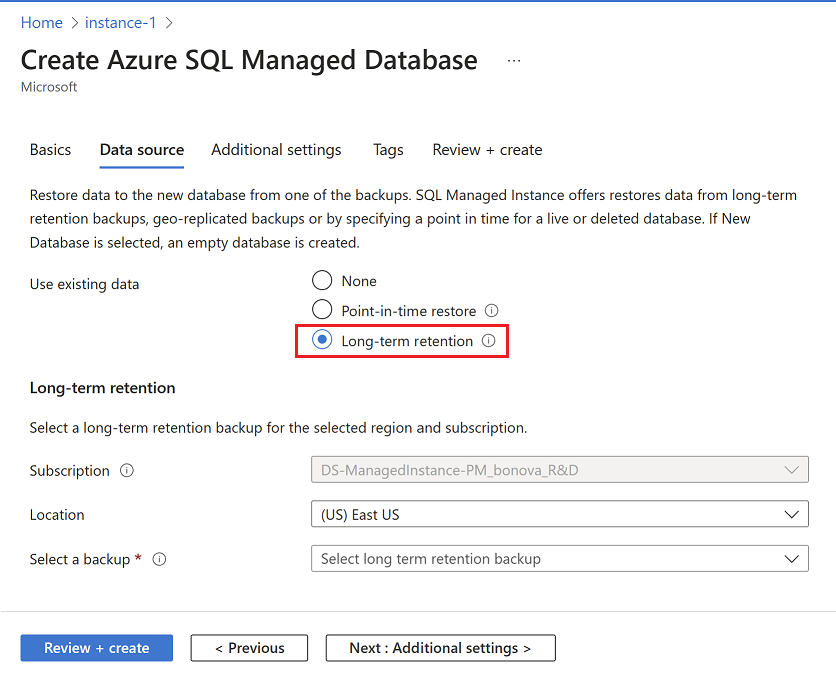
On the Data source tab, choose Point-in-time restore under Use existing data. Provide the subscription, resource group and managed instance that contains the source database. From the Managed database dropdown list, choose the database you want to restore, and then choose the point in time you want to restore the database from. The source and target instance can be the same, or two different instances. Select Next : Additional settings >
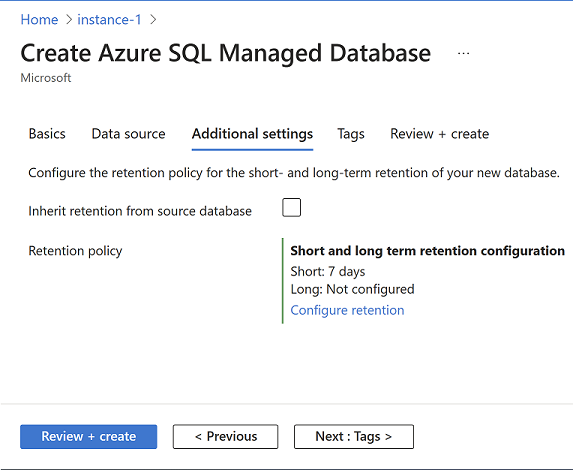
On the Additional settings tab, you can check the box to inherit the retention policy from the source database, or, alternatively, you can select Configure retention to open the Configure policies page, and set your desired retention policies for your restored database. When finished, select Review + create.
On Review + create, when validation is successful, select Create to restore your database.
This action starts the restore process, which creates a new database and populates it with data from the original database at the specified point in time. For more information about the recovery process, see Recovery time.
To restore from an LTR backup after the instance has been deleted, you must have permissions scoped to the subscription of the instance and that subscription must be active.
Note
From here, you can connect to the restored database using SQL Server Management Studio to perform needed tasks, such as to extract a bit of data from the restored database to copy into the existing database or to delete the existing database and rename the restored database to the existing database name. See point in time restore.
View LTR policies
This example shows how to list the LTR policies within an instance for a single database.
# gets the current version of LTR policy for a database
$LTRPolicy = @{
    InstanceName = $instanceName
    DatabaseName = $dbName
    ResourceGroupName = $resourceGroup
}
Get-AzSqlInstanceDatabaseBackupLongTermRetentionPolicy @LTRPolicy
This example shows how to list the LTR policies for all of the databases on an instance.
# gets the current version of LTR policy for all of the databases on an instance

$Databases = Get-AzSqlInstanceDatabase -ResourceGroupName $resourceGroup -InstanceName $instanceName

$LTRParams = @{
    InstanceName = $instanceName
    ResourceGroupName = $resourceGroup
}

foreach($database in $Databases.Name){
    Get-AzSqlInstanceDatabaseBackupLongTermRetentionPolicy @LTRParams  -DatabaseName $database
 }
Clear an LTR policy
This example shows how to clear an LTR policy from a database.
# remove the LTR policy from a database
$LTRPolicy = @{
    InstanceName = $instanceName
    DatabaseName = $dbName
    ResourceGroupName = $resourceGroup
    RemovePolicy = $true
}
Set-AzSqlInstanceDatabaseBackupLongTermRetentionPolicy @LTRPolicy
View LTR backups
This example shows how to list the LTR backups within an instance.
$instance = Get-AzSqlInstance -Name $instanceName -ResourceGroupName $resourceGroup

# get the list of all LTR backups in a specific Azure region
# backups are grouped by the logical database id, within each group they are ordered by the timestamp, the earliest backup first
Get-AzSqlInstanceDatabaseLongTermRetentionBackup -Location $instance.Location

# get the list of LTR backups from the Azure region under the given managed instance
$LTRBackupParam = @{
    Location = $instance.Location
    InstanceName = $instanceName
}
Get-AzSqlInstanceDatabaseLongTermRetentionBackup @LTRBackupParam

# get the LTR backups for a specific database from the Azure region under the given managed instance
$LTRBackupParam = @{
    Location = $instance.Location
    InstanceName = $instanceName
    DatabaseName = $dbName
}
Get-AzSqlInstanceDatabaseLongTermRetentionBackup @LTRBackupParam

# list LTR backups only from live databases (you have option to choose All/Live/Deleted)
$LTRBackupParam = @{
    Location = $instance.Location
    DatabaseState = 'Live'
}
Get-AzSqlInstanceDatabaseLongTermRetentionBackup @LTRBackupParam

# only list the latest LTR backup for each database
$LTRBackupParam = @{
    Location = $instance.Location
    InstanceName = $instanceName
    OnlyLatestPerDatabase = $true
}
Get-AzSqlInstanceDatabaseLongTermRetentionBackup @LTRBackupParam
Restore from LTR backups
This example shows how to restore from an LTR backup. Note, this interface did not change but the resource ID parameter now requires the LTR backup resource ID.
# restore a specific LTR backup as an P1 database on the instance $instanceName of the resource group $resourceGroup
$LTRBackupParam = @{
    Location = $instance.Location
    InstanceName = $instanceName
    DatabaseName = $dbname
    OnlyLatestPerDatabase = $true
}
$ltrBackup = Get-AzSqlInstanceDatabaseLongTermRetentionBackup @LTRBackupParam

$RestoreLTRParam = @{
    TargetInstanceName          = $instanceName
    TargetResourceGroupName     = $resourceGroup
    TargetInstanceDatabaseName  = $dbName
    FromLongTermRetentionBackup = $true
    ResourceId                  = $ltrBackup.ResourceId
}
Restore-AzSqlInstanceDatabase @RestoreLTRParam
Important
To restore from an LTR backup after the instance has been deleted, you must have permissions scoped to the subscription of the instance and that subscription must be active. You must also omit the optional -ResourceGroupName parameter.
Note
From here, you can connect to the restored database using SQL Server Management Studio to perform needed tasks, such as to extract a bit of data from the restored database to copy into the existing database or to delete the existing database and rename the restored database to the existing database name. See point in time restore.
Delete LTR backups
Delete backups that are retained for a specific database with an LTR policy.
Important
Deleting LTR backup is non-reversible. To delete an LTR backup after the instance has been deleted you must have Subscription scope permission. You can set up notifications about each delete in Azure Monitor by filtering for operation 'Deletes a long term retention backup'. The activity log contains information on who and when made the request. See Create activity log alerts for detailed instructions.
In the Azure portal, navigate to the SQL managed instance.
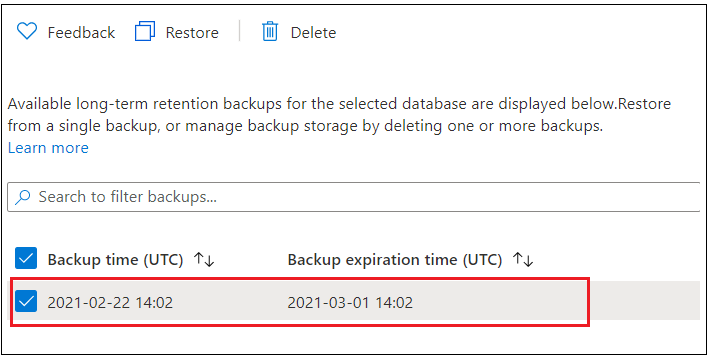
Select Backups. To view the available LTR backups for a specific database, select Manage under the Available LTR backups column. A pane appears with a list of the available LTR backups for the selected database.
In the Available LTR backups pane that appears, review the available backups. Select a backup to delete. Select Delete.
This example shows how to delete the earliest LTR backup from the list of backups. This sample gets the list of LTR backups for a specific database from the Azure region under the given SQL managed instance.
# remove the earliest backup
# get the LTR backups for a specific database from the Azure region under the given SQL managed instance
$LTRBackupParam = @{
    Location = $instance.Location
    InstanceName = $instanceName
    DatabaseName = $dbName
}
$ltrBackups = Get-AzSqlInstanceDatabaseLongTermRetentionBackup @LTRBackupParam
$ltrBackup = $ltrBackups[0]
Remove-AzSqlInstanceDatabaseLongTermRetentionBackup -ResourceId $ltrBackup.ResourceId
Next steps
To learn about service-generated automatic backups, see automatic backups
Kommer snart: Gjennom 2024 faser vi ut GitHub Issues som tilbakemeldingsmekanisme for innhold, og erstatter det med et nytt system for tilbakemeldinger. Hvis du vil ha mer informasjon, kan du se: https://aka.ms/ContentUserFeedback.