Run an SSIS package with the Execute SSIS Package activity in Azure portal
APPLIES TO:  Azure Data Factory
Azure Synapse Analytics
Azure Data Factory
Azure Synapse Analytics
Tip
Try out Data Factory in Microsoft Fabric, an all-in-one analytics solution for enterprises. Microsoft Fabric covers everything from data movement to data science, real-time analytics, business intelligence, and reporting. Learn how to start a new trial for free!
This article describes how to run a SQL Server Integration Services (SSIS) package in an Azure Data Factory pipeline by using the Execute SSIS Package activity in Azure Data Factory and Synapse Pipelines portal.
Prerequisites
Create an Azure-SSIS integration runtime (IR) if you don't have one already by following the step-by-step instructions in the Tutorial: Provisioning Azure-SSIS IR.
Create a pipeline with an Execute SSIS Package activity
In this step, you use the Data Factory UI or app to create a pipeline. You add an Execute SSIS Package activity to the pipeline and configure it to run your SSIS package.
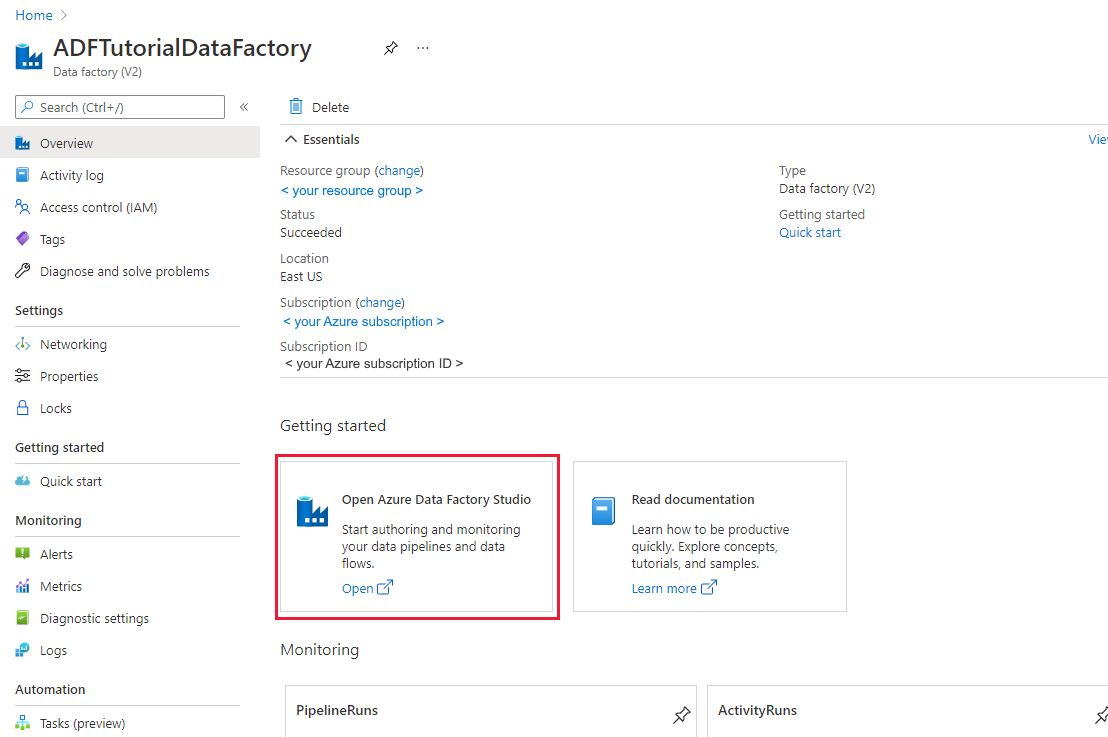
On your Data Factory overview or home page in the Azure portal, select the Open Azure Data Factory Studio tile to start the Data Factory UI or app in a separate tab.
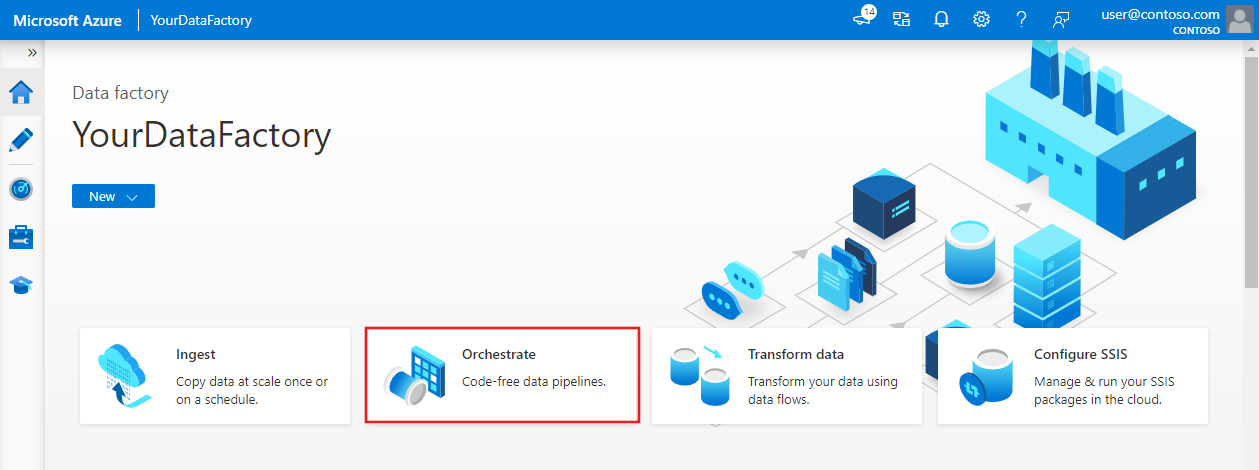
On the home page, select Orchestrate.

In the Activities toolbox, search for SSIS. Then drag an Execute SSIS Package activity to the pipeline designer surface.

Select the Execute SSIS Package activity object to configure its General, Settings, SSIS Parameters, Connection Managers, and Property Overrides tabs.
General tab
On the General tab of Execute SSIS Package activity, complete the following steps.
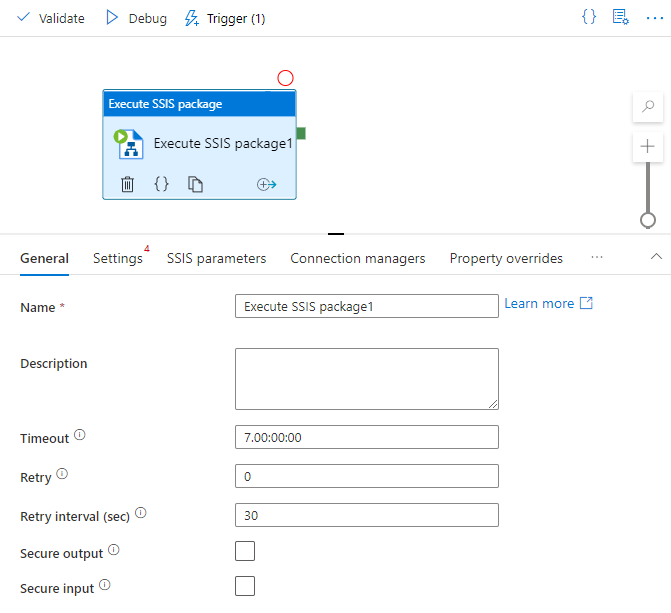
For Name, enter the name of your Execute SSIS Package activity.
For Description, enter the description of your Execute SSIS Package activity.
For Timeout, enter the maximum amount of time your Execute SSIS Package activity can run. Default is 7 days, format is D.HH:MM:SS.
For Retry, enter the maximum number of retry attempts for your Execute SSIS Package activity.
For Retry interval, enter the number of seconds between each retry attempt for your Execute SSIS Package activity. Default is 30 seconds.
Select the Secure output check box to choose whether you want to exclude the output of your Execute SSIS Package activity from logging.
Select the Secure input check box to choose whether you want to exclude the input of your Execute SSIS Package activity from logging.
Settings tab
On the Settings tab of Execute SSIS Package activity, complete the following steps.
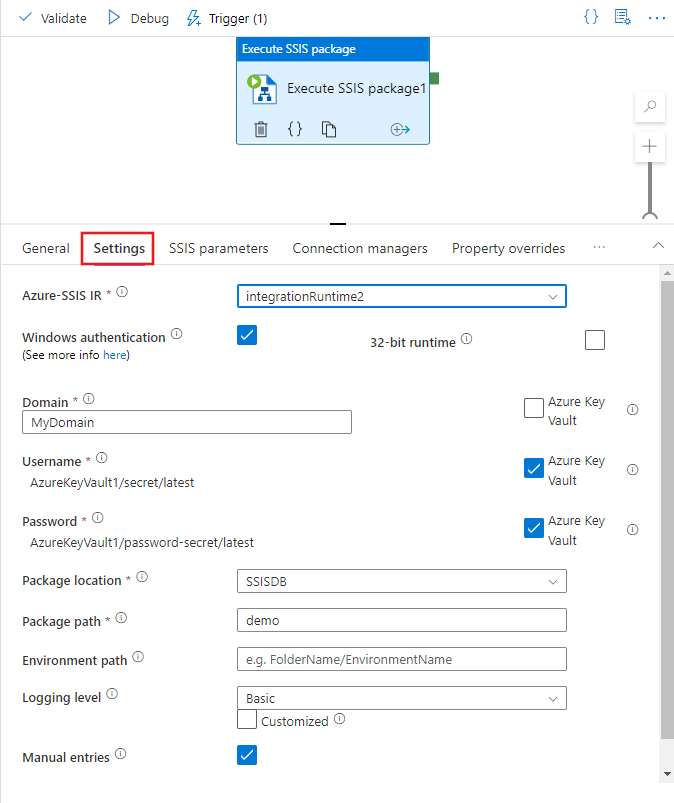
For Azure-SSIS IR, select the designated Azure-SSIS IR to run your Execute SSIS Package activity.
For Description, enter the description of your Execute SSIS Package activity.
Select the Windows authentication check box to choose whether you want to use Windows authentication to access data stores, such as SQL servers/file shares on-premises or Azure Files.
If you select this check box, enter the values for your package execution credentials in the Domain, Username, and Password boxes. For example, to access Azure Files, the domain is
Azure, the username is<storage account name>, and the password is<storage account key>.Alternatively, you can use secrets stored in your Azure Key Vault as their values. To do so, select the AZURE KEY VAULT check box next to them. Select or edit your existing key vault linked service or create a new one. Then select the secret name and version for your value. When you create or edit your key vault linked service, you can select or edit your existing key vault or create a new one. Make sure to grant Data Factory managed identity access to your key vault if you haven't done so already. You can also enter your secret directly in the following format:
<key vault linked service name>/<secret name>/<secret version>.Select the 32-Bit runtime check box to choose whether your package needs 32-bit runtime to run.
For Package location, select SSISDB, File System (Package), File System (Project), Embedded package, or Package store.
Package location: SSISDB
SSISDB as your package location is automatically selected if your Azure-SSIS IR was provisioned with an SSIS catalog (SSISDB) hosted by Azure SQL Database server/Managed Instance or you can select it yourself. If it's selected, complete the following steps.
If your Azure-SSIS IR is running and the Manual entries check box is cleared, browse and select your existing folders, projects, packages, and environments from SSISDB. Select Refresh to fetch your newly added folders, projects, packages, or environments from SSISDB, so that they're available for browsing and selection. To browse and select the environments for your package executions, you must configure your projects beforehand to add those environments as references from the same folders under SSISDB. For more information, see Create and map SSIS environments.
For Logging level, select a predefined scope of logging for your package execution. Select the Customized check box if you want to enter your customized logging name instead.
If your Azure-SSIS IR isn't running or the Manual entries check box is selected, enter your package and environment paths from SSISDB directly in the following formats:
<folder name>/<project name>/<package name>.dtsxand<folder name>/<environment name>.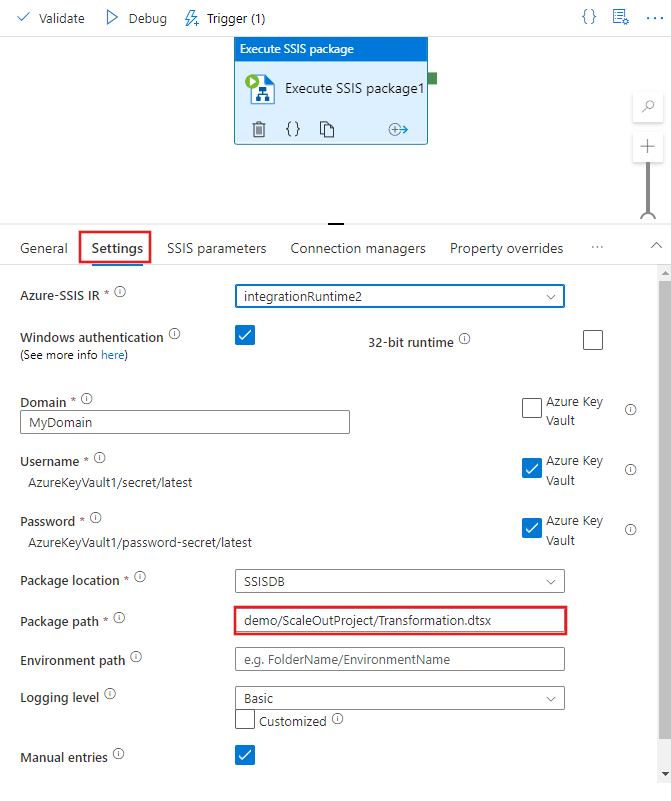
Package location: File System (Package)
File System (Package) as your package location is automatically selected if your Azure-SSIS IR was provisioned without SSISDB or you can select it yourself. If it's selected, complete the following steps.
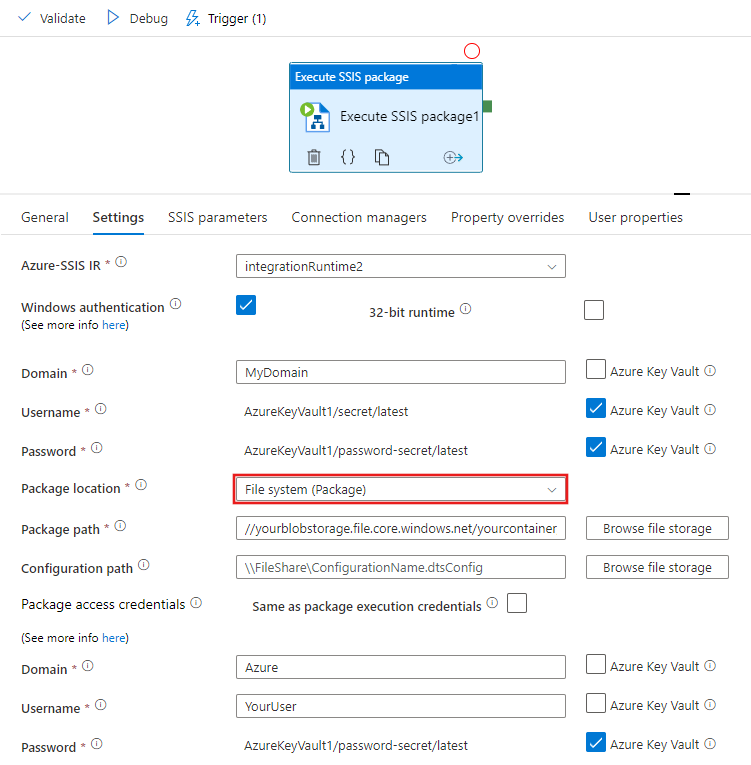
Specify your package to run by providing a Universal Naming Convention (UNC) path to your package file (with
.dtsx) in the Package path box. You can browse and select your package by selecting Browse file storage or enter its path manually. For example, if you store your package in Azure Files, its path is\\<storage account name>.file.core.windows.net\<file share name>\<package name>.dtsx.If you configure your package in a separate file, you also need to provide a UNC path to your configuration file (with
.dtsConfig) in the Configuration path box. You can browse and select your configuration by selecting Browse file storage or enter its path manually. For example, if you store your configuration in Azure Files, its path is\\<storage account name>.file.core.windows.net\<file share name>\<configuration name>.dtsConfig.Specify the credentials to access your package and configuration files. If you previously entered the values for your package execution credentials (for Windows authentication), you can reuse them by selecting the Same as package execution credentials check box. Otherwise, enter the values for your package access credentials in the Domain, Username, and Password boxes. For example, if you store your package and configuration in Azure Files, the domain is
Azure, the username is<storage account name>, and the password is<storage account key>.Alternatively, you can use secrets stored in your Azure Key Vault as their values. To do so, select the AZURE KEY VAULT check box next to them. Select or edit your existing key vault linked service or create a new one. Then select the secret name and version for your value. When you create or edit your key vault linked service, you can select or edit your existing key vault or create a new one. Make sure to grant Data Factory managed identity access to your key vault if you haven't done so already. You can also enter your secret directly in the following format:
<key vault linked service name>/<secret name>/<secret version>.These credentials are also used to access your child packages in Execute Package Task that are referenced by their own path and other configurations specified in your packages.
If you used the EncryptAllWithPassword or EncryptSensitiveWithPassword protection level when you created your package via SQL Server Data Tools (SSDT), enter the value for your password in the Encryption password box. Alternatively, you can use a secret stored in your Azure Key Vault as its value (see above).
If you used the EncryptSensitiveWithUserKey protection level, reenter your sensitive values in configuration files or on the SSIS Parameters, Connection Managers, or Property Overrides tabs (see below).
If you used the EncryptAllWithUserKey protection level, it's unsupported. You need to reconfigure your package to use another protection level via SSDT or the
dtutilcommand-line utility.For Logging level, select a predefined scope of logging for your package execution. Select the Customized check box if you want to enter your customized logging name instead.
If you want to log your package executions beyond using the standard log providers that can be specified in your package, specify your log folder by providing its UNC path in the Logging path box. You can browse and select your log folder by selecting Browse file storage or enter its path manually. For example, if you store your logs in Azure Files, your logging path is
\\<storage account name>.file.core.windows.net\<file share name>\<log folder name>. A subfolder is created in this path for each individual package run, named after the Execute SSIS Package activity run ID, and in which log files are generated every five minutes.Specify the credentials to access your log folder. If you previously entered the values for your package access credentials (see above), you can reuse them by selecting the Same as package access credentials check box. Otherwise, enter the values for your logging access credentials in the Domain, Username, and Password boxes. For example, if you store your logs in Azure Files, the domain is
Azure, the username is<storage account name>, and the password is<storage account key>. Alternatively, you can use secrets stored in your Azure Key Vault as their values (see above).
For all UNC paths previously mentioned, the fully qualified file name must be fewer than 260 characters. The directory name must be fewer than 248 characters.
Package location: File System (Project)
If you select File System (Project) as your package location, complete the following steps.
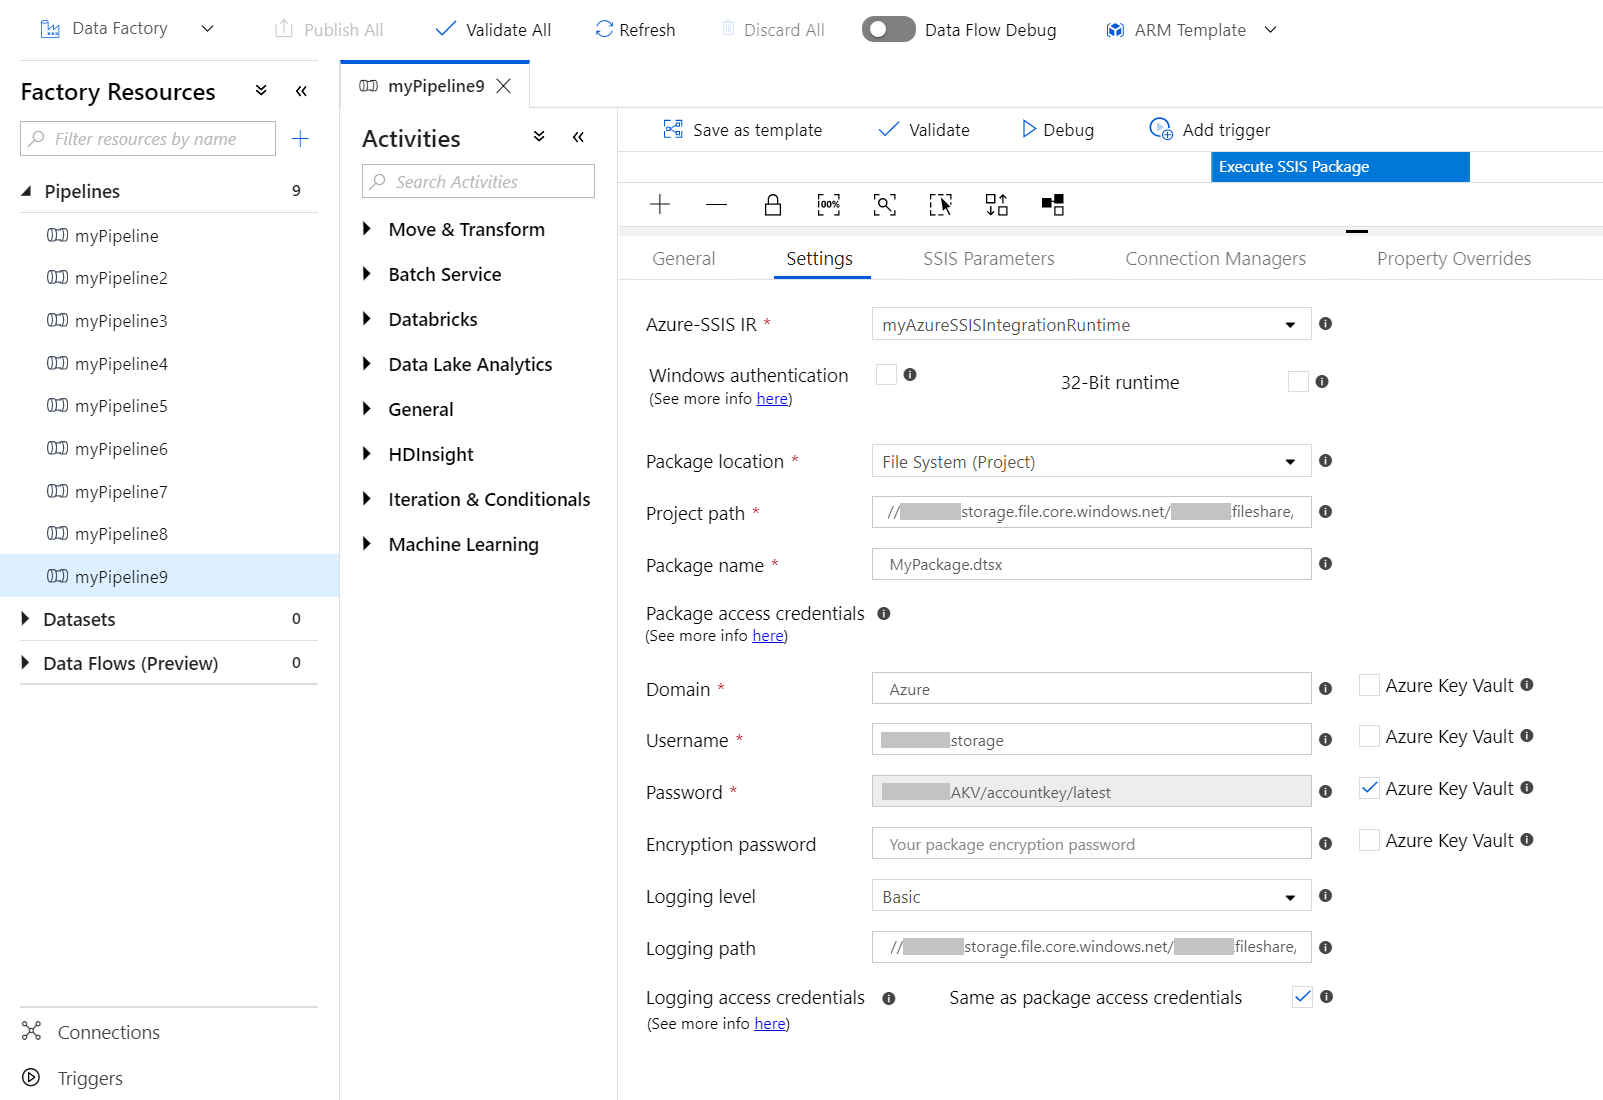
Specify your package to run by providing a UNC path to your project file (with
.ispac) in the Project path box and a package file (with.dtsx) from your project in the Package name box. You can browse and select your project by selecting Browse file storage or enter its path manually. For example, if you store your project in Azure Files, its path is\\<storage account name>.file.core.windows.net\<file share name>\<project name>.ispac.Specify the credentials to access your project and package files. If you previously entered the values for your package execution credentials (for Windows authentication), you can reuse them by selecting the Same as package execution credentials check box. Otherwise, enter the values for your package access credentials in the Domain, Username, and Password boxes. For example, if you store your project and package in Azure Files, the domain is
Azure, the username is<storage account name>, and the password is<storage account key>.Alternatively, you can use secrets stored in your Azure Key Vault as their values. To do so, select the AZURE KEY VAULT check box next to them. Select or edit your existing key vault linked service or create a new one. Then select the secret name and version for your value. When you create or edit your key vault linked service, you can select or edit your existing key vault or create a new one. Make sure to grant Data Factory managed identity access to your key vault if you haven't done so already. You can also enter your secret directly in the following format:
<key vault linked service name>/<secret name>/<secret version>.These credentials are also used to access your child packages in Execute Package Task that are referenced from the same project.
If you used the EncryptAllWithPassword or EncryptSensitiveWithPassword protection level when you created your package via SSDT, enter the value for your password in the Encryption password box. Alternatively, you can use a secret stored in your Azure Key Vault as its value (see above).
If you used the EncryptSensitiveWithUserKey protection level, reenter your sensitive values on the SSIS Parameters, Connection Managers, or Property Overrides tabs (see below).
If you used the EncryptAllWithUserKey protection level, it's unsupported. You need to reconfigure your package to use another protection level via SSDT or the
dtutilcommand-line utility.For Logging level, select a predefined scope of logging for your package execution. Select the Customized check box if you want to enter your customized logging name instead.
If you want to log your package executions beyond using the standard log providers that can be specified in your package, specify your log folder by providing its UNC path in the Logging path box. You can browse and select your log folder by selecting Browse file storage or enter its path manually. For example, if you store your logs in Azure Files, your logging path is
\\<storage account name>.file.core.windows.net\<file share name>\<log folder name>. A subfolder is created in this path for each individual package run, named after the Execute SSIS Package activity run ID, and in which log files are generated every five minutes.Specify the credentials to access your log folder. If you previously entered the values for your package access credentials (see above), you can reuse them by selecting the Same as package access credentials check box. Otherwise, enter the values for your logging access credentials in the Domain, Username, and Password boxes. For example, if you store your logs in Azure Files, the domain is
Azure, the username is<storage account name>, and the password is<storage account key>. Alternatively, you can use secrets stored in your Azure Key Vault as their values (see above).
For all UNC paths previously mentioned, the fully qualified file name must be fewer than 260 characters. The directory name must be fewer than 248 characters.
Package location: Embedded package
If you select Embedded package as your package location, complete the following steps.
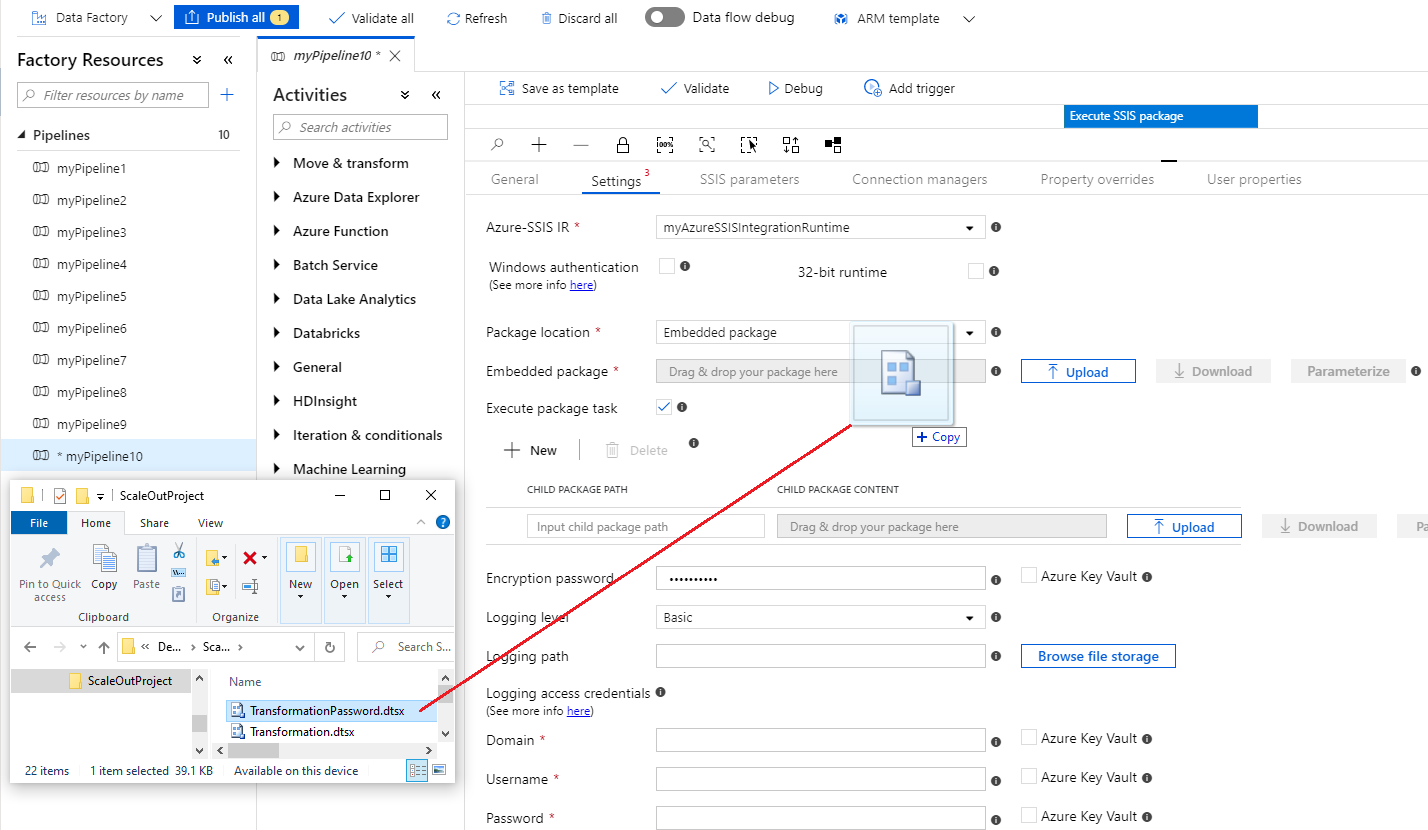
Drag and drop your package file (with
.dtsx) or Upload it from a file folder into the box provided. Your package will be automatically compressed and embedded in the activity payload. Once embedded, you can Download your package later for editing. You can also Parameterize your embedded package by assigning it to a pipeline parameter that can be used in multiple activities, hence optimizing the size of your pipeline payload. Embedding project files (with.ispac) is currently unsupported, so you can't use SSIS parameters/connection managers with project-level scope in your embedded packages.If your embedded package is not all encrypted and we detect the use of Execute Package Task (EPT) in it, the Execute Package Task check box will be automatically selected and your child packages that are referenced by their file system path will be automatically added, so you can also embed them.
If we can't detect the use of EPT, you need to manually select the Execute Package Task check box and add your child packages that are referenced by their file system path one by one, so you can also embed them. If your child packages are stored in SQL Server database (MSDB), you can't embed them, so you need to ensure that your Azure-SSIS IR can access MSDB to fetch them using their SQL Server references. Embedding project files (with
.ispac) is currently unsupported, so you can't use project-based references for your child packages.If you used the EncryptAllWithPassword or EncryptSensitiveWithPassword protection level when you created your package via SSDT, enter the value for your password in the Encryption password box.
Alternatively, you can use a secret stored in your Azure Key Vault as its value. To do so, select the AZURE KEY VAULT check box next to it. Select or edit your existing key vault linked service or create a new one. Then select the secret name and version for your value. When you create or edit your key vault linked service, you can select or edit your existing key vault or create a new one. Make sure to grant Data Factory managed identity access to your key vault if you haven't done so already. You can also enter your secret directly in the following format:
<key vault linked service name>/<secret name>/<secret version>.If you used the EncryptSensitiveWithUserKey protection level, reenter your sensitive values in configuration files or on the SSIS Parameters, Connection Managers, or Property Overrides tabs (see below).
If you used the EncryptAllWithUserKey protection level, it's unsupported. You need to reconfigure your package to use another protection level via SSDT or the
dtutilcommand-line utility.For Logging level, select a predefined scope of logging for your package execution. Select the Customized check box if you want to enter your customized logging name instead.
If you want to log your package executions beyond using the standard log providers that can be specified in your package, specify your log folder by providing its UNC path in the Logging path box. You can browse and select your log folder by selecting Browse file storage or enter its path manually. For example, if you store your logs in Azure Files, your logging path is
\\<storage account name>.file.core.windows.net\<file share name>\<log folder name>. A subfolder is created in this path for each individual package run, named after the Execute SSIS Package activity run ID, and in which log files are generated every five minutes.Specify the credentials to access your log folder by entering their values in the Domain, Username, and Password boxes. For example, if you store your logs in Azure Files, the domain is
Azure, the username is<storage account name>, and the password is<storage account key>. Alternatively, you can use secrets stored in your Azure Key Vault as their values (see above).
For all UNC paths previously mentioned, the fully qualified file name must be fewer than 260 characters. The directory name must be fewer than 248 characters.
Package location: Package store
If you select Package store as your package location, complete the following steps.
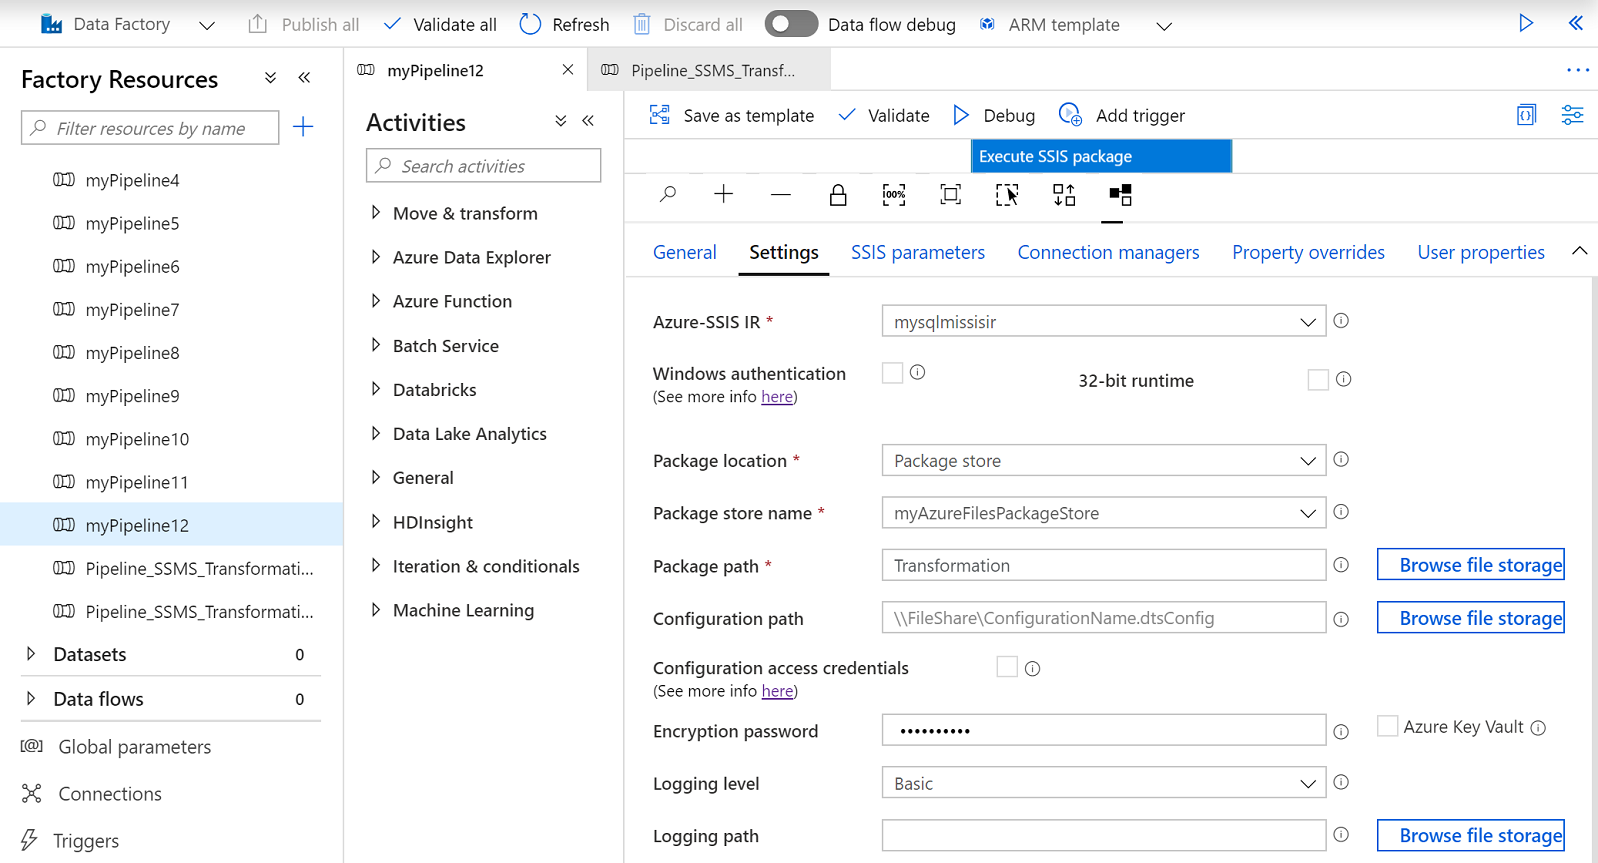
For Package store name, select an existing package store that's attached to your Azure-SSIS IR.
Specify your package to run by providing its path (without
.dtsx) from the selected package store in the Package path box. If the selected package store is on top of file system/Azure Files, you can browse and select your package by selecting Browse file storage, otherwise you can enter its path in the format of<folder name>\<package name>. You can also import new packages into the selected package store via SQL Server Management Studio (SSMS) similar to the legacy SSIS package store. For more information, see Manage SSIS packages with Azure-SSIS IR package stores.If you configure your package in a separate file, you need to provide a UNC path to your configuration file (with
.dtsConfig) in the Configuration path box. You can browse and select your configuration by selecting Browse file storage or enter its path manually. For example, if you store your configuration in Azure Files, its path is\\<storage account name>.file.core.windows.net\<file share name>\<configuration name>.dtsConfig.Select the Configuration access credentials check box to choose whether you want to specify the credentials to access your configuration file separately. This is needed when the selected package store is on top of SQL Server database (MSDB) hosted by your Azure SQL Managed Instance or doesn't also store your configuration file.
If you previously entered the values for your package execution credentials (for Windows authentication), you can reuse them by selecting the Same as package execution credentials check box. Otherwise, enter the values for your configuration access credentials in the Domain, Username, and Password boxes. For example, if you store your configuration in Azure Files, the domain is
Azure, the username is<storage account name>, and the password is<storage account key>.Alternatively, you can use secrets stored in your Azure Key Vault as their values. To do so, select the AZURE KEY VAULT check box next to them. Select or edit your existing key vault linked service or create a new one. Then select the secret name and version for your value. When you create or edit your key vault linked service, you can select or edit your existing key vault or create a new one. Make sure to grant Data Factory managed identity access to your key vault if you haven't done so already. You can also enter your secret directly in the following format:
<key vault linked service name>/<secret name>/<secret version>.If you used the EncryptAllWithPassword or EncryptSensitiveWithPassword protection level when you created your package via SSDT, enter the value for your password in the Encryption password box. Alternatively, you can use a secret stored in your Azure Key Vault as its value (see above).
If you used the EncryptSensitiveWithUserKey protection level, reenter your sensitive values in configuration files or on the SSIS Parameters, Connection Managers, or Property Overrides tabs (see below).
If you used the EncryptAllWithUserKey protection level, it's unsupported. You need to reconfigure your package to use another protection level via SSDT or the
dtutilcommand-line utility.For Logging level, select a predefined scope of logging for your package execution. Select the Customized check box if you want to enter your customized logging name instead.
If you want to log your package executions beyond using the standard log providers that can be specified in your package, specify your log folder by providing its UNC path in the Logging path box. You can browse and select your log folder by selecting Browse file storage or enter its path manually. For example, if you store your logs in Azure Files, your logging path is
\\<storage account name>.file.core.windows.net\<file share name>\<log folder name>. A subfolder is created in this path for each individual package run, named after the Execute SSIS Package activity run ID, and in which log files are generated every five minutes.Specify the credentials to access your log folder by entering their values in the Domain, Username, and Password boxes. For example, if you store your logs in Azure Files, the domain is
Azure, the username is<storage account name>, and the password is<storage account key>. Alternatively, you can use secrets stored in your Azure Key Vault as their values (see above).
For all UNC paths previously mentioned, the fully qualified file name must be fewer than 260 characters. The directory name must be fewer than 248 characters.
SSIS Parameters tab
On the SSIS Parameters tab of Execute SSIS Package activity, complete the following steps.
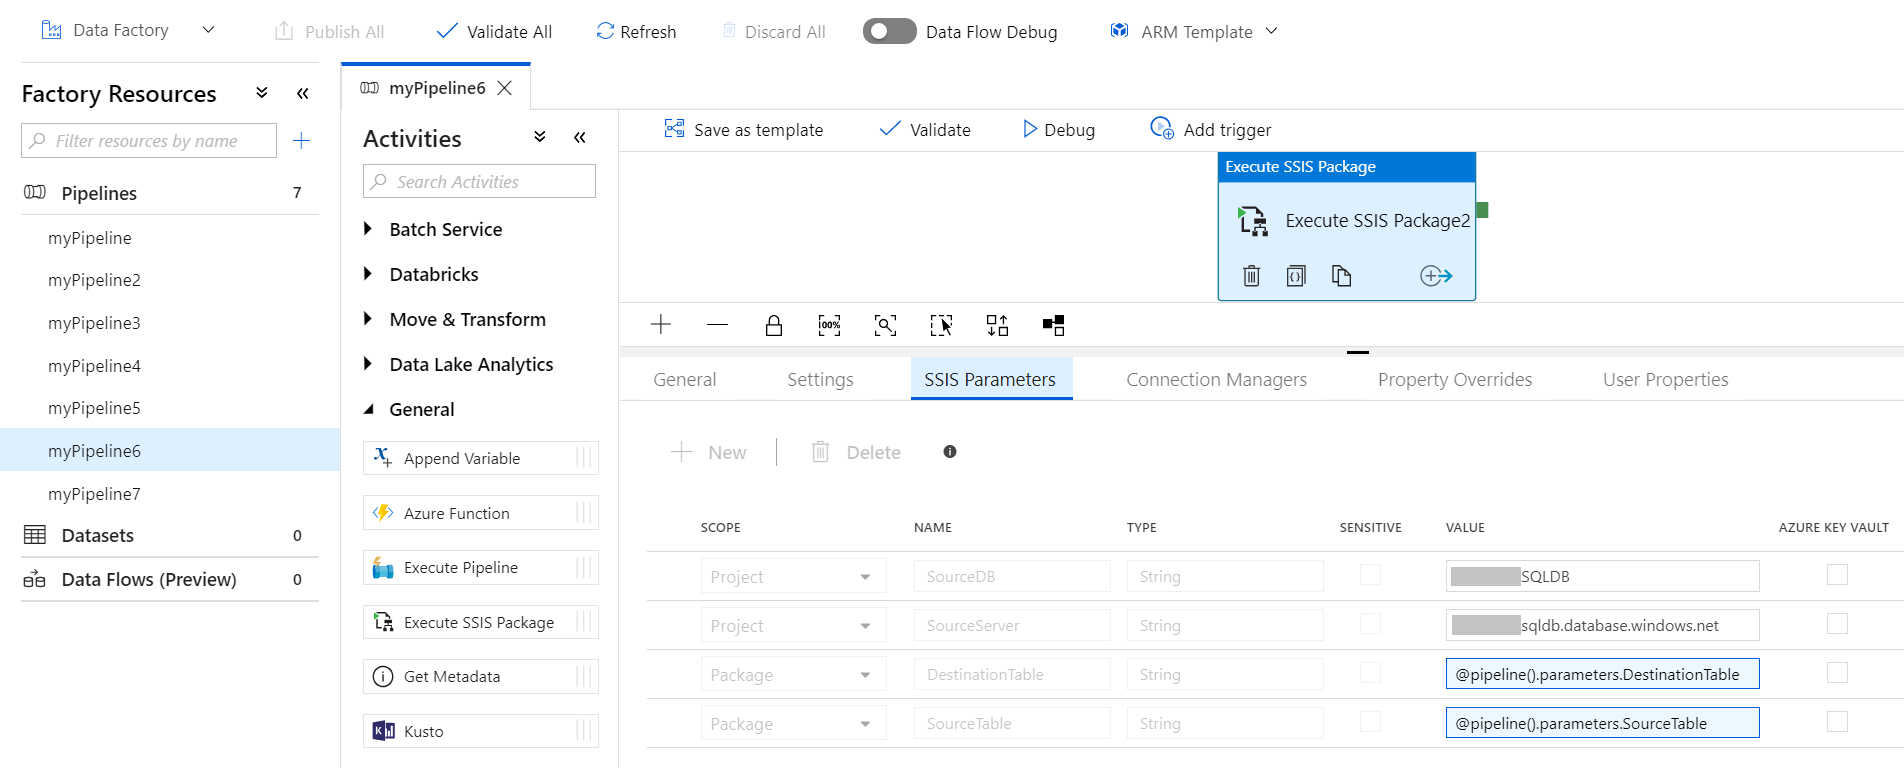
If your Azure-SSIS IR is running, SSISDB is selected as your package location, and the Manual entries check box on the Settings tab is cleared, the existing SSIS parameters in your selected project and package from SSISDB are displayed for you to assign values to them. Otherwise, you can enter them one by one to assign values to them manually. Make sure that they exist and are correctly entered for your package execution to succeed.
If you used the EncryptSensitiveWithUserKey protection level when you created your package via SSDT and File System (Package), File System (Project), Embedded package, or Package store is selected as your package location, you also need to reenter your sensitive parameters to assign values to them on this tab.
When you assign values to your parameters, you can add dynamic content by using expressions, functions, Data Factory system variables, and Data Factory pipeline parameters or variables.
Alternatively, you can use secrets stored in your Azure Key Vault as their values. To do so, select the AZURE KEY VAULT check box next to them. Select or edit your existing key vault linked service or create a new one. Then select the secret name and version for your value. When you create or edit your key vault linked service, you can select or edit your existing key vault or create a new one. Make sure to grant Data Factory managed identity access to your key vault if you haven't done so already. You can also enter your secret directly in the following format: <key vault linked service name>/<secret name>/<secret version>.
Connection Managers tab
On the Connection Managers tab of Execute SSIS Package activity, complete the following steps.
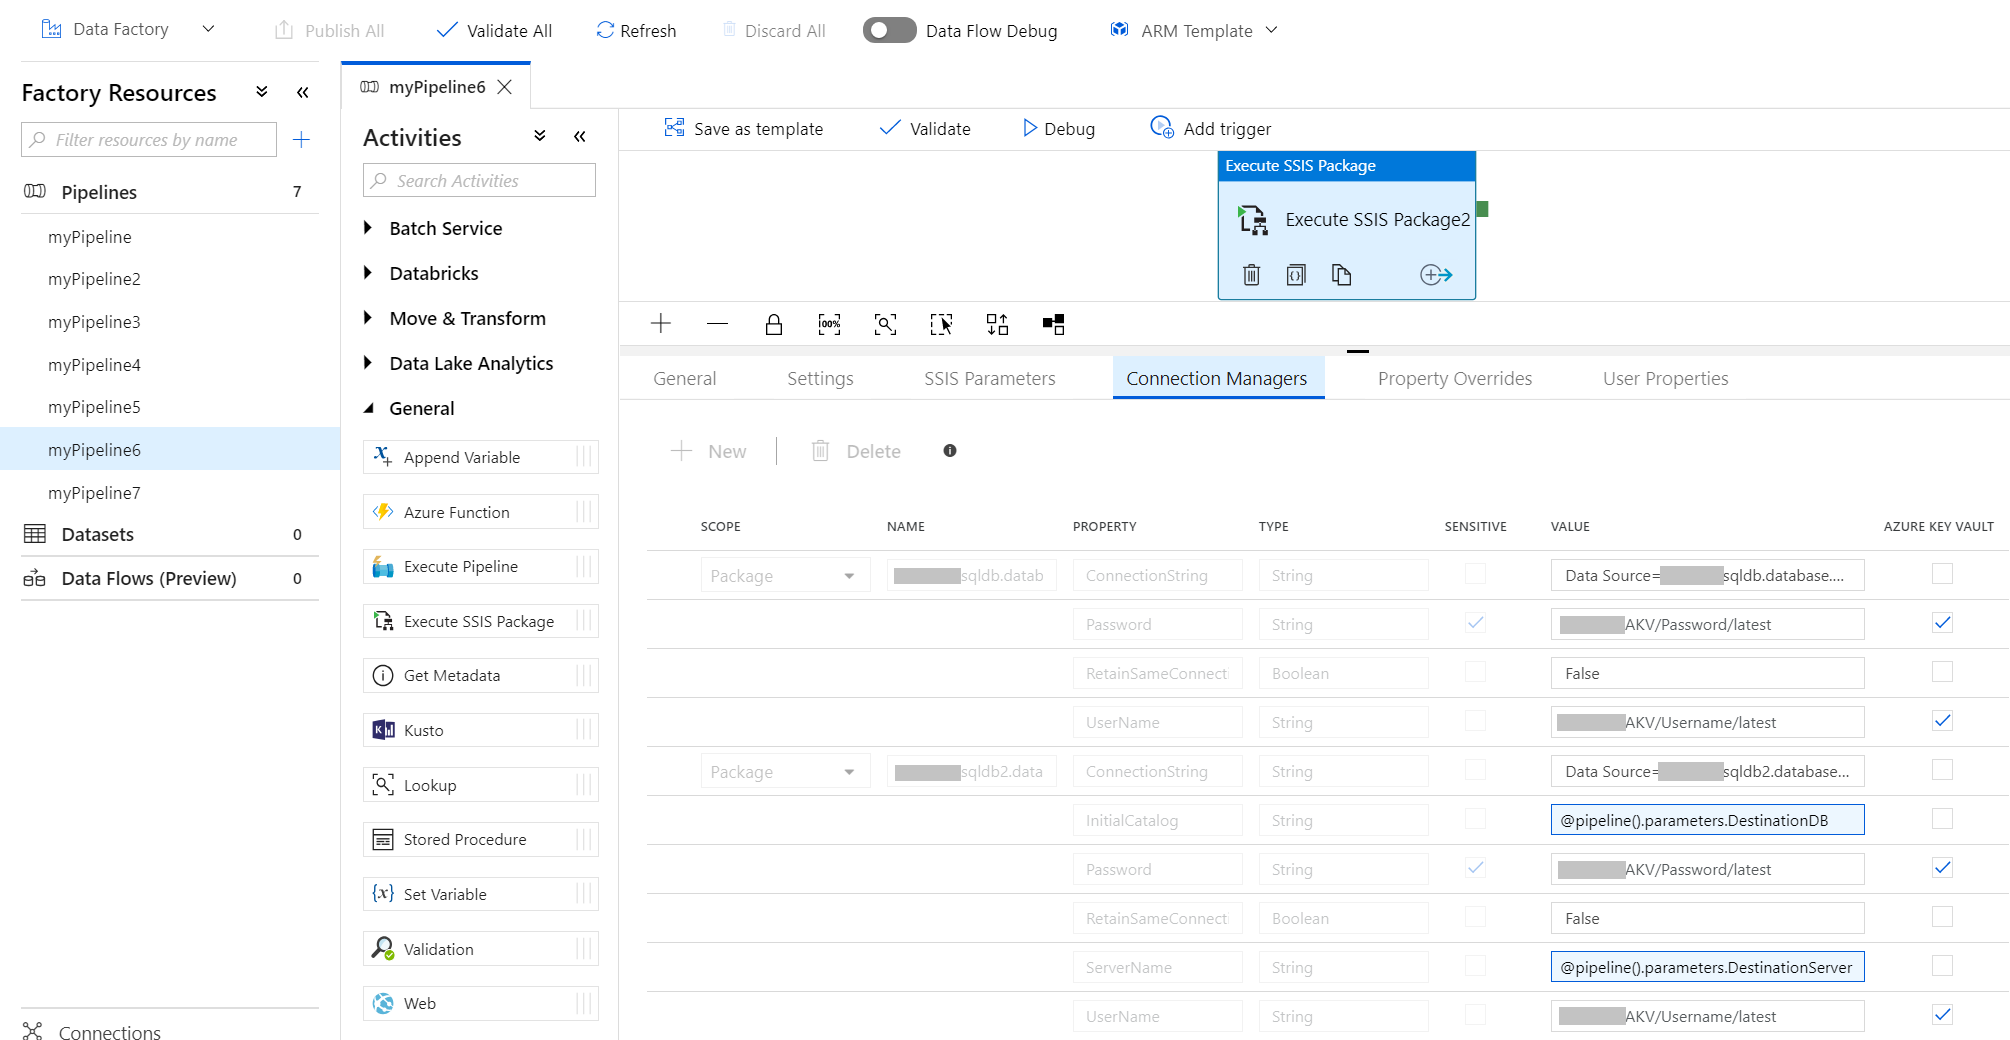
If your Azure-SSIS IR is running, SSISDB is selected as your package location, and the Manual entries check box on the Settings tab is cleared, the existing connection managers in your selected project and package from SSISDB are displayed for you to assign values to their properties. Otherwise, you can enter them one by one to assign values to their properties manually. Make sure that they exist and are correctly entered for your package execution to succeed.
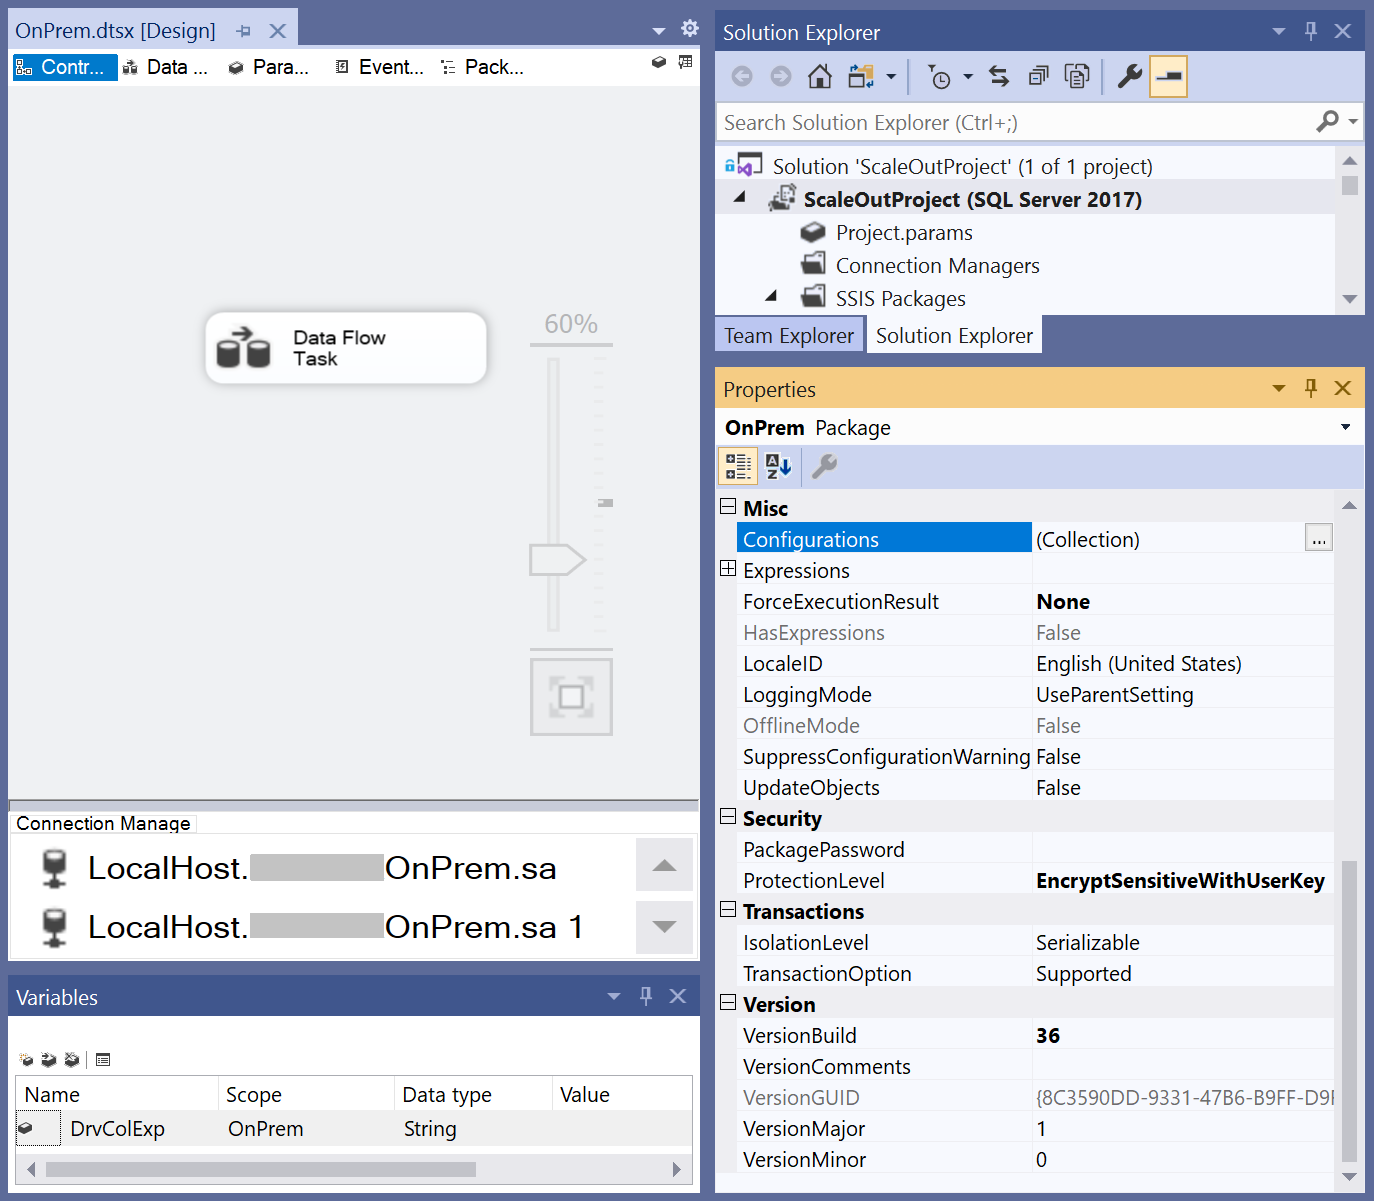
You can obtain the correct SCOPE, NAME, and PROPERTY names for any connection manager by opening the package that contains it on SSDT. After the package is opened, select the relevant connection manager to show the names and values for all of its properties on the Properties window of SSDT. With this info, you can override the values of any connection manager properties at run-time.
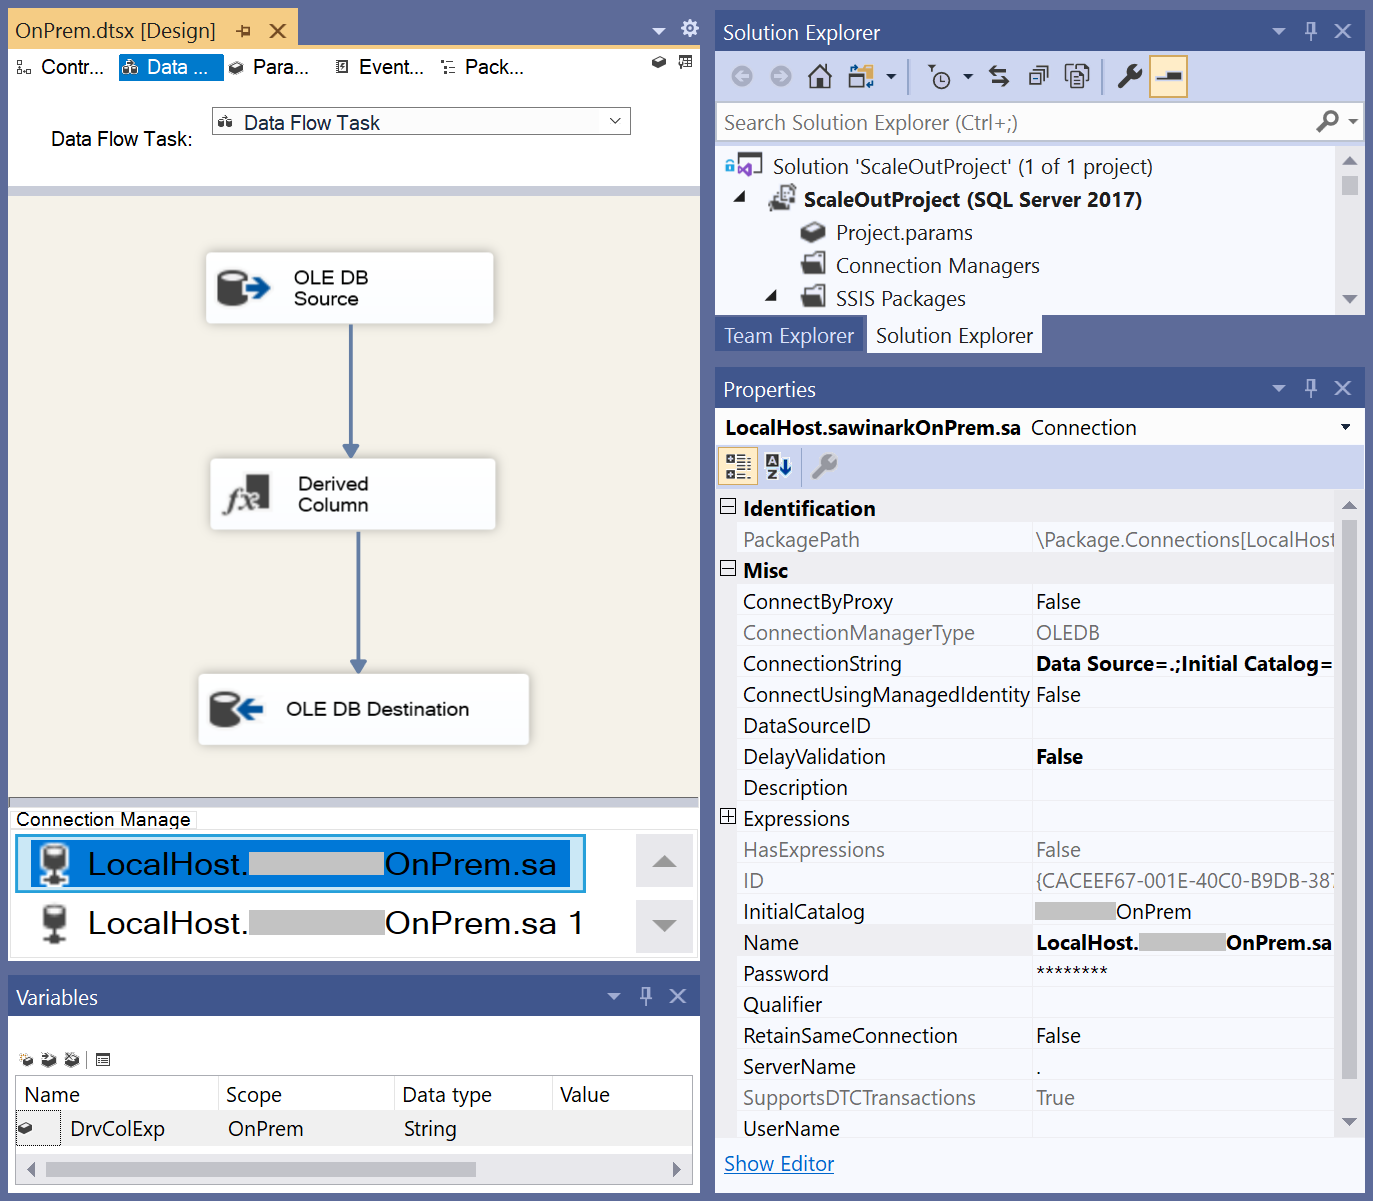
For example, without modifying your original package on SSDT, you can convert its on-premises-to-on-premises data flows running on SQL Server into on-premises-to-cloud data flows running on SSIS IR in ADF by overriding the values of ConnectByProxy, ConnectionString, and ConnectUsingManagedIdentity properties in existing connection managers at run-time.
These run-time overrides can enable Self-Hosted IR (SHIR) as a proxy for SSIS IR when accessing data on premises, see Configuring SHIR as a proxy for SSIS IR, and Azure SQL Database/Managed Instance connections using the latest MSOLEDBSQL driver that in turn enables Microsoft Entra authentication with ADF managed identity, see Configuring Microsoft Entra authentication with ADF managed identity for OLEDB connections.

If you used the EncryptSensitiveWithUserKey protection level when you created your package via SSDT and File System (Package), File System (Project), Embedded package, or Package store is selected as your package location, you also need to reenter your sensitive connection manager properties to assign values to them on this tab.
When you assign values to your connection manager properties, you can add dynamic content by using expressions, functions, Data Factory system variables, and Data Factory pipeline parameters or variables.
Alternatively, you can use secrets stored in your Azure Key Vault as their values. To do so, select the AZURE KEY VAULT check box next to them. Select or edit your existing key vault linked service or create a new one. Then select the secret name and version for your value. When you create or edit your key vault linked service, you can select or edit your existing key vault or create a new one. Make sure to grant Data Factory managed identity access to your key vault if you haven't done so already. You can also enter your secret directly in the following format: <key vault linked service name>/<secret name>/<secret version>.
Property Overrides tab
On the Property Overrides tab of Execute SSIS Package activity, complete the following steps.

Enter the paths of existing properties in your selected package one by one to assign values to them manually. Make sure that they exist and are correctly entered for your package execution to succeed. For example, to override the value of your user variable, enter its path in the following format:
\Package.Variables[User::<variable name>].Value.You can obtain the correct PROPERTY PATH for any package property by opening the package that contains it on SSDT. After the package is opened, select its control flow and Configurations property on the Properties window of SSDT. Next, select the ellipsis (...) button next to its Configurations property to open the Package Configurations Organizer that's normally used to create package configurations in Package Deployment Model.
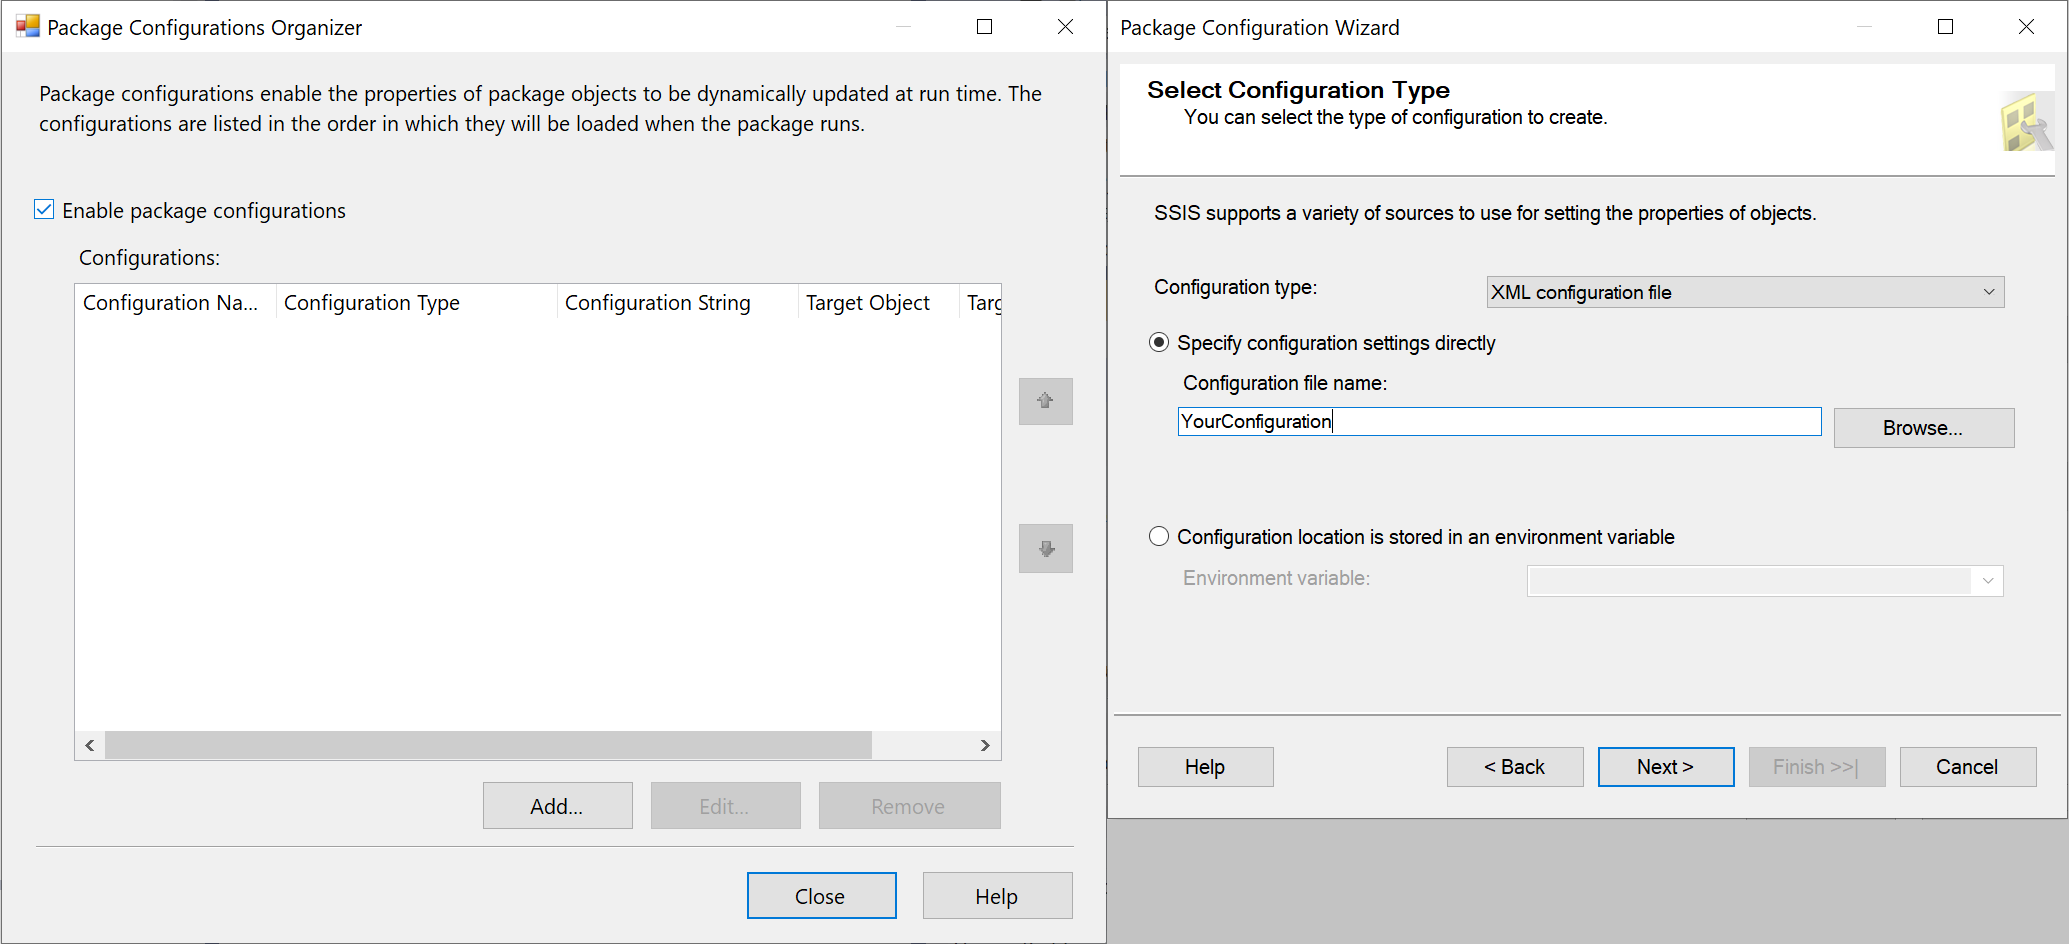
On the Package Configurations Organizer, select the Enable package configurations check box and the Add... button to open the Package Configuration Wizard.
On the Package Configuration Wizard, select the XML configuration file item in Configuration type dropdown menu and the Specify configuration settings directly button, enter your configuration file name, and select the Next > button.
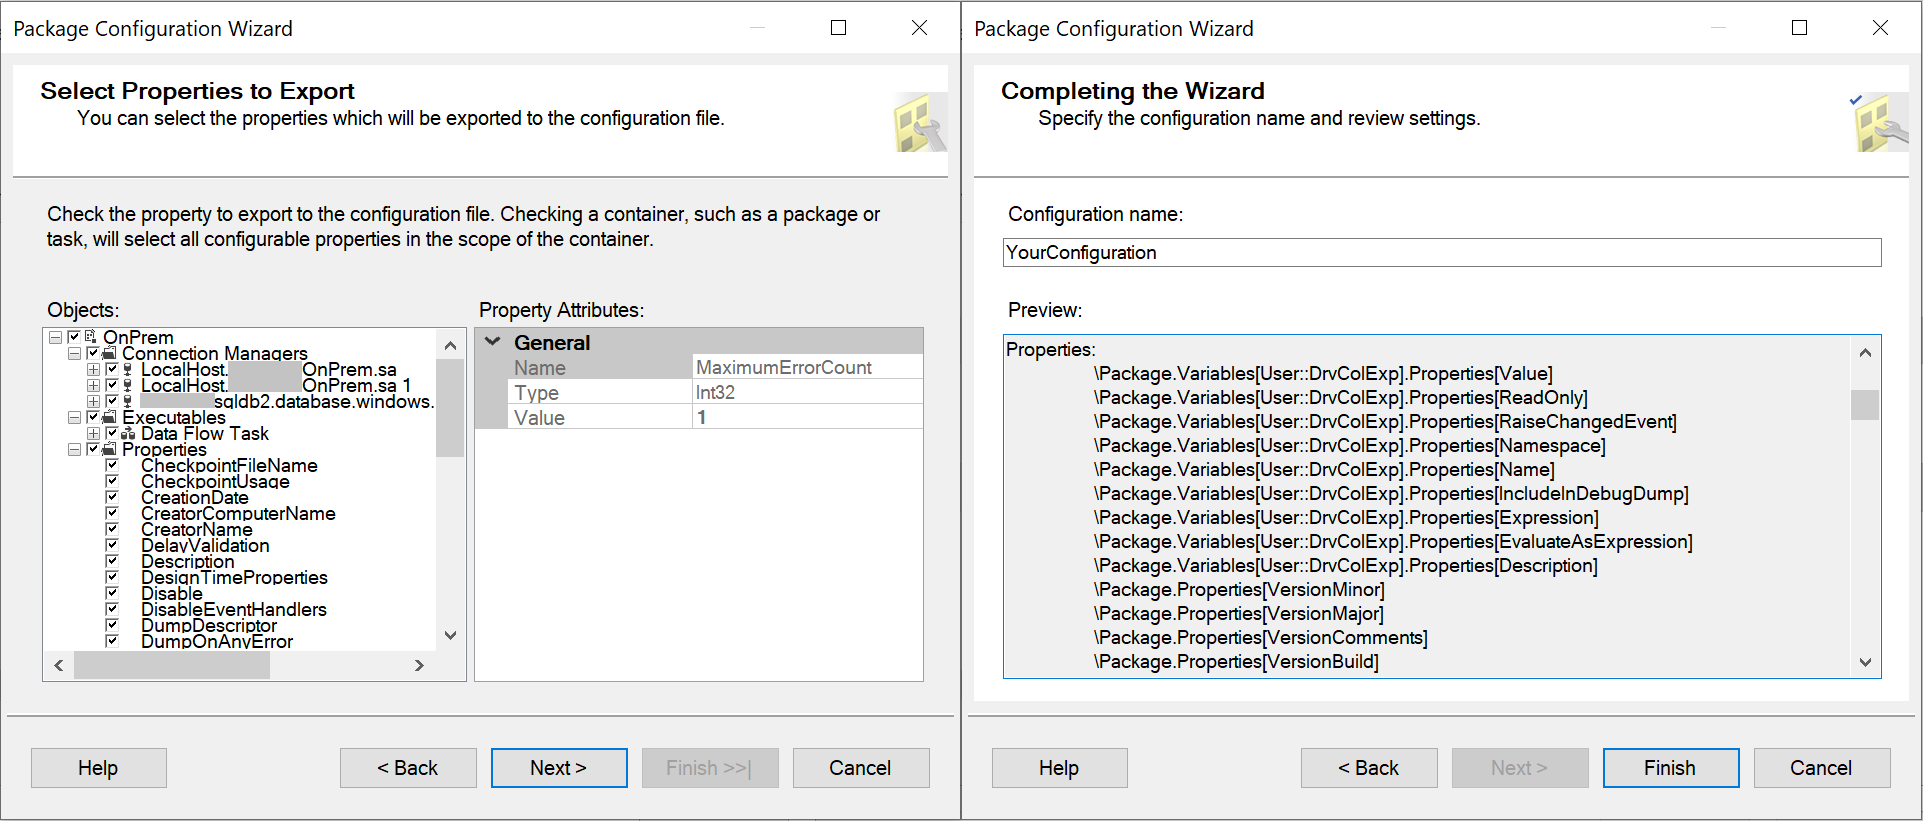
Finally, select the package properties whose path you want and the Next > button. You can now see, copy & paste the package property paths you want and save them in your configuration file. With this info, you can override the values of any package properties at run-time.
If you used the EncryptSensitiveWithUserKey protection level when you created your package via SSDT and File System (Package), File System (Project), Embedded package, or Package store is selected as your package location, you also need to reenter your sensitive package properties to assign values to them on this tab.
When you assign values to your package properties, you can add dynamic content by using expressions, functions, Data Factory system variables, and Data Factory pipeline parameters or variables.
The values assigned in configuration files and on the SSIS Parameters tab can be overridden by using the Connection Managers or Property Overrides tabs. The values assigned on the Connection Managers tab can also be overridden by using the Property Overrides tab.
To validate the pipeline configuration, select Validate on the toolbar. To close the Pipeline Validation Report, select >>.
To publish the pipeline to Data Factory, select Publish All.
Run the pipeline
In this step, you trigger a pipeline run.
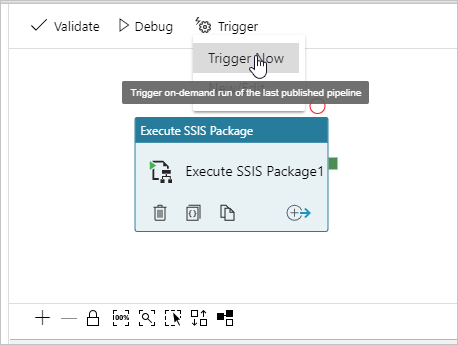
To trigger a pipeline run, select Trigger on the toolbar, and select Trigger now.
In the Pipeline Run window, select Finish.
Monitor the pipeline
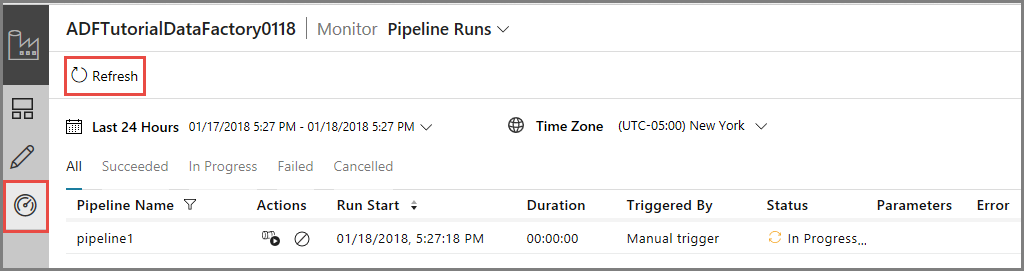
Switch to the Monitor tab on the left. You see the pipeline run and its status along with other information, such as the Run Start time. To refresh the view, select Refresh.
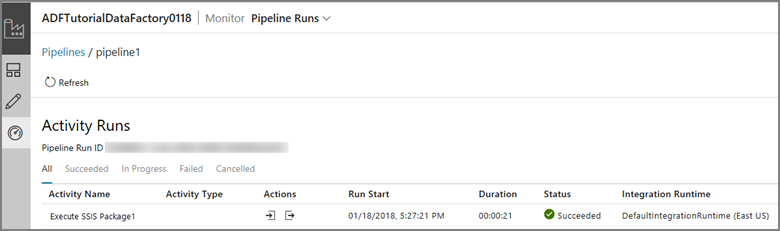
Select the View Activity Runs link in the Actions column. You see only one activity run because the pipeline has only one activity. It's the Execute SSIS Package activity.
Run the following query against the SSISDB database in your SQL server to verify that the package executed.
select * from catalog.executions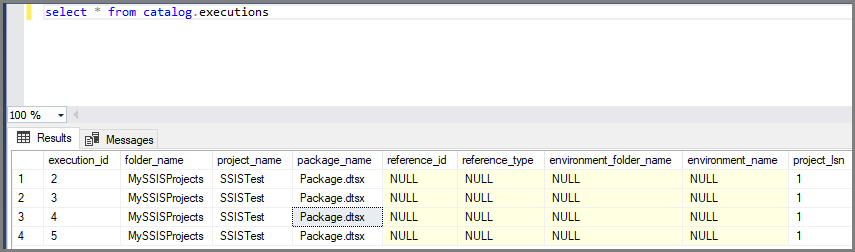
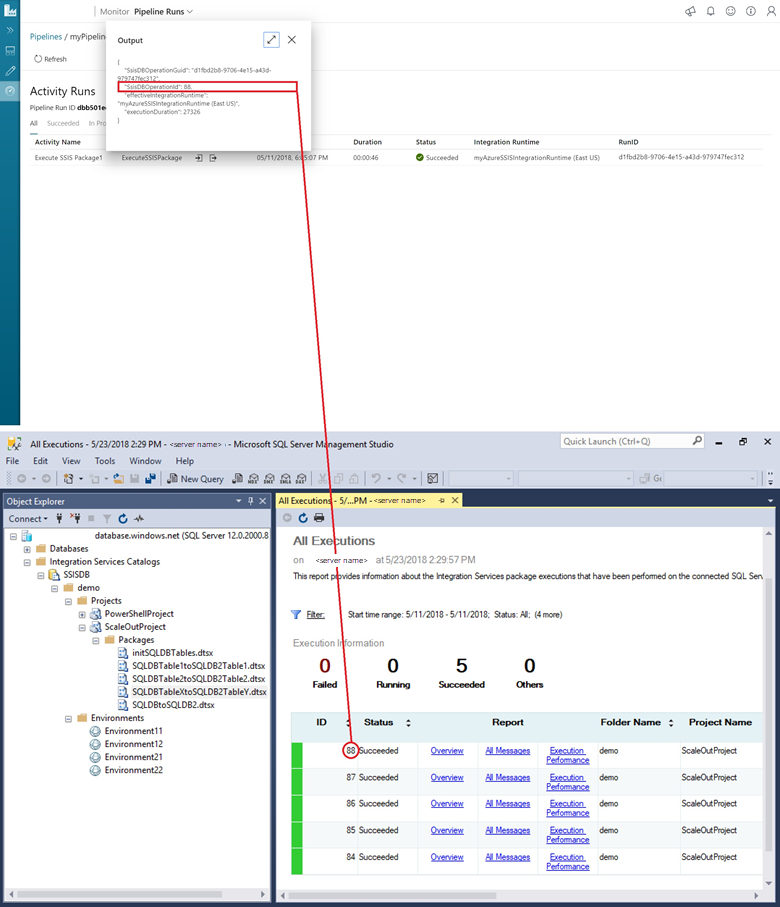
You can also get the SSISDB execution ID from the output of the pipeline activity run and use the ID to check more comprehensive execution logs and error messages in SQL Server Management Studio.
Schedule the pipeline with a trigger
You can also create a scheduled trigger for your pipeline so that the pipeline runs on a schedule, such as hourly or daily. For an example, see Create a data factory - Data Factory UI.
Related content
Tilbakemeldinger
Kommer snart: Gjennom 2024 faser vi ut GitHub Issues som tilbakemeldingsmekanisme for innhold, og erstatter det med et nytt system for tilbakemeldinger. Hvis du vil ha mer informasjon, kan du se: https://aka.ms/ContentUserFeedback.
Send inn og vis tilbakemelding for