Install NVIDIA GPU drivers on N-series VMs running Linux
Caution
This article references CentOS, a Linux distribution that is nearing End Of Life (EOL) status. Please consider your use and plan accordingly. For more information, see the CentOS End Of Life guidance.
Applies to: ✔️ Linux VMs
To take advantage of the GPU capabilities of Azure N-series VMs backed by NVIDIA GPUs, you must install NVIDIA GPU drivers. The NVIDIA GPU Driver Extension installs appropriate NVIDIA CUDA or GRID drivers on an N-series VM. Install or manage the extension using the Azure portal or tools such as the Azure CLI or Azure Resource Manager templates. See the NVIDIA GPU Driver Extension documentation for supported distributions and deployment steps.
If you choose to install NVIDIA GPU drivers manually, this article provides supported distributions, drivers, and installation and verification steps. Manual driver setup information is also available for Windows VMs.
For N-series VM specs, storage capacities, and disk details, see GPU Linux VM sizes.
Supported distributions and drivers
Caution
This article references CentOS, a Linux distribution that is nearing End Of Life (EOL) status. Please consider your use and planning accordingly.
NVIDIA CUDA drivers
For the latest CUDA drivers and supported operating systems, visit the NVIDIA website. Ensure that you install or upgrade to the latest supported CUDA drivers for your distribution.
Note
The latest supported CUDA drivers for original NC-series SKU VMs is currently 470.82.01. Later driver versions are not supported on the K80 cards in NC.
Note
The Azure NVads A10 v5 VMs only support GRID 14.1(510.73) or higher driver versions. The vGPU driver for the A10 SKU is a unified driver that supports both graphics and compute workloads.
Tip
As an alternative to manual CUDA driver installation on a Linux VM, you can deploy an Azure Data Science Virtual Machine image. The DSVM editions for Ubuntu 16.04 LTS or CentOS 7.4 pre-install NVIDIA CUDA drivers, the CUDA Deep Neural Network Library, and other tools.
NVIDIA GRID drivers
Microsoft redistributes NVIDIA GRID driver installers for NV and NVv3-series VMs used as virtual workstations or for virtual applications. Install only these GRID drivers on Azure NV VMs, only on the operating systems listed in the following table. These drivers include licensing for GRID Virtual GPU Software in Azure. You don't need to set up a NVIDIA vGPU software license server.
The GRID drivers redistributed by Azure don't work on most non-NV series VMs like NC, NCv2, NCv3, ND, and NDv2-series VMs but works on NCasT4v3 series.
| Distribution | Driver |
|---|---|
| Ubuntu 20.04 LTS, 22.04 LTS Red Hat Enterprise Linux 7.9, 8.6, 8.8 SUSE Linux Enterprise Server 15 SP2, 12 SP2,12 SP5 Rocky Linux 8.4 |
NVIDIA vGPU 16.3, driver branch R535(.exe) NVIDIA vGPU 16.2, driver branch R535(.exe) |
Note
For Azure NVads A10 v5 VMs we recommend customers to always be on the latest driver version. The latest NVIDIA major driver branch(n) is only backward compatbile with the previous major branch(n-1). For eg, vGPU 17.x is backward compatible with vGPU 16.x only. Any VMs still runnig n-2 or lower may see driver failures when the latest drive branch is rolled out to Azure hosts.
NVs_v3 VMs only support vGPU 16 or lower driver version.
Visit GitHub for the complete list of all previous Nvidia GRID driver links.
Warning
Installation of third-party software on Red Hat products can affect the Red Hat support terms. See the Red Hat Knowledgebase article.
Install CUDA drivers on N-series VMs
Here are steps to install CUDA drivers from the NVIDIA CUDA Toolkit on N-series VMs.
C and C++ developers can optionally install the full Toolkit to build GPU-accelerated applications. For more information, see the CUDA Installation Guide.
To install CUDA drivers, make an SSH connection to each VM. To verify that the system has a CUDA-capable GPU, run the following command:
lspci | grep -i NVIDIA
Output is similar to the following example (showing an NVIDIA Tesla K80 card):

lspci lists the PCIe devices on the VM, including the InfiniBand NIC and GPUs, if any. If lspci doesn't return successfully, you may need to install LIS on CentOS/RHEL.
Then run installation commands specific for your distribution.
Ubuntu
Ubuntu packages NVIDIA proprietary drivers. Those drivers come directly from NVIDIA and are simply packaged by Ubuntu so that they can be automatically managed by the system. Downloading and installing drivers from another source can lead to a broken system. Moreover, installing third-party drivers requires extra-steps on VMs with TrustedLaunch and Secure Boot enabled. They require the user to add a new Machine Owner Key for the system to boot. Drivers from Ubuntu are signed by Canonical and will work with Secure Boot.
Install
ubuntu-driversutility:sudo apt update && sudo apt install -y ubuntu-drivers-commonInstall the latest NVIDIA drivers:
sudo ubuntu-drivers installDownload and install the CUDA toolkit from NVIDIA:
Note
The example shows the CUDA package path for Ubuntu 22.04 LTS. Replace the path specific to the version you plan to use.
Visit the NVIDIA Download Center or the NVIDIA CUDA Resources page for the full path specific to each version.
wget https://developer.download.nvidia.com/compute/cuda/repos/ubuntu2204/x86_64/cuda-keyring_1.1-1_all.deb
sudo apt install -y ./cuda-keyring_1.1-1_all.deb
sudo apt update
sudo apt -y install cuda-toolkit-12-3
The installation can take several minutes.
Verify that the GPU is correctly recognized (you may need to reboot your VM for system changes to take effect):
nvidia-smi
NVIDIA driver updates
We recommend that you periodically update NVIDIA drivers after deployment.
sudo apt update
sudo apt full-upgrade
CentOS or Red Hat Enterprise Linux
Update the kernel (recommended). If you choose not to update the kernel, ensure that the versions of
kernel-devel, anddkmsare appropriate for your kernel.sudo yum install kernel kernel-tools kernel-headers kernel-devel sudo rebootInstall the latest Linux Integration Services for Hyper-V and Azure. Check if LIS is required by verifying the results of lspci. If all GPU devices are listed as expected, installing LIS isn't required.
LIS is applicable to Red Hat Enterprise Linux, CentOS, and the Oracle Linux Red Hat Compatible Kernel 5.2-5.11, 6.0-6.10, and 7.0-7.7. Refer to the Linux Integration Services documentation for more details. Skip this step if you plan to use CentOS/RHEL 7.8 (or higher versions) as LIS is no longer required for these versions.
wget https://aka.ms/lis
tar xvzf lis
cd LISISO

sudo ./install.sh
sudo reboot
Reconnect to the VM and continue installation with the following commands:
sudo rpm -Uvh https://dl.fedoraproject.org/pub/epel/epel-release-latest-7.noarch.rpm
sudo yum-config-manager --add-repo https://developer.download.nvidia.com/compute/cuda/repos/rhel7/x86_64/cuda-rhel7.repo
sudo yum clean all
sudo yum -y install nvidia-driver-latest-dkms cuda-drivers
The installation can take several minutes.
Note
Visit Fedora and Nvidia CUDA repo to pick the correct package for the CentOS or RHEL version you want to use.
For example, CentOS 8 and RHEL 8 need the following steps.
sudo rpm -Uvh https://dl.fedoraproject.org/pub/epel/epel-release-latest-8.noarch.rpm
sudo yum install dkms

sudo wget https://developer.download.nvidia.com/compute/cuda/repos/rhel8/x86_64/cuda-rhel8.repo -O /etc/yum.repos.d/cuda-rhel8.repo

sudo yum install cuda-drivers
To optionally install the complete CUDA toolkit, type:
sudo yum install cudaNote
If you see an error message related to missing packages like vulkan-filesystem then you may need to edit /etc/yum.repos.d/rh-cloud , look for optional-rpms and set enabled to 1
Reboot the VM and proceed to verify the installation.
Verify driver installation
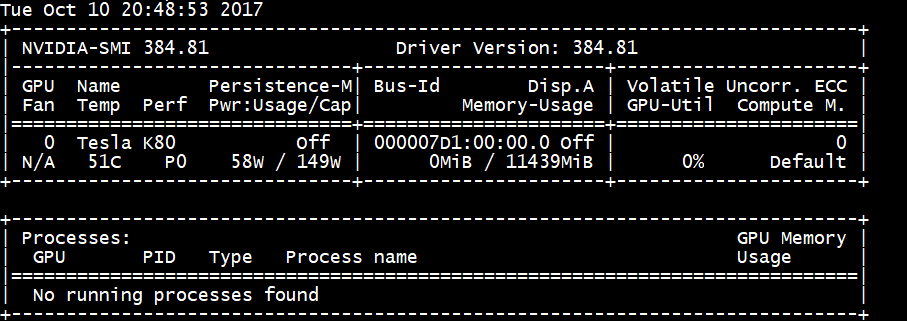
To query the GPU device state, SSH to the VM and run the nvidia-smi command-line utility installed with the driver.
If the driver is installed, Nvidia SMI lists the GPU-Util as 0% until you run a GPU workload on the VM. Your driver version and GPU details may be different from the ones shown.
RDMA network connectivity
RDMA network connectivity can be enabled on RDMA-capable N-series VMs such as NC24r deployed in the same availability set or in a single placement group in a virtual machine (VM) scale set. The RDMA network supports Message Passing Interface (MPI) traffic for applications running with Intel MPI 5.x or a later version:
Distributions
Deploy RDMA-capable N-series VMs from one of the images in the Azure Marketplace that supports RDMA connectivity on N-series VMs:
Ubuntu 16.04 LTS - Configure RDMA drivers on the VM and register with Intel to download Intel MPI:
Install dapl, rdmacm, ibverbs, and mlx4
sudo apt-get update

sudo apt-get install libdapl2 libmlx4-1
In /etc/waagent.conf, enable RDMA by uncommenting the following configuration lines. You need root access to edit this file.
OS.EnableRDMA=y

OS.UpdateRdmaDriver=y
Add or change the following memory settings in KB in the /etc/security/limits.conf file. You need root access to edit this file. For testing purposes you can set memlock to unlimited. For example:
<User or group name> hard memlock unlimited.<User or group name> hard memlock <memory required for your application in KB> <User or group name> soft memlock <memory required for your application in KB>Install Intel MPI Library. Either purchase and download the library from Intel or download the free evaluation version.
wget http://registrationcenter-download.intel.com/akdlm/irc_nas/tec/9278/l_mpi_p_5.1.3.223.tgzOnly Intel MPI 5.x runtimes are supported.
For installation steps, see the Intel MPI Library Installation Guide.
Enable ptrace for non-root non-debugger processes (needed for the most recent versions of Intel MPI).
echo 0 | sudo tee /proc/sys/kernel/yama/ptrace_scope
CentOS-based 7.4 HPC - RDMA drivers and Intel MPI 5.1 are installed on the VM.
CentOS-based HPC - CentOS-HPC 7.6 and later (for SKUs where InfiniBand is supported over SR-IOV). These images have Mellanox OFED and MPI libraries pre-installed.
Note
CX3-Pro cards are supported only through LTS versions of Mellanox OFED. Use LTS Mellanox OFED version (4.9-0.1.7.0) on the N-series VMs with ConnectX3-Pro cards. For more information, see Linux Drivers.
Also, some of the latest Azure Marketplace HPC images have Mellanox OFED 5.1 and later, which don't support ConnectX3-Pro cards. Check the Mellanox OFED version in the HPC image before using it on VMs with ConnectX3-Pro cards.
The following images are the latest CentOS-HPC images that support ConnectX3-Pro cards:
- OpenLogic:CentOS-HPC:7.6:7.6.2020062900
- OpenLogic:CentOS-HPC:7_6gen2:7.6.2020062901
- OpenLogic:CentOS-HPC:7.7:7.7.2020062600
- OpenLogic:CentOS-HPC:7_7-gen2:7.7.2020062601
- OpenLogic:CentOS-HPC:8_1:8.1.2020062400
- OpenLogic:CentOS-HPC:8_1-gen2:8.1.2020062401
Install GRID drivers on NV or NVv3-series VMs
To install NVIDIA GRID drivers on NV or NVv3-series VMs, make an SSH connection to each VM and follow the steps for your Linux distribution.
Ubuntu
Run the
lspcicommand. Verify that the NVIDIA M60 card or cards are visible as PCI devices.Install updates.
sudo apt-get update
sudo apt-get upgrade -y
sudo apt-get dist-upgrade -y
sudo apt-get install build-essential ubuntu-desktop -y
sudo apt-get install linux-azure -y
Disable the Nouveau kernel driver, which is incompatible with the NVIDIA driver. (Only use the NVIDIA driver on NV or NVv2 VMs.) To disable the driver, create a file in
/etc/modprobe.dnamednouveau.confwith the following contents:blacklist nouveau blacklist lbm-nouveauReboot the VM and reconnect. Exit X server:
sudo systemctl stop lightdm.serviceDownload and install the GRID driver:
wget -O NVIDIA-Linux-x86_64-grid.run https://go.microsoft.com/fwlink/?linkid=874272
chmod +x NVIDIA-Linux-x86_64-grid.run
sudo ./NVIDIA-Linux-x86_64-grid.run
When you're asked whether you want to run the nvidia-xconfig utility to update your X configuration file, select Yes.
After installation completes, copy /etc/nvidia/gridd.conf.template to a new file gridd.conf at location /etc/nvidia/
sudo cp /etc/nvidia/gridd.conf.template /etc/nvidia/gridd.confAdd the following to
/etc/nvidia/gridd.conf:IgnoreSP=FALSE EnableUI=FALSERemove the following from
/etc/nvidia/gridd.confif it is present:FeatureType=0Reboot the VM and proceed to verify the installation.
Install GRID driver on Ubuntu with Secure Boot enabled
The GRID driver installation process does not offer any options to skip kernel module build and installation and select a different source of signed kernel modules, so secure boot has to be disabled in Linux VMs in order to use them with GRID, after installing signed kernel modules.
CentOS or Red Hat Enterprise Linux
Update the kernel and DKMS (recommended). If you choose not to update the kernel, ensure that the versions of
kernel-develanddkmsare appropriate for your kernel.sudo yum update sudo yum install kernel-devel sudo rpm -Uvh https://dl.fedoraproject.org/pub/epel/epel-release-latest-7.noarch.rpm sudo yum install dkms sudo yum install hyperv-daemonsDisable the Nouveau kernel driver, which is incompatible with the NVIDIA driver. (Only use the NVIDIA driver on NV or NV3 VMs.) To do this, create a file in
/etc/modprobe.dnamednouveau.confwith the following contents:blacklist nouveau blacklist lbm-nouveauReboot the VM, reconnect, and install the latest Linux Integration Services for Hyper-V and Azure. Check if LIS is required by verifying the results of lspci. If all GPU devices are listed as expected, installing LIS isn't required.
Skip this step if you plan to use CentOS/RHEL 7.8 (or higher versions) as LIS is no longer required for these versions.
wget https://aka.ms/lis
tar xvzf lis
cd LISISO

sudo ./install.sh
sudo reboot
Reconnect to the VM and run the
lspcicommand. Verify that the NVIDIA M60 card or cards are visible as PCI devices.Download and install the GRID driver:
wget -O NVIDIA-Linux-x86_64-grid.run https://go.microsoft.com/fwlink/?linkid=874272
chmod +x NVIDIA-Linux-x86_64-grid.run

sudo ./NVIDIA-Linux-x86_64-grid.run
When you're asked whether you want to run the nvidia-xconfig utility to update your X configuration file, select Yes.
After installation completes, copy /etc/nvidia/gridd.conf.template to a new file gridd.conf at location /etc/nvidia/
sudo cp /etc/nvidia/gridd.conf.template /etc/nvidia/gridd.confAdd two lines to
/etc/nvidia/gridd.conf:IgnoreSP=FALSE EnableUI=FALSERemove one line from
/etc/nvidia/gridd.confif it is present:FeatureType=0Reboot the VM and proceed to verify the installation.
Verify driver installation
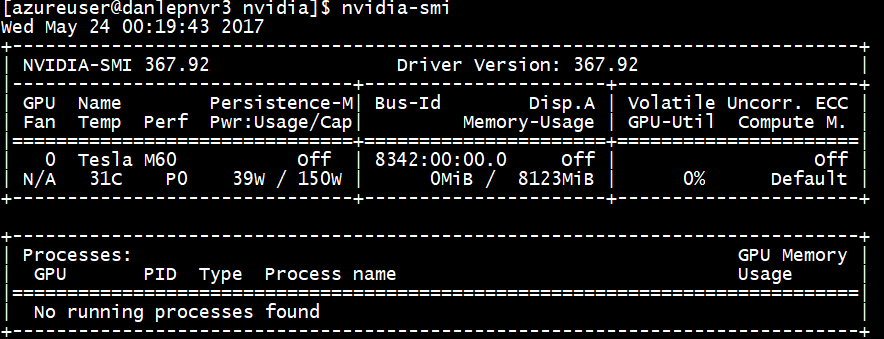
To query the GPU device state, SSH to the VM and run the nvidia-smi command-line utility installed with the driver.
If the driver is installed, Nvidia SMI will list the GPU-Util as 0% until you run a GPU workload on the VM. Your driver version and GPU details may be different from the ones shown.
X11 server
If you need an X11 server for remote connections to an NV or NVv2 VM, x11vnc is recommended because it allows hardware acceleration of graphics. The BusID of the M60 device must be manually added to the X11 configuration file (usually, etc/X11/xorg.conf). Add a "Device" section similar to the following:
Section "Device"
    Identifier     "Device0"
    Driver         "nvidia"
    VendorName     "NVIDIA Corporation"
    BoardName      "Tesla M60"
    BusID          "PCI:0@your-BusID:0:0"
EndSection
Additionally, update your "Screen" section to use this device.
The decimal BusID can be found by running
nvidia-xconfig --query-gpu-info | awk '/PCI BusID/{print $4}'
The BusID can change when a VM gets reallocated or rebooted. Therefore, you may want to create a script to update the BusID in the X11 configuration when a VM is rebooted. For example, create a script named busidupdate.sh (or another name you choose) with contents similar to the following:
#!/bin/bash
XCONFIG="/etc/X11/xorg.conf"
OLDBUSID=`awk '/BusID/{gsub(/"/, "", $2); print $2}' ${XCONFIG}`
NEWBUSID=`nvidia-xconfig --query-gpu-info | awk '/PCI BusID/{print $4}'`

if [[ "${OLDBUSID}" == "${NEWBUSID}" ]] ; then
        echo "NVIDIA BUSID not changed - nothing to do"
else
        echo "NVIDIA BUSID changed from \"${OLDBUSID}\" to \"${NEWBUSID}\": Updating ${XCONFIG}"
        sed -e 's|BusID.*|BusID          '\"${NEWBUSID}\"'|' -i ${XCONFIG}
fi
Then, create an entry for your update script in /etc/rc.d/rc3.d so the script is invoked as root on boot.
Troubleshooting
- You can set persistence mode using
nvidia-smiso the output of the command is faster when you need to query cards. To set persistence mode, executenvidia-smi -pm 1. Note that if the VM is restarted, the mode setting goes away. You can always script the mode setting to execute upon startup. - If you updated the NVIDIA CUDA drivers to the latest version and find RDMA connectivity is no longer working, reinstall the RDMA drivers to reestablish that connectivity.
- During installation of LIS, if a certain CentOS/RHEL OS version (or kernel) is not supported for LIS, an error “Unsupported kernel version” is thrown. Please report this error along with the OS and kernel versions.
- If jobs are interrupted by ECC errors on the GPU (either correctable or uncorrectable), first check to see if the GPU meets any of Nvidia's RMA criteria for ECC errors. If the GPU is eligible for RMA, please contact support about getting it serviced; otherwise, reboot your VM to reattach the GPU as described here. Less invasive methods such as
nvidia-smi -rdon't work with the virtualization solution deployed in Azure.
Next steps
- To capture a Linux VM image with your installed NVIDIA drivers, see How to generalize and capture a Linux virtual machine.
Tilbakemeldinger
Kommer snart: Gjennom 2024 faser vi ut GitHub Issues som tilbakemeldingsmekanisme for innhold, og erstatter det med et nytt system for tilbakemeldinger. Hvis du vil ha mer informasjon, kan du se: https://aka.ms/ContentUserFeedback.
Send inn og vis tilbakemelding for