Create a C++ console app project
The usual starting point for a C++ programmer is a "Hello, world!" application that runs on the command line. That's what you create in Visual Studio in this step.
Prerequisites
- Have Visual Studio with the Desktop development with C++ workload installed and running on your computer. If it's not installed yet, see Install C++ support in Visual Studio.
Create your app project
Visual Studio uses projects to organize the code for an app, and solutions to organize your projects. A project contains all the options, configurations, and rules used to build your apps. It manages the relationship between all the project's files and any external files. To create your app, first, create a new project and solution.
In Visual Studio, open the File menu and choose New > Project to open the Create a new Project dialog. Select the Console App template that has C++, Windows, and Console tags, and then choose Next.
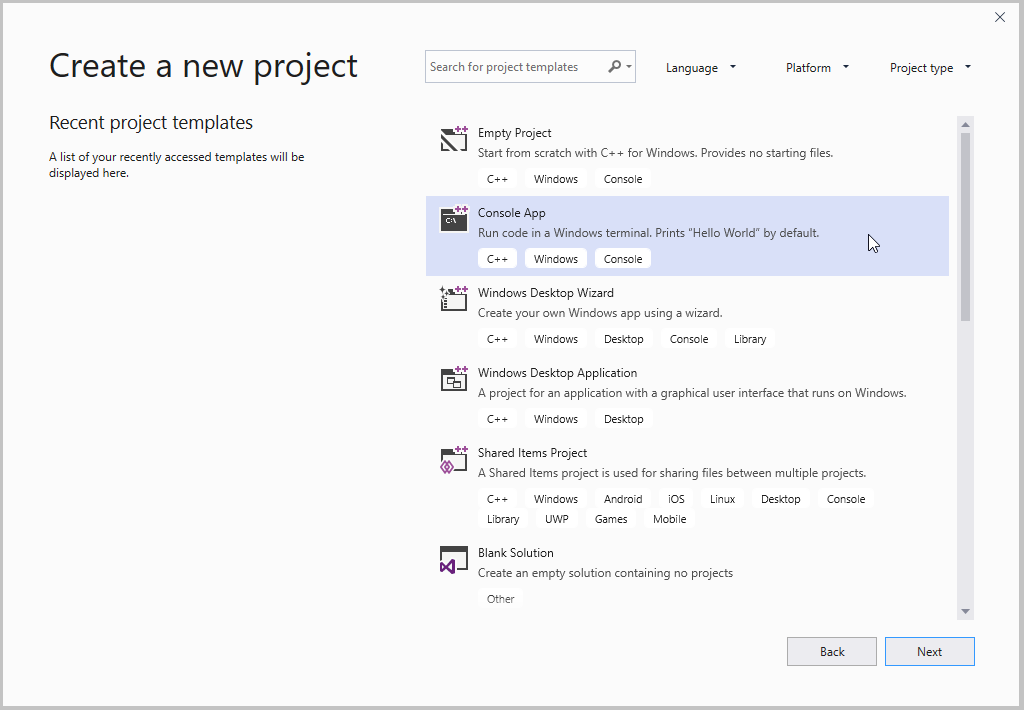
The create a new project dialog with the Console App template selected. That template says: Run code in a windows terminal. Prints hello world by default. Has the tags c++, Windows, and Console.
In the Configure your new project dialog, enter HelloWorld in the Project name edit box. Choose Create to create the project.
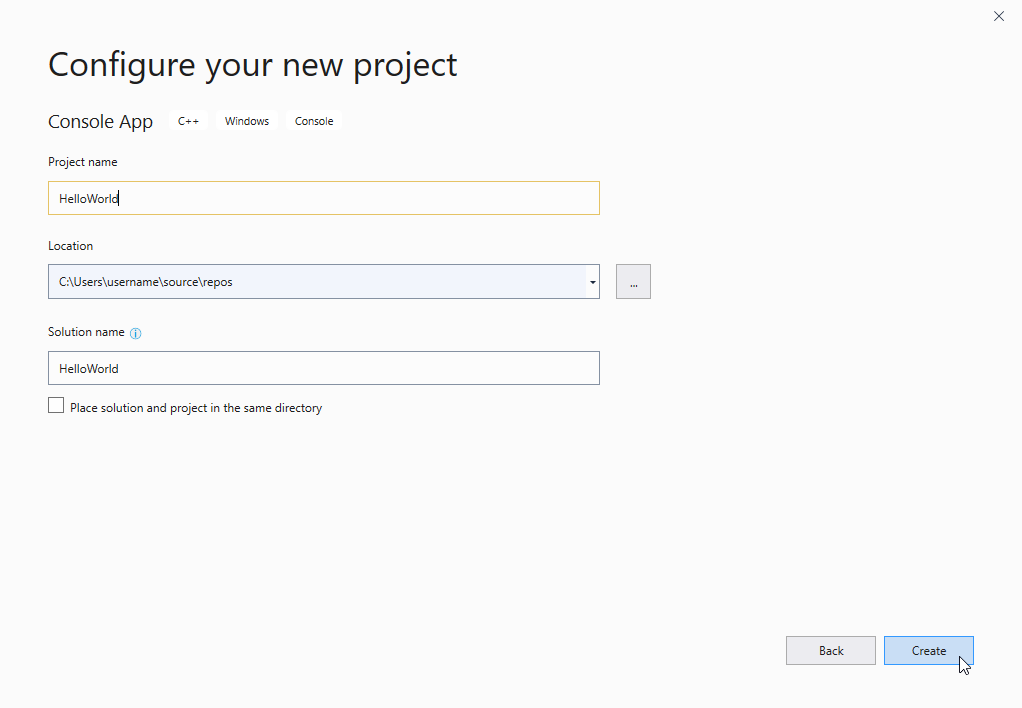
The Configure your new project dialog with HelloWorld entered into the Project name field.
Visual Studio creates a new project. It's ready for you to add and edit your source code. By default, the Console App template provides source code for a "Hello World" app, like this:
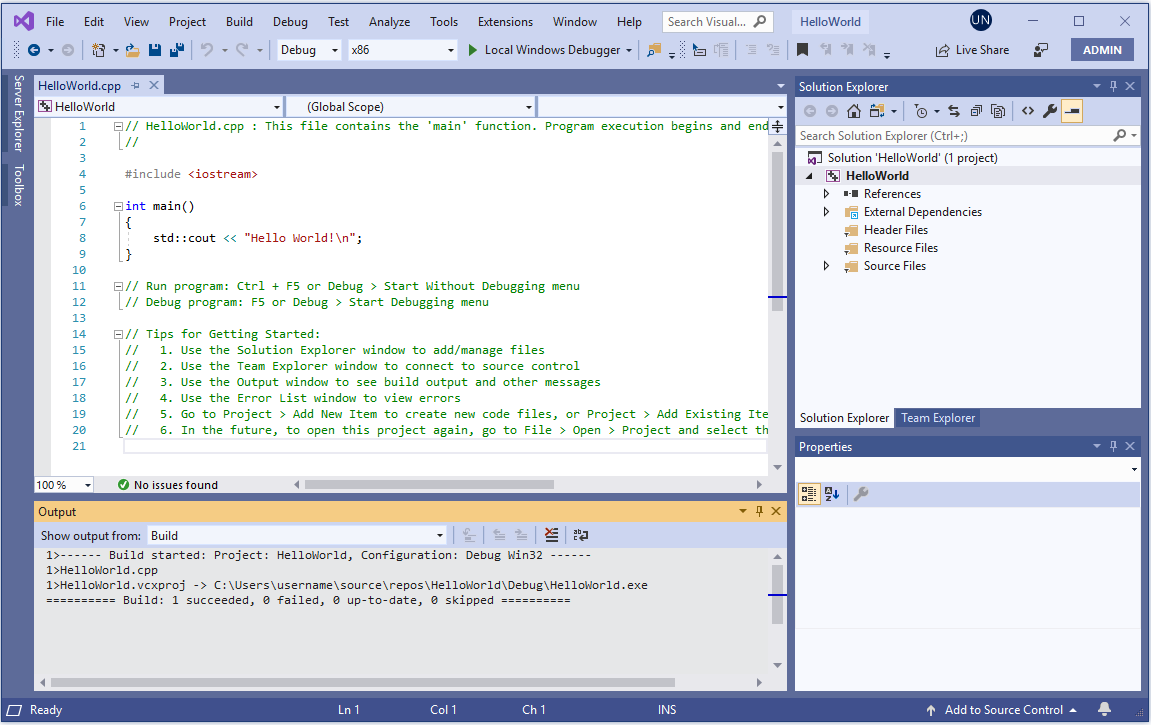
Shows the new project. The HelloWorld.cpp file is open, showing the default code that is included with this template. That code consists of #include iostream and a main() function that contains the line: std::cout << quote hello world!\n quote;
When the code looks like this in the editor, you're ready to go on to the next step and build your app.
In Visual Studio, open the File menu and choose New > Project to open the New Project dialog.

In the New Project dialog, select Installed > Visual C++ if it isn't selected already, and then choose the Empty Project template. In the Name field, enter HelloWorld. Choose OK to create the project.

Visual Studio creates a new, empty project. It's ready for you to specialize for the kind of app you want to create and to add your source code files. You do that next.
Make your project a console app
Visual Studio can create all kinds of apps and components for Windows and other platforms. The Empty Project template isn't specific about what kind of app it creates. A console app is one that runs in a console or command prompt window. To create one, you must tell Visual Studio to build your app to use the console subsystem.
In Visual Studio, open the Project menu and choose Properties to open the HelloWorld Property Pages dialog.
In the Property Pages dialog, select Configuration Properties > Linker > System, and then choose the edit box next to the Subsystem property. In the dropdown menu that appears, select Console (/SUBSYSTEM:CONSOLE). Choose OK to save your changes.

Visual Studio now knows to build your project to run in a console window. Next, you add a source code file and enter the code for your app.
Add a source code file
In Solution Explorer, select the HelloWorld project. On the menu bar, choose Project, Add New Item to open the Add New Item dialog.
In the Add New Item dialog, select Visual C++ under Installed if it isn't selected already. In the center pane, select C++ file (.cpp). Change the Name to HelloWorld.cpp. Choose Add to close the dialog and create the file.

Visual studio creates a new, empty source code file and opens it in an editor window, ready to enter your source code.
Add code to the source file
Copy this code into the HelloWorld.cpp editor window.
#include <iostream>

int main()
{
    std::cout << "Hello, world!" << std::endl;
    return 0;
}
The code should look like this in the editor window:
 function that contains the line: std::cout << \"hello world!\n\"; followed by return 0;")
When the code looks like this in the editor, you're ready to go on to the next step and build your app.
Next steps
Troubleshooting guide
Come here for solutions to common issues when you create your first C++ project.
Create your app project: issues
The New Project dialog should show a Console App template that has C++, Windows, and Console tags. If you don't see it, there are two possible causes. It might be filtered out of the list, or it might not be installed. First, check the filter dropdowns at the top of the list of templates. Set them to C++, Windows, and Console. The C++ Console App template should appear; otherwise, the Desktop development with C++ workload isn't installed.
To install Desktop development with C++, you can run the installer right from the New Project dialog. Choose the Install more tools and features link at the bottom of the template list to start the installer. If the User Account Control dialog requests permissions, choose Yes. In the installer, make sure the Desktop development with C++ workload is checked. Then choose Modify to update your Visual Studio installation.
If another project with the same name already exists, choose another name for your project. Or, delete the existing project and try again. To delete an existing project, delete the solution folder (the folder that contains the helloworld.sln file) in File Explorer.
If the New Project dialog doesn't show a Visual C++ entry under Installed, your copy of Visual Studio probably doesn't have the Desktop development with C++ workload installed. You can run the installer right from the New Project dialog. Choose the Open Visual Studio Installer link to start the installer again. If the User Account Control dialog requests permissions, choose Yes. Update the installer if necessary. In the installer, make sure the Desktop development with C++ workload is checked, and choose OK to update your Visual Studio installation.
If another project with the same name already exists, choose another name for your project. Or, delete the existing project and try again. To delete an existing project, delete the solution folder (the folder that contains the helloworld.sln file) in File Explorer.
Make your project a console app: issues
If you don't see Linker listed under Configuration Properties, choose Cancel to close the Property Pages dialog. Make sure that the HelloWorld project is selected in Solution Explorer before you try again. Don't select the HelloWorld solution, or another item, in Solution Explorer.
The dropdown control doesn't appear in the SubSystem property edit box until you select the property. Click in the edit box to select it. Or, you can press Tab to cycle through the dialog controls until SubSystem is highlighted. Choose the dropdown control or press Alt+Down to open it.
Add a source code file: issues
It's okay if you give the source code file a different name. However, don't add more than one file that contains the same code to your project.
If you added the wrong file type to your project, such as a header file, delete it and try again. To delete the file, select it in Solution Explorer. Then press the Delete key.
Add code to the source file: issues
If you accidentally closed the source code file editor window, you can easily open it again. To open it, double-click on HelloWorld.cpp in the Solution Explorer window.
If red squiggles appear under anything in the source code editor, check that your code matches the example in spelling, punctuation, and case. Case is significant in C++ code.
Tilbakemeldinger
Kommer snart: Gjennom 2024 faser vi ut GitHub Issues som tilbakemeldingsmekanisme for innhold, og erstatter det med et nytt system for tilbakemeldinger. Hvis du vil ha mer informasjon, kan du se: https://aka.ms/ContentUserFeedback.
Send inn og vis tilbakemelding for