Hand coach — MRTK2

Hand coach is 3D modeled hand which is triggered when the system does not detect the user’s hands. This is implemented as a “teaching” component that helps guide the user when the gesture has not been taught. If users have not done the specified gesture for a period, the hands will loop with a delay. Hand coach could be used to represent pressing a button or picking up a hologram.
The current interaction model represents a wide variety of gesture controls such as scrolling, far select, and near tap. Below is a full list of existing Hand coach examples:
- Near tap – Used for buttons or close interactable objects
- Far select – Used for objects that are far away
- Move – Used to move a hologram in space
- Rotate – Used to show how to rotate holograms or objects
- Scale – Used to show how to manipulate holograms to be bigger or smaller
- Hand flip – Used for bringing up a UI start panel or Hand Menus
- Palm up – Used for hummingbird moment in out of the box experience. Another suggestion could be to bring up a UI start panel
- Scroll – Used for scrolling a list or a long document
Example scene
You can find examples in the HandCoachExample scene under: MixedRealityToolkit.Examples/Experimental/HandCoach/Scenes
Hand 3D Assets
You can find the assets under: MixedRealityToolkit.SDK/Experimental/HandCoach
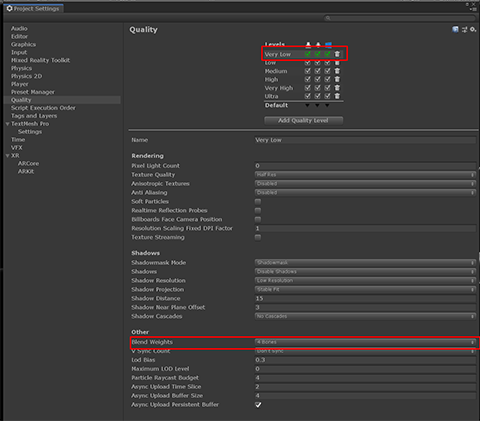
Quality
If you notice distortions on the skinned mesh, you need to make sure your project is using the proper amount of joints.
Go to Unity's Edit > Project Settings > Quality > Other > Blend Weights. Make sure "4 bones" are selected to see Smooth Joints.
Scripts
Interaction hint
The InteractionHint.cs script provides wrapper functionality for triggering animations and fades for the hand rig.
How to set up an interaction hint
To set up an interaction hint, it is recommended to use the provided prefabs “StaticHandCoachRoot_L.prefab” and “StaticHandCoachRoot_R.prefab”. This prefab contains the InteractionHint script and hand rig as well as the proper hierarchy to ensure that the provided hint animations work as intended. Otherwise, you'll need to place the script on a gameObject one parent level up from your hand rig with animator.
Inspector properties
HideIfHandTracked This boolean specifies whether hand tracking state should be used to hide visuals when a user’s hands are being tracked. If this is set to false, only the scripting property “customShouldHideVisuals” will be used to determine whether to hide the hint.
MinDelay This property specifies the minimum delay for showing the visuals. By default, the visuals for the hand will appear after this many seconds if the user’s hands are not being tracked.
MaxDelay This property specifies the maximum delay for showing the visuals. By default, the visuals for the hand will appear after this many seconds even if the user’s hands are being tracked.
UseMaxTimer If this boolean is set to false, it disables the max timer and only allows the hand hint to be shown when the user’s hands are out of view, or the custom condition returns false.
Repeats This property controls how many times the hint animation plays when the min or max timer has passed. The hint then hides and waits for the delay again.
AutoActivate When this boolean is set to true, the hint will automatically run through the timer logic when the GameObject of the script is active in the hierarchy and the script is enabled. This should only be set to false if you intend to manually control the hint appearance and disappearance via code.
AnimationState The name of the animation state that should play when the hint is active. This must be set before the StartHintLoop() function is called (during OnEnable if AutoActivate is checked).
Controlling InteractionHint via script
- StartHintLoop This function starts the show/hide loop that otherwise starts OnEnable if the AutoActivate flag is set to true.
- StopHintLoop This function calls the fade out animation state if it is not currently playing, then will deactivate the show/hide loop and set the hand rig inactive in the hierarchy.
- AnimationState This string determines which animation state is played during the loop. You may change this string to change which state plays, but you must do so after calling StopHintLoop, and you must call StartHintLoop again after you have changed the state.
- CustomShouldHideVisuals You can set this with your own function, which should return true when you want to hide the hand visuals (keep in mind the MinMaxTimer, specifically the max parameter)
Custom animation considerations
Fades are defaulted to 0.5 seconds, so any custom animations created for use with the rig should be 1.5 seconds minimum for any meaningful information to be conveyed
The provided default fade in and fade out states, Fade_In and Fade_Out may be adjusted by changing the timestamp of the second keyframe to set the fade length.
The animator and script were set up in a way that should make setup as simple as possible. To add new animation states, simply import your fbx, ensure the animation name is set with a distinct name, and drag that animation into the animator.
MoveToTarget
The MoveToTarget.cs script provides functionality to move the hand hint from a tracking position to a target position over time.
How to set up MoveToTarget
The provided prefabs “MovingHandCoachRoot_L.prefab” and “MovingHandCoachRoot_R.prefab” contain a MoveToTarget in their hierarchies. If you want to use this script on your own setup, you need to place it on the root gameobject containing the Animator for your rig.
Inspector properties
- TrackingObject Set this with the object you want the rig to follow before it starts its motion. It is recommended to create an empty GameObject and move it to a specific position to help you pinpoint the tracking.
- TargetObject Set this with the object you want the rig to move to during its motion. It is recommended to create an empty GameObject and move it to a specific position to help you pinpoint the tracking.
- RootObject Set this to a shared parent between tracking and target object so that the relative positions can be calculated correctly. The included prefab has both tracking and target objects in its hierarchy, but you can set the target object as a gameObject outside of the prefab and change the root object to a shared parent.
- Duration The amount of time it should take (in seconds) to move from TrackingObject to TargetObject in seconds.
- TargetOffset A tunable offset to get the GameObject to arrive at the right target position. This is useful if your animation includes a position offset during the animation.
- AnimationCurve This is defaulted to a linear curve, but you can alter the curve to provide easing in/out when starting and stopping the motion path.
Controlling MoveToTarget via script
In your custom script, make a call to Follow() while you want the hand rig to be following the TrackingObject, then make a call to MoveToTargetPosition() when you want the hand rig to begin its motion to the TargetObject.
Controlling MoveToTarget via animations
In the animation that needs to move, set two events: one with a call to Follow() and one with a call to MoveToTargetPosition(). Follow should be set on the first keyframe, since it causes the hand rig to follow your TrackingObject. MoveToTargetPosition should be set on the keyframe where you want the rig to begin moving to the target. This is how the script functionality is used in the provided prefabs.
RotateAroundPoint
The RotateAroundPoint.cs script provides functionality to rotate the hand hint around a pivot point over time.
How to set up RotateAroundPoint
The provided prefabs “RotatingHandCoachRoot_L.prefab” and “RotatingHandCoachRoot_R.prefab” contain a RotateAroundPoint in their hierarchies. If you want to use this script on your own setup, you need to place it on the root gameobject containing the Animator for your rig.
Inspector properties
- CenteredParent Set this with the parent object you want the rig to pivot around.
- InverseParent Set this with the parent to rotate inverse to centeredParent in order to keep the hand orientation the same. In general, this will be the parent object with the InteractionHint script on it.
- PivotPosition Set this to a point where you want the hint to start movement at.
- Duration The amount of time it should take (in seconds) to rotate around the CenteredParent.
- AnimationCurve This is defaulted to a linear curve, but you can alter the curve to provide easing in/out when starting and stopping the motion path.
- RotationVector How many degrees to rotate along each axis.
Controlling RotateAroundPoint via script
In your custom script, make a call to RotateToTarget() when you want the hand rig to begin its rotation around the CenteredParent. When you want the position to reset to the original PivotPosition, make a call to ResetAndDeterminePivot().
Controlling RotateAroundPoint via animations
In the animation that needs to move, set two events: one with a call to ResetAndDeterminePivot() and one with a call to RotateToTarget(). ResetAndDeterminePivot should be set on the first keyframe, since it causes the hand rig to reset to the PivotPosition. RotateToTarget should be set on the keyframe where you want the rig to begin rotating around the CenteredParent. This is how the script functionality is used in the provided prefabs.
Tilbakemeldinger
Kommer snart: Gjennom 2024 faser vi ut GitHub Issues som tilbakemeldingsmekanisme for innhold, og erstatter det med et nytt system for tilbakemeldinger. Hvis du vil ha mer informasjon, kan du se: https://aka.ms/ContentUserFeedback.
Send inn og vis tilbakemelding for