Deploy Microsoft Edge using System Center Configuration Manager
This article shows you how to automate a Microsoft Edge deployment by using System Center Configuration Manager (SCCM).
Before you begin
Review the information in Introduction to application management in Configuration Manager. This application management article helps you understand the terminology used in this article and is a guide to preparing your site to install applications.
Download the Microsoft Edge Enterprise installation files (MicrosoftEdgeDevEnterpriseX64.msi and/or MicrosoftEdgeDevEnterpriseX86.msi) from the Microsoft Edge Enterprise landing page.
Make sure you store the Microsoft Edge installation files in an accessible network location.
Tip
Use the Microsoft Edge setup guide to automate Configuration Manager steps.
Create the application
Use the Configuration Manager wizard to create the application.
Start the Create Application Wizard and create the application
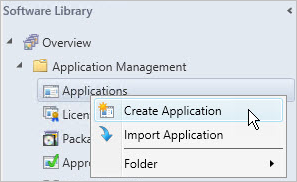
In the Configuration Manager console, click Software Library > Application Management > Applications.
On the Home tab, in the Create group, click Create Application. Or, right-click on Applications in the navigation bar and then click Create Application.
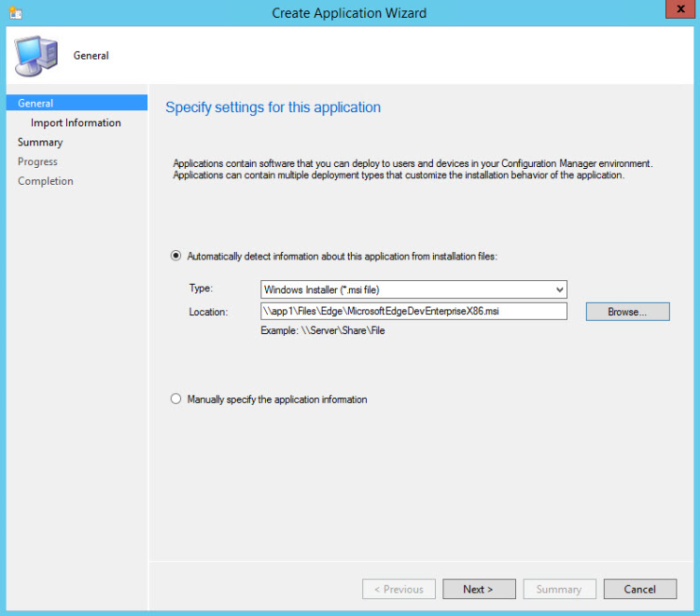
On the General page of the Create Application Wizard, choose Automatically detect information about this application from installation files. This action pre-populates some of the information in the wizard with information extracted from the installation .msi file. Provide the following information:
Type: Choose Windows Installer (*.msi file).
Location: Type the location (or click Browse to select the location) of the installation file MicrosoftEdgeDevEnterpriseX64.msi or MicrosoftEdgeDevEnterpriseX86.msi. Note: The location must be specified in the form \\Server\Share\File for Configuration Manager to locate the installation files.
Your Specify settings for this application page looks like the following example:
Click Next. Under Details on the Imported Information page, you'll see information about the application and any associated files that were imported. Click Next to continue with the wizard.

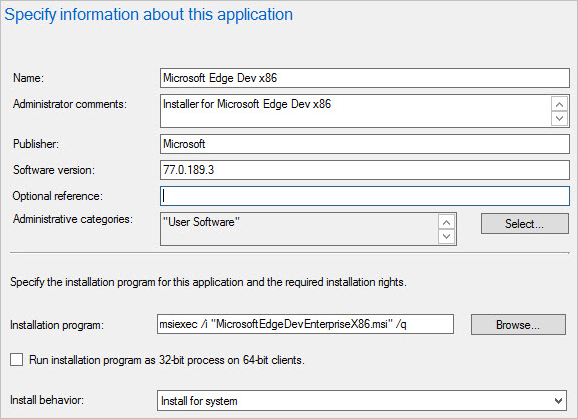
On the General Information page, you can add more information about the application. For example, Software version, Administrator comments, and Publisher. You can use this information to to help you sort and find the application in the Configuration Manager console.
You can also use the Installation program field to specify the full command line that will be used to install the application on PCs. You can edit this to add your own properties (for example, /q for an unattended installation).
The following screenshot shows an example where the Specify information about this application fields are used.
Click Next.
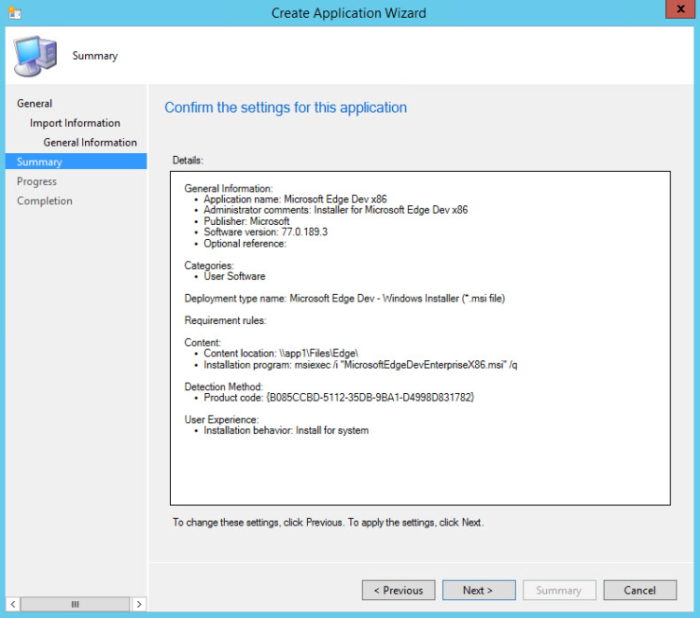
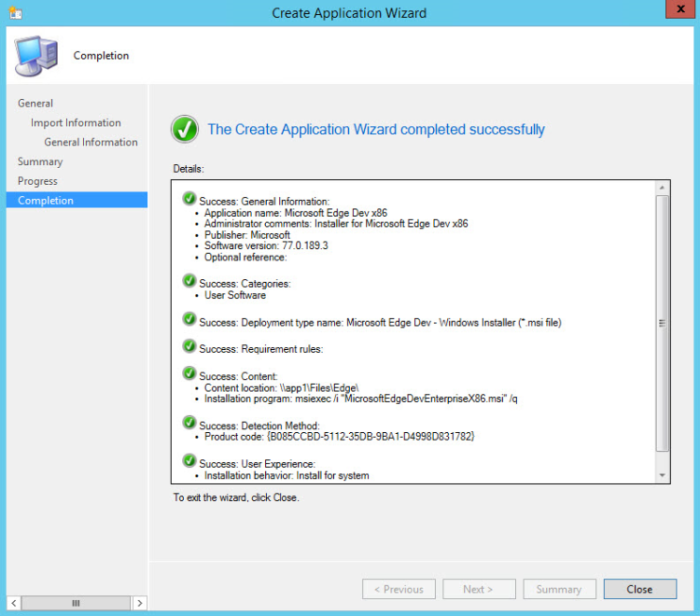
On the Summary page, you can confirm your application settings under Details and then finish using the wizard. Click Next.
On the Completion page, click Close.
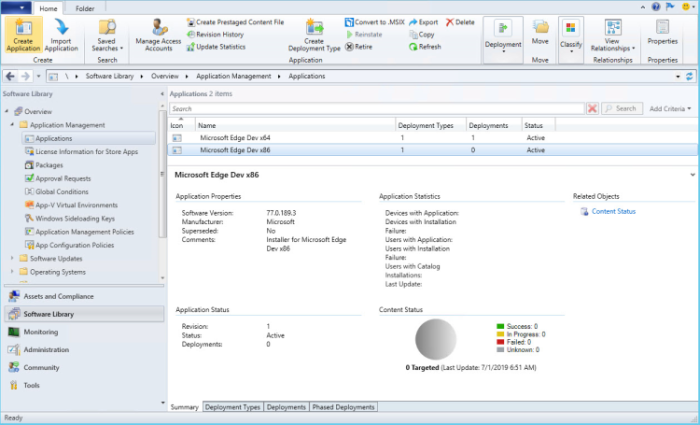
You've finished creating the application. Use the following steps to see it in Configuration Manager:
- select the Software Library workspace
- expand Application Management
- click Applications.
The following screenshot shows the example used for this article.
Change application properties and deployment settings
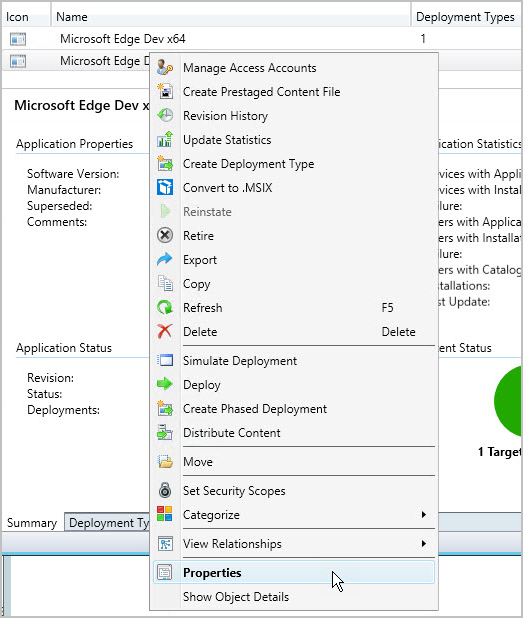
After you create an application, you can refine the application settings if you need to. To look at the application properties:
select the application
in Home>Properties, click Properties.
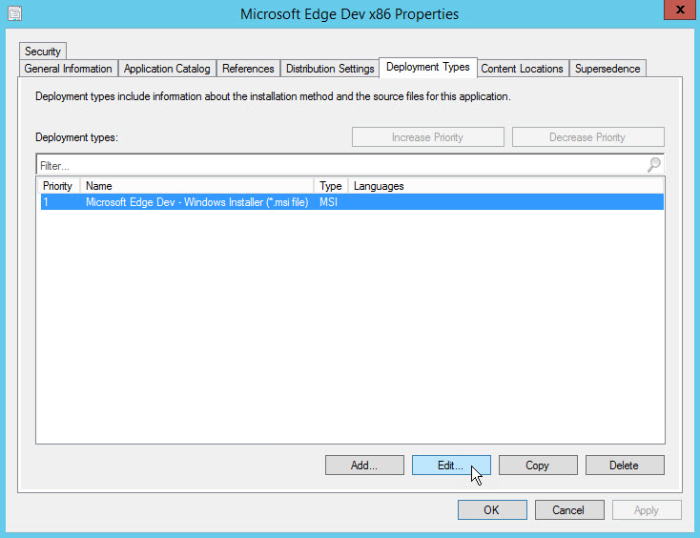
In the <application name> Application Properties dialog page, you'll see a tabbed view of the items that you can configure to change the behavior of the application. For more information about the settings you can configure, see Create applications.
For this example, you'll change some properties of the application's deployment type. To change the deployment properties:
Click the Deployment Types tab.
Under Deployment types:, select the application Name
Click Edit.
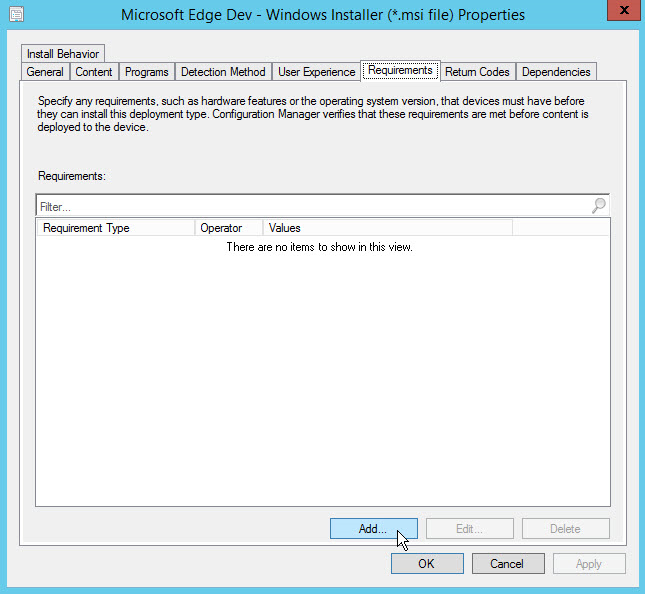
Add a requirement to the deployment type
Requirements specify conditions that must be met before an application is installed on a device. You can choose from built-in requirements or you can create your own. For example, you can add a requirement that the application will only be installed on PCs that are running Windows 10 x86 or x64, depending on the installation file's target processor architecture. In this example, you'll specify Windows 10 x86.
From the deployment type properties page you just opened, click the Requirements tab.
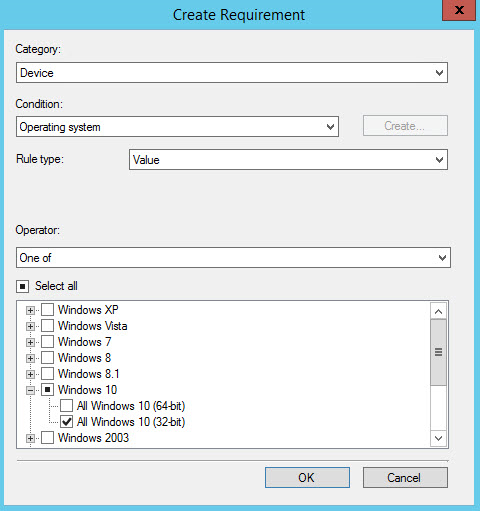
Click Add to open the Create Requirement dialog.
In the Create Requirement dialog box, specify the following information:
Category: Device
Condition: Operating system
Rule type: Value
Operator: One of
From the operating systems list, select Windows 10 > All Windows 10 (32-bit).
When you're finished, the dialog will look like the following screenshot example:
Click OK to close each open property page and return to the Applications list in the Configuration Manager console.
Add the application content to a distribution point
To deploy the updated application to PCs, make sure that the application content is copied to a distribution point. PCs access the distribution point to install the application.
Tip
To find out more about distribution points and content management in Configuration Manager, see Deploy and manage content for System Center Configuration Manager.
In the Configuration Manager console, click Software Library.
In the Software Library workspace, expand Applications. Select the application you created in the list of applications.
On the Home tab in the Deployment group, click Distribute Content.
On the General page of the Distribute Content Wizard, check that the application name is correct, and then click Next.
On the Content page, review the information that will be copied to the distribution point, and then click Next.
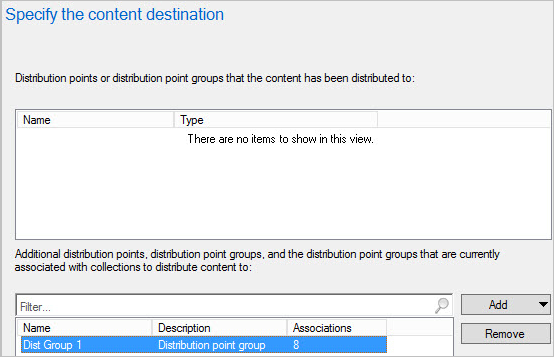
On the Content Destination page, click Add to select one or more collections, distribution points, or distribution point groups on which to install the application content.
Complete the wizard.
You can check that the application content was copied successfully to the distribution point from the Monitoring workspace, under Distribution Status > Content Status.
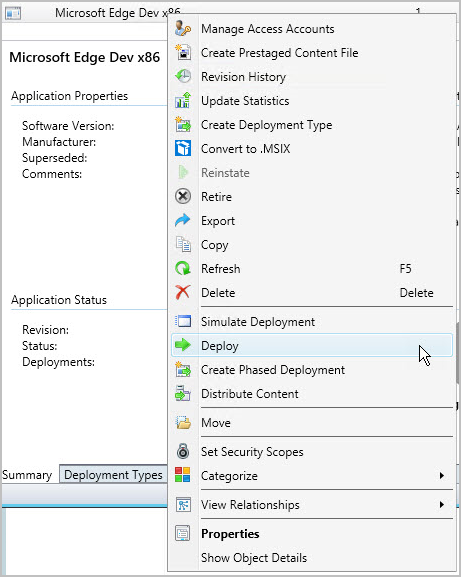
Deploy the application
Next, deploy the application to a device collection in your hierarchy. In this example, you deploy the application to the All Systems device collection.
Tip
Remember that only Windows 10 computers of the specified processor architecture will install the application because of the requirements that you selected earlier.
In the Configuration Manager console, click Software Library > Application Management > Applications.
From the list of applications, select the application that you created earlier. Then, on the Home tab in the Deployment group, click Deploy, or right-click the application and select Deploy.
On the General page of the Deploy Software Wizard, click Browse to select the device collection to which you want to deploy the application.
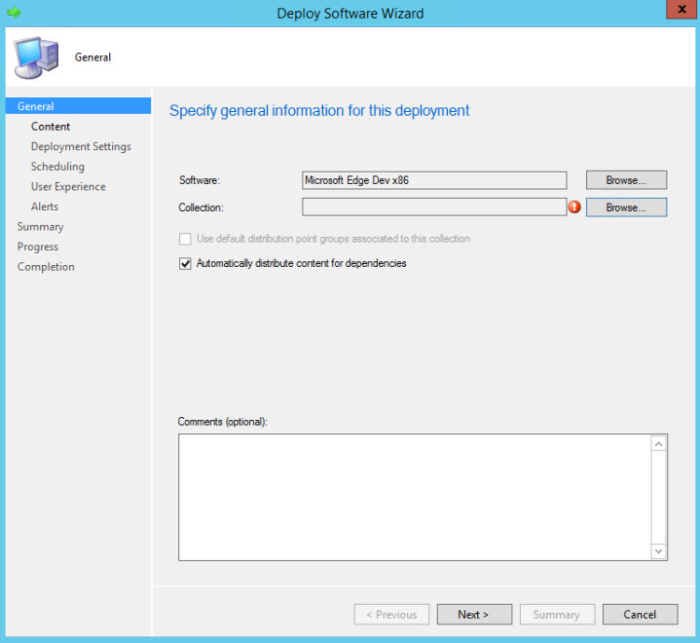
On the Content page, check that the distribution point from which you want PCs to install the application is selected.
On the Deployment Settings page, make sure that the deployment action is set to Install, and the deployment purpose is set to Required.
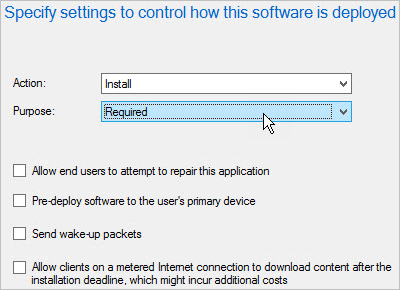
Tip
By setting the deployment purpose to Required, you make sure that the application is installed on PCs that meet the requirements that you set. If you set this value to Available, then users can install the application on demand from Software Center.
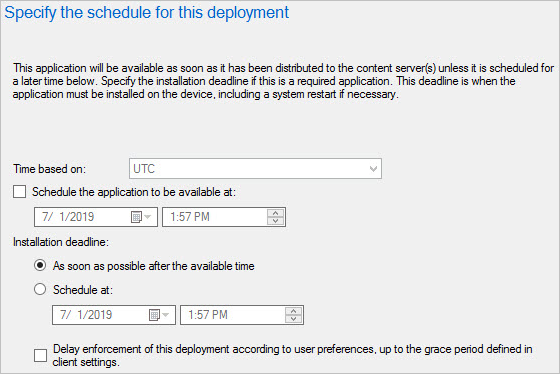
On the Scheduling page, you can configure when the application will be installed. For this example, select As soon as possible after the available time.
On the User Experience page, select your desired values and click Next.
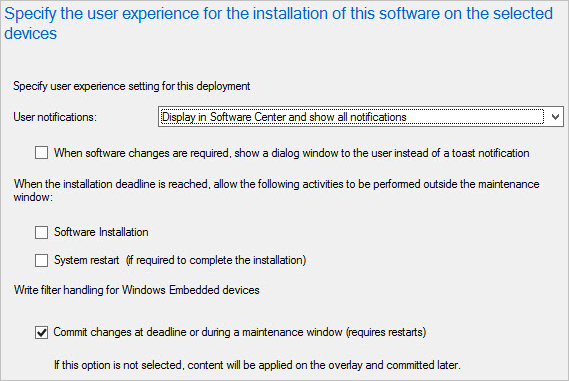
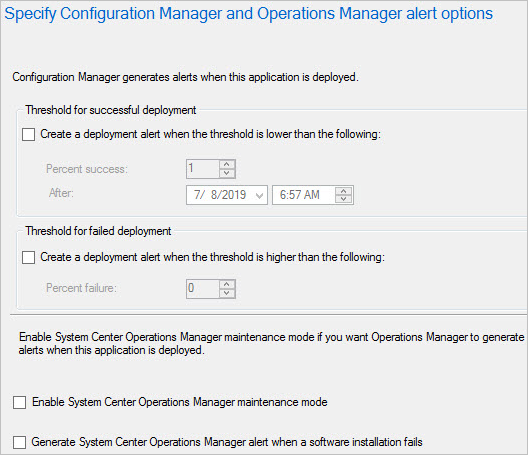
Specify your desired alert options and click Next.
Complete the wizard.
Use the information in the following Monitor the application section to see the status of your application deployment.
Monitor the application
In this section, you'll take a quick look at the deployment status of the application that you just deployed.
To review the deployment status
In the Configuration Manager console, click Monitoring > Deployments.
From the list of deployments, select the application.
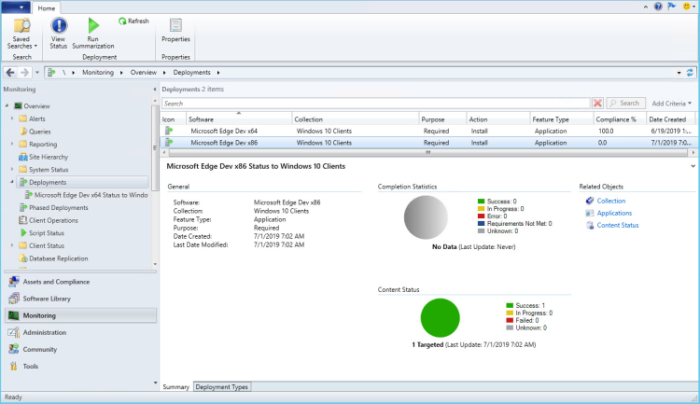
On the Home tab in the Deployment group, click View Status.
Select one of the following tabs to see more status updates about the application deployment:
Success: The application installed successfully on the indicated PCs.
In Progress: The application has not yet finished installing.
Error: An error occurred installing the application on the indicated PCs. Further information about the error is also displayed.
Requirements Not Met: No installation attempt was made on the indicated devices because they did not meet the requirements you configured (in this example, because they do not run on Windows 10.)
Unknown: Configuration Manager was unable to report the status of the deployment. Check back again later.
Tip
There are several ways you can monitor application deployments. For more information, see Monitor applications from the System Center Configuration Manager console.
End-user experience
Users who have PCs that are managed by Configuration Manager and are running Windows 10 of the specified processor architecture, will see a message telling them that they must install the Microsoft Edge Dev application. When they accept this installation option, the application is installed.
See also
Feedback
Binnenkort beschikbaar: In de loop van 2024 zullen we GitHub Issues geleidelijk uitfaseren als het feedbackmechanisme voor inhoud. Het wordt vervangen door een nieuw feedbacksysteem. Zie voor meer informatie: https://aka.ms/ContentUserFeedback.
Feedback verzenden en weergeven voor