Integreren met een clienttoepassing met behulp van Speech SDK
Belangrijk
Aangepaste opdrachten worden op 30 april 2026 buiten gebruik gesteld. Vanaf 30 oktober 2023 kunt u geen nieuwe toepassingen voor aangepaste opdrachten maken in Speech Studio. Met betrekking tot deze wijziging wordt LUIS op 1 oktober 2025 buiten gebruik gesteld. Vanaf 1 april 2023 kunt u geen nieuwe LUIS-resources maken.
In dit artikel leert u hoe u aanvragen kunt indienen bij een gepubliceerde toepassing voor aangepaste opdrachten vanuit de Speech SDK die wordt uitgevoerd in een UWP-toepassing. Als u verbinding wilt maken met de toepassing Aangepaste opdrachten, hebt u het volgende nodig:
- Een toepassing voor aangepaste opdrachten publiceren en een toepassings-id (app-id) ophalen
- Een Universeel Windows-platform -client-app (UWP) maken met behulp van de Speech SDK, zodat u kunt communiceren met uw toepassing voor aangepaste opdrachten
Vereisten
Er is een toepassing voor aangepaste opdrachten vereist om dit artikel te voltooien. Probeer een quickstart om een aangepaste opdrachttoepassing te maken:
U hebt ook het volgende nodig:
- Visual Studio 2019 of hoger. Deze handleiding is gebaseerd op Visual Studio 2019.
- Een Azure AI Speech-resourcesleutel en -regio: Maak een spraakresource in Azure Portal. Zie Een multiserviceresource maken voor meer informatie.
- Uw apparaat inschakelen voor ontwikkeling
Stap 1: De toepassing Aangepaste opdrachten publiceren
Open de eerder gemaakte aangepaste opdrachtentoepassing.
Ga naar Instellingen en selecteer LUIS-resource.
Als er geen voorspellingsresource is toegewezen, selecteert u een queryvoorspellingssleutel of maakt u een nieuwe.
Queryvoorspellingssleutel is altijd vereist voordat u een toepassing publiceert. Raadpleeg LUIS-resource maken voor meer informatie over LUIS-resources
Ga terug naar bewerkingsopdrachten en selecteer Publiceren.
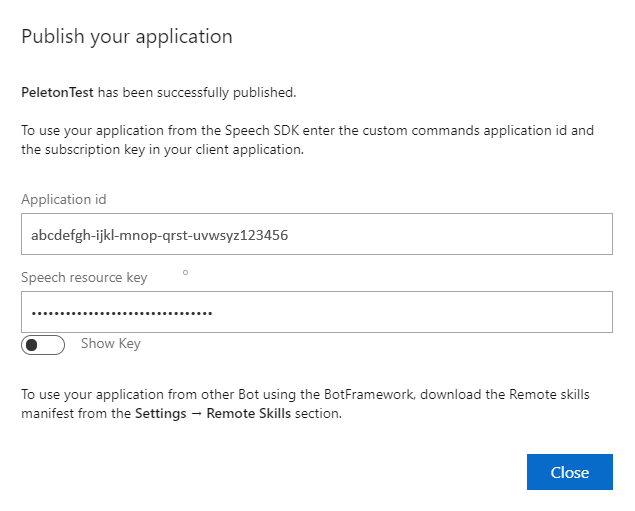
Kopieer de app-id uit de melding publiceren voor later gebruik.
Kopieer de spraakresourcesleutel voor later gebruik.
Stap 2: Een Visual Studio-project maken
Maak een Visual Studio-project voor UWP-ontwikkeling en installeer de Speech SDK.
Stap 3: Voorbeeldcode toevoegen
In deze stap voegen we de XAML-code toe die de gebruikersinterface van de toepassing definieert en voegen we de C#-code-behind-implementatie toe.
XAML-code
Maak de gebruikersinterface van de toepassing door de XAML-code toe te voegen.
Open in Solution Explorer
MainPage.xamlVervang in de XAML-weergave van de ontwerper de volledige inhoud door het volgende codefragment:
<Page
    x:Class="helloworld.MainPage"
    xmlns="http://schemas.microsoft.com/winfx/2006/xaml/presentation"
    xmlns:x="http://schemas.microsoft.com/winfx/2006/xaml"
    xmlns:local="using:helloworld"
    xmlns:d="http://schemas.microsoft.com/expression/blend/2008"
    xmlns:mc="http://schemas.openxmlformats.org/markup-compatibility/2006"
    mc:Ignorable="d"
    Background="{ThemeResource ApplicationPageBackgroundThemeBrush}">

    <Grid>
        <StackPanel Orientation="Vertical" HorizontalAlignment="Center"
                    Margin="20,50,0,0" VerticalAlignment="Center" Width="800">
            <Button x:Name="EnableMicrophoneButton" Content="Enable Microphone"
                    Margin="0,10,10,0" Click="EnableMicrophone_ButtonClicked"
                    Height="35"/>
            <Button x:Name="ListenButton" Content="Talk"
                    Margin="0,10,10,0" Click="ListenButton_ButtonClicked"
                    Height="35"/>
            <StackPanel x:Name="StatusPanel" Orientation="Vertical"
                        RelativePanel.AlignBottomWithPanel="True"
                        RelativePanel.AlignRightWithPanel="True"
                        RelativePanel.AlignLeftWithPanel="True">
                <TextBlock x:Name="StatusLabel" Margin="0,10,10,0"
                           TextWrapping="Wrap" Text="Status:" FontSize="20"/>
                <Border x:Name="StatusBorder" Margin="0,0,0,0">
                    <ScrollViewer VerticalScrollMode="Auto"
                                  VerticalScrollBarVisibility="Auto" MaxHeight="200">
                        <!-- Use LiveSetting to enable screen readers to announce
                             the status update. -->
                        <TextBlock
                            x:Name="StatusBlock" FontWeight="Bold"
                            AutomationProperties.LiveSetting="Assertive"
                            MaxWidth="{Binding ElementName=Splitter, Path=ActualWidth}"
                            Margin="10,10,10,20" TextWrapping="Wrap"  />
                    </ScrollViewer>
                </Border>
            </StackPanel>
        </StackPanel>
        <MediaElement x:Name="mediaElement"/>
    </Grid>
</Page>
De Ontwerpweergave is bijgewerkt om de gebruikersinterface van de toepassing weer te geven.
C#-code-behind-bron
Voeg de code-behind-bron toe, zodat de toepassing werkt zoals verwacht. De code-behind-bron bevat:
- Vereiste
usinginstructies voor deSpeechenSpeech.Dialognaamruimten. - Een eenvoudige implementatie om toegang tot de microfoon te garanderen, bekabeld met een knophandler.
- Eenvoudige ui-helpers voor het presenteren van berichten en fouten in de toepassing.
- Een landingspunt voor het initialisatiecodepad.
- Een helper voor het afspelen van tekst naar spraak (zonder streaming-ondersteuning).
- Een lege knophandler om te beginnen met luisteren.
Voeg de code-behind-bron als volgt toe:
Open in Solution Explorer het bronbestand
MainPage.xaml.csachter de code (gegroepeerd onderMainPage.xaml)Vervang de inhoud van het bestand door de volgende code:
using Microsoft.CognitiveServices.Speech;
using Microsoft.CognitiveServices.Speech.Audio;
using Microsoft.CognitiveServices.Speech.Dialog;
using System;
using System.IO;
using System.Text;
using Windows.UI.Xaml;
using Windows.UI.Xaml.Controls;
using Windows.UI.Xaml.Media;

namespace helloworld
{
    public sealed partial class MainPage : Page
    {
        private DialogServiceConnector connector;

        private enum NotifyType
        {
            StatusMessage,
            ErrorMessage
        };

        public MainPage()
        {
            this.InitializeComponent();
        }

        private async void EnableMicrophone_ButtonClicked(
            object sender, RoutedEventArgs e)
        {
            bool isMicAvailable = true;
            try
            {
                var mediaCapture = new Windows.Media.Capture.MediaCapture();
                var settings =
                    new Windows.Media.Capture.MediaCaptureInitializationSettings();
                settings.StreamingCaptureMode =
                    Windows.Media.Capture.StreamingCaptureMode.Audio;
                await mediaCapture.InitializeAsync(settings);
            }
            catch (Exception)
            {
                isMicAvailable = false;
            }
            if (!isMicAvailable)
            {
                await Windows.System.Launcher.LaunchUriAsync(
                    new Uri("ms-settings:privacy-microphone"));
            }
            else
            {
                NotifyUser("Microphone was enabled", NotifyType.StatusMessage);
            }
        }

        private void NotifyUser(
            string strMessage, NotifyType type = NotifyType.StatusMessage)
        {
            // If called from the UI thread, then update immediately.
            // Otherwise, schedule a task on the UI thread to perform the update.
            if (Dispatcher.HasThreadAccess)
            {
                UpdateStatus(strMessage, type);
            }
            else
            {
                var task = Dispatcher.RunAsync(
                    Windows.UI.Core.CoreDispatcherPriority.Normal,
                    () => UpdateStatus(strMessage, type));
            }
        }

        private void UpdateStatus(string strMessage, NotifyType type)
        {
            switch (type)
            {
                case NotifyType.StatusMessage:
                    StatusBorder.Background = new SolidColorBrush(
                        Windows.UI.Colors.Green);
                    break;
                case NotifyType.ErrorMessage:
                    StatusBorder.Background = new SolidColorBrush(
                        Windows.UI.Colors.Red);
                    break;
            }
            StatusBlock.Text += string.IsNullOrEmpty(StatusBlock.Text)
                ? strMessage : "\n" + strMessage;

            if (!string.IsNullOrEmpty(StatusBlock.Text))
            {
                StatusBorder.Visibility = Visibility.Visible;
                StatusPanel.Visibility = Visibility.Visible;
            }
            else
            {
                StatusBorder.Visibility = Visibility.Collapsed;
                StatusPanel.Visibility = Visibility.Collapsed;
            }
            // Raise an event if necessary to enable a screen reader
            // to announce the status update.
            var peer = Windows.UI.Xaml.Automation.Peers.FrameworkElementAutomationPeer.FromElement(StatusBlock);
            if (peer != null)
            {
                peer.RaiseAutomationEvent(
                    Windows.UI.Xaml.Automation.Peers.AutomationEvents.LiveRegionChanged);
            }
        }

        // Waits for and accumulates all audio associated with a given
        // PullAudioOutputStream and then plays it to the MediaElement. Long spoken
        // audio will create extra latency and a streaming playback solution
        // (that plays audio while it continues to be received) should be used --
        // see the samples for examples of this.
        private void SynchronouslyPlayActivityAudio(
            PullAudioOutputStream activityAudio)
        {
            var playbackStreamWithHeader = new MemoryStream();
            playbackStreamWithHeader.Write(Encoding.ASCII.GetBytes("RIFF"), 0, 4); // ChunkID
            playbackStreamWithHeader.Write(BitConverter.GetBytes(UInt32.MaxValue), 0, 4); // ChunkSize: max
            playbackStreamWithHeader.Write(Encoding.ASCII.GetBytes("WAVE"), 0, 4); // Format
            playbackStreamWithHeader.Write(Encoding.ASCII.GetBytes("fmt "), 0, 4); // Subchunk1ID
            playbackStreamWithHeader.Write(BitConverter.GetBytes(16), 0, 4); // Subchunk1Size: PCM
            playbackStreamWithHeader.Write(BitConverter.GetBytes(1), 0, 2); // AudioFormat: PCM
            playbackStreamWithHeader.Write(BitConverter.GetBytes(1), 0, 2); // NumChannels: mono
            playbackStreamWithHeader.Write(BitConverter.GetBytes(16000), 0, 4); // SampleRate: 16kHz
            playbackStreamWithHeader.Write(BitConverter.GetBytes(32000), 0, 4); // ByteRate
            playbackStreamWithHeader.Write(BitConverter.GetBytes(2), 0, 2); // BlockAlign
            playbackStreamWithHeader.Write(BitConverter.GetBytes(16), 0, 2); // BitsPerSample: 16-bit
            playbackStreamWithHeader.Write(Encoding.ASCII.GetBytes("data"), 0, 4); // Subchunk2ID
            playbackStreamWithHeader.Write(BitConverter.GetBytes(UInt32.MaxValue), 0, 4); // Subchunk2Size

            byte[] pullBuffer = new byte[2056];

            uint lastRead = 0;
            do
            {
                lastRead = activityAudio.Read(pullBuffer);
                playbackStreamWithHeader.Write(pullBuffer, 0, (int)lastRead);
            }
            while (lastRead == pullBuffer.Length);

            var task = Dispatcher.RunAsync(
                Windows.UI.Core.CoreDispatcherPriority.Normal, () =>
            {
                mediaElement.SetSource(
                    playbackStreamWithHeader.AsRandomAccessStream(), "audio/wav");
                mediaElement.Play();
            });
        }

        private void InitializeDialogServiceConnector()
        {
            // New code will go here
        }

        private async void ListenButton_ButtonClicked(
            object sender, RoutedEventArgs e)
        {
            // New code will go here
        }
    }
}
Notitie
Als er een foutbericht wordt weergegeven: 'Het type Object is gedefinieerd in een assembly waarnaar niet wordt verwezen'
- Client uw oplossing met de juiste client.
- Kies NuGet-pakketten beheren voor oplossing, selecteer updates
- Als u Microsoft.NETCore.UniversalWindowsPlatform in de updatelijst ziet, werkt u Microsoft.NETCore.UniversalWindowsPlatform bij naar de nieuwste versie
Voeg de volgende code toe aan de hoofdtekst van de methode
InitializeDialogServiceConnector// This code creates the `DialogServiceConnector` with your resource information. // create a DialogServiceConfig by providing a Custom Commands application id and Speech resource key // The RecoLanguage property is optional (default en-US); note that only en-US is supported in Preview const string speechCommandsApplicationId = "YourApplicationId"; // Your application id const string speechSubscriptionKey = "YourSpeechSubscriptionKey"; // Your Speech resource key const string region = "YourServiceRegion"; // The Speech resource region. var speechCommandsConfig = CustomCommandsConfig.FromSubscription(speechCommandsApplicationId, speechSubscriptionKey, region); speechCommandsConfig.SetProperty(PropertyId.SpeechServiceConnection_RecoLanguage, "en-us"); connector = new DialogServiceConnector(speechCommandsConfig);Vervang de tekenreeksen
YourApplicationIdenYourSpeechSubscriptionKeyYourServiceRegiondoor uw eigen waarden voor uw app, spraaksleutel en regioVoeg het volgende codefragment toe aan het einde van de hoofdtekst van de methode
InitializeDialogServiceConnector// // This code sets up handlers for events relied on by `DialogServiceConnector` to communicate its activities, // speech recognition results, and other information. // // ActivityReceived is the main way your client will receive messages, audio, and events connector.ActivityReceived += (sender, activityReceivedEventArgs) => { NotifyUser( $"Activity received, hasAudio={activityReceivedEventArgs.HasAudio} activity={activityReceivedEventArgs.Activity}"); if (activityReceivedEventArgs.HasAudio) { SynchronouslyPlayActivityAudio(activityReceivedEventArgs.Audio); } }; // Canceled will be signaled when a turn is aborted or experiences an error condition connector.Canceled += (sender, canceledEventArgs) => { NotifyUser($"Canceled, reason={canceledEventArgs.Reason}"); if (canceledEventArgs.Reason == CancellationReason.Error) { NotifyUser( $"Error: code={canceledEventArgs.ErrorCode}, details={canceledEventArgs.ErrorDetails}"); } }; // Recognizing (not 'Recognized') will provide the intermediate recognized text // while an audio stream is being processed connector.Recognizing += (sender, recognitionEventArgs) => { NotifyUser($"Recognizing! in-progress text={recognitionEventArgs.Result.Text}"); }; // Recognized (not 'Recognizing') will provide the final recognized text // once audio capture is completed connector.Recognized += (sender, recognitionEventArgs) => { NotifyUser($"Final speech to text result: '{recognitionEventArgs.Result.Text}'"); }; // SessionStarted will notify when audio begins flowing to the service for a turn connector.SessionStarted += (sender, sessionEventArgs) => { NotifyUser($"Now Listening! Session started, id={sessionEventArgs.SessionId}"); }; // SessionStopped will notify when a turn is complete and // it's safe to begin listening again connector.SessionStopped += (sender, sessionEventArgs) => { NotifyUser($"Listening complete. Session ended, id={sessionEventArgs.SessionId}"); };Voeg het volgende codefragment toe aan de hoofdtekst van de
ListenButton_ButtonClickedmethode in deMainPageklasse// This code sets up `DialogServiceConnector` to listen, since you already established the configuration and // registered the event handlers. if (connector == null) { InitializeDialogServiceConnector(); // Optional step to speed up first interaction: if not called, // connection happens automatically on first use var connectTask = connector.ConnectAsync(); } try { // Start sending audio await connector.ListenOnceAsync(); } catch (Exception ex) { NotifyUser($"Exception: {ex.ToString()}", NotifyType.ErrorMessage); }Kies Alles> opslaan in de menubalk in de menubalk om uw wijzigingen op te slaan
Probeer het zelf
Kies in de menubalk Build>Build Solution om de toepassing te bouwen. De code moet zonder fouten worden gecompileerd.
Kies Debug>Start Debugging (of druk op F5) om de toepassing te starten. Het venster helloworld wordt weergegeven.
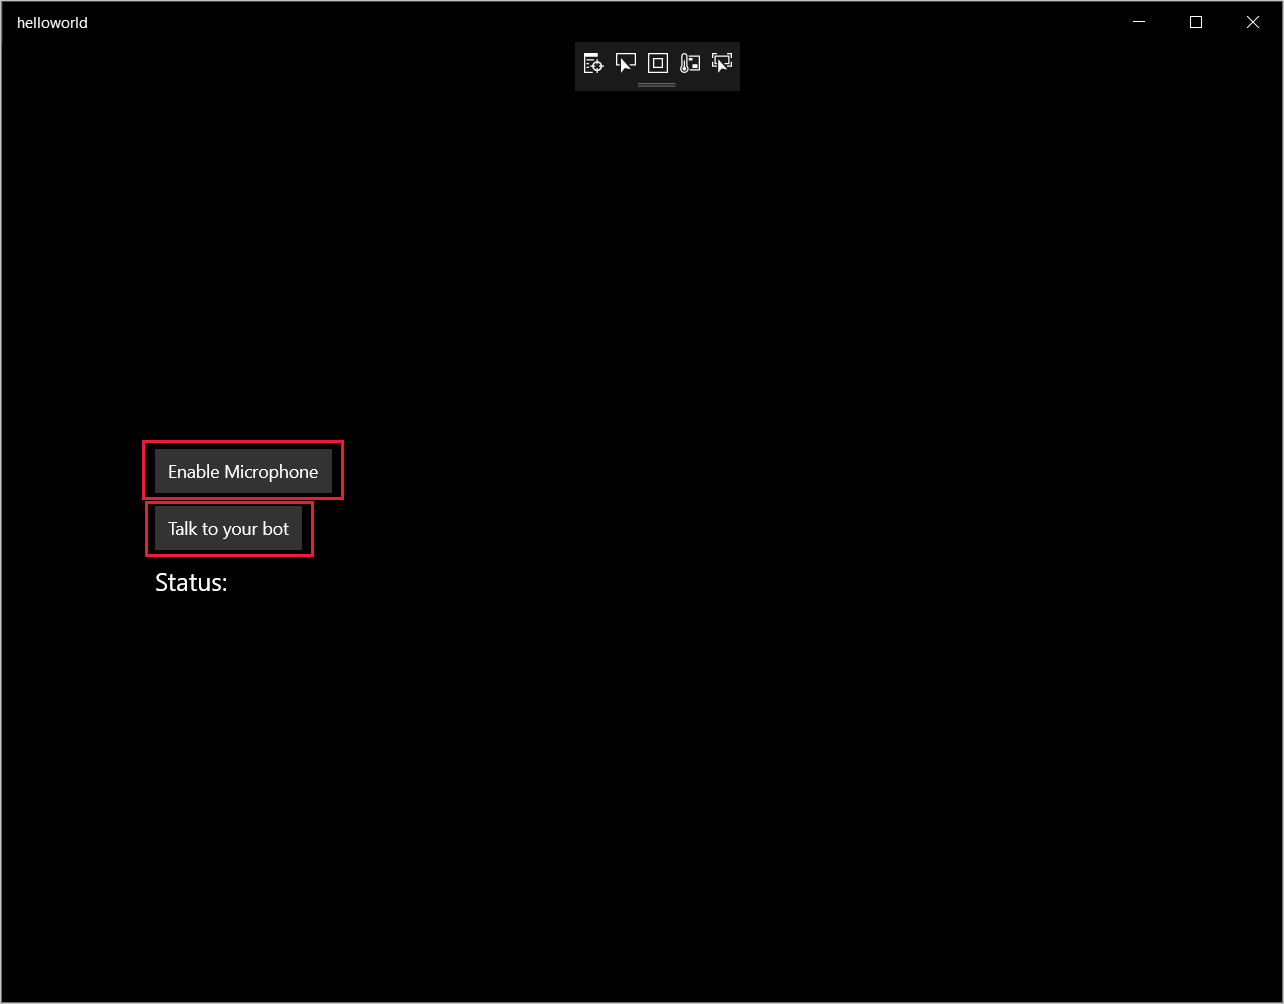
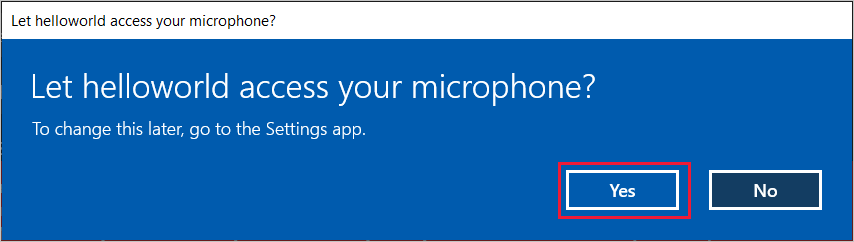
Selecteer Microfoon inschakelen. Als de toegangsmachtigingsaanvraag wordt weergegeven, selecteert u Ja.
Selecteer Praten en spreek een Engelse zin of zin in de microfoon van uw apparaat. De gesproken tekst wordt verzonden naar de Direct Line Speech-service en getranscribeerd naar tekst, die in het venster wordt weergegeven.