Azure Notification Hubs Rich Push
Overzicht
Als u gebruikers met direct uitgebreide inhoud wilt benaderen, kan een toepassing verder gaan dan tekst zonder opmaak. Deze meldingen bevorderen gebruikersinteracties en presenteren inhoud zoals URL's, geluiden, afbeeldingen/coupons en meer. Deze zelfstudie bouwt voort op de zelfstudie Gebruikers waarschuwen en laat zien hoe u pushmeldingen verzendt die payloads bevatten (bijvoorbeeld afbeeldingen).
Deze zelfstudie is compatibel met iOS 7 en 8.
Op hoog niveau:
- De back-end van de app:
- Slaat de rijke nettolading (in dit geval afbeelding) op in de back-enddatabase/lokale opslag.
- Hiermee wordt de id van deze uitgebreide melding naar het apparaat verzonden.
- App op het apparaat:
- Neemt contact op met de back-end die de uitgebreide nettolading aanvraagt met de id die deze ontvangt.
- Hiermee worden gebruikers meldingen op het apparaat verzonden wanneer het ophalen van gegevens is voltooid en wordt de nettolading onmiddellijk weergegeven wanneer gebruikers tikken voor meer informatie.
WebAPI-project
Open in Visual Studio het project AppBackend dat u hebt gemaakt in de zelfstudie Gebruikers waarschuwen .
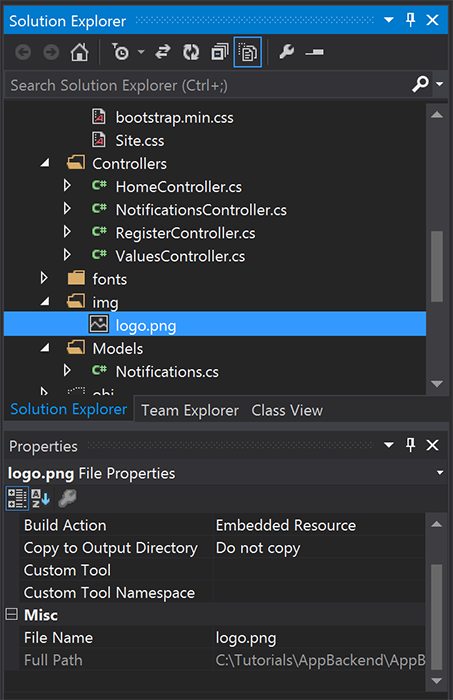
Haal een afbeelding op waarmee u gebruikers op de hoogte wilt stellen en plaats deze in een map img in uw projectmap.
Klik op Alle bestanden weergeven in de Solution Explorer en klik met de rechtermuisknop op de map die u wilt opnemen in Project.
Terwijl de afbeelding is geselecteerd, wijzigt u de buildactie in het venster Eigenschappen in Ingesloten resource.
Voeg
Notifications.csin de volgendeusinginstructie toe:using System.Reflection;Vervang de
Notificationsklasse door de volgende code. Zorg ervoor dat u de tijdelijke aanduidingen vervangt door uw notification hub-referenties en de naam van het installatiekopieënbestand:public class Notification { public int Id { get; set; } // Initial notification message to display to users public string Message { get; set; } // Type of rich payload (developer-defined) public string RichType { get; set; } public string Payload { get; set; } public bool Read { get; set; } } public class Notifications { public static Notifications Instance = new Notifications(); private List<Notification> notifications = new List<Notification>(); public NotificationHubClient Hub { get; set; } private Notifications() { // Placeholders: replace with the connection string (with full access) for your notification hub and the hub name from the Azure Classics Portal Hub = NotificationHubClient.CreateClientFromConnectionString("{conn string with full access}", "{hub name}"); } public Notification CreateNotification(string message, string richType, string payload) { var notification = new Notification() { Id = notifications.Count, Message = message, RichType = richType, Payload = payload, Read = false }; notifications.Add(notification); return notification; } public Stream ReadImage(int id) { var assembly = Assembly.GetExecutingAssembly(); // Placeholder: image file name (for example, logo.png). return assembly.GetManifestResourceStream("AppBackend.img.{logo.png}"); } }Definieer in
NotificationsController.csNotificationsControlleropnieuw met de volgende code. Hiermee wordt een eerste uitgebreide meldings-id op de achtergrond naar het apparaat verzonden en kan de installatiekopie aan de clientzijde worden opgehaald:// Return http response with image binary public HttpResponseMessage Get(int id) { var stream = Notifications.Instance.ReadImage(id); var result = new HttpResponseMessage(HttpStatusCode.OK); result.Content = new StreamContent(stream); // Switch in your image extension for "png" result.Content.Headers.ContentType = new System.Net.Http.Headers.MediaTypeHeaderValue("image/{png}"); return result; } // Create rich notification and send initial silent notification (containing id) to client public async Task<HttpResponseMessage> Post() { // Replace the placeholder with image file name var richNotificationInTheBackend = Notifications.Instance.CreateNotification("Check this image out!", "img", "{logo.png}"); var usernameTag = "username:" + HttpContext.Current.User.Identity.Name; // Silent notification with content available var aboutUser = "{\"aps\": {\"content-available\": 1, \"sound\":\"\"}, \"richId\": \"" + richNotificationInTheBackend.Id.ToString() + "\", \"richMessage\": \"" + richNotificationInTheBackend.Message + "\", \"richType\": \"" + richNotificationInTheBackend.RichType + "\"}"; // Send notification to apns await Notifications.Instance.Hub.SendAppleNativeNotificationAsync(aboutUser, usernameTag); return Request.CreateResponse(HttpStatusCode.OK); }Implementeer deze app nu opnieuw op een Azure-website om deze toegankelijk te maken vanaf alle apparaten. Klik met de rechtermuisknop op het project AppBackend en selecteer Publiceren.
Selecteer Azure-website als publicatiedoel. Meld u aan met uw Azure-account en selecteer een bestaande of nieuwe website en noteer de eigenschap doel-URL op het tabblad Verbinding . Verderop in deze zelfstudie verwijzen we naar deze URL als uw back-endeindpunt . Selecteer Publiceren.
Het iOS-project wijzigen
Nu u de back-end van uw app hebt aangepast om alleen de id van een melding te verzenden, wijzigt u uw iOS-app om die id te verwerken en haalt u het uitgebreide bericht op uit uw back-end:
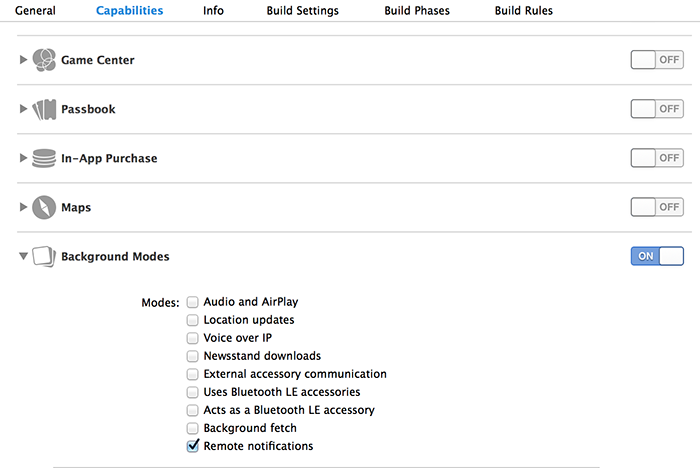
Open uw iOS-project en schakel externe meldingen in door naar uw belangrijkste app-doel te gaan in de sectie Doelen .
Selecteer Mogelijkheden, schakel Achtergrondmodi in en schakel het selectievakje Externe meldingen in.
Open
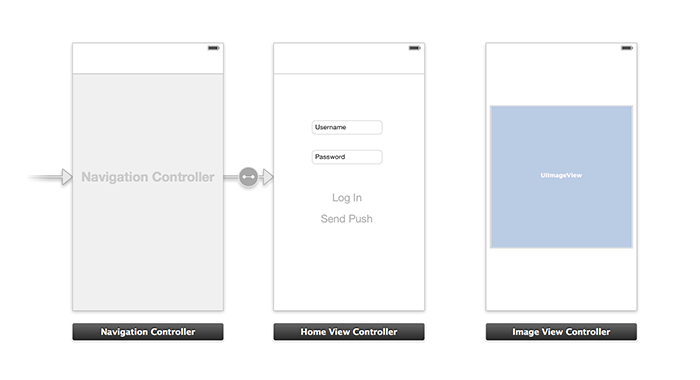
Main.storyboarden zorg ervoor dat u een weergavecontroller hebt (in deze zelfstudie home view controller genoemd) in de zelfstudie Gebruiker waarschuwen .Voeg een navigatiecontroller toe aan uw storyboard en sleep met control de Home View Controller om deze de hoofdweergave van de navigatie te maken. Zorg ervoor dat is initiële weergavecontroller in de kenmerkcontrole is geselecteerd voor alleen de navigatiecontroller.
Voeg een weergavecontroller toe aan het storyboard en voeg een afbeeldingsweergave toe. Dit is de pagina die gebruikers te zien krijgen zodra ze ervoor kiezen om meer te weten te komen door op de melding te klikken. Uw storyboard moet er als volgt uitzien:
Klik op de Home View Controller in het storyboard en zorg ervoor dat deze homeViewController heeft als aangepaste klasse en Storyboard-id onder de identiteitscontrole.
Doe hetzelfde voor de Controller voor afbeeldingsweergave als imageViewController.
Maak vervolgens een nieuwe View Controller-klasse met de naam imageViewController om de gebruikersinterface te verwerken die u zojuist hebt gemaakt.
Voeg in imageViewController.h de volgende code toe aan de interfacedeclaraties van de controller. Zorg ervoor dat u control-sleept vanuit de weergave van de storyboard-afbeelding naar deze eigenschappen om de twee te koppelen:
@property (weak, nonatomic) IBOutlet UIImageView *myImage;
@property (strong) UIImage* imagePayload;
Voeg
imageViewController.min het volgende toe aan het einde vanviewDidload:// Display the UI Image in UI Image View [self.myImage setImage:self.imagePayload];In
AppDelegate.mimporteert u de installatiekopieëncontroller die u hebt gemaakt:#import "imageViewController.h"Voeg een interfacesectie toe met de volgende declaratie:
@interface AppDelegate ()

@property UIImage* imagePayload;
@property NSDictionary* userInfo;
@property BOOL iOS8;

// Obtain content from backend with notification id
- (void)retrieveRichImageWithId:(int)richId completion: (void(^)(NSError*)) completion;

// Redirect to Image View Controller after notification interaction
- (void)redirectToImageViewWithImage: (UIImage *)img;

@end
Controleer
AppDelegatein of uw app zich registreert voor meldingen op de achtergrond inapplication: didFinishLaunchingWithOptions:// Software version self.iOS8 = [[UIApplication sharedApplication] respondsToSelector:@selector(registerUserNotificationSettings:)] && [[UIApplication sharedApplication] respondsToSelector:@selector(registerForRemoteNotifications)]; // Register for remote notifications for iOS8 and previous versions if (self.iOS8) { NSLog(@"This device is running with iOS8."); // Action UIMutableUserNotificationAction *richPushAction = [[UIMutableUserNotificationAction alloc] init]; richPushAction.identifier = @"richPushMore"; richPushAction.activationMode = UIUserNotificationActivationModeForeground; richPushAction.authenticationRequired = NO; richPushAction.title = @"More"; // Notification category UIMutableUserNotificationCategory* richPushCategory = [[UIMutableUserNotificationCategory alloc] init]; richPushCategory.identifier = @"richPush"; [richPushCategory setActions:@[richPushAction] forContext:UIUserNotificationActionContextDefault]; // Notification categories NSSet* richPushCategories = [NSSet setWithObjects:richPushCategory, nil]; UIUserNotificationSettings *settings = [UIUserNotificationSettings settingsForTypes:UIUserNotificationTypeSound | UIUserNotificationTypeAlert | UIUserNotificationTypeBadge categories:richPushCategories]; [[UIApplication sharedApplication] registerUserNotificationSettings:settings]; [[UIApplication sharedApplication] registerForRemoteNotifications]; } else { // Previous iOS versions NSLog(@"This device is running with iOS7 or earlier versions."); [[UIApplication sharedApplication] registerForRemoteNotificationTypes: UIRemoteNotificationTypeAlert | UIRemoteNotificationTypeBadge | UIRemoteNotificationTypeSound | UIRemoteNotificationTypeNewsstandContentAvailability]; } return YES;Vervang door de volgende implementatie
application:didRegisterForRemoteNotificationsWithDeviceTokenom rekening te houden met de wijzigingen in de gebruikersinterface van het storyboard:// Access navigation controller which is at the root of window UINavigationController *nc = (UINavigationController *)self.window.rootViewController; // Get home view controller from stack on navigation controller homeViewController *hvc = (homeViewController *)[nc.viewControllers objectAtIndex:0]; hvc.deviceToken = deviceToken;Voeg vervolgens de volgende methoden toe aan om de afbeelding op te
AppDelegate.mhalen van uw eindpunt en een lokale melding te verzenden wanneer het ophalen is voltooid. Zorg ervoor dat u de tijdelijke aanduiding{backend endpoint}vervangt door uw back-endeindpunt:NSString *const GetNotificationEndpoint = @"{backend endpoint}/api/notifications"; // Helper: retrieve notification content from backend with rich notification id - (void)retrieveRichImageWithId:(int)richId completion: (void(^)(NSError*)) completion { UINavigationController *nc = (UINavigationController *)self.window.rootViewController; homeViewController *hvc = (homeViewController *)[nc.viewControllers objectAtIndex:0]; NSString* authenticationHeader = hvc.registerClient.authenticationHeader; // Check if authenticated if (!authenticationHeader) return; NSURLSession* session = [NSURLSession sessionWithConfiguration:[NSURLSessionConfiguration defaultSessionConfiguration] delegate:nil delegateQueue:nil]; NSURL* requestURL = [NSURL URLWithString:[NSString stringWithFormat:@"%@/%d", GetNotificationEndpoint, richId]]; NSMutableURLRequest* request = [NSMutableURLRequest requestWithURL:requestURL]; [request setHTTPMethod:@"GET"]; NSString* authorizationHeaderValue = [NSString stringWithFormat:@"Basic %@", authenticationHeader]; [request setValue:authorizationHeaderValue forHTTPHeaderField:@"Authorization"]; NSURLSessionDataTask* dataTask = [session dataTaskWithRequest:request completionHandler:^(NSData *data, NSURLResponse *response, NSError *error) { NSHTTPURLResponse* httpResponse = (NSHTTPURLResponse*) response; if (!error && httpResponse.statusCode == 200) { // From NSData to UIImage self.imagePayload = [UIImage imageWithData:data]; completion(nil); } else { NSLog(@"Error status: %ld, request: %@", (long)httpResponse.statusCode, error); if (error) completion(error); else { completion([NSError errorWithDomain:@"APICall" code:httpResponse.statusCode userInfo:nil]); } } }]; [dataTask resume]; } // Handle silent push notifications when id is sent from backend - (void)application:(UIApplication *)application didReceiveRemoteNotification:(NSDictionary *)userInfo fetchCompletionHandler:(void (^)(UIBackgroundFetchResult result))handler { self.userInfo = userInfo; int richId = [[self.userInfo objectForKey:@"richId"] intValue]; NSString* richType = [self.userInfo objectForKey:@"richType"]; // Retrieve image data if ([richType isEqualToString:@"img"]) { [self retrieveRichImageWithId:richId completion:^(NSError* error) { if (!error){ // Send local notification UILocalNotification* localNotification = [[UILocalNotification alloc] init]; // "5" is arbitrary here to give you enough time to quit out of the app and receive push notifications localNotification.fireDate = [NSDate dateWithTimeIntervalSinceNow:5]; localNotification.userInfo = self.userInfo; localNotification.alertBody = [self.userInfo objectForKey:@"richMessage"]; localNotification.timeZone = [NSTimeZone defaultTimeZone]; // iOS8 categories if (self.iOS8) { localNotification.category = @"richPush"; } [[UIApplication sharedApplication] scheduleLocalNotification:localNotification]; handler(UIBackgroundFetchResultNewData); } else{ handler(UIBackgroundFetchResultFailed); } }]; } // Add "else if" here to handle more types of rich content such as url, sound files, etc. }Verwerk de vorige lokale melding door de afbeeldingsweergavecontroller in
AppDelegate.mte openen met de volgende methoden:// Helper: redirect users to image view controller - (void)redirectToImageViewWithImage: (UIImage *)img { UINavigationController *navigationController = (UINavigationController*) self.window.rootViewController; UIStoryboard *mainStoryboard = [UIStoryboard storyboardWithName:@"Main" bundle: nil]; imageViewController *imgViewController = [mainStoryboard instantiateViewControllerWithIdentifier: @"imageViewController"]; // Pass data/image to image view controller imgViewController.imagePayload = img; // Redirect [navigationController pushViewController:imgViewController animated:YES]; } // Handle local notification sent above in didReceiveRemoteNotification - (void)application:(UIApplication *)application didReceiveLocalNotification:(UILocalNotification *)notification { if (application.applicationState == UIApplicationStateActive) { // Show in-app alert with an extra "more" button UIAlertView *alert = [[UIAlertView alloc] initWithTitle:@"Notification" message:notification.alertBody delegate:self cancelButtonTitle:@"OK" otherButtonTitles:@"More", nil]; [alert show]; } // App becomes active from user's tap on notification else { [self redirectToImageViewWithImage:self.imagePayload]; } } // Handle buttons in in-app alerts and redirect with data/image - (void)alertView:(UIAlertView *)alertView clickedButtonAtIndex:(NSInteger)buttonIndex { // Handle "more" button if (buttonIndex == 1) { [self redirectToImageViewWithImage:self.imagePayload]; } // Add "else if" here to handle more buttons } // Handle notification setting actions in iOS8 - (void)application:(UIApplication *)application handleActionWithIdentifier:(NSString *)identifier forLocalNotification:(UILocalNotification *)notification completionHandler:(void (^)())completionHandler { // Handle richPush related buttons if ([identifier isEqualToString:@"richPushMore"]) { [self redirectToImageViewWithImage:self.imagePayload]; } completionHandler(); }
De toepassing uitvoeren
- Voer in XCode de app uit op een fysiek iOS-apparaat (pushmeldingen werken niet in de simulator).
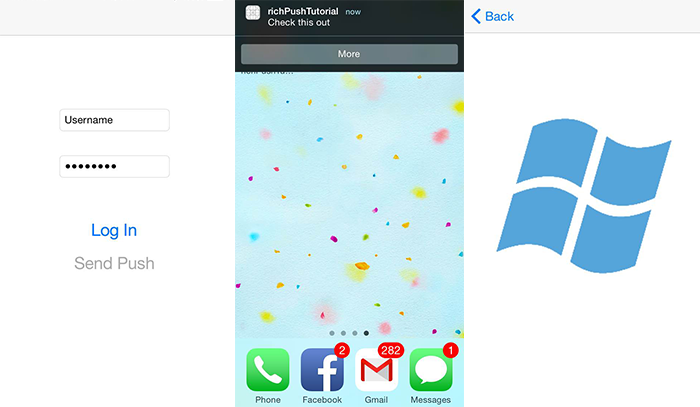
- Voer in de gebruikersinterface van de iOS-app een gebruikersnaam en wachtwoord in met dezelfde waarde voor verificatie en klik op Aanmelden.
- Klik op Push verzenden om een waarschuwing in de app te zien. Als u op Meer klikt, wordt u naar de afbeelding gebracht die u hebt gekozen om op te nemen in de back-end van uw app.
- U kunt ook op Push verzenden klikken en onmiddellijk op de startknop van uw apparaat drukken. Over enkele ogenblikpen ontvangt u een pushmelding. Als u erop tikt of op Meer klikt, wordt u naar uw app en de uitgebreide afbeeldingsinhoud gebracht.