Anonieme leestoegang tot blobgegevens herstellen (klassieke implementaties)
Azure Blob Storage ondersteunt optionele anonieme leestoegang tot containers en blobs. Anonieme toegang kan echter een beveiligingsrisico vormen. We raden u aan anonieme toegang uit te schakelen voor optimale beveiliging. Het ongedaan maken van anonieme toegang helpt om schendingen van gegevens te voorkomen die worden veroorzaakt door ongewenste anonieme toegang.
Anonieme toegang tot uw blobgegevens is standaard altijd verboden. Met de standaardconfiguratie voor een klassiek opslagaccount kan een gebruiker met de juiste machtigingen anonieme toegang tot containers en blobs in een opslagaccount configureren. Als u anonieme toegang tot een klassiek opslagaccount wilt voorkomen, moet u elke container in het account configureren om anonieme toegang te blokkeren.
Als uw opslagaccount gebruikmaakt van het klassieke implementatiemodel, raden we u aan om zo snel mogelijk naar het Azure Resource Manager-implementatiemodel te migreren . Nadat u uw account hebt gemigreerd, kunt u dit configureren om anonieme toegang op accountniveau niet toe te laten. Zie Anonieme leestoegang tot blobgegevens (Azure Resource Manager-implementaties) herstellen voor informatie over het niet toestaan van anonieme toegang voor een Azure Resource Manager-account.
Als u op dit moment uw klassieke opslagaccounts niet kunt migreren, moet u anonieme toegang tot deze accounts nu herstellen door alle containers in te stellen op privé. In dit artikel wordt beschreven hoe u de toegang tot de containers in een klassiek opslagaccount herstelt.
Azure Storage-accounts die gebruikmaken van het klassieke implementatiemodel, worden op 31 augustus 2024 buiten gebruik gesteld. Zie klassieke Azure-opslagaccounts worden op 31 augustus 2024 buiten gebruik gesteld voor meer informatie.
Waarschuwing
Anonieme toegang vormt een beveiligingsrisico. U wordt aangeraden de acties uit te voeren die in de volgende sectie worden beschreven om anonieme toegang voor al uw klassieke opslagaccounts te herstellen, tenzij voor uw scenario specifiek anonieme toegang is vereist.
Anonieme toegang tot containers blokkeren
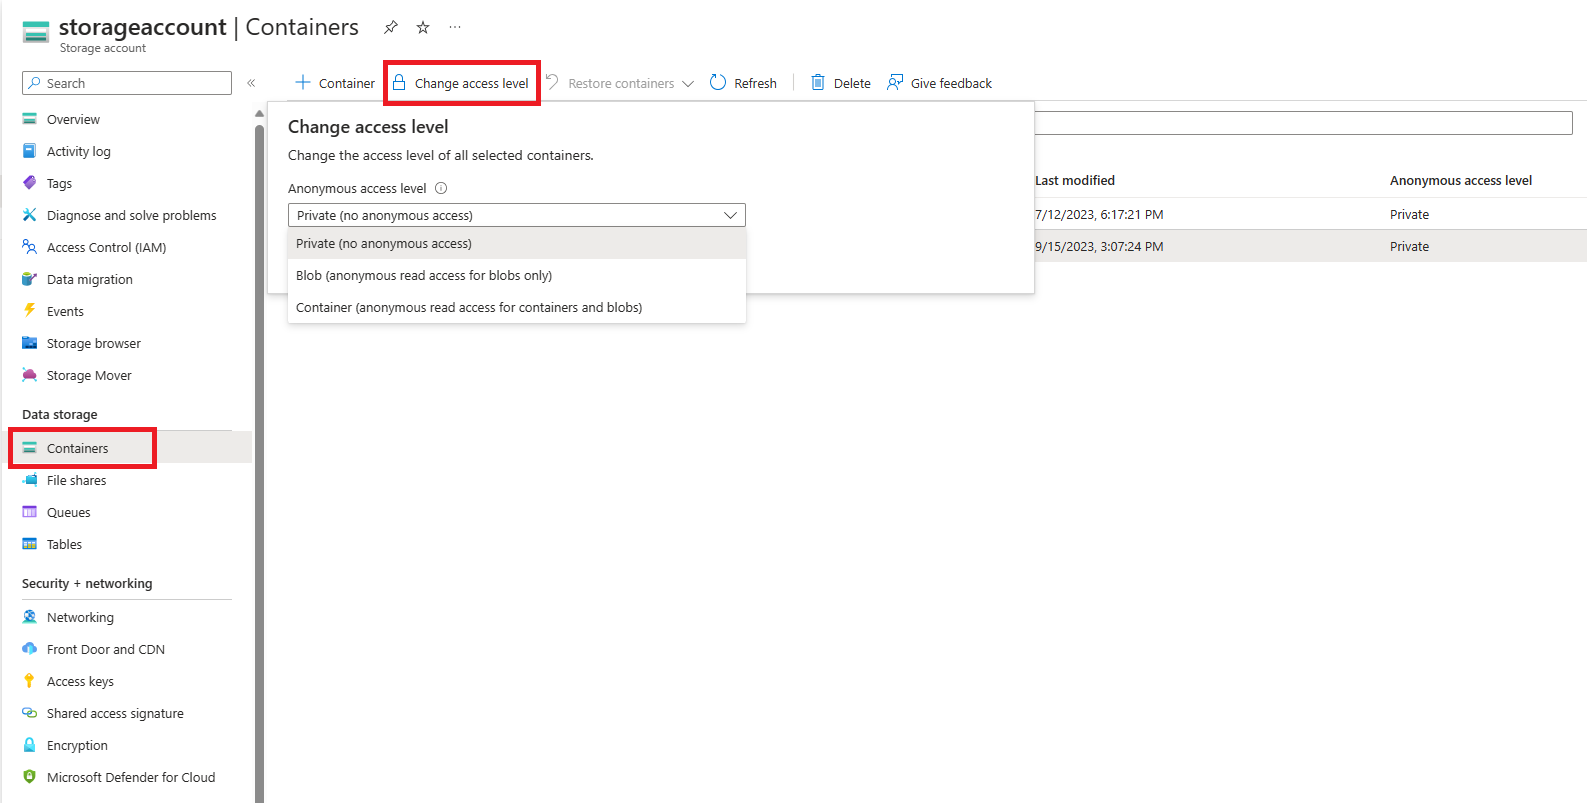
Als u anonieme toegang voor een klassiek opslagaccount wilt herstellen, stelt u het anonieme toegangsniveau voor elke container in het account in op Privé.
Als u anonieme toegang wilt herstellen voor een of meer containers in Azure Portal, voert u de volgende stappen uit:
Navigeer naar het overzicht van uw opslagaccount in Azure Portal.
Selecteer blobcontainers onder Gegevensopslag op de menublade.
Selecteer de containers waarvoor u het anonieme toegangsniveau wilt instellen.
Gebruik de knop Toegangsniveau wijzigen om de toegangsinstellingen weer te geven.
Selecteer Privé (geen anonieme toegang) in de vervolgkeuzelijst Anoniem toegangsniveau en klik op de knop OK om de wijziging toe te passen op de geselecteerde containers.

Controleer de instelling voor anonieme toegang voor een set containers
Het is mogelijk om te controleren welke containers in een of meer opslagaccounts zijn geconfigureerd voor anonieme toegang door de containers weer te geven en de instelling voor anonieme toegang te controleren. Deze aanpak is een praktische optie wanneer een opslagaccount geen groot aantal containers bevat of wanneer u de instelling controleert voor een klein aantal opslagaccounts. De prestaties kunnen echter lijden als u probeert een groot aantal containers op te sommen.
In het volgende voorbeeld wordt PowerShell gebruikt om de instelling voor anonieme toegang voor alle containers in een opslagaccount op te halen. Vergeet niet om de tijdelijke aanduidingen tussen haakjes te vervangen door uw eigen waarden:
$rgName = "<resource-group>"
$accountName = "<storage-account>"

$storageAccount = Get-AzStorageAccount -ResourceGroupName $rgName -Name $accountName
$ctx = $storageAccount.Context

Get-AzStorageContainer -Context $ctx | Select Name, PublicAccess
Voorbeeldscript voor bulkherstel
Het volgende PowerShell-voorbeeldscript wordt uitgevoerd op alle klassieke opslagaccounts in een abonnement en stelt de instelling voor anonieme toegang voor de containers in die accounts in op Privé.
Let op
Het uitvoeren van dit script voor opslagaccounts met zeer grote aantallen containers kan aanzienlijke resources vereisen en lang duren. Als u een opslagaccount met een zeer groot aantal containers hebt, kunt u een andere benadering bedenken voor het herstellen van anonieme toegang.
# This script runs against all classic storage accounts in a single subscription
# and sets containers to private.

## IMPORTANT ##
# Running this script requires a connected account through the previous version
# of Azure PowerShell. Use the following command to install:
# Install-Module Azure -scope CurrentUser -force
#
# Once installed, you will need to connect with:
# Add-AzureAccount
#
# This command may fail if there are modules installed that conflict with it.
# One known conflicting module is AzureRm.Accounts
# You will need to remove conflicting modules using the following:
# Remove-Module -name <name>
#
# The Azure PowerShell module assumes a current subscription when enumerating
# storage accounts.  You can set the current subscription with:
# Select-AzureSubscription -subscriptionId <subscriptionId>
#
# Get-AzureSubscription lists all subscriptions available to the Azure
# module. Not all subscriptions listed under your name in the portal may
# appear here. If a subscription does not appear, you may need to use
# the portal to remediate public access for those accounts.
# After you have selected your subscription, verify that it is current
# by running:
# Get-AzureSubscription -current
#
# After the current subscription runs, you can run this script, change
# to another subscription after it completes, and then run again as necessary.
## END IMPORTANT##

# Standard operation will enumerate all accounts and check for containers with public
# access, then allow the user to decide whether or not to disable the setting.

# Run with BypassConfirmation=$true if you wish to remove permissions from all containers
# without individual confirmation

# Run with BypassArmUpgrade=$true if you wish to upgrade your storage account to use the
# Azure Resource Manager deployment model. All accounts must be upgraded by 31 August 2024.

param(
    [boolean]$BypassConfirmation=$false,
    [boolean]$BypassArmUpgrade=$false
)

#Do not change this
$convertAccounts = $false

foreach($classicAccount in Get-AzureStorageAccount)
{
    $enumerate = $false

    if(!$BypassArmUpgrade)
    {
        write-host "Classic Storage Account" $classicAccount.storageAccountname "found"
        $confirmation = read-host "Convert to ARM? [y/n]:"
    }
    if(($confirmation -eq 'y') -and (!$BypassArmUpgrade))
    {
        write-host "Conversion selected"
        $convertAccounts = $true
    }
    else
    {
        write-host $classicAccount.StorageAccountName "conversion not selected.  Searching for public containers..."
        $enumerate = $true
    }

    if($enumerate)
    {
        foreach($container in get-azurestoragecontainer -context (get-azurestorageaccount -storageaccountname $classicAccount.StorageAccountName).context)
        {
            if($container.PublicAccess -eq 'Off')
            {
            }
            else
            {
                if(!$BypassConfirmation)
                {
                    $selection = read-host $container.Name $container.PublicAccess "access found, Make private?[y/n]:"
                }
                if(($selection -eq 'y') -or ($BypassConfirmation))
                {
                    write-host "Removing permissions from" $container.name "container on storage account" $classicaccount.StorageAccountName
                    try
                    {
                        Set-AzureStorageContainerAcl -context $classicAccount.context -name $container.name -Permission Off
                        write-host "Success!"
                    }
                    catch
                    {
                        $_
                    }
                }
                else
                {
                    write-host "Skipping..."
                }
            }
        }
    }
}
if($convertAccounts)
{
    write-host "Converting accounts to ARM is the preferred method, however there are some caveats."
    write-host "The preferred method would be to use the portal to perform the conversions and then "
    write-host "run the ARM script against them.  For more information on converting a classic account"
    write-host "to an ARM account, please see:"
    write-host "https://learn.microsoft.com/en-us/azure/virtual-machines/migration-classic-resource-manager-overview"
}
write-host "Script complete"