Create and deploy a Windows Information Protection policy in Configuration Manager
Note
Starting in July 2022, Microsoft is deprecating Windows Information Protection (WIP). Microsoft will continue to support WIP on supported versions of Windows. New versions of Windows won't include new capabilities for WIP, and it won't be supported in future versions of Windows. For more information, see Announcing sunset of Windows Information Protection.
For your data protection needs, Microsoft recommends that you use Microsoft Purview Information Protection and Microsoft Purview Data Loss Prevention. Purview simplifies the configuration set-up and provides an advanced set of capabilities.
Applies to:
- Windows 10
- Windows 11
Microsoft Configuration Manager helps you create and deploy your Windows Information Protection (WIP) policy. You can choose your protected apps, your WIP-protection mode, and how to find enterprise data on the network.
Add a WIP policy
After you've installed and set up Configuration Manager for your organization, you must create a configuration item for WIP, which in turn becomes your WIP policy.
Tip
Review the Limitations while using Windows Information Protection (WIP) article before creating a new configuration item to avoid common issues.
To create a configuration item for WIP
Open the Configuration Manager console, select the Assets and Compliance node, expand the Overview node, expand the Compliance Settings node, and then expand the Configuration Items node.
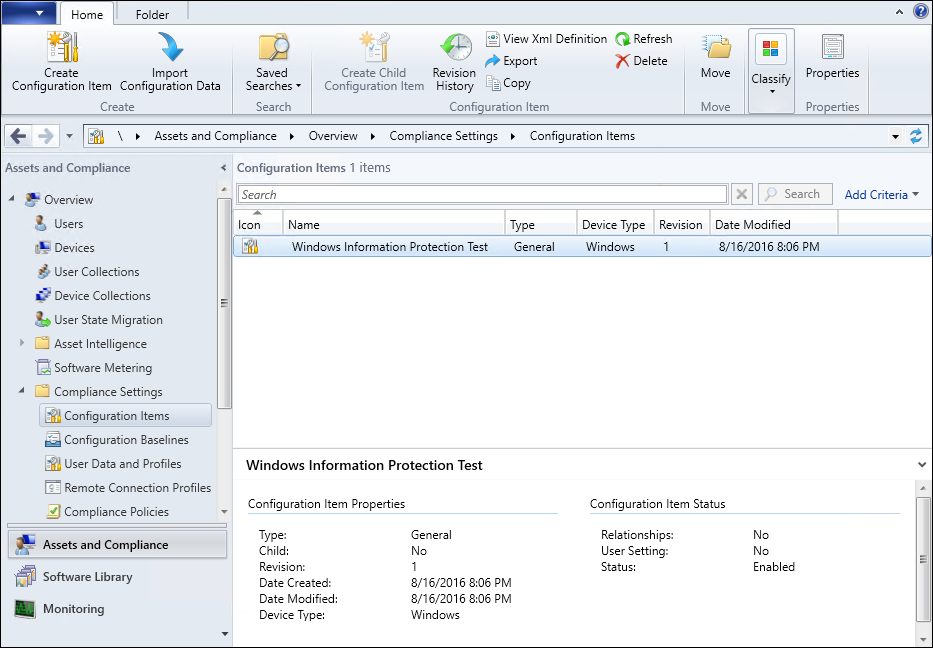
Select the Create Configuration Item button.
The Create Configuration Item Wizard starts.
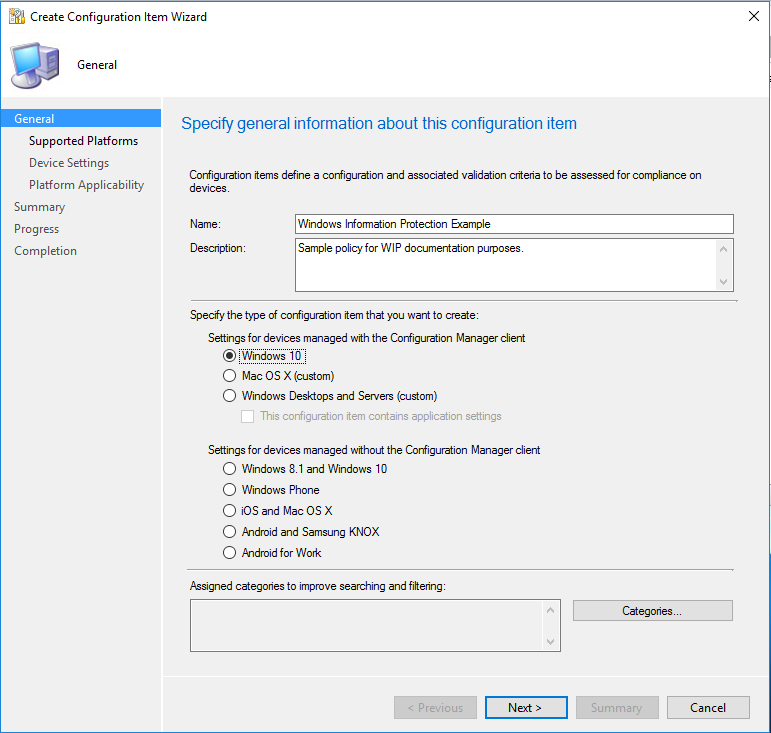
On the General Information screen, type a name (required) and an optional description for your policy into the Name and Description boxes.
In the Specify the type of configuration item you want to create area, pick the option that represents whether you use Configuration Manager for device management, and then select Next.
Settings for devices managed with the Configuration Manager client: Windows 10
-OR-
Settings for devices managed without the Configuration Manager client: Windows 8.1 and Windows 10
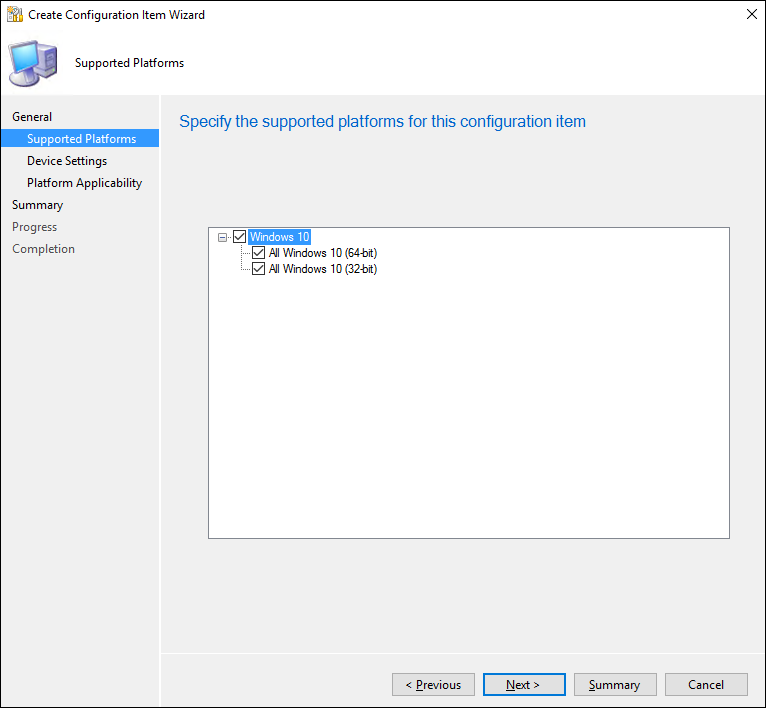
On the Supported Platforms screen, select the Windows 10 box, and then select Next.
On the Device Settings screen, select Windows Information Protection, and then select Next.
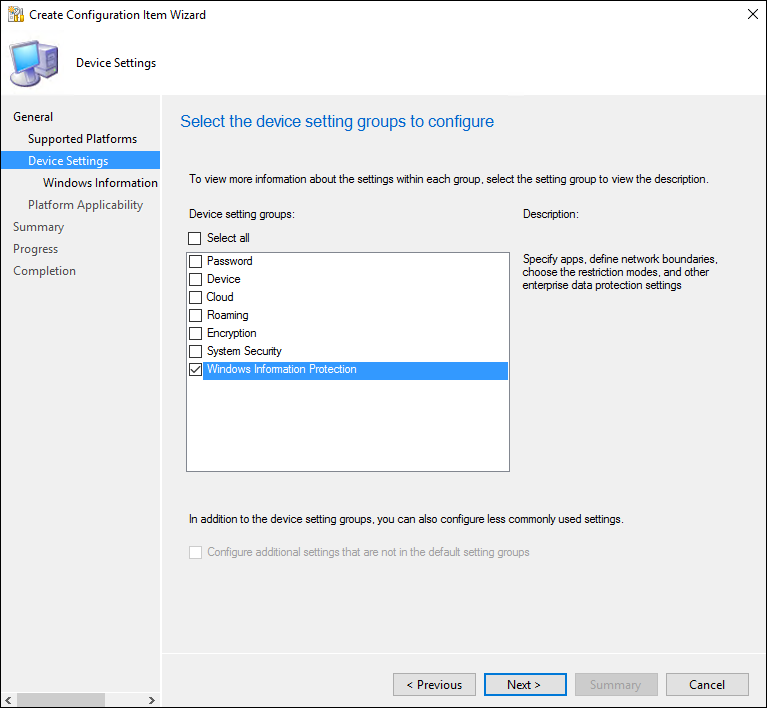
The Configure Windows Information Protection settings page appears, where you'll configure your policy for your organization.
Add app rules to your policy
During the policy-creation process in Configuration Manager, you can choose the apps you want to give access to your enterprise data through Windows Information Protection. Apps included in this list can protect data on behalf of the enterprise and are restricted from copying or moving enterprise data to unprotected apps.
The steps to add your app rules are based on the type of rule template being applied. You can add a store app (also known as a Universal Windows Platform (UWP) app), a signed Windows desktop app, or an AppLocker policy file.
Important
Enlightened apps are expected to prevent enterprise data from going to unprotected network locations and to avoid encrypting personal data. On the other hand, WIP-unaware apps might not respect the corporate network boundary, and WIP-unaware apps will encrypt all files they create or modify. This means that they could encrypt personal data and cause data loss during the revocation process.
Care must be taken to get a support statement from the software provider that their app is safe with Windows Information Protection before adding it to your App rules list. If you don't get this statement, it's possible that you could experience app compat issues due to an app losing the ability to access a necessary file after revocation.
Add a store app rule to your policy
For this example, we're going to add Microsoft OneNote, a store app, to the App Rules list.
To add a store app
From the App rules area, select Add.
The Add app rule box appears.
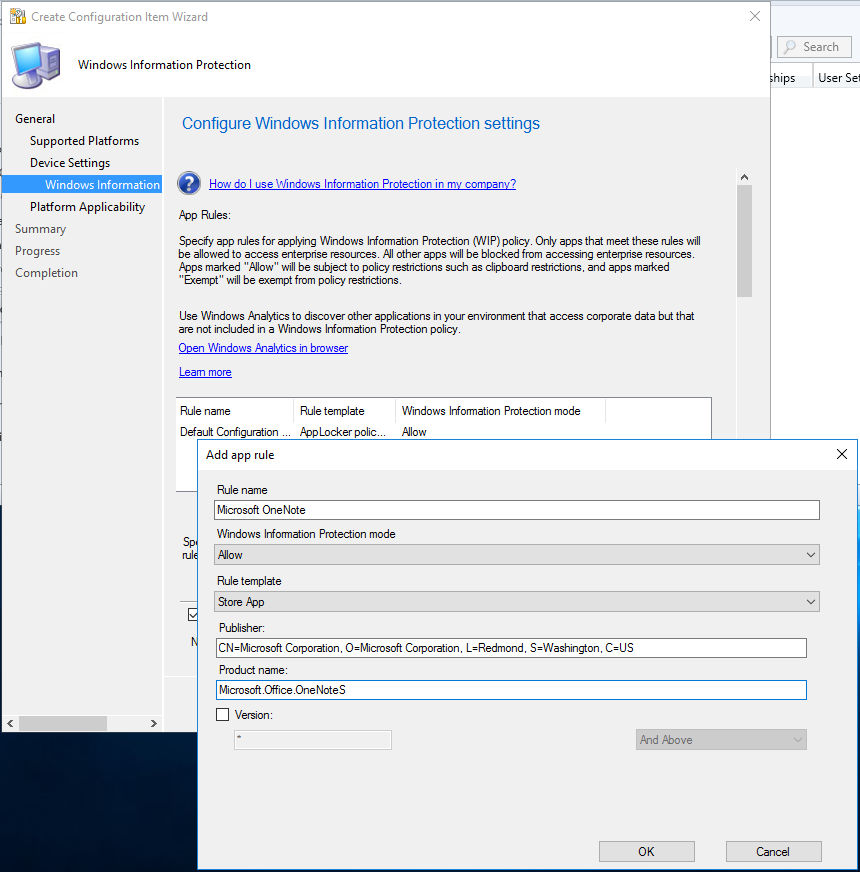
Add a friendly name for your app into the Title box. In this example, it's Microsoft OneNote.
Select Allow from the Windows Information Protection mode drop-down list.
Allow turns on WIP, helping to protect that app's corporate data through the enforcement of WIP restrictions. If you want to exempt an app, you can follow the steps in the Exempt apps from WIP restrictions section.
Pick Store App from the Rule template drop-down list.
The box changes to show the store app rule options.
Type the name of the app and the name of its publisher, and then select OK. For this UWP app example, the Publisher is
CN=Microsoft Corporation, O=Microsoft Corporation, L=Redmond, S=Washington, C=USand the Product name isMicrosoft.Office.OneNote.
If you don't know the publisher or product name, you can find them for both desktop devices by following these steps.
To find the Publisher and Product Name values for Store apps without installing them
Go to the Microsoft Store website, and find your app. For example, Microsoft OneNote.
Note
If your app is already installed on desktop devices, you can use the AppLocker local security policy MMC snap-in to gather the info for adding the app to the protected apps list. For info about how to do this, see the steps in Add an AppLocker policy file in this article.
Copy the ID value from the app URL. For example, Microsoft OneNote's ID URL is
https://www.microsoft.com/store/apps/onenote/9wzdncrfhvjl, and you'd copy the ID value,9wzdncrfhvjl.In a browser, run the Store for Business portal web API, to return a JavaScript Object Notation (JSON) file that includes the publisher and product name values. For example, run
https://bspmts.mp.microsoft.com/v1/public/catalog/Retail/Products/9wzdncrfhvjl/applockerdata, where9wzdncrfhvjlis replaced with your ID value.The API runs and opens a text editor with the app details.
{
    "packageIdentityName": "Microsoft.Office.OneNote",
    "publisherCertificateName": "CN=Microsoft Corporation, O=Microsoft Corporation, L=Redmond, S=Washington, C=US"
}
Copy the
publisherCertificateNamevalue and paste them into the Publisher Name box, copy thepackageIdentityNamevalue into the Product Name box of Intune.Important
The JSON file might also return a
windowsPhoneLegacyIdvalue for both the Publisher Name and Product Name boxes. This means that you have an app that's using a XAP package and that you must set the Product Name aswindowsPhoneLegacyId, and set the Publisher Name as "CN=" followed by thewindowsPhoneLegacyId.For example:
{
    "windowsPhoneLegacyId": "ca05b3ab-f157-450c-8c49-a1f127f5e71d",
}
Add a desktop app rule to your policy
For this example, we're going to add Internet Explorer, a desktop app, to the App Rules list.
To add a desktop app to your policy
From the App rules area, select Add.
The Add app rule box appears.
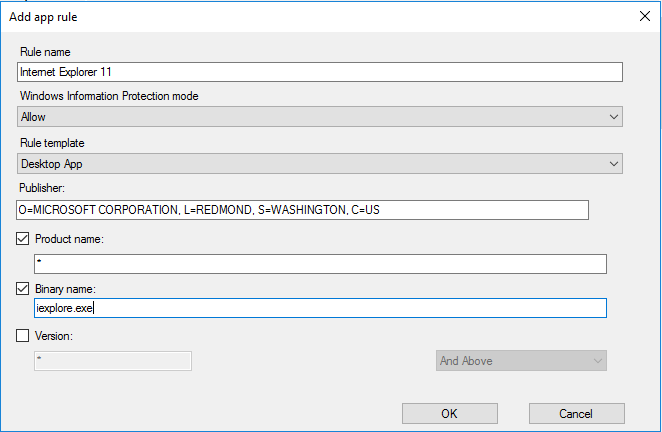
Add a friendly name for your app into the Title box. In this example, it's Internet Explorer.
Select Allow from the Windows Information Protection mode drop-down list.
Allow turns on WIP, helping to protect that app's corporate data through the enforcement of WIP restrictions. If you want to exempt an app, you can follow the steps in the Exempt apps from WIP restrictions section.
Pick Desktop App from the Rule template drop-down list.
The box changes to show the desktop app rule options.
Pick the options you want to include for the app rule (see table), and then select OK.
Option Manages All fields left as "*" All files signed by any publisher. (Not recommended.) Publisher selected All files signed by the named publisher. This might be useful if your company is the publisher and signer of internal line-of-business apps. Publisher and Product Name selected All files for the specified product, signed by the named publisher. Publisher, Product Name, and Binary name selected Any version of the named file or package for the specified product, signed by the named publisher. Publisher, Product Name, Binary name, and File Version, and above, selected Specified version or newer releases of the named file or package for the specified product, signed by the named publisher. This option is recommended for enlightened apps that weren't previously enlightened. Publisher, Product Name, Binary name, and File Version, And below selected Specified version or older releases of the named file or package for the specified product, signed by the named publisher. Publisher, Product Name, Binary name, and File Version, Exactly selected Specified version of the named file or package for the specified product, signed by the named publisher.
If you're unsure about what to include for the publisher, you can run this PowerShell command:
Get-AppLockerFileInformation -Path "<path of the exe>"
Where "<path of the exe>" goes to the location of the app on the device. For example, Get-AppLockerFileInformation -Path "C:\Program Files\Internet Explorer\iexplore.exe".
In this example, you'd get the following info:
Path                   Publisher
----                   ---------
%PROGRAMFILES%\INTERNET EXPLORER\IEXPLORE.EXE O=MICROSOFT CORPORATION, L=REDMOND, S=WASHINGTON, C=US\INTERNET EXPLOR...
Where the text, O=MICROSOFT CORPORATION, L=REDMOND, S=WASHINGTON, C=US is the publisher name to enter in the Publisher Name box.
Add an AppLocker policy file
For this example, we're going to add an AppLocker XML file to the App Rules list. You'll use this option if you want to add multiple apps at the same time. For more info about AppLocker, see the AppLocker content.
To create an app rule and xml file using the AppLocker tool
Open the Local Security Policy snap-in (SecPol.msc).
In the left pane, expand Application Control Policies, expand AppLocker, and then select Packaged App Rules.

Right-click in the right-hand pane, and then select Create New Rule.
The Create Packaged app Rules wizard appears.
On the Before You Begin page, select Next.

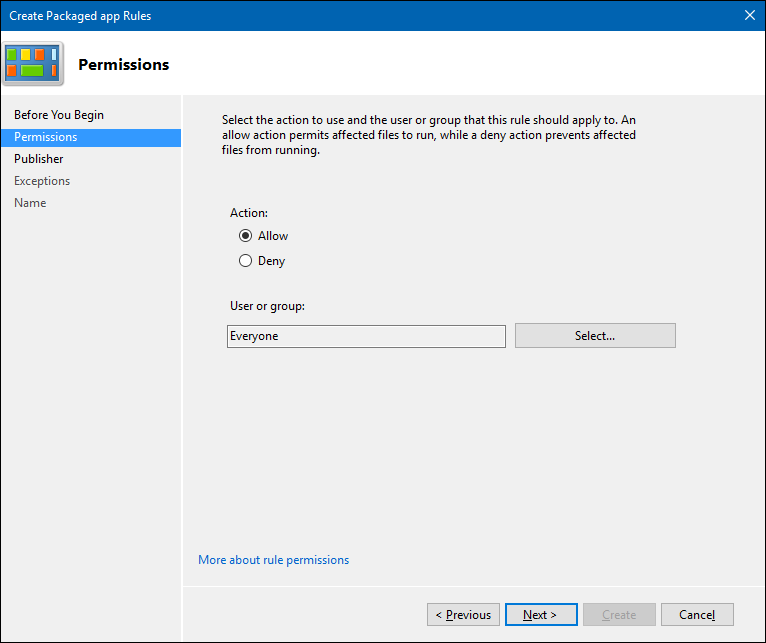
On the Permissions page, make sure the Action is set to Allow and the User or group is set to Everyone, and then select Next.
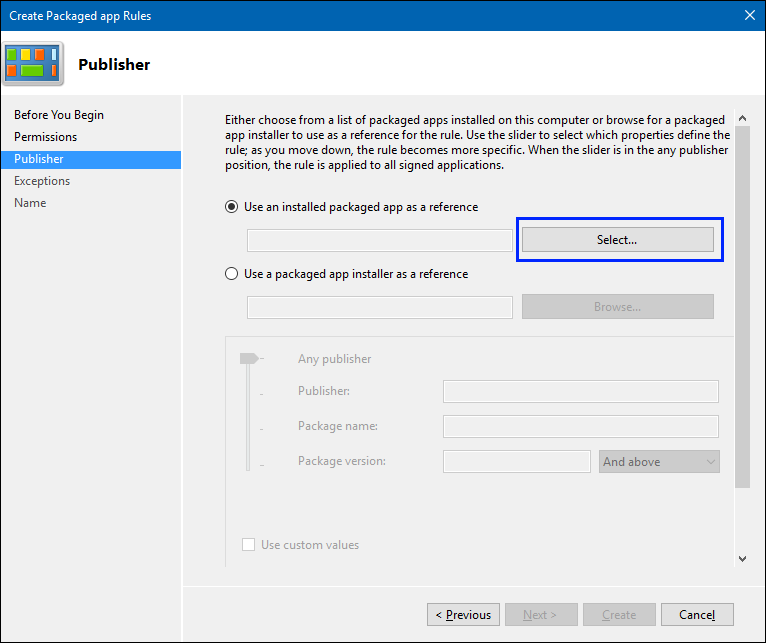
On the Publisher page, select Select from the Use an installed packaged app as a reference area.
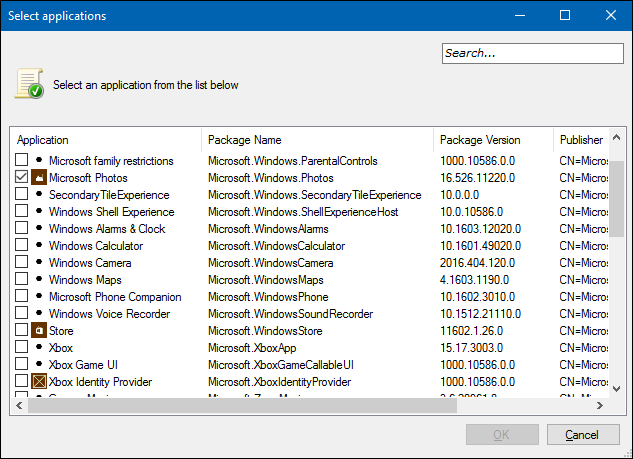
In the Select applications box, pick the app that you want to use as the reference for your rule, and then select OK. For this example, we're using Microsoft Photos.
On the updated Publisher page, select Create.

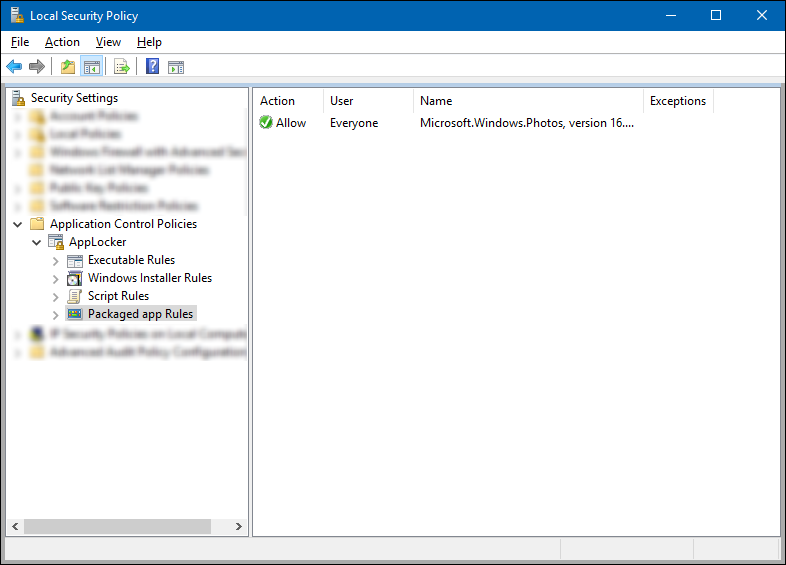
Review the Local Security Policy snap-in to make sure your rule is correct.
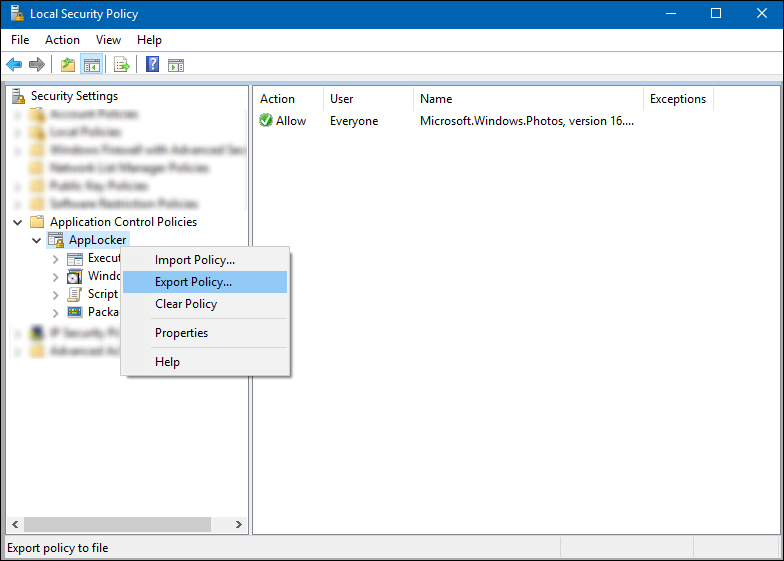
In the left pane, right-click on AppLocker, and then select Export policy.
The Export policy box opens, letting you export and save your new policy as XML.
In the Export policy box, browse to where the policy should be stored, give the policy a name, and then select Save.
The policy is saved and you'll see a message that says one rule was exported from the policy.
Example XML file
This is the XML file that AppLocker creates for Microsoft Photos.<AppLockerPolicy Version="1"> <RuleCollection Type="Exe" EnforcementMode="NotConfigured" /> <RuleCollection Type ="Msi" EnforcementMode="NotConfigured" /> <RuleCollection Type ="Script" EnforcementMode="NotConfigured" /> <RuleCollection Type ="Dll" EnforcementMode="NotConfigured" /> <RuleCollection Type ="Appx" EnforcementMode="NotConfigured"> <FilePublisherRule Id="5e0c752b-5921-4f72-8146-80ad5f582110" Name="Microsoft.Windows.Photos, version 16.526.0.0 and above, from Microsoft Corporation" Description="" UserOrGroupSid="S-1-1-0" Action="Allow"> <Conditions> <FilePublisherCondition PublisherName="CN=Microsoft Corporation, O=Microsoft Corporation, L=Redmond, S=Washington, C=US" ProductName="Microsoft.Windows.Photos" BinaryName="*"> <BinaryVersionRange LowSection="16.526.0.0" HighSection="*" /> </FilePublisherCondition> </Conditions> </FilePublisherRule> </RuleCollection> </AppLockerPolicy>After you've created your XML file, you need to import it by using Configuration Manager.
To import your Applocker policy file app rule using Configuration Manager
From the App rules area, select Add.
The Add app rule box appears.
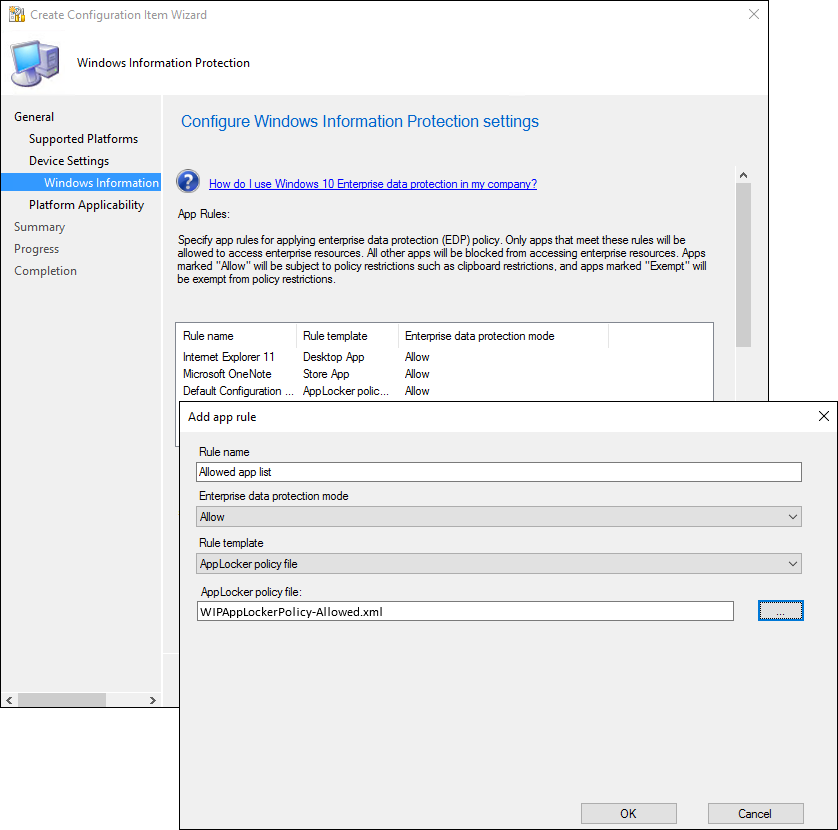
Add a friendly name for your app into the Title box. In this example, it's Allowed app list.
Select Allow from the Windows Information Protection mode drop-down list.
Allow turns on WIP, helping to protect that app's corporate data through the enforcement of WIP restrictions. If you want to exempt an app, you can follow the steps in the Exempt apps from WIP restrictions section.
Pick the AppLocker policy file from the Rule template drop-down list.
The box changes to let you import your AppLocker XML policy file.
Select the ellipsis (...) to browse for your AppLocker XML file, select Open, and then select OK to close the Add app rule box.
The file is imported and the apps are added to your App Rules list.
Exempt apps from WIP restrictions
If you're running into compatibility issues where your app is incompatible with Windows Information Protection (WIP), but still needs to be used with enterprise data, you can exempt the app from the WIP restrictions. This means that your apps won't include auto-encryption or tagging and won't honor your network restrictions. It also means that your exempted apps might leak.
To exempt a store app, a desktop app, or an AppLocker policy file app rule
From the App rules area, select Add.
The Add app rule box appears.
Add a friendly name for your app into the Title box. In this example, it's Exempt apps list.
Select Exempt from the Windows Information Protection mode drop-down list.
When you exempt apps, they're allowed to bypass the WIP restrictions and access your corporate data. To allow apps, see Add app rules to your policy in this article.
Fill out the rest of the app rule info, based on the type of rule you're adding:
Store app. Follow the Publisher and Product name instructions in the Add a store app rule to your policy section of this article.
Desktop app. Follow the Publisher, Product name, Binary name, and Version instructions in the Add a desktop app rule to your policy section of this article.
AppLocker policy file. Follow the Import instructions in the Add an AppLocker policy file section of this article, using a list of exempted apps.
Select OK.
Manage the WIP-protection level for your enterprise data
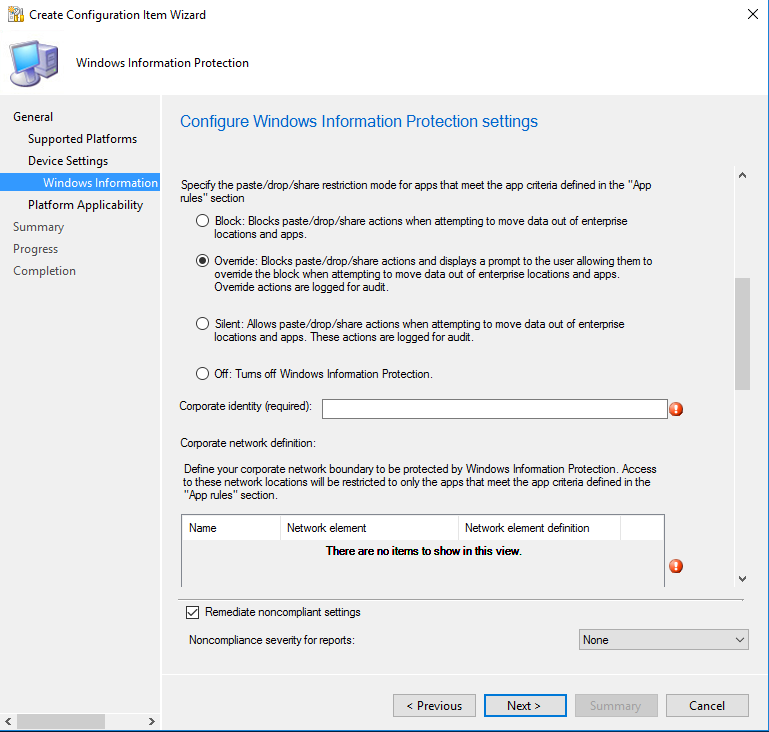
After you've added the apps you want to protect with WIP, you'll need to apply a management and protection mode.
We recommend that you start with Silent or Override while verifying with a small group that you have the right apps on your protected apps list. After you're done, you can change to your final enforcement policy, either Override or Block.
Note
For info about how to collect your audit log files, see How to collect Windows Information Protection (WIP) audit event logs.
| Mode | Description |
|---|---|
| Block | WIP looks for inappropriate data sharing practices and stops the employee from completing the action. This can include sharing info across non-enterprise-protected apps in addition to sharing enterprise data between other people and devices outside of your enterprise. |
| Override | WIP looks for inappropriate data sharing, warning employees if they do something deemed potentially unsafe. However, this management mode lets the employee override the policy and share the data, logging the action to your audit log. |
| Silent | WIP runs silently, logging inappropriate data sharing, without blocking anything that would have been prompted for employee interaction while in Override mode. Unallowed actions, like apps inappropriately trying to access a network resource or WIP-protected data, are still blocked. |
| Off | WIP is turned off and doesn't help to protect or audit your data. After you turn off WIP, an attempt is made to decrypt any WIP-tagged files on the locally attached drives. Your previous decryption and policy info isn't automatically reapplied if you turn WIP protection back on. For more information, see How to disable Windows Information Protection. |
Define your enterprise-managed identity domains
Corporate identity, usually expressed as your primary internet domain (for example, contoso.com), helps to identify and tag your corporate data from apps you've marked as protected by WIP. For example, emails using contoso.com are identified as being corporate and are restricted by your Windows Information Protection policies.
You can specify multiple domains owned by your enterprise by separating them with the | character. For example, contoso.com|newcontoso.com. With multiple domains, the first one is designated as your corporate identity and all of the additional ones as being owned by the first one. We strongly recommend that you include all of your email address domains in this list.
To add your corporate identity
Type the name of your corporate identity into the Corporate identity field. For example,
contoso.comorcontoso.com|newcontoso.com.
Choose where apps can access enterprise data
After you've added a protection mode to your apps, you'll need to decide where those apps can access enterprise data on your network.
There are no default locations included with WIP, you must add each of your network locations. This area applies to any network endpoint device that gets an IP address in your enterprise's range and is also bound to one of your enterprise domains, including SMB shares. Local file system locations should just maintain encryption (for example, on local NTFS, FAT, ExFAT).
Important
Every WIP policy should include policy that defines your enterprise network locations.
Classless Inter-Domain Routing (CIDR) notation isn't supported for WIP configurations.
To define where your protected apps can find and send enterprise data on your network
Add additional network locations your apps can access by clicking Add.
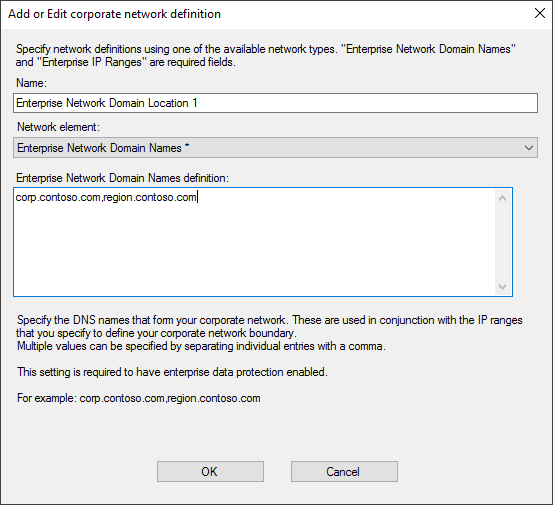
The Add or edit corporate network definition box appears.
Type a name for your corporate network element into the Name box, and then pick what type of network element it is, from the Network element drop-down box. This can include any of the options in the following table.
Enterprise Cloud Resources: Specify the cloud resources to be treated as corporate and protected by WIP.
For each cloud resource, you may also optionally specify a proxy server from your internal proxy servers list to route traffic for this cloud resource. All traffic routed through your internal proxy servers is considered enterprise.
If you have multiple resources, you must separate them using the
|delimiter. If you don't use proxy servers, you must also include the,delimiter just before the|. For example: URL<,proxy>|URL <,proxy>.Format examples:
With proxy:
contoso.sharepoint.com,contoso.internalproxy1.com|contoso.visualstudio.com,contoso.internalproxy2.comWithout proxy:
contoso.sharepoint.com|contoso.visualstudio.com
Important
In some cases, such as when an app connects directly to a cloud resource through an IP address, Windows can't tell whether it's attempting to connect to an enterprise cloud resource or to a personal site. In this case, Windows blocks the connection by default. To stop Windows from automatically blocking these connections, you can add the /AppCompat/ string to the setting. For example: URL <,proxy>|URL <,proxy>|/AppCompat/.
Enterprise Network Domain Names (Required): Specify the DNS suffixes used in your environment. All traffic to the fully qualified domains appearing in this list will be protected.
This setting works with the IP ranges settings to detect whether a network endpoint is enterprise or personal on private networks.
If you have multiple resources, you must separate them using the "," delimiter.
Format examples:
corp.contoso.com,region.contoso.comProxy servers: Specify the proxy servers your devices will go through to reach your cloud resources. Using this server type indicates that the cloud resources you're connecting to are enterprise resources.
This list shouldn't include any servers listed in your Internal proxy servers list. Internal proxy servers must be used only for WIP-protected (enterprise) traffic.
If you have multiple resources, you must separate them using the ";" delimiter.
Format examples:
proxy.contoso.com:80;proxy2.contoso.com:443Internal proxy servers: Specify the internal proxy servers your devices will go through to reach your cloud resources. Using this server type indicates that the cloud resources you're connecting to are enterprise resources.
This list shouldn't include any servers listed in your Proxy servers list. Proxy servers must be used only for non-WIP-protected (non-enterprise) traffic.
If you have multiple resources, you must separate them using the ";" delimiter.
Format examples:
contoso.internalproxy1.com;contoso.internalproxy2.comEnterprise IPv4 Range (Required): Specify the addresses for a valid IPv4 value range within your intranet. These addresses, used with your Enterprise Network Domain Names, define your corporate network boundaries.
If you have multiple ranges, you must separate them using the "," delimiter.
Format examples:
- Starting IPv4 Address:
3.4.0.1 - Ending IPv4 Address:
3.4.255.254 - Custom URI:
3.4.0.1-3.4.255.254, 10.0.0.1-10.255.255.254
- Starting IPv4 Address:
Enterprise IPv6 Range: Specify the addresses for a valid IPv6 value range within your intranet. These addresses, used with your Enterprise Network Domain Names, define your corporate network boundaries.
If you have multiple ranges, you must separate them using the "," delimiter.
Format examples:
- Starting IPv6 Address:
2a01:110:: - Ending IPv6 Address:
2a01:110:7fff:ffff:ffff:ffff:ffff:ffff - Custom URI:
2a01:110:7fff:ffff:ffff:ffff:ffff:ffff,fd00::-fdff:ffff:ffff:ffff:ffff:ffff:ffff:ffff
- Starting IPv6 Address:
Neutral Resources: Specify your authentication redirection endpoints for your company. These locations are considered enterprise or personal, based on the context of the connection before the redirection.
If you have multiple resources, you must separate them using the "," delimiter.
Format examples:
sts.contoso.com,sts.contoso2.com
Add as many locations as you need, and then select OK.
The Add or edit corporate network definition box closes.
Decide if you want to Windows to look for additional network settings and if you want to show the WIP icon on your corporate files while in File Explorer.
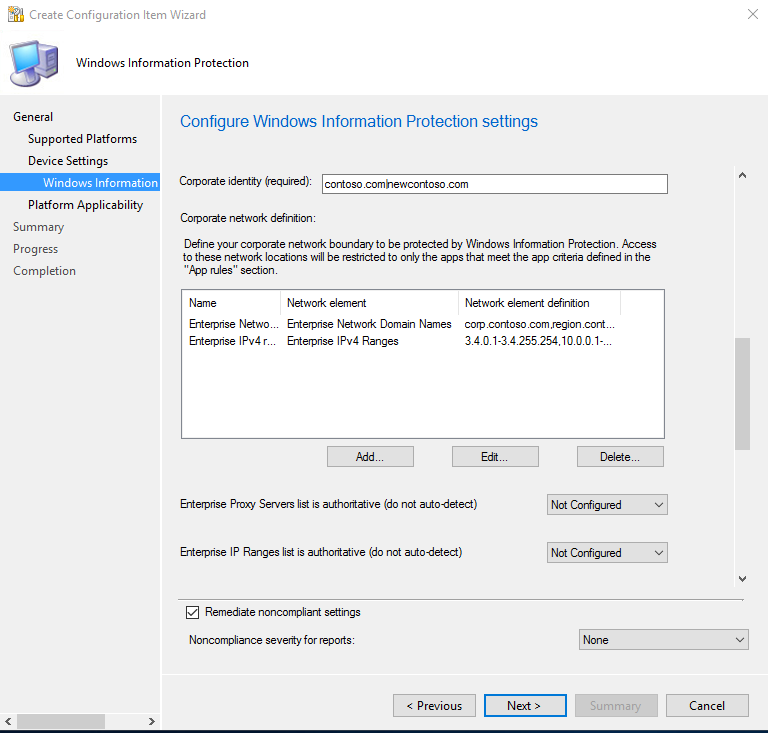
Enterprise Proxy Servers list is authoritative (do not auto-detect). Select this box if you want Windows to treat the proxy servers you specified in the network boundary definition as the complete list of proxy servers available on your network. If you clear this box, Windows will search for additional proxy servers in your immediate network. Not configured is the default option.
Enterprise IP Ranges list is authoritative (do not auto-detect). Select this box if you want Windows to treat the IP ranges you specified in the network boundary definition as the complete list of IP ranges available on your network. If you clear this box, Windows will search for additional IP ranges on any domain-joined devices connected to your network. Not configured is the default option.
Show the Windows Information Protection icon overlay on your allowed apps that are WIP-unaware on corporate files in the File Explorer. Select this box if you want the Windows Information Protection icon overlay to appear on corporate files in the Save As and File Explorer views. Additionally, for unenlightened but allowed apps, the icon overlay also appears on the app tile and with Managed text on the app name in the Start menu. Not configured is the default option.
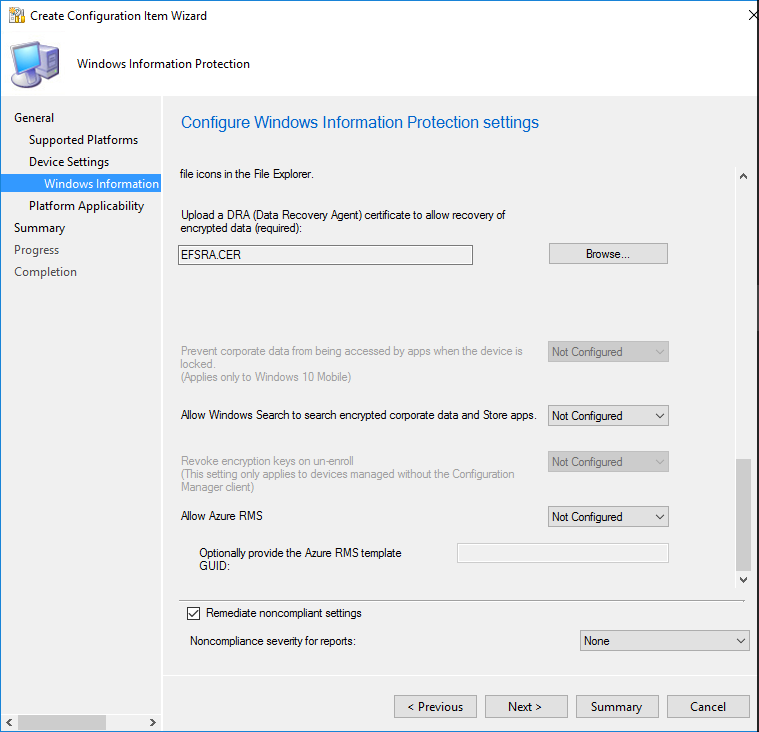
In the required Upload a Data Recovery Agent (DRA) certificate to allow recovery of encrypted data box, select Browse to add a data recovery certificate for your policy.

After you create and deploy your WIP policy to your employees, Windows will begin to encrypt your corporate data on the employees' local device drive. If somehow the employees' local encryption keys get lost or revoked, the encrypted data can become unrecoverable. To help avoid this possibility, the DRA certificate lets Windows use an included public key to encrypt the local data, while you maintain the private key that can unencrypt the data.
For more info about how to find and export your data recovery certificate, see Data Recovery and Encrypting File System (EFS). For more info about creating and verifying your EFS DRA certificate, see Create and verify an Encrypting File System (EFS) Data Recovery Agent (DRA) certificate.
Choose your optional WIP-related settings
After you've decided where your protected apps can access enterprise data on your network, you'll be asked to decide if you want to add any optional WIP settings.
To set your optional settings
Choose to set any or all of the optional settings:
Allow Windows Search to search encrypted corporate data and Store apps. Determines whether Windows Search can search and index encrypted corporate data and Store apps. The options are:
Yes. Allows Windows Search to search and index encrypted corporate data and Store apps.
No, or not configured (recommended). Stops Windows Search from searching and indexing encrypted corporate data and Store apps.
Revoke local encryption keys during the unenrollment process. Determines whether to revoke a user's local encryption keys from a device when it's unenrolled from Windows Information Protection. If the encryption keys are revoked, a user no longer has access to encrypted corporate data. The options are:
Yes, or not configured (recommended). Revokes local encryption keys from a device during unenrollment.
No. Stop local encryption keys from being revoked from a device during unenrollment. For example, if you're migrating between Mobile Device Management (MDM) solutions.
Allow Azure RMS. Enables secure sharing of files by using removable media such as USB drives. For more information about how RMS works with WIP, see Create a WIP policy using Intune. To confirm what templates your tenant has, run Get-AadrmTemplate from the AADRM PowerShell module. If you don't specify a template, WIP uses a key from a default RMS template that everyone in the tenant will have access to.
After you pick all of the settings you want to include, select Summary.
Review your configuration choices in the Summary screen
After you've finished configuring your policy, you can review all of your info on the Summary screen.
To view the Summary screen
Select the Summary button to review your policy choices, and then select Next to finish and to save your policy.
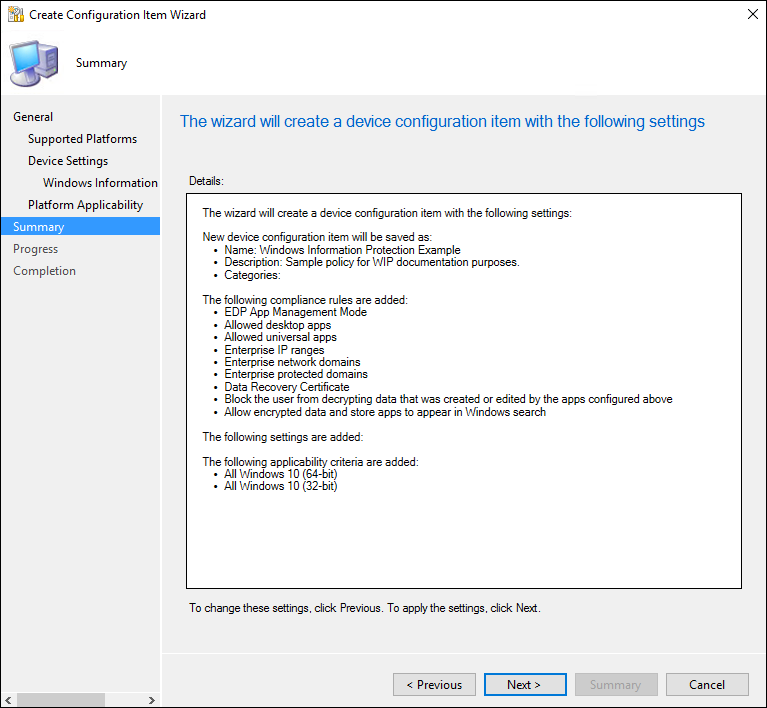
A progress bar appears, showing you progress for your policy. After it's done, select Close to return to the Configuration Items page.
Deploy the WIP policy
After you've created your WIP policy, you'll need to deploy it to your organization's devices. For more information about your deployment options, see the following articles:
Related articles
Feedback
Binnenkort beschikbaar: In de loop van 2024 zullen we GitHub-problemen geleidelijk uitfaseren als het feedbackmechanisme voor inhoud en deze vervangen door een nieuw feedbacksysteem. Zie voor meer informatie: https://aka.ms/ContentUserFeedback.
Feedback verzenden en weergeven voor