AzureML Web Service Parameters
Overview
AzureML Web Service APIs are published from Experiments that are built using modules with configurable parameters. There is often a need to change the module behavior during Web Service execution. The Web Service Parameters feature enables this functionality.
A common example is setting up the Reader module to read from a different source, or the Writer module to write to a different destination. Some other examples include changing the number of bits for Feature Hashing module, or the number of desired features for filter-based feature selection module, or training and generating a forecast with newly incoming data in a time series forecasting scenario, among other things. The parameters can be marked as required or optional at the time of creation.
How to set and use Web Service Parameters
In the following example we’ll walk through setting up and using the feature in AzureML Studio. (Click here to get started with AzureML)
We will first create a predictive Web Service from one of the sample experiments. We will parameterize the API to enable the client calling it to write the results of the prediction to an Azure Storage Blob location different from the one specified in the Experiment. This gives the client control over where to write the results of the prediction.
1. Build a Training experiment and save the Trained Model
a. Start with the Sample 5: Train, Test, Evaluate for Binary Classification: Adult Dataset
b. Click Save As, then name the experiment as Web Service Parameters Example - Training
c. Remove some nodes to simplify the graph (see screenshot below), then Save and Run
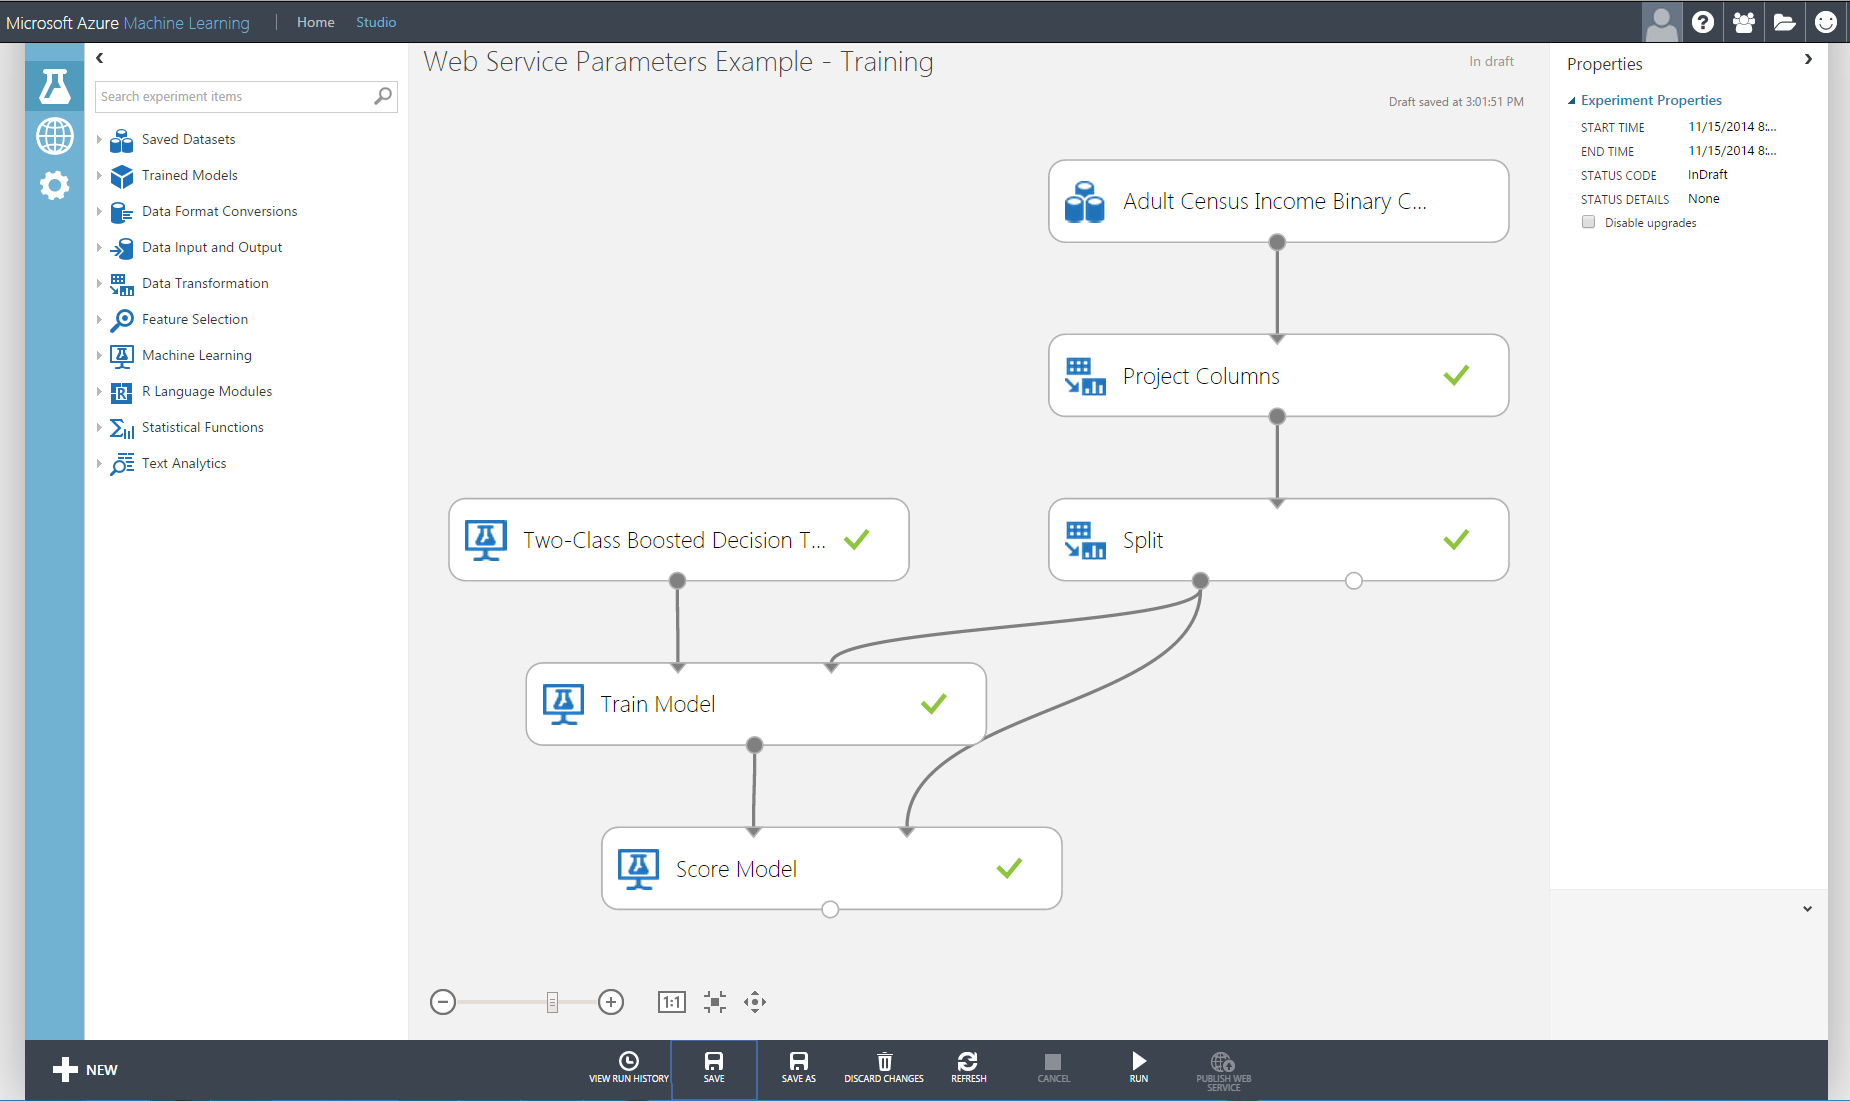
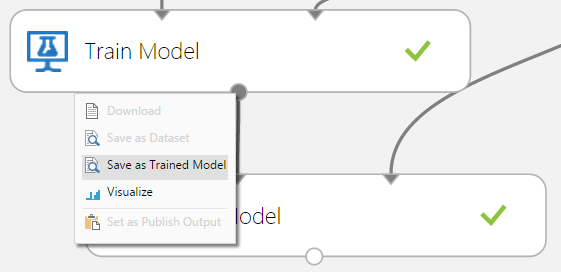
d. After run is done, save the Trained Model by right-clicking on the lower pin of the Train module, then selecting Save As Trained Model. Call it Trained Model Web Service Parameters.
e. Note the newly saved Trained Model in the left menu under Trained Models.
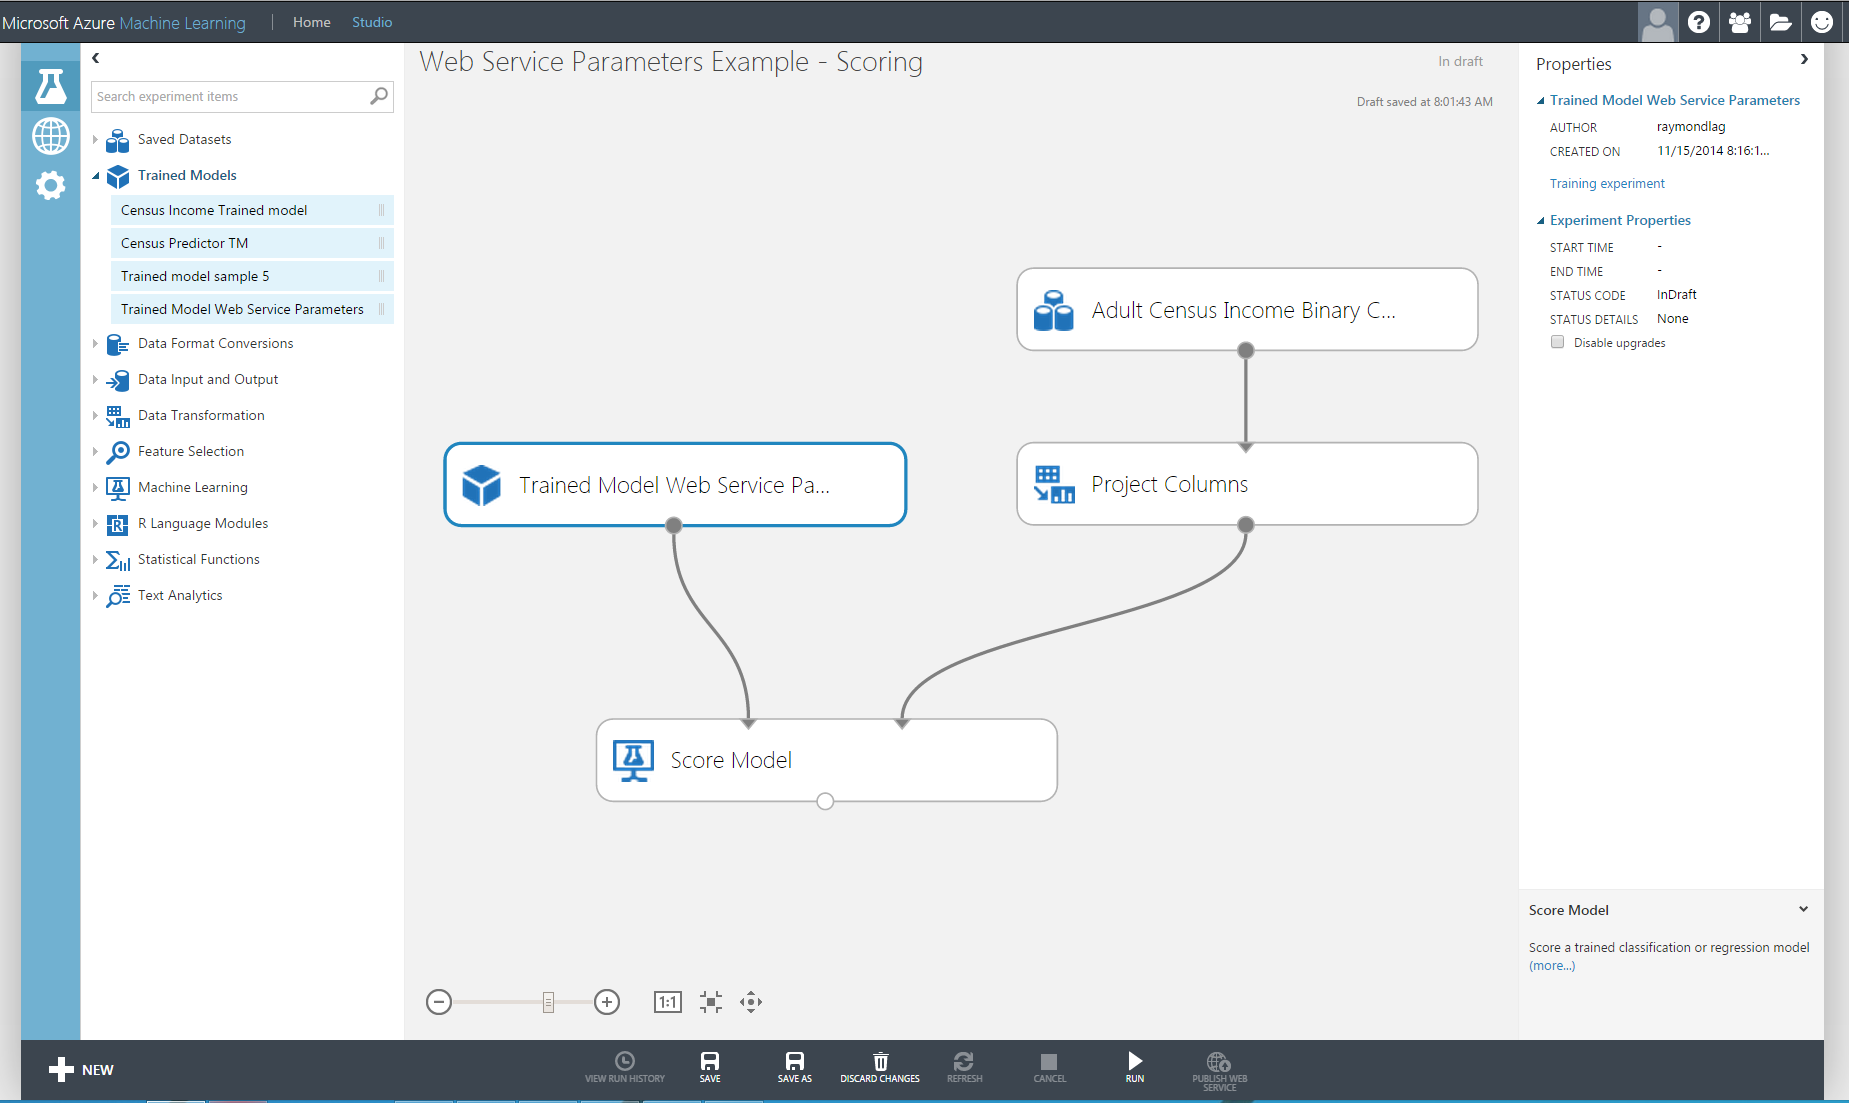
2. Build a Scoring Experiment
Now that we have a Trained Model, we will build a Scoring experiment which we will publish as a Web Service. To do that:
a. Click on Save As and create a copy of the Experiment; call it Web Service Parameters Example – Scoring.
b. From under Trained Models in the left menu, drag the Trained Model Web Service Parameters and add it to the graph.
c. Remove the Two-Class Boosted Decision Tree learning algorithm, the Train and Split modules (we have already trained a model and saved it in the above step so we don’t need to train again).
d. Click on Project Columns and add Income to the list of excluded columns (this is the target value we will predict). The graph should now look like below.
3. Set a Web Service Parameter
Here is where we will use the Web Service Parameters feature to dynamically change the Writer module’s destination at run time.
a. Drag a Writer module under the Score module, then connect Score to Writer.
b. Click on the Writer to select it. Then view its properties on the right hand side of the screen.
c. Enter the account information for AzureBlobStorage option of the data destination. This information is available through the Azure Management Portal’s Storage option. (You would need to set up your Azure Storage in advance for this).
d. Note the icons next to the module properties. Click on the icon next to the Path to blob, and select Set as web service parameter.
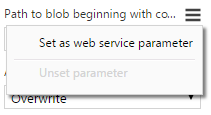
e. Set the path to container1/output1.csv
f. Note the Web Service Parameters list item added to the Properties with the Path to blob beginning with… under it.
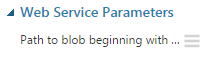
g. To rename the parameter, click on the name and type in blobpath, then hit enter. Note the property’s new name (bottom of the list).
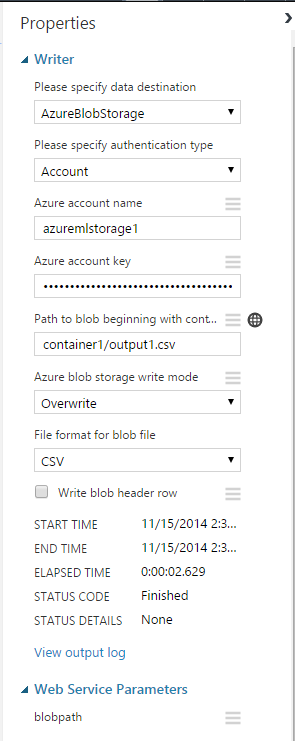
h. Click run.

4. Publish the Web Service
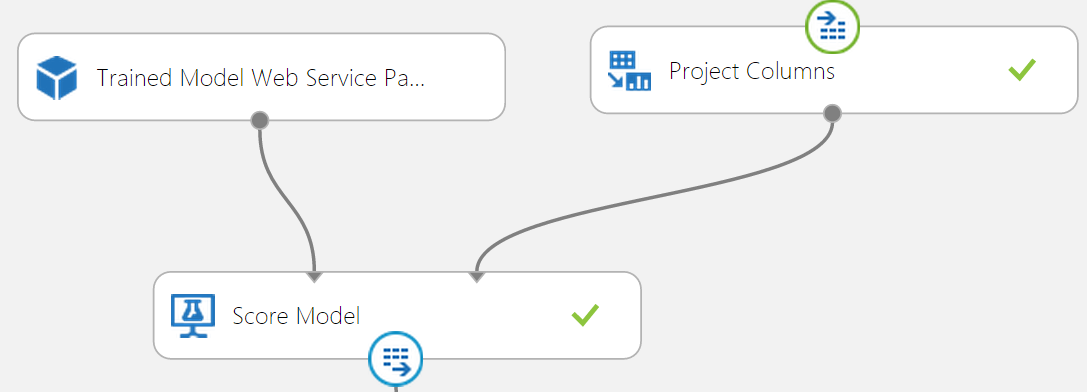
a. Set the Input Port of the Web Service by right-clicking on the input pin (top) of the Project Columns and selecting the Set as Publish Input. Then right-click the output pin of the Score Model and select Set as Publish Output.
b. Click run, then click on Publish Web Service after run is completed successfully.
c. In the resulting Web Service Dashboard, note the API Key. We will copy this into the C# code later.
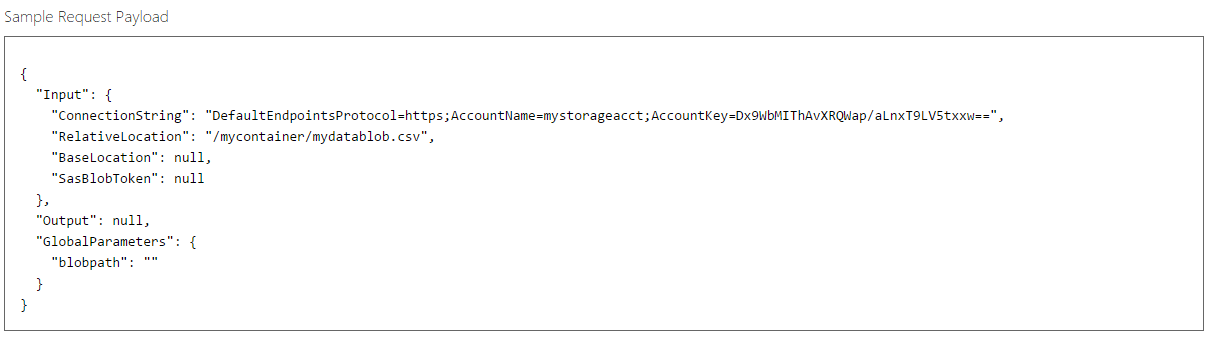
d. Click on the API help page link for the Batch Execution option (second entry). Note the Sample Request Payload shows the newly added parameter – blobpath.
e. Click on the Sample Code link on the Web Service help page to view the C# sample code. We will paste this code into a C# Console client App.
5. Build a client application to call the new Web Service
a. Start Visual Studio, and create a new C# Console Application. (File->New->Project->Windows Desktop->Console Application). Call it AzureMLClientApp.
b. Return to AzureML Studio API help page, and copy the code from the C# sample into the Program.cs file of AzureMLClientApp. (Note and follow the instructions in the sample code about installing libraries and setting references).
c. Update the parameters defined as constants in the code. A few to note:
i. BaseUrl: the Post URL on the Web Service’s API help page for the Batch Execution Service (see Step 4.e above)
ii. StorageAccountKey: the key from Azure Management Portal -> Storage -> Manage Access Keys
iii. StorageContainerName: name of the Storage Container from Azure Management Portal -> Storage -> Containers
iv. InputFileLocation: file location for the input file that we will do prediction on e.g. C:\Temp\censusinput.csv. To download a sample input file used for testing the API, return to the Training or Scoring Experiment created above, and right click on the output pin of the Adult Census Income Binary Classification Dataset (the top first module used in either Experiment), then select Download.
v. OutputFileLocation: file location for local output file generated after prediction e.g. c:\Temp\censusoutput.csv.
vi. apiKey: to get this, in AzureML Studio, click on Web Services in the left menu bar, then click on the Web Service name (Web Parameters Example – Scoring). Then copy the API Key from the Web Service Dashboard.
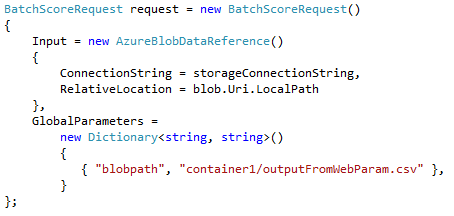
d. Set the Web Service Parameter’s value
In Program.cs file’s InvokeBatchExecutionService method, we set the value of “blobpath” to the desired blob name (e.g. container1/outputFromWebParam.csv). This is will be used as the value of the parameter we had set when setting up the Experiment.
e. Optional: Tweak the final Console.Writeline statement to show the blob path we are passing in

f. Run the C# application
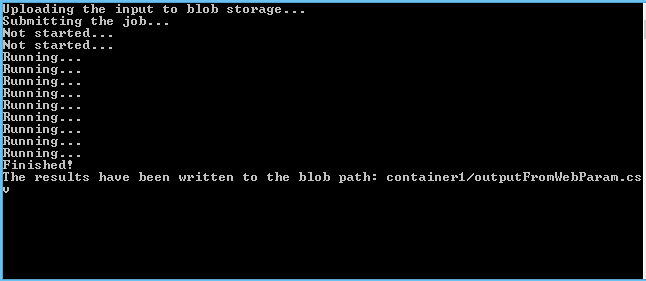
g. Validate the result
The output file containing the prediction results is written to the Storage blob path specified in the client application (in Azure Management Portal -> Storage -> Containers):

Wrapping Up
We walked through setting up the Writer module in an AzureML BES service with a parameter to specify the destination Storage blob path at run time. During that example, we:
Created a Training Experiment and saved a Trained model
Created a Scoring Experiment using the Trained model
Used a Writer module and the new Web Service Parameters feature to set the Storage blob path as an input parameter
Published a Web Service from the Experiment, and used the Batch Execution Service (BES) to do batch prediction on an input file
Used the Web Service Parameter to set the location of the output of the prediction at run time
Wrote to the destination Storage blob path specified by the client application
We will be releasing a new feature in the near future, called Retraining APIs, which will allow programmatic retraining of trained models using this feature by setting the location of input file at run time. We will have more details on that later.
ML Blog Team