Events
Power BI DataViz World Championships
Feb 14, 4 PM - Mar 31, 4 PM
With 4 chances to enter, you could win a conference package and make it to the LIVE Grand Finale in Las Vegas
Learn moreThis browser is no longer supported.
Upgrade to Microsoft Edge to take advantage of the latest features, security updates, and technical support.
In this article, you learn about some common data operations in Power Automate, such as compose, join, select, filter arrays, create tables, and parse JSON. Use these operations to manipulate data when you create flows.
Note
The different sections in this article aren't related and aren't dependent upon each other. The different sections use different examples.
Here's a quick video about data operations.
Use the Data Operation - Compose action to save yourself from having to enter the same data multiple times as you're designing a cloud flow. In this example, you need to enter an array of digits—[0,1,2,3,4,5,6,7,8,9]—several times while you design your flow. You can use the compose action to save the array, as described in the following procedure.

In the Inputs box, enter the array that you want to reference later.

Tip
To make the Compose card easier to find later, rename it by selecting the text Compose on the title bar of the card and entering a name that's easy to remember.
When you need to access the contents of the compose action, do so by following these steps.
Add an action, such as Join - Data Operation.
Select the control to which you'd like to add the contents you saved in the compose action.
The Add dynamic content from the apps and connectors used in this flow screen opens.
On the Dynamic content tab, in the Compose section, select Outputs.

Use the Data Operation - Join action to delimit an array with the separator of your choice. For example, your flow receives a web request that includes the following array of email addresses: ["d@example.com", "k@example.com", "dal@example.com"]. However, your email program requires addresses to be formatted in a single string, separated with semicolons. You use the Data Operation - Join action to change the comma delimiter (,) to a semicolon (;) by following these steps:
Add a new action, search for Join, and then select Data Operation - Join.

In the From box, enter the array, and in the Join with box, enter a semicolon (;).

Save your flow, and then run it.
After your flow runs, the output of the Data Operation – Join action will be a string with the addresses joined by semicolons, as shown in the following screenshot.

Use the Data Operation – Select action to transform the shape of objects in an array. For example, you can add, remove, or rename elements in each object in an array.
Note
Although you can add or remove elements by using the select action, you can't change the number of objects in the array.
In this example, data enters your flow via a web request in this format:
[ { "first": "Eugenia", "last": "Lopez" }, { "first": "Elizabeth", "last": "Moore" } ]
You want to reshape the incoming data by renaming first to FirstName and last to FamilyName, and adding a new member named FullName that combines first and last (separated with a space).
[ { "FirstName": "Eugenia", "FamilyName": "Lopez", "FullName": "Eugenia Lopez" }, { "FirstName": "Elizabeth", "FamilyName": "Moore", "FullName": "Elizabeth Moore" } ]
To do this:
Add the When an HTTP request is received trigger to your flow.
Select Use sample payload to generate schema.

In the box that appears, paste a sample of your source data array, and then select Done.
Add the Data Operation – Select action, and then configure it as shown in the following screenshot.
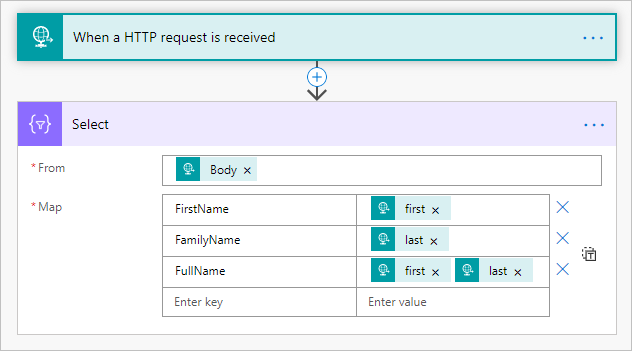
> The output from the select action is an array that contains the newly shaped objects. You can then use this array in any other action, such as the compose action discussed earlier.
Use the Filter array - Data Operation action to reduce the number of objects in an array to a subset that matches the criteria you provide.
Note
In this example, you use the filter array action on this array:
[ { "first": "Eugenia", "last": "Lopez" }, { "first": "Elizabeth", "last": "Moore" } ]
This example creates a new array that contains only objects in which first is set to Eugenia.
Find, and then add, the Filter array action to your flow.
Configure the filter array action as shown in the following screenshot.

Save, and then run your flow.
Use the Create CSV table - Data Operation action to change a JSON array input into a comma-separated value (CSV) table. You can keep the headers visible in the CSV output. In this example, you convert the following array into a CSV table:
[ { "first": "Eugenia", "last": "Lopez" }, { "first": "Elizabeth", "last": "Moore" } ]
Find, add, and then configure the Create CSV table - Data Operation action to resemble the following image.

The Body token in this image comes from a When a HTTP request is received action; however, you can get the input for the Create CSV table action from the output of any previous action in your flow, or you can enter it directly in the From box.
Save, and then run your flow.
When your flow runs, the Create CSV table action displays the output shown in the following screenshot.

Use the Create HTML table - Data Operation action to change a JSON array input into an HTML table. You can keep the headers visible in the HTML output.
To do this, follow the steps in the previous Use the create CSV table action section for creating a CSV table. Use the Create HTML table - Data Operation action instead of Create CSV table.
Tip
If you plan to send the HTML table via email, remember to select IsHtml in the email action.
Events
Power BI DataViz World Championships
Feb 14, 4 PM - Mar 31, 4 PM
With 4 chances to enter, you could win a conference package and make it to the LIVE Grand Finale in Las Vegas
Learn moreTraining
Module
Use Dataverse triggers and actions in Power Automate - Training
Extend Dataverse usability by integrating with Power Automate to reduce or eliminate repetitive business processes.
Certification
Microsoft Certified: Power Automate RPA Developer Associate - Certifications
Demonstrate how to improve and automate workflows with Microsoft Power Automate RPA developer.
Documentation
Use the Apply to each action to process a list of items periodically - Power Automate
Use Power Automate to loop through an array of items to check multiple conditions and take actions based on those conditions.
Use expressions in conditions in Power Automate - Power Automate
Use advanced expressions such as "and", "or", "empty", "less", and "greater" in Power Automate Conditions.
Store and manage values in variables in Power Automate - Power Automate
Learn how to store, manage, use, and pass values by using variables in your flows