Tutorial: Add a multistep form to your page
Multistep forms are a powerful way to collect inputs from users over multiple steps. The collected information is stored or updated in Microsoft Dataverse. Here are features available in multistep form as compared to regular forms:
- Allows data collection or update process to be broken up over multiple steps.
- Provides conditions that dynamically change the flow of the steps based on user inputs.
- Session tracking allows a user to pick up where they left off when following a data update process.
Watch this video (no audio) to see an example of a multistep form on a page:
In this tutorial, you learn how to:
- Create Dataverse tables, views, and forms to use in your multistep form
- Add a multistep form to a web page
- Configure table permissions for multistep forms
- Add a condition and redirect step to a multistep form
Prerequisites
- A Power Pages subscription or trial. Get a Power Pages trial here.
- A Power Pages site created. Create a Power Pages site.
- Complete the Add and design a page tutorial.
- Complete the Display data securely on pages tutorial.
- Complete the Add a form to a page tutorial.
Note
When creating a multistep form, it is important to plan the steps first. This will make the configuration process easier. Establish the individual steps and any conditional branches to the multistep process.
Create a multistep form
In the steps below, we'll create a multistep form, this example follows a simple process to apply for a scholarship, but you can apply the concepts to other business processes.
Here's an outline of the sample steps:
| Step | Description |
|---|---|
| 1 | Select the scholarship to apply for and enter the applicants name. |
| 2 | Fill-in details about the applicant. |
| 3 | Gather some more details. Later in the tutorial, we'll make this step conditional based on information from step 2. |
| 4 | Collect final sign out consent from the user. |
Create Dataverse tables and forms to use in the multistep form
The following video shows how to create forms to use in the multistep form process.
We'll need to store our information of our process in Microsoft Dataverse tables.
For each step of the process that requires a user to create or update columns on a Dataverse record, you'll need to have a corresponding Dataverse form.
In our example, we'll create a Dataverse table called Applications for our process. For more information on how to create Dataverse tables, see How to create and modify Dataverse tables by using the Data workspace
Go to Power Pages.
Select a site where you want to add a multistep form and select Edit.
In the design studio, select the Data workspace.
Create a Dataverse table called Applications with the following properties:
Tip
- The following table is just an example, feel free to create tables to match your own business processes.
Column name Column data type Applicant name Text (rename name column) Scholarship Choice (example choices: American Architect Scholarship, Foreign Language Scholarship,Women in STEM Scholarship, Future Design Leaders Scholarship) Class Level Choice (choices: Junior, Senior) Consent Yes/No Cost of Tuition Currency Degree Type Choice (choices: Masters, Bachelor) Fulltime Yes/No Major Text Other Scholarships Multiple lines of text 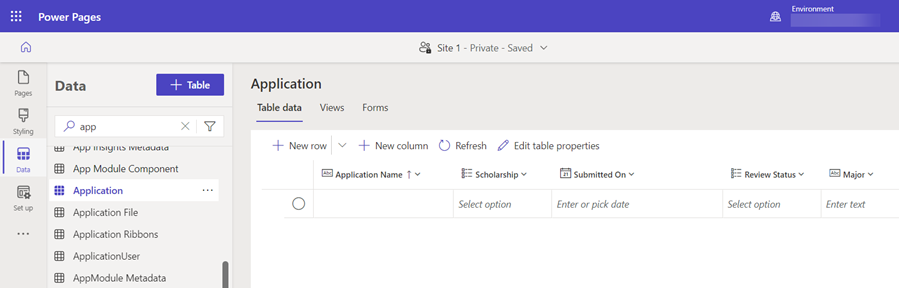
Once you've created the tables, you'll need to create forms for each step of your process.
Tip
- See How to create and modify Dataverse forms by using the Data workspace on how to create Dataverse forms.
- A good practice is to name your forms to correspond to each step of your multistep process.
- To display columns in the form but not allow users to update, configure the columns to be read-only when creating the forms.
Create the following four forms and arrange the columns on the form. As each form is created, select Publish form.
Form name Columns on form Application Step 1 Scholarship, Applicant name Application Step 2 Scholarship (read-only), Applicant name (read-only), Degree Type, Major, Full-time, Class Level, Stem Application Step 3 Scholarship (read-only), Applicant name (read-only), Cost of Tuition, Other Scholarships Application Step 4 Scholarship (read-only), Applicant name (read-only), Consent 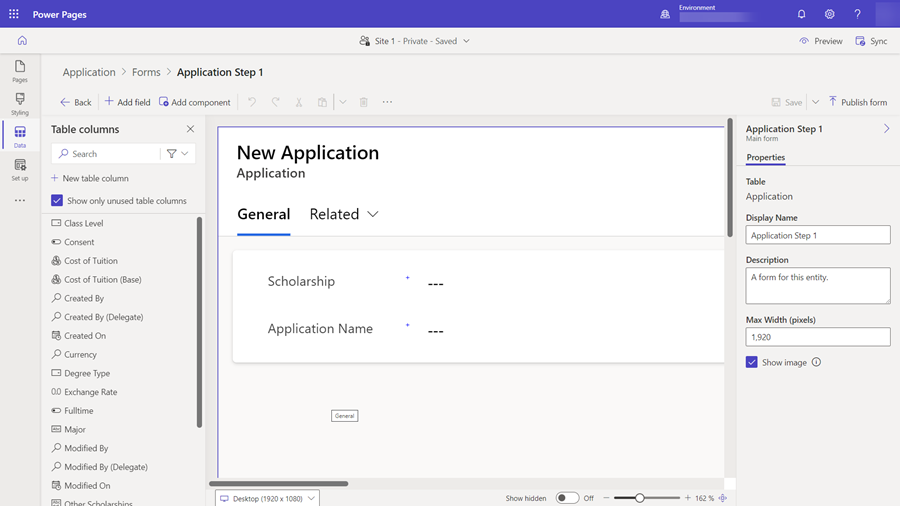
You should now have a series of forms to use in your multistep process.

Add a multistep form component to a page
Now that we have our table and forms, we can create a multistep form on a webpage.
This video shows how to create a multistep form on a page.
Go to the Pages workspace and add a new page or edit an existing page. For more information on creating webpages, see Create and design pages.
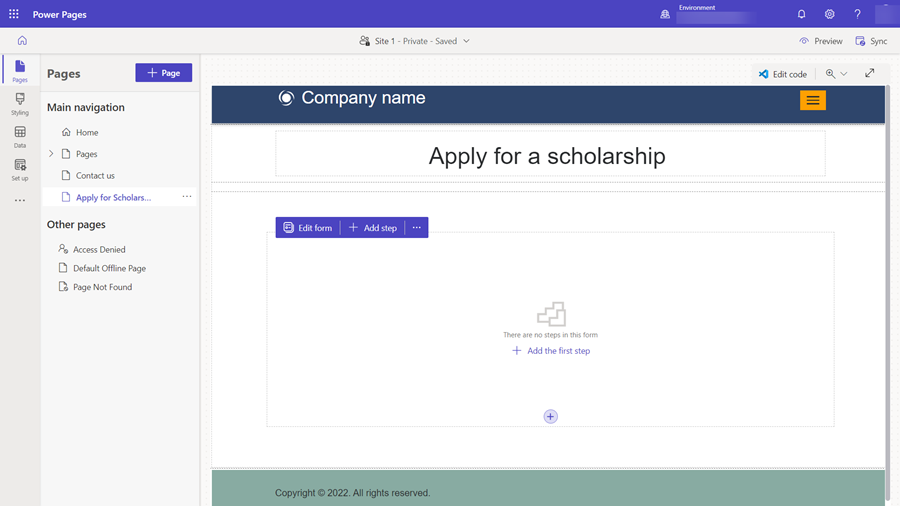
Add a new section and select the Multistep form component.
If other multistep forms exist on your site, you'll be given the option to add them to your page. In our example, we'll create a new multistep form for our tutorial, Select + New multistep form from the dialog.
You'll see the Add a multistep form window. Enter in Application (or other name) for the Form name. Select OK.
There will be no steps in the form. Select + Add the first step to add the first step.
In the Add step window, enter the following values in the configuration:
- In the Step name field, enter Application Step 1.
- In the Choose a table field select Application (or whatever you named your table).
- In the Select a form field, select Application Step 1 .
Choose the More options side tab and note that the Data from this form: option is automatically set to Create a new record. In our example for the first step we'll be creating a new record in the Dataverse table. Note that in subsequent steps we'll be modifying the record created in the first step and this option will be different.
Select OK.
We'll begin to add more steps. From the menu, select + Add step.
In the Add step window, enter the following values for the second step:
- In the Step name field, enter Application Step 2.
- In the Choose a table field the Application table (or whatever you named your table) should already be selected.
- In the Select a form field, select Application Step 2 .
Choose the More options side tab and note that the Data from this form: option is automatically set to Update an existing record. In our example for, the second step will continue to add details to the Dataverse record created in the first step.
Note
Depending on your unique processes, you may be creating or updating different Dataverse records at different steps in the process.
Select OK
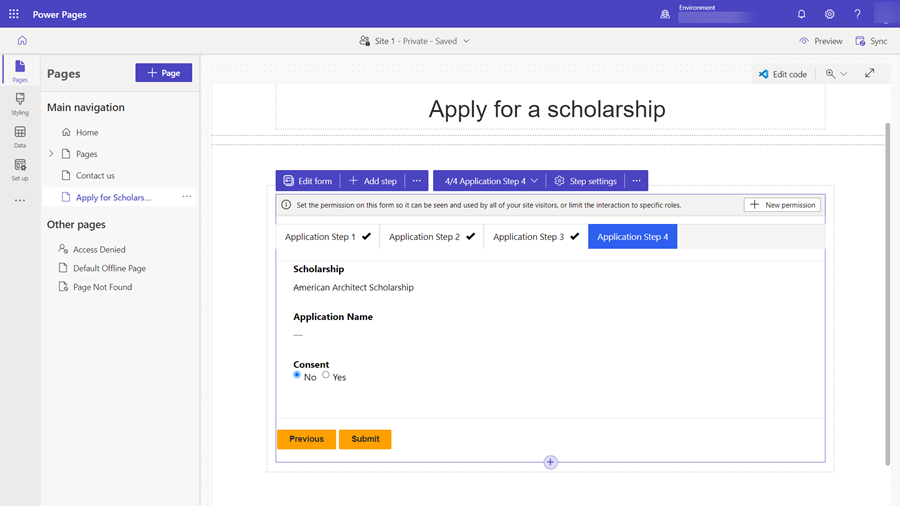
Continue to add the remaining two steps as update steps, Application Step 3 and Application Step 4 following the instructions above.
Edit field properties
You can modify some of the field properties on your multistep form in the design studio. Let's make a field required, update the label and add a description.
Select a field on the multistep form component on the page.
Select Edit field.
In the Edit field window, change the Field label to another value. Select Make this field required and select Show a description. Enter some instructions in the Description field.
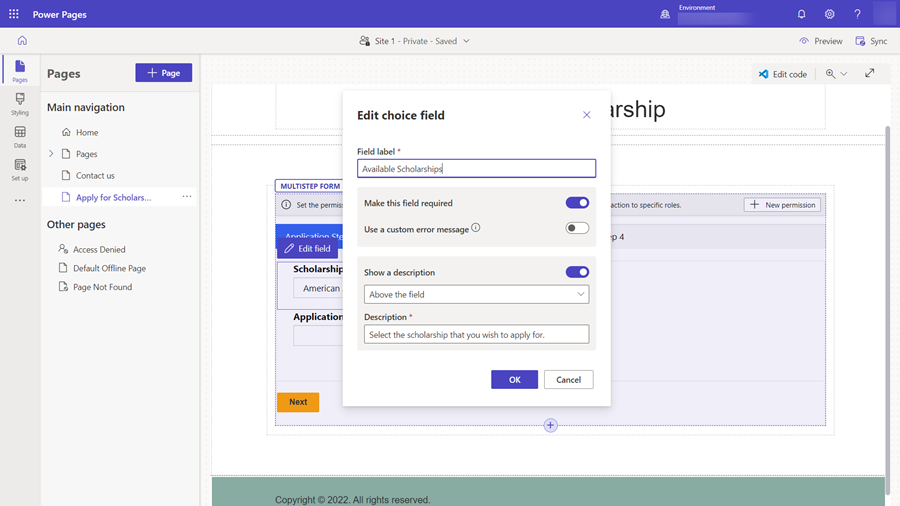
Select OK.
Add table permission
By default, visitors to the site won't be able to access the multistep form. In our example, we would only want to allow authenticated users to fill in the multistep form. You can use a combination of web roles and table permissions to configure create, read, and update data actions for your own multistep process.
This video shows how to configure table permissions for multistep forms.
For new forms, a banner will appear prompting you to add permissions.
If you have already configured permissions for the table used in your multistep form, you can select the ellipse (...) and choose Permissions.
Select + New permission.
The table permission provides a name, the table selected and the Access type set to Global access by default. The Write and Create permissions will be selected so site visitors can use the form.
Select + Add roles and select Authenticated Users as the default role.

Select Save.
Testing your multistep form
At this point you can try out your multistep form.
Select Preview, followed by Desktop.
When the home page appears, select Sign in and sign in with a site user. See Provide access to external audiences for more information.
Select the page where you placed your multistep form component.
Try the process as a user and go through the steps.
If you encounter any issues, review the configuration in design studio and review each step.
Once you've successfully submitted the form, return to the design studio.
Select Data, then select the Application table (or whatever you had named your table) and confirm that you can see that records were created using the multistep form process.
Add a conditional step to your multistep form
If you need to add conditional logic to your multistep form, you first need to identify the condition by viewing the Dataverse column logical name and the evaluation you want to perform. The logical name of a column can be found by viewing the column configuration in Data workspace.
In our example below, we'll check to see if an applicant is pursuing a Masters degree. If a user is pursuing an advanced degree, they'll be directed to extra steps. Other applicants will skip that step. Feel free to add a condition based on your own business processes.
We'll evaluate whether the Degree Type field has a value of Bachelor or Master, represented by the logical name of the field craxx_degreetype and the choice values (Master = '124860001').
Conditional steps are configured in the Portal Management app.
In the design studio, on the multistep form, select the dropdown listing all the steps of the multistep form, choose the Portal Management App link.
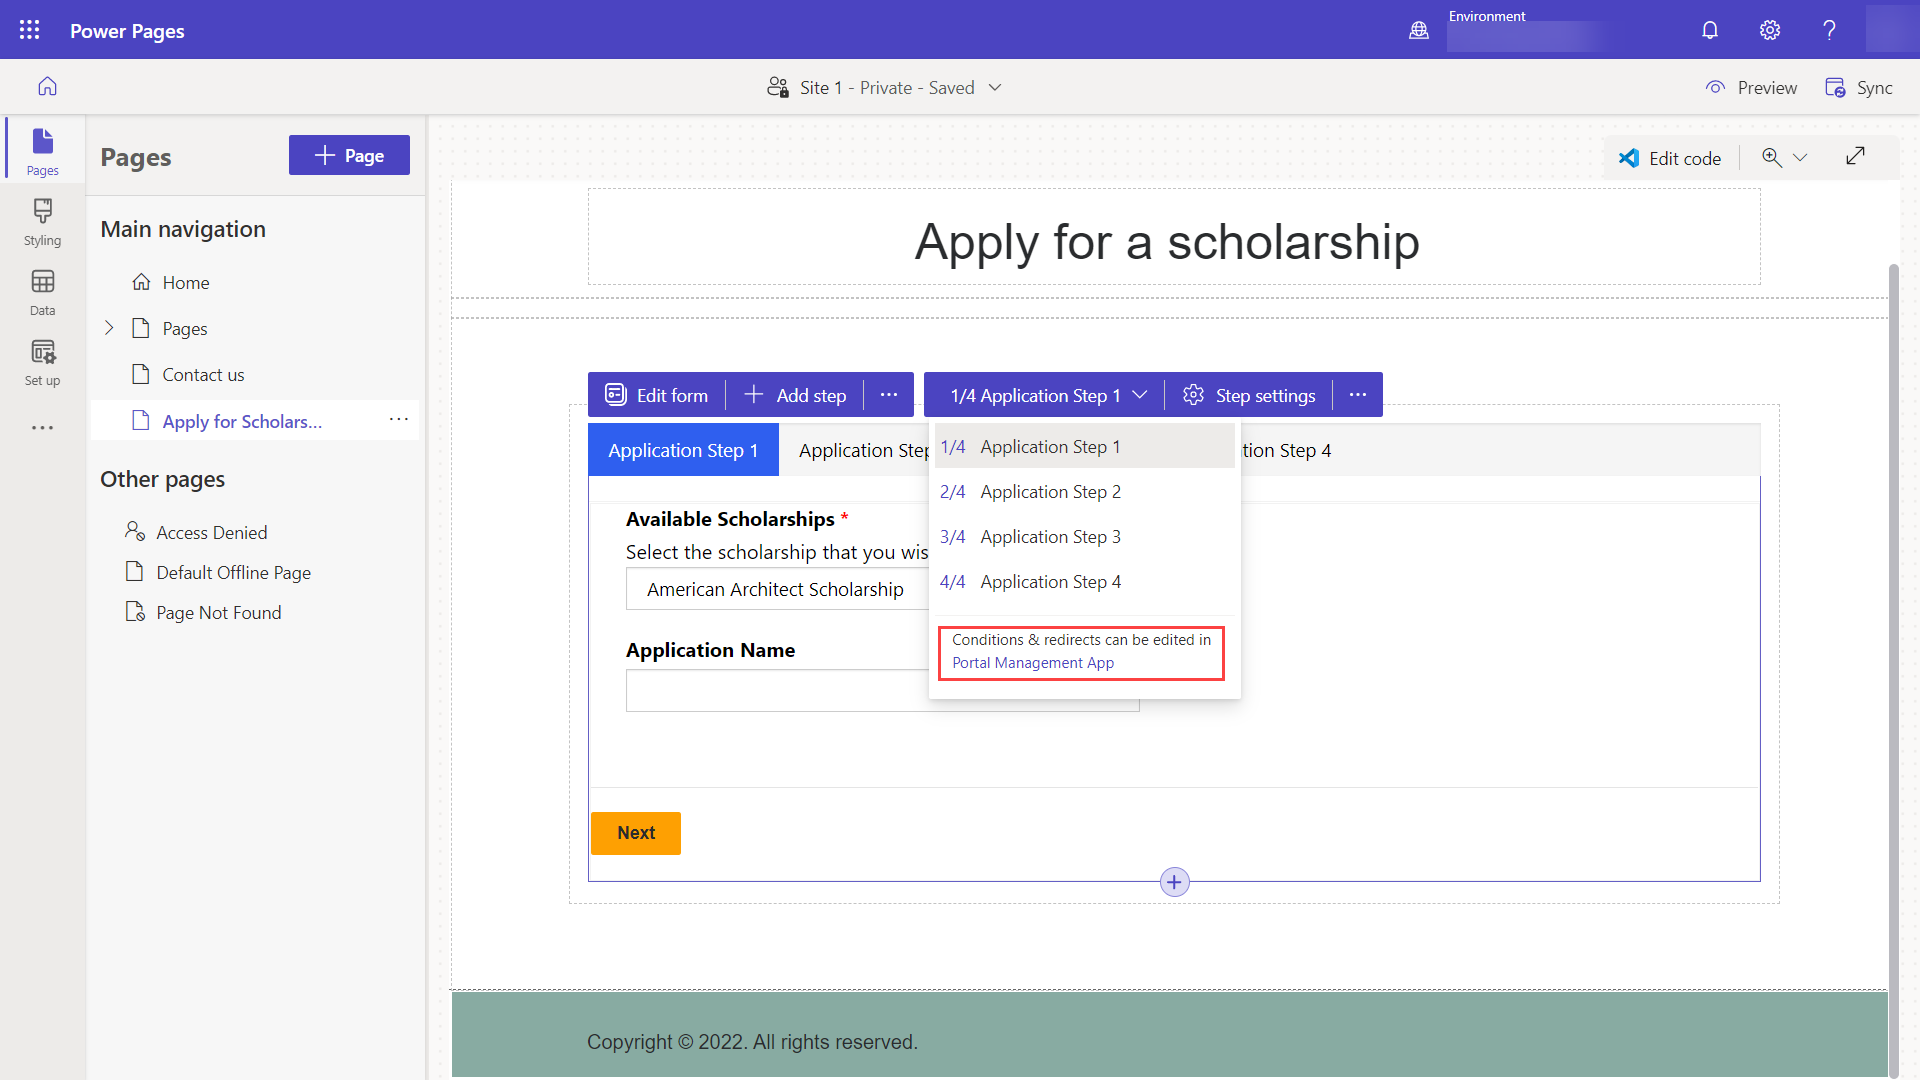
You should be in the Portal Management app in the metadata record for your multistep form. Select the Form Steps tab.
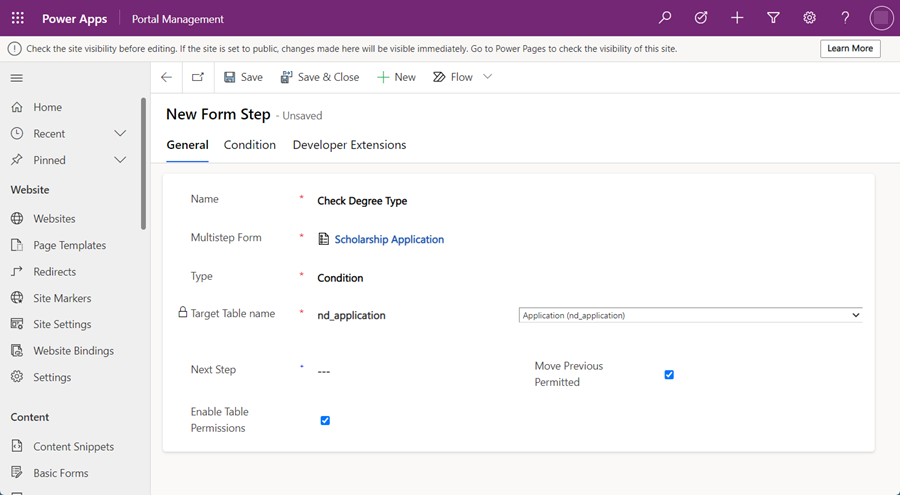
Select + New Form Step.
Give the step a name (for example, Check degree type).
Specify the configurations.
- Set Type to Condition.
- Select the application table from the Target Table name drop-down menu.
Select the Condition tab and enter the condition using the logical column name and a value. In our example, we would have something similar to
craxx_degreetype == 124860001(You need to specify your logical name and value from your own environment.)
We need set up the process to go to a step if the condition isn't met. Select Application Step 4 in the Next Step If Condition Fails field.
Now we need to set up the process to go a specific step if the condition is met. Select the General tab.
In the Next Step field, select Application Step 3.
Select Save & Close
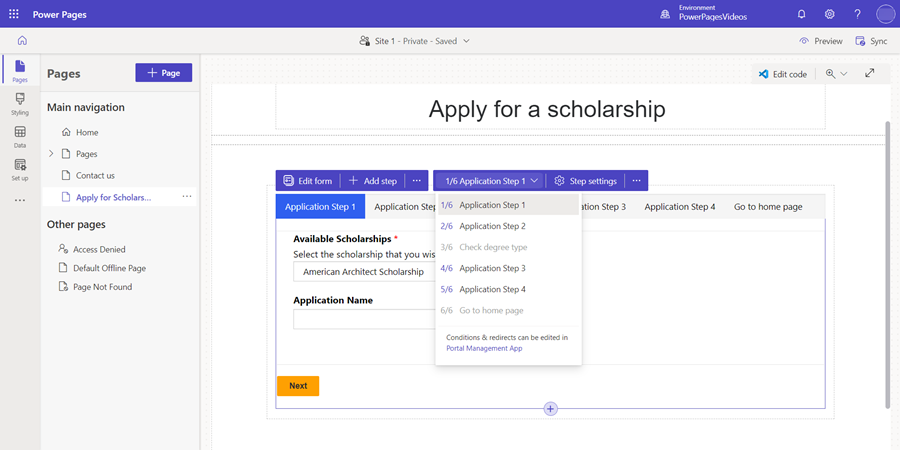
You should now see your conditional step in the list of steps. We need to make sure our user will reach the conditional step after completing the second step. Select Application Step 2 and select Edit.
In the Next Step field, change the value from Application Step 3 to Check degree type.
Select the Form Definition tab and in the Source Type field select Result From Previous Step and in the Entity Source Step field select Application Step 1.
Select Save & Close.
Add a redirect step to your multistep form
We'll also add a redirect step at the end of the process to navigate the user back to the home page.
Select + New Form Step and fill in the following configuration:
- Set the Name to Go to home page*
- Set the Type to Redirect
Select the Redirect tab.
In the or Web Page field, select the Home page.
Select Save & Close.
You should now see your redirect step in the list of steps. We need to make sure our user will reach the redirect step after completing the last step in the process. Select Application Step 4 and select Edit.
In the Next Step field, select Go to home page.
Select the Form Definition tab and in the Source Type field select Result From Previous Step and in the Entity Source Step field select Application Step 2.
Tip
We choose an earlier step in the process (Application Step 2) as users will arrive at this step from either the second step or the third step depending on the condition, we want to choose a common step that all users will have interacted with.
Select Save & Close.
Return the design studio and select the Sync button.
You should have a complete multistep form with steps, conditions, and a redirect.
Select Preview, followed by Desktop.
When the home page appears, select Sign in and sign in with a site user.
Select the page where you placed your multistep form component.
Try various combinations of the process to see how the multistep form works.
See Also
Feedback
Coming soon: Throughout 2024 we will be phasing out GitHub Issues as the feedback mechanism for content and replacing it with a new feedback system. For more information see: https://aka.ms/ContentUserFeedback.
Submit and view feedback for