Crie aplicativos para Android com o Microsoft Graph
Este tutorial ensina como criar um aplicativo Android que usa a API do Microsoft Graph para recuperar informações de calendário para um usuário.
Dica
Se você preferir apenas baixar o tutorial concluído, poderá baixar ou clonar o GitHub repositório.
Pré-requisitos
Antes de iniciar este tutorial, você deve ter o Android Studio instalado em sua máquina de desenvolvimento.
Você também deve ter uma conta pessoal da Microsoft com uma caixa de correio em Outlook.com, ou uma conta de trabalho ou de estudante da Microsoft. Se você não tiver uma conta da Microsoft, há algumas opções para obter uma conta gratuita:
- Você pode se inscrever em uma nova conta pessoal da Microsoft.
- Você pode se inscrever no programa Microsoft 365 desenvolvedor para obter uma assinatura Microsoft 365 gratuita.
Observação
Este tutorial foi escrito com o Android Studio versão 4.1.3 e o SDK do Android 10.0. As etapas neste guia podem funcionar com outras versões, mas que não foram testadas.
Comentários
Forneça qualquer comentário sobre este tutorial no repositório GitHub.
Crie um aplicativo Android
Comece criando um novo projeto do Android Studio.
Abra o Android Studio e selecione Iniciar um novo projeto do Android Studio na tela de boas-vindas.
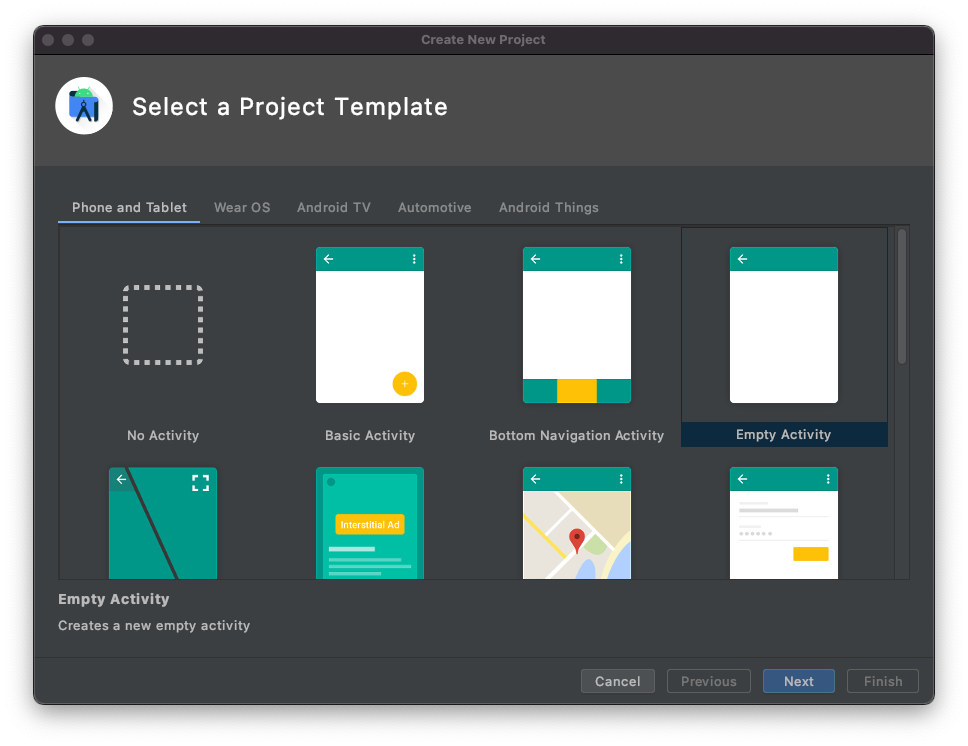
Na caixa de diálogo Criar novo Project, selecione Atividade Vazia e selecione Próximo.
Na caixa de diálogo Configurar seu projeto, de configure o nome
Graph Tutorialcomo , verifique se o campo IdiomaJavaestá definido como , e verifique se o nível mínimo da API está definido comoAPI 29: Android 10.0 (Q). Modifique o nome do pacote e salve o local conforme necessário. Selecione Concluir.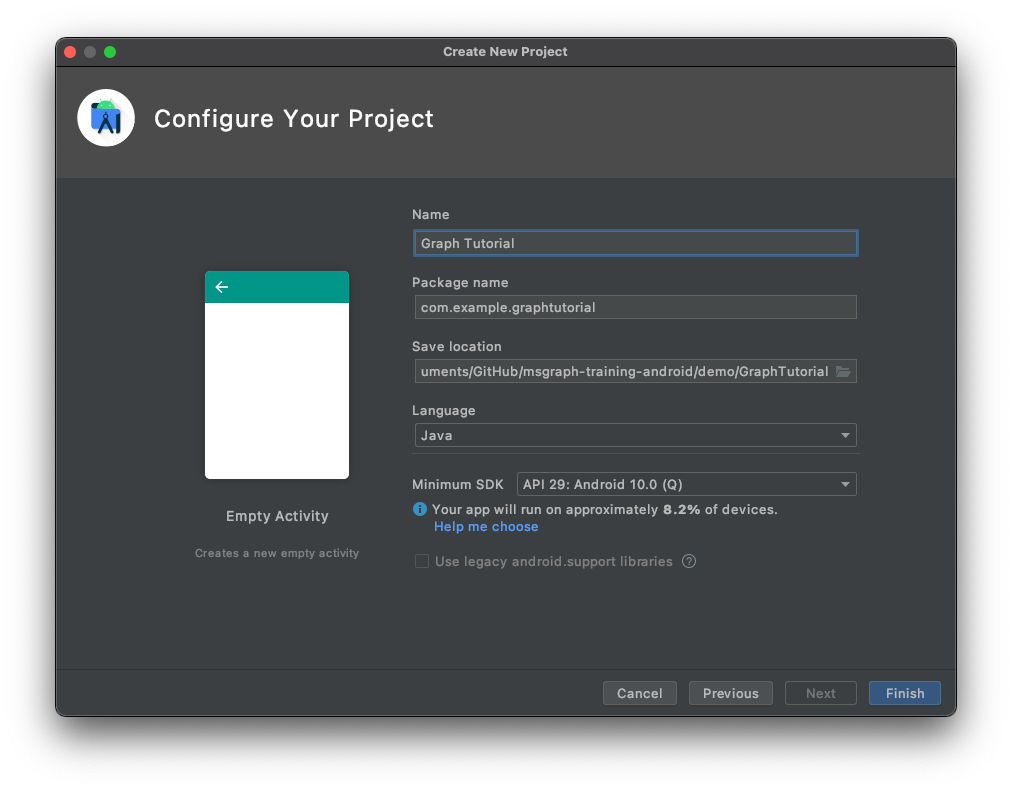
Importante
O código e as instruções neste tutorial usam o nome do pacote com.example.graphtutorial. Se você usar um nome de pacote diferente ao criar o projeto, certifique-se de usar o nome do pacote onde quer que você veja esse valor.
Instalar dependências
Antes de continuar, instale algumas dependências adicionais que você usará mais tarde.
com.google.android.material:materialpara disponibilizar o modo de exibição de navegação para o aplicativo.- Biblioteca de Autenticação da Microsoft (MSAL) para Android para lidar com a autenticação do Azure AD e o gerenciamento de tokens.
- Microsoft Graph SDK para Java para fazer chamadas para o microsoft Graph.
Expanda Scripts gradle e abra build.gradle (Module: Graph_Tutorial.app).
Adicione as seguintes linhas dentro do
dependenciesvalor.implementation 'com.google.android.material:material:1.3.0' implementation 'com.microsoft.identity.client:msal:2.0.8' implementation ('com.microsoft.graph:microsoft-graph:3.1.0') { exclude group: 'javax.activation' }Adicione um
packagingOptionsvalor dentro doandroidvalor em build.gradle (Module: Graph_Tutorial.app).packagingOptions { pickFirst 'META-INF/*' }Adicione o repositório do Azure Maven para a biblioteca MicrosoftDeviceSDK, uma dependência do MSAL. Abra build.gradle (Project: Graph_Tutorial). Adicione o seguinte ao valor
repositoriesdentro doallprojectsvalor.maven { url 'https://pkgs.dev.azure.com/MicrosoftDeviceSDK/DuoSDK-Public/_packaging/Duo-SDK-Feed/maven/v1' }Salve suas alterações. No menu Arquivo, selecione Sincronizar Project arquivos gradle.
Design do aplicativo
O aplicativo usará uma gaveta de navegação para navegar entre diferentes exibições. Nesta etapa, você atualizará a atividade para usar um layout da gaveta de navegação e adicionará fragmentos para os exibições.
Criar uma gaveta de navegação
Nesta seção, você criará ícones para o menu de navegação do aplicativo, criará um menu para o aplicativo e atualizará o tema e o layout do aplicativo para ser compatível com uma gaveta de navegação.
Criar ícones
Clique com o botão direito do mouse na pasta app/res/drawable e selecione Novo e, em seguida, Vector Asset.
Clique no botão ícone ao lado de Clip Art.
Na janela Selecionar Ícone , digite na
homebarra de pesquisa e selecione o ícone Home e selecione OK.Altere o nome para
ic_menu_home.
Selecione Próximo e , em seguida, Concluir.
Repita a etapa anterior para criar mais quatro ícones.
- Nome:
ic_menu_calendar, Ícone:event - Nome:
ic_menu_add_event, Ícone:add box - Nome:
ic_menu_signout, Ícone:exit to app - Nome:
ic_menu_signin, Ícone:person add
- Nome:
Criar o menu
Clique com o botão direito do mouse na pasta res e selecione Novo e, em seguida, Diretório de Recursos do Android.
Altere o tipo de recurso para
menue selecione OK.Clique com o botão direito do mouse na nova pasta de menus e selecione Novo e, em seguida, menu arquivo de recurso.
Nomeia o arquivo
drawer_menue selecione OK.Quando o arquivo for aberto, selecione a guia Código para exibir o XML e substitua todo o conteúdo pelo seguinte.
<?xml version="1.0" encoding="utf-8"?>
<menu xmlns:android="http://schemas.android.com/apk/res/android"
    xmlns:tools="http://schemas.android.com/tools"
    tools:showIn="navigation_view">

    <group android:checkableBehavior="single">
        <item
            android:id="@+id/nav_home"
            android:icon="@drawable/ic_menu_home"
            android:title="Home" />

        <item
            android:id="@+id/nav_calendar"
            android:icon="@drawable/ic_menu_calendar"
            android:title="Calendar" />

        <item
            android:id="@+id/nav_create_event"
            android:icon="@drawable/ic_menu_add_event"
            android:title="New Event" />

        <item
            android:id="@+id/nav_signout"
            android:icon="@drawable/ic_menu_signout"
            android:title="Sign Out" />

        <item
            android:id="@+id/nav_signin"
            android:icon="@drawable/ic_menu_signin"
            android:title="Sign In" />
    </group>
</menu>
Atualizar o tema e o layout do aplicativo
Abra o arquivo app/res/values/themes.xml e adicione as seguintes linhas dentro do
styleelemento.<item name="windowActionBar">false</item> <item name="windowNoTitle">true</item>Abra o arquivo app/res/values-night/themes.xml e adicione as seguintes linhas dentro do
styleelemento.<item name="windowActionBar">false</item> <item name="windowNoTitle">true</item>Clique com o botão direito do mouse na pasta aplicativo/res/layout .
Selecione Novo e, em seguida, Arquivo de recurso layout.
Nomeia o arquivo
nav_headere altere o elemento Root paraLinearLayout, em seguida, selecione OK.Abra o nav_header.xml e selecione a guia Código. Substitua todo o conteúdo pelo seguinte.
<?xml version="1.0" encoding="utf-8"?>
<LinearLayout xmlns:android="http://schemas.android.com/apk/res/android"
    android:layout_width="match_parent"
    android:layout_height="176dp"
    android:background="?colorPrimary"
    android:gravity="bottom"
    android:orientation="vertical"
    android:padding="16dp"
    android:theme="@style/Theme.GraphTutorial">

    <ImageView
        android:id="@+id/user_profile_pic"
        android:layout_width="wrap_content"
        android:layout_height="wrap_content"
        android:src="@mipmap/ic_launcher" />

    <TextView
        android:id="@+id/user_name"
        android:layout_width="wrap_content"
        android:layout_height="wrap_content"
        android:paddingTop="8dp"
        android:text="Test User"
        android:textColor="?colorOnPrimary"
        android:textAppearance="@style/TextAppearance.AppCompat.Body1" />

    <TextView
        android:id="@+id/user_email"
        android:layout_width="wrap_content"
        android:layout_height="wrap_content"
        android:text="test@contoso.com"
        android:textColor="?colorOnPrimary" />

</LinearLayout>
Abra o arquivo app/res/layout/activity_main.xml e atualize o layout para um
DrawerLayoutsubstituindo o XML existente pelo seguinte.<?xml version="1.0" encoding="utf-8"?> <androidx.drawerlayout.widget.DrawerLayout xmlns:android="http://schemas.android.com/apk/res/android" xmlns:app="http://schemas.android.com/apk/res-auto" xmlns:tools="http://schemas.android.com/tools" android:id="@+id/drawer_layout" android:layout_width="match_parent" android:layout_height="match_parent" android:fitsSystemWindows="true" tools:context=".MainActivity" tools:openDrawer="start"> <RelativeLayout android:layout_width="match_parent" android:layout_height="match_parent" android:orientation="vertical"> <ProgressBar android:id="@+id/progressbar" android:layout_width="75dp" android:layout_height="75dp" android:layout_centerInParent="true" android:visibility="gone"/> <androidx.appcompat.widget.Toolbar android:id="@+id/toolbar" android:layout_width="match_parent" android:layout_height="?attr/actionBarSize" android:background="?colorPrimary" app:titleTextColor="?colorOnPrimary" android:elevation="4dp" android:theme="@style/Theme.GraphTutorial" /> <FrameLayout android:id="@+id/fragment_container" android:layout_width="match_parent" android:layout_height="match_parent" android:layout_below="@+id/toolbar" /> </RelativeLayout> <com.google.android.material.navigation.NavigationView android:id="@+id/nav_view" android:layout_width="wrap_content" android:layout_height="match_parent" android:layout_gravity="start" app:headerLayout="@layout/nav_header" app:menu="@menu/drawer_menu" /> </androidx.drawerlayout.widget.DrawerLayout>Abra app/res/values/strings.xml e adicione os seguintes elementos dentro do
resourceselemento.<string name="navigation_drawer_open">Open navigation drawer</string> <string name="navigation_drawer_close">Close navigation drawer</string>Abra o arquivo app/java/com.example/graphtutorial/MainActivity e substitua todo o conteúdo pelo seguinte.
package com.example.graphtutorial;

import android.os.Bundle;
import android.view.Menu;
import android.view.MenuItem;
import android.view.View;
import android.widget.FrameLayout;
import android.widget.ProgressBar;
import android.widget.TextView;
import androidx.annotation.NonNull;
import androidx.appcompat.app.ActionBarDrawerToggle;
import androidx.appcompat.app.AppCompatActivity;
import androidx.appcompat.widget.Toolbar;
import androidx.core.view.GravityCompat;
import androidx.drawerlayout.widget.DrawerLayout;
import com.google.android.material.navigation.NavigationView;

public class MainActivity extends AppCompatActivity implements NavigationView.OnNavigationItemSelectedListener {
    private static final String SAVED_IS_SIGNED_IN = "isSignedIn";
    private static final String SAVED_USER_NAME = "userName";
    private static final String SAVED_USER_EMAIL = "userEmail";
    private static final String SAVED_USER_TIMEZONE = "userTimeZone";

    private DrawerLayout mDrawer;
    private NavigationView mNavigationView;
    private View mHeaderView;
    private boolean mIsSignedIn = false;
    private String mUserName = null;
    private String mUserEmail = null;
    private String mUserTimeZone = null;

    @Override
    protected void onCreate(Bundle savedInstanceState) {
        super.onCreate(savedInstanceState);
        setContentView(R.layout.activity_main);

        // Set the toolbar
        Toolbar toolbar = findViewById(R.id.toolbar);
        setSupportActionBar(toolbar);

        mDrawer = findViewById(R.id.drawer_layout);

        // Add the hamburger menu icon
        ActionBarDrawerToggle toggle = new ActionBarDrawerToggle(this, mDrawer, toolbar,
                R.string.navigation_drawer_open, R.string.navigation_drawer_close);
        mDrawer.addDrawerListener(toggle);
        toggle.syncState();

        mNavigationView = findViewById(R.id.nav_view);

        // Set user name and email
        mHeaderView = mNavigationView.getHeaderView(0);
        setSignedInState(mIsSignedIn);

        // Listen for item select events on menu
        mNavigationView.setNavigationItemSelectedListener(this);

        if (savedInstanceState == null) {
            // Load the home fragment by default on startup
            openHomeFragment(mUserName);
        } else {
            // Restore state
            mIsSignedIn = savedInstanceState.getBoolean(SAVED_IS_SIGNED_IN);
            mUserName = savedInstanceState.getString(SAVED_USER_NAME);
            mUserEmail = savedInstanceState.getString(SAVED_USER_EMAIL);
            mUserTimeZone = savedInstanceState.getString(SAVED_USER_TIMEZONE);
            setSignedInState(mIsSignedIn);
        }
    }

    @Override
    protected void onSaveInstanceState(@NonNull Bundle outState) {
        super.onSaveInstanceState(outState);
        outState.putBoolean(SAVED_IS_SIGNED_IN, mIsSignedIn);
        outState.putString(SAVED_USER_NAME, mUserName);
        outState.putString(SAVED_USER_EMAIL, mUserEmail);
        outState.putString(SAVED_USER_TIMEZONE, mUserTimeZone);
    }

    @Override
    public boolean onNavigationItemSelected(@NonNull MenuItem menuItem) {
        // TEMPORARY
        return false;
    }

    @Override
    public void onBackPressed() {
        if (mDrawer.isDrawerOpen(GravityCompat.START)) {
            mDrawer.closeDrawer(GravityCompat.START);
        } else {
            super.onBackPressed();
        }
    }

    public void showProgressBar()
    {
        FrameLayout container = findViewById(R.id.fragment_container);
        ProgressBar progressBar = findViewById(R.id.progressbar);
        container.setVisibility(View.GONE);
        progressBar.setVisibility(View.VISIBLE);
    }

    public void hideProgressBar()
    {
        FrameLayout container = findViewById(R.id.fragment_container);
        ProgressBar progressBar = findViewById(R.id.progressbar);
        progressBar.setVisibility(View.GONE);
        container.setVisibility(View.VISIBLE);
    }

    // Update the menu and get the user's name and email
    private void setSignedInState(boolean isSignedIn) {
        mIsSignedIn = isSignedIn;

        mNavigationView.getMenu().clear();
        mNavigationView.inflateMenu(R.menu.drawer_menu);

        Menu menu = mNavigationView.getMenu();

        // Hide/show the Sign in, Calendar, and Sign Out buttons
        if (isSignedIn) {
            menu.removeItem(R.id.nav_signin);
        } else {
            menu.removeItem(R.id.nav_home);
            menu.removeItem(R.id.nav_calendar);
            menu.removeItem(R.id.nav_create_event);
            menu.removeItem(R.id.nav_signout);
        }

        // Set the user name and email in the nav drawer
        TextView userName = mHeaderView.findViewById(R.id.user_name);
        TextView userEmail = mHeaderView.findViewById(R.id.user_email);

        if (isSignedIn) {
            // For testing
            mUserName = "Lynne Robbins";
            mUserEmail = "lynner@contoso.com";
            mUserTimeZone = "Pacific Standard Time";

            userName.setText(mUserName);
            userEmail.setText(mUserEmail);
        } else {
            mUserName = null;
            mUserEmail = null;
            mUserTimeZone = null;

            userName.setText("Please sign in");
            userEmail.setText("");
        }
    }
}
Adicionar fragmentos
Nesta seção, você criará fragmentos para as exibições de início e calendário.
Clique com o botão direito do mouse na pasta aplicativo/res/layout e selecione Novo e, em seguida, arquivo de recurso layout.
Nomeia o arquivo
fragment_homee altere o elemento Root paraRelativeLayout, em seguida, selecione OK.Abra o arquivofragment_home.xml e substitua seu conteúdo pelo seguinte.
<?xml version="1.0" encoding="utf-8"?>
<RelativeLayout xmlns:android="http://schemas.android.com/apk/res/android"
    android:layout_width="match_parent"
    android:layout_height="match_parent">

    <LinearLayout
        android:layout_width="wrap_content"
        android:layout_height="wrap_content"
        android:layout_centerInParent="true"
        android:orientation="vertical">

        <TextView
            android:layout_width="wrap_content"
            android:layout_height="wrap_content"
            android:layout_gravity="center_horizontal"
            android:text="Welcome!"
            android:textSize="30sp" />

        <TextView
            android:id="@+id/home_page_username"
            android:layout_width="wrap_content"
            android:layout_height="wrap_content"
            android:layout_gravity="center_horizontal"
            android:paddingTop="8dp"
            android:text="Please sign in"
            android:textSize="20sp" />
    </LinearLayout>

</RelativeLayout>
Clique com o botão direito do mouse na pasta aplicativo/res/layout e selecione Novo e, em seguida, arquivo de recurso layout.
Nomeia o arquivo
fragment_calendare altere o elemento Root paraRelativeLayout, em seguida, selecione OK.Abra o arquivofragment_calendar.xml e substitua seu conteúdo pelo seguinte.
<?xml version="1.0" encoding="utf-8"?>
<RelativeLayout xmlns:android="http://schemas.android.com/apk/res/android"
    android:layout_width="match_parent"
    android:layout_height="match_parent">

    <TextView
        android:layout_width="wrap_content"
        android:layout_height="wrap_content"
        android:layout_centerInParent="true"
        android:text="Calendar"
        android:textSize="30sp" />

</RelativeLayout>
Clique com o botão direito do mouse na pasta aplicativo/res/layout e selecione Novo e, em seguida, arquivo de recurso layout.
Nomeia o arquivo
fragment_new_evente altere o elemento Root paraRelativeLayout, em seguida, selecione OK.Abra o arquivofragment_new_event.xml e substitua seu conteúdo pelo seguinte.
<?xml version="1.0" encoding="utf-8"?>
<RelativeLayout xmlns:android="http://schemas.android.com/apk/res/android"
    android:layout_width="match_parent"
    android:layout_height="match_parent">

    <TextView
        android:layout_width="wrap_content"
        android:layout_height="wrap_content"
        android:layout_centerInParent="true"
        android:text="New Event"
        android:textSize="30sp" />

</RelativeLayout>
Clique com o botão direito do mouse na pasta app/java/com.example.graphtutorial e selecione Novo e Java Classe.
Nomeia a classe
HomeFragmente selecione OK.Abra o arquivo HomeFragment e substitua seu conteúdo pelo seguinte.
package com.example.graphtutorial;

import android.os.Bundle;
import android.view.LayoutInflater;
import android.view.View;
import android.view.ViewGroup;
import android.widget.TextView;
import androidx.annotation.NonNull;
import androidx.annotation.Nullable;
import androidx.fragment.app.Fragment;

public class HomeFragment extends Fragment {
    private static final String USER_NAME = "userName";

    private String mUserName;

    public HomeFragment() {

    }

    public static HomeFragment createInstance(String userName) {
        HomeFragment fragment = new HomeFragment();

        // Add the provided username to the fragment's arguments
        Bundle args = new Bundle();
        args.putString(USER_NAME, userName);
        fragment.setArguments(args);
        return fragment;
    }

    @Override
    public void onCreate(@Nullable Bundle savedInstanceState) {
        super.onCreate(savedInstanceState);
        if (getArguments() != null) {
            mUserName = getArguments().getString(USER_NAME);
        }
    }

    @Nullable
    @Override
    public View onCreateView(@NonNull LayoutInflater inflater, @Nullable ViewGroup container, @Nullable Bundle savedInstanceState) {
        View homeView = inflater.inflate(R.layout.fragment_home, container, false);

        // If there is a username, replace the "Please sign in" with the username
        if (mUserName != null) {
            TextView userName = homeView.findViewById(R.id.home_page_username);
            userName.setText(mUserName);
        }

        return homeView;
    }
}
Clique com o botão direito do mouse na pasta app/java/com.example.graphtutorial e selecione Novo e Java Classe.
Nomeia a classe
CalendarFragmente selecione OK.Abra o arquivo CalendarFragment e substitua seu conteúdo pelo seguinte.
package com.example.graphtutorial;

import android.os.Bundle;
import android.view.LayoutInflater;
import android.view.View;
import android.view.ViewGroup;
import androidx.annotation.NonNull;
import androidx.annotation.Nullable;
import androidx.fragment.app.Fragment;

public class CalendarFragment extends Fragment {
    private static final String TIME_ZONE = "timeZone";

    private String mTimeZone;

    public CalendarFragment() {}

    public static CalendarFragment createInstance(String timeZone) {
        CalendarFragment fragment = new CalendarFragment();

        // Add the provided time zone to the fragment's arguments
        Bundle args = new Bundle();
        args.putString(TIME_ZONE, timeZone);
        fragment.setArguments(args);
        return fragment;
    }

    @Override
    public void onCreate(@Nullable Bundle savedInstanceState) {
        super.onCreate(savedInstanceState);
        if (getArguments() != null) {
            mTimeZone = getArguments().getString(TIME_ZONE);
        }
    }

    @Nullable
    @Override
    public View onCreateView(@NonNull LayoutInflater inflater, @Nullable ViewGroup container, @Nullable Bundle savedInstanceState) {
        return inflater.inflate(R.layout.fragment_calendar, container, false);
    }
}
Clique com o botão direito do mouse na pasta app/java/com.example.graphtutorial e selecione Novo e Java Classe.
Nomeia a classe
NewEventFragmente selecione OK.Abra o arquivo NewEventFragment e substitua seu conteúdo pelo seguinte.
package com.example.graphtutorial;

import android.os.Bundle;
import android.view.LayoutInflater;
import android.view.View;
import android.view.ViewGroup;
import androidx.annotation.NonNull;
import androidx.annotation.Nullable;
import androidx.fragment.app.Fragment;

public class NewEventFragment extends Fragment {
    private static final String TIME_ZONE = "timeZone";

    private String mTimeZone;

    public NewEventFragment() {}

    public static NewEventFragment createInstance(String timeZone) {
        NewEventFragment fragment = new NewEventFragment();

        // Add the provided time zone to the fragment's arguments
        Bundle args = new Bundle();
        args.putString(TIME_ZONE, timeZone);
        fragment.setArguments(args);
        return fragment;
    }

    @Override
    public void onCreate(@Nullable Bundle savedInstanceState) {
        super.onCreate(savedInstanceState);
        if (getArguments() != null) {
            mTimeZone = getArguments().getString(TIME_ZONE);
        }
    }

    @Nullable
    @Override
    public View onCreateView(@NonNull LayoutInflater inflater, @Nullable ViewGroup container, @Nullable Bundle savedInstanceState) {
        return inflater.inflate(R.layout.fragment_new_event, container, false);
    }
}
Abra o arquivo MainActivity.java e adicione as seguintes funções à classe.
// Load the "Home" fragment
public void openHomeFragment(String userName) {
    HomeFragment fragment = HomeFragment.createInstance(userName);
    getSupportFragmentManager().beginTransaction()
            .replace(R.id.fragment_container, fragment)
            .commit();
    mNavigationView.setCheckedItem(R.id.nav_home);
}

// Load the "Calendar" fragment
private void openCalendarFragment(String timeZone) {
    CalendarFragment fragment = CalendarFragment.createInstance(timeZone);
    getSupportFragmentManager().beginTransaction()
            .replace(R.id.fragment_container, fragment)
            .commit();
    mNavigationView.setCheckedItem(R.id.nav_calendar);
}

// Load the "New Event" fragment
private void openNewEventFragment(String timeZone) {
    NewEventFragment fragment = NewEventFragment.createInstance(timeZone);
    getSupportFragmentManager().beginTransaction()
            .replace(R.id.fragment_container, fragment)
            .commit();
    mNavigationView.setCheckedItem(R.id.nav_create_event);
}

private void signIn() {
    setSignedInState(true);
    openHomeFragment(mUserName);
}

private void signOut() {
    setSignedInState(false);
    openHomeFragment(mUserName);
}
Substitua a função
onNavigationItemSelectedexistente pela seguinte.@Override public boolean onNavigationItemSelected(@NonNull MenuItem menuItem) { // Load the fragment that corresponds to the selected item switch (menuItem.getItemId()) { case R.id.nav_home: openHomeFragment(mUserName); break; case R.id.nav_calendar: openCalendarFragment(mUserTimeZone); break; case R.id.nav_create_event: openNewEventFragment(mUserTimeZone); break; case R.id.nav_signin: signIn(); break; case R.id.nav_signout: signOut(); break; } mDrawer.closeDrawer(GravityCompat.START); return true; }Salve todas as alterações.
No menu Executar , selecione Executar 'aplicativo'.
O menu do aplicativo deve funcionar para navegar entre os dois fragmentos e alterar quando você tocar nos botões Entrar ou Sair.

Registrar o aplicativo no portal
Neste exercício, você criará um novo aplicativo nativo do Azure AD usando o Azure Active Directory de administração.
Abra um navegador, navegue até o centro de administração do Azure Active Directory e faça logon usando uma conta pessoal (também conhecida como conta da Microsoft) ou Conta Corporativa ou de Estudante.
Selecione Azure Active Directory na navegação esquerda e selecione Registros de aplicativos em Gerenciar.

Selecione Novo registro. Na página Registrar um aplicativo, defina os valores da seguinte forma.
- Defina Nome para
Android Graph Tutorial. - Defina Tipos de conta com suporte para Contas em qualquer diretório organizacional e contas pessoais da Microsoft.
- Em URI de redirecionamento, de definir o menu suspenso como Cliente público/nativo ( área de trabalho móvel &)
msauth://YOUR_PACKAGE_NAME/callbacke de definir o valor como ,YOUR_PACKAGE_NAMEsubstituindo pelo nome do pacote do seu projeto.
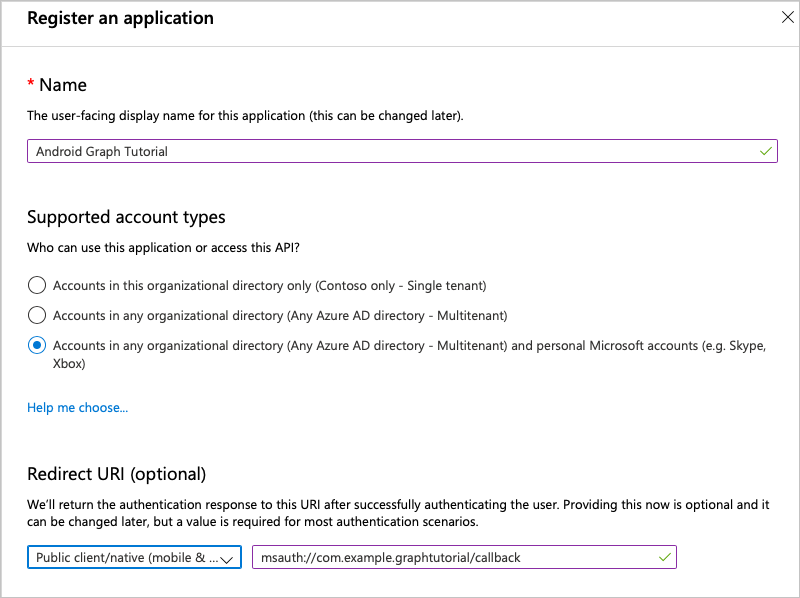
- Defina Nome para
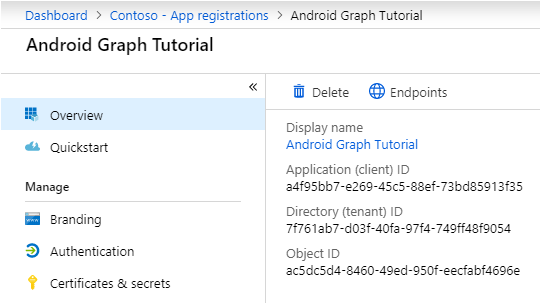
Selecione Registrar. Na página Tutorial Graph Android, copie o valor da ID do Aplicativo (cliente) e salve-a, você precisará dela na próxima etapa.
Adicionar autenticação do Azure AD
Neste exercício, você estenderá o aplicativo do exercício anterior para dar suporte à autenticação com o Azure AD. Isso é necessário para obter o token de acesso OAuth necessário para chamar o microsoft Graph. Para fazer isso, você integrará a Biblioteca de Autenticação da Microsoft (MSAL) para Android ao aplicativo.
Clique com o botão direito do mouse na pasta res e selecione Novo e, em seguida, Diretório de Recursos do Android.
Altere o tipo de recurso para
rawe selecione OK.Clique com o botão direito do mouse na nova pasta bruta e selecione Novo e , em seguida, Arquivo.
Nomeia o arquivo
msal_config.jsone selecione OK.Adicione o seguinte ao arquivo msal_config.json .
{
  "client_id" : "YOUR_APP_ID_HERE",
  "redirect_uri" : "msauth://com.example.graphtutorial/callback",
  "broker_redirect_uri_registered": false,
  "account_mode": "SINGLE",
  "authorities" : [
    {
      "type": "AAD",
      "audience": {
        "type": "AzureADandPersonalMicrosoftAccount"
      },
      "default": true
    }
  ]
}
Substitua
YOUR_APP_ID_HEREpela ID do aplicativo do registro do aplicativo e substituacom.example.graphtutorialpelo nome do pacote do seu projeto.Importante
Se você estiver usando o controle de origem, como git,
msal_config.jsonagora seria um bom momento para excluir o arquivo do controle de origem para evitar o vazamento inadvertida da ID do aplicativo.
Implementar login
Nesta seção, você atualizará o manifesto para permitir que o MSAL use um navegador para autenticar o usuário, registrar seu URI de redirecionamento como sendo manipulado pelo aplicativo, criar uma classe auxiliar de autenticação e atualizar o aplicativo para entrar e sair.
Expanda a pasta aplicativo/manifestos e abra AndroidManifest.xml. Adicione os elementos a seguir acima do
applicationelemento.<uses-permission android:name="android.permission.INTERNET" /> <uses-permission android:name="android.permission.ACCESS_NETWORK_STATE" />Observação
Essas permissões são necessárias para que a biblioteca MSAL autenture o usuário.
Adicione o elemento a seguir dentro do
applicationelemento, substituindo a cadeia de caracteresYOUR_PACKAGE_NAME_HEREpelo nome do pacote.<!--Intent filter to capture authorization code response from the default browser on the device calling back to the app after interactive sign in --> <activity android:name="com.microsoft.identity.client.BrowserTabActivity"> <intent-filter> <action android:name="android.intent.action.VIEW" /> <category android:name="android.intent.category.DEFAULT" /> <category android:name="android.intent.category.BROWSABLE" /> <data android:scheme="msauth" android:host="YOUR_PACKAGE_NAME_HERE" android:path="/callback" /> </intent-filter> </activity>Clique com o botão direito do mouse na pasta app/java/com.example.graphtutorial e selecione Novo e Java Classe. Altere o Tipo para Interface. Nomeia a interface
IAuthenticationHelperCreatedListenere selecione OK.Abra o novo arquivo e substitua seu conteúdo pelo seguinte.
package com.example.graphtutorial;

import com.microsoft.identity.client.exception.MsalException;

public interface IAuthenticationHelperCreatedListener {
    void onCreated(final AuthenticationHelper authHelper);
    void onError(final MsalException exception);
}
Clique com o botão direito do mouse na pasta app/java/com.example.graphtutorial e selecione Novo e Java Classe. Nomeia a classe
AuthenticationHelpere selecione OK.Abra o novo arquivo e substitua seu conteúdo pelo seguinte.
package com.example.graphtutorial;

import android.app.Activity;
import android.content.Context;
import android.util.Log;

import androidx.annotation.NonNull;

import com.microsoft.graph.authentication.BaseAuthenticationProvider;
import com.microsoft.identity.client.AuthenticationCallback;
import com.microsoft.identity.client.IAuthenticationResult;
import com.microsoft.identity.client.IPublicClientApplication;
import com.microsoft.identity.client.ISingleAccountPublicClientApplication;
import com.microsoft.identity.client.PublicClientApplication;
import com.microsoft.identity.client.exception.MsalException;

import java.net.URL;
import java.util.concurrent.CompletableFuture;

import javax.annotation.Nonnull;

// Singleton class - the app only needs a single instance
// of PublicClientApplication
public class AuthenticationHelper extends BaseAuthenticationProvider {
    private static AuthenticationHelper INSTANCE = null;
    private ISingleAccountPublicClientApplication mPCA = null;
    private String[] mScopes = { "User.Read", "MailboxSettings.Read", "Calendars.ReadWrite" };

    private AuthenticationHelper(Context ctx, final IAuthenticationHelperCreatedListener listener) {
        PublicClientApplication.createSingleAccountPublicClientApplication(ctx, R.raw.msal_config,
                new IPublicClientApplication.ISingleAccountApplicationCreatedListener() {
                    @Override
                    public void onCreated(ISingleAccountPublicClientApplication application) {
                        mPCA = application;
                        listener.onCreated(INSTANCE);
                    }

                    @Override
                    public void onError(MsalException exception) {
                        Log.e("AUTHHELPER", "Error creating MSAL application", exception);
                        listener.onError(exception);
                    }
                });
    }

    public static synchronized CompletableFuture<AuthenticationHelper> getInstance(Context ctx) {

        if (INSTANCE == null) {
            CompletableFuture<AuthenticationHelper> future = new CompletableFuture<>();
            INSTANCE = new AuthenticationHelper(ctx, new IAuthenticationHelperCreatedListener() {
                @Override
                public void onCreated(AuthenticationHelper authHelper) {
                    future.complete(authHelper);
                }

                @Override
                public void onError(MsalException exception) {
                    future.completeExceptionally(exception);
                }
            });

            return future;
        } else {
            return CompletableFuture.completedFuture(INSTANCE);
        }
    }

    // Version called from fragments. Does not create an
    // instance if one doesn't exist
    public static synchronized AuthenticationHelper getInstance() {
        if (INSTANCE == null) {
            throw new IllegalStateException(
                    "AuthenticationHelper has not been initialized from MainActivity");
        }

        return INSTANCE;
    }

    public CompletableFuture<IAuthenticationResult> acquireTokenInteractively(Activity activity) {
        CompletableFuture<IAuthenticationResult> future = new CompletableFuture<>();
        mPCA.signIn(activity, null, mScopes, getAuthenticationCallback(future));

        return future;
    }

    public CompletableFuture<IAuthenticationResult> acquireTokenSilently() {
        // Get the authority from MSAL config
        String authority = mPCA.getConfiguration()
            .getDefaultAuthority().getAuthorityURL().toString();

        CompletableFuture<IAuthenticationResult> future = new CompletableFuture<>();
        mPCA.acquireTokenSilentAsync(mScopes, authority, getAuthenticationCallback(future));
        return future;
    }

    public void signOut() {
        mPCA.signOut(new ISingleAccountPublicClientApplication.SignOutCallback() {
            @Override
            public void onSignOut() {
                Log.d("AUTHHELPER", "Signed out");
            }

            @Override
            public void onError(@NonNull MsalException exception) {
                Log.d("AUTHHELPER", "MSAL error signing out", exception);
            }
        });
    }

    private AuthenticationCallback getAuthenticationCallback(
        CompletableFuture<IAuthenticationResult> future) {
        return new AuthenticationCallback() {
            @Override
            public void onCancel() {
                future.cancel(true);
            }

            @Override
            public void onSuccess(IAuthenticationResult authenticationResult) {
                future.complete(authenticationResult);
            }

            @Override
            public void onError(MsalException exception) {
                future.completeExceptionally(exception);
            }
        };
    }

    @Nonnull
    @Override
    public CompletableFuture<String> getAuthorizationTokenAsync(@Nonnull URL requestUrl) {
        if (shouldAuthenticateRequestWithUrl(requestUrl) == true) {
            return acquireTokenSilently()
                .thenApply(result -> result.getAccessToken());
        }

        return CompletableFuture.completedFuture(null);
    }
}
Abra MainActivity e adicione as instruções a
importseguir.import android.util.Log; import com.microsoft.identity.client.IAuthenticationResult; import com.microsoft.identity.client.exception.MsalClientException; import com.microsoft.identity.client.exception.MsalServiceException; import com.microsoft.identity.client.exception.MsalUiRequiredException;Adicione a seguinte propriedade membro à
MainActivityclasse.private AuthenticationHelper mAuthHelper = null;Adicione o seguinte código ao final da função
onCreate.showProgressBar(); // Get the authentication helper AuthenticationHelper.getInstance(getApplicationContext()) .thenAccept(authHelper -> { mAuthHelper = authHelper; if (!mIsSignedIn) { doSilentSignIn(false); } else { hideProgressBar(); } }) .exceptionally(exception -> { Log.e("AUTH", "Error creating auth helper", exception); return null; });Adicione as seguintes funções à
MainActivityclasse.// Silently sign in - used if there is already a // user account in the MSAL cache private void doSilentSignIn(boolean shouldAttemptInteractive) { mAuthHelper.acquireTokenSilently() .thenAccept(authenticationResult -> { handleSignInSuccess(authenticationResult); }) .exceptionally(exception -> { // Check the type of exception and handle appropriately Throwable cause = exception.getCause(); if (cause instanceof MsalUiRequiredException) { Log.d("AUTH", "Interactive login required"); if (shouldAttemptInteractive) doInteractiveSignIn(); } else if (cause instanceof MsalClientException) { MsalClientException clientException = (MsalClientException)cause; if (clientException.getErrorCode() == "no_current_account" || clientException.getErrorCode() == "no_account_found") { Log.d("AUTH", "No current account, interactive login required"); if (shouldAttemptInteractive) doInteractiveSignIn(); } } else { handleSignInFailure(cause); } hideProgressBar(); return null; }); } // Prompt the user to sign in private void doInteractiveSignIn() { mAuthHelper.acquireTokenInteractively(this) .thenAccept(authenticationResult -> { handleSignInSuccess(authenticationResult); }) .exceptionally(exception -> { handleSignInFailure(exception); hideProgressBar(); return null; }); } // Handles the authentication result private void handleSignInSuccess(IAuthenticationResult authenticationResult) { // Log the token for debug purposes String accessToken = authenticationResult.getAccessToken(); Log.d("AUTH", String.format("Access token: %s", accessToken)); hideProgressBar(); setSignedInState(true); openHomeFragment(mUserName); } private void handleSignInFailure(Throwable exception) { if (exception instanceof MsalServiceException) { // Exception when communicating with the auth server, likely config issue Log.e("AUTH", "Service error authenticating", exception); } else if (exception instanceof MsalClientException) { // Exception inside MSAL, more info inside MsalError.java Log.e("AUTH", "Client error authenticating", exception); } else { Log.e("AUTH", "Unhandled exception authenticating", exception); } }Substitua as funções existentes
signInsignOute existentes pelo seguinte.private void signIn() { showProgressBar(); // Attempt silent sign in first // if this fails, the callback will handle doing // interactive sign in doSilentSignIn(true); } private void signOut() { mAuthHelper.signOut(); setSignedInState(false); openHomeFragment(mUserName); }Observação
Observe que o
signInmétodo faz uma login silencioso (viadoSilentSignIn). O retorno de chamada para este método fará uma login interativa se o silencioso falhar. Isso evita ter que solicitar ao usuário sempre que ele iniciar o aplicativo.Salve suas alterações e execute o aplicativo.
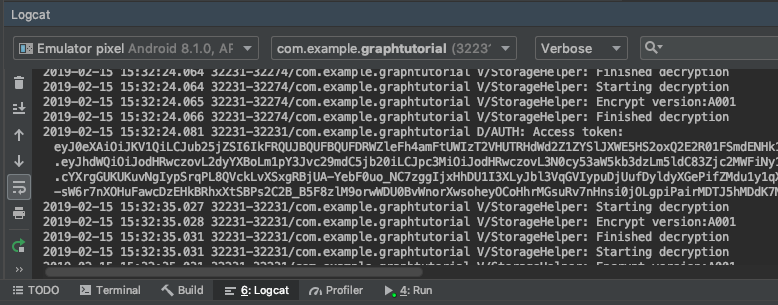
Quando você toca no item de menu Entrar, um navegador é aberto para a página de logon do Azure AD. Entrar com sua conta.
Depois que o aplicativo é retomado, você deve ver um token de acesso impresso no log de depuração no Android Studio.
Obter detalhes do usuário
Nesta seção, você criará uma classe auxiliar para manter todas as chamadas para o Microsoft Graph e atualizar a MainActivity classe para usar essa nova classe para obter o usuário conectado.
Clique com o botão direito do mouse na pasta app/java/com.example.graphtutorial e selecione Novo e Java Classe. Nomeia a classe
GraphHelpere selecione OK.Abra o novo arquivo e substitua seu conteúdo pelo seguinte.
package com.example.graphtutorial;

import com.microsoft.graph.models.extensions.User;
import com.microsoft.graph.requests.GraphServiceClient;

import java.util.concurrent.CompletableFuture;

// Singleton class - the app only needs a single instance
// of the Graph client
public class GraphHelper implements IAuthenticationProvider {
    private static GraphHelper INSTANCE = null;
    private GraphServiceClient mClient = null;

    private GraphHelper() {
        AuthenticationHelper authProvider = AuthenticationHelper.getInstance();

        mClient = GraphServiceClient.builder()
            .authenticationProvider(authProvider).buildClient();
    }

    public static synchronized GraphHelper getInstance() {
        if (INSTANCE == null) {
            INSTANCE = new GraphHelper();
        }

        return INSTANCE;
    }

    public CompletableFuture<User> getUser() {
        // GET /me (logged in user)
        return mClient.me().buildRequest()
            .select("displayName,mail,mailboxSettings,userPrincipalName")
            .getAsync();
    }
}
Observação
Considere o que esse código faz.
- Ele expõe uma função
getUserpara obter as informações do usuário conectado do ponto/mede extremidade Graph.- Ele usa
.selectpara solicitar apenas as propriedades do usuário que o aplicativo precisa.
- Ele usa
- Ele expõe uma função
Remova as seguintes linhas que definirão o nome de usuário e o email:
// For testing
mUserName = "Lynne Robbins";
mUserEmail = "lynner@contoso.com";
mUserTimeZone = "Pacific Standard Time";
Substitua a função
handleSignInSuccessexistente pela seguinte.// Handles the authentication result private void handleSignInSuccess(IAuthenticationResult authenticationResult) { // Log the token for debug purposes String accessToken = authenticationResult.getAccessToken(); Log.d("AUTH", String.format("Access token: %s", accessToken)); // Get Graph client and get user GraphHelper graphHelper = GraphHelper.getInstance(); graphHelper.getUser() .thenAccept(user -> { mUserName = user.displayName; mUserEmail = user.mail == null ? user.userPrincipalName : user.mail; mUserTimeZone = user.mailboxSettings.timeZone; runOnUiThread(() -> { hideProgressBar(); setSignedInState(true); openHomeFragment(mUserName); }); }) .exceptionally(exception -> { Log.e("AUTH", "Error getting /me", exception); runOnUiThread(()-> { hideProgressBar(); setSignedInState(false); }); return null; }); }Salve suas alterações e execute o aplicativo. Depois que a interface do usuário for atualizada com o nome de exibição e o endereço de email do usuário.
Obter uma exibição de calendário
Neste exercício, você incorporará o microsoft Graph no aplicativo. Para este aplicativo, você usará o Microsoft Graph SDK para Java fazer chamadas para o Microsoft Graph.
Obtenha eventos de calendário do Outlook
Nesta seção, você estenderá GraphHelper a classe para adicionar uma função para obter os eventos do CalendarFragment usuário para a semana atual e atualizar para usar essas novas funções.
Abra GraphHelper e adicione as instruções
importa seguir à parte superior do arquivo.import com.microsoft.graph.options.Option; import com.microsoft.graph.options.HeaderOption; import com.microsoft.graph.options.QueryOption; import com.microsoft.graph.requests.EventCollectionPage; import com.microsoft.graph.requests.EventCollectionRequestBuilder; import java.time.ZonedDateTime; import java.time.format.DateTimeFormatter; import java.util.LinkedList; import java.util.List; import java.util.concurrent.CompletableFuture;Adicione as seguintes funções à
GraphHelperclasse.public CompletableFuture<List<Event>> getCalendarView(ZonedDateTime viewStart, ZonedDateTime viewEnd, String timeZone) { final List<Option> options = new LinkedList<Option>(); options.add(new QueryOption("startDateTime", viewStart.format(DateTimeFormatter.ISO_OFFSET_DATE_TIME))); options.add(new QueryOption("endDateTime", viewEnd.format(DateTimeFormatter.ISO_OFFSET_DATE_TIME))); // Start and end times adjusted to user's time zone options.add(new HeaderOption("Prefer", "outlook.timezone=\"" + timeZone + "\"")); final List<Event> allEvents = new LinkedList<Event>(); // Create a separate list of options for the paging requests // paging request should not include the query parameters from the initial // request, but should include the headers. final List<Option> pagingOptions = new LinkedList<Option>(); pagingOptions.add(new HeaderOption("Prefer", "outlook.timezone=\"" + timeZone + "\"")); return mClient.me().calendarView() .buildRequest(options) .select("subject,organizer,start,end") .orderBy("start/dateTime") .top(5) .getAsync() .thenCompose(eventPage -> processPage(eventPage, allEvents, pagingOptions)); } private CompletableFuture<List<Event>> processPage(EventCollectionPage currentPage, List<Event> eventList, List<Option> options) { eventList.addAll(currentPage.getCurrentPage()); // Check if there is another page of results EventCollectionRequestBuilder nextPage = currentPage.getNextPage(); if (nextPage != null) { // Request the next page and repeat return nextPage.buildRequest(options) .getAsync() .thenCompose(eventPage -> processPage(eventPage, eventList, options)); } else { // No more pages, complete the future // with the complete list return CompletableFuture.completedFuture(eventList); } } // Debug function to get the JSON representation of a Graph // object public String serializeObject(Object object) { return mClient.getSerializer().serializeObject(object); }Observação
Considere o que o código está
getCalendarViewfazendo.- O URL que será chamado é
/v1.0/me/calendarview.- Os
startDateTimeparâmetrosendDateTimee consulta definem o início e o fim do exibição de calendário. - o
Prefer: outlook.timezoneheader faz com que o microsoft Graph retornar os horários de início e término de cada evento no fuso horário do usuário. - A função
selectlimita os campos retornados para cada evento apenas para aqueles que o modo de exibição realmente usará. - A
orderbyfunção classifica os resultados por hora de início. - A
topfunção solicita 25 resultados por página.
- Os
- A
processPagefunção verifica se há mais resultados disponíveis e solicita páginas adicionais, se necessário.
- O URL que será chamado é
Clique com o botão direito do mouse na pasta app/java/com.example.graphtutorial e selecione Novo e Java Classe. Nomeia a classe
GraphToIanae selecione OK.Abra o novo arquivo e substitua seu conteúdo pelo seguinte.
package com.example.graphtutorial;

import java.time.ZoneId;
import java.util.HashMap;

// Basic lookup for mapping Windows time zone identifiers to
// IANA identifiers
// Mappings taken from
// https://github.com/unicode-org/cldr/blob/master/common/supplemental/windowsZones.xml
public class GraphToIana {
    private static final HashMap<String, String> timeZoneIdMap = new HashMap<String, String>();
    static {
        timeZoneIdMap.put("Dateline Standard Time", "Etc/GMT+12");
        timeZoneIdMap.put("UTC-11", "Etc/GMT+11");
        timeZoneIdMap.put("Aleutian Standard Time", "America/Adak");
        timeZoneIdMap.put("Hawaiian Standard Time", "Pacific/Honolulu");
        timeZoneIdMap.put("Marquesas Standard Time", "Pacific/Marquesas");
        timeZoneIdMap.put("Alaskan Standard Time", "America/Anchorage");
        timeZoneIdMap.put("UTC-09", "Etc/GMT+9");
        timeZoneIdMap.put("Pacific Standard Time (Mexico)", "America/Tijuana");
        timeZoneIdMap.put("UTC-08", "Etc/GMT+8");
        timeZoneIdMap.put("Pacific Standard Time", "America/Los_Angeles");
        timeZoneIdMap.put("US Mountain Standard Time", "America/Phoenix");
        timeZoneIdMap.put("Mountain Standard Time (Mexico)", "America/Chihuahua");
        timeZoneIdMap.put("Mountain Standard Time", "America/Denver");
        timeZoneIdMap.put("Central America Standard Time", "America/Guatemala");
        timeZoneIdMap.put("Central Standard Time", "America/Chicago");
        timeZoneIdMap.put("Easter Island Standard Time", "Pacific/Easter");
        timeZoneIdMap.put("Central Standard Time (Mexico)", "America/Mexico_City");
        timeZoneIdMap.put("Canada Central Standard Time", "America/Regina");
        timeZoneIdMap.put("SA Pacific Standard Time", "America/Bogota");
        timeZoneIdMap.put("Eastern Standard Time (Mexico)", "America/Cancun");
        timeZoneIdMap.put("Eastern Standard Time", "America/New_York");
        timeZoneIdMap.put("Haiti Standard Time", "America/Port-au-Prince");
        timeZoneIdMap.put("Cuba Standard Time", "America/Havana");
        timeZoneIdMap.put("US Eastern Standard Time", "America/Indianapolis");
        timeZoneIdMap.put("Turks And Caicos Standard Time", "America/Grand_Turk");
        timeZoneIdMap.put("Paraguay Standard Time", "America/Asuncion");
        timeZoneIdMap.put("Atlantic Standard Time", "America/Halifax");
        timeZoneIdMap.put("Venezuela Standard Time", "America/Caracas");
        timeZoneIdMap.put("Central Brazilian Standard Time", "America/Cuiaba");
        timeZoneIdMap.put("SA Western Standard Time", "America/La_Paz");
        timeZoneIdMap.put("Pacific SA Standard Time", "America/Santiago");
        timeZoneIdMap.put("Newfoundland Standard Time", "America/St_Johns");
        timeZoneIdMap.put("Tocantins Standard Time", "America/Araguaina");
        timeZoneIdMap.put("E. South America Standard Time", "America/Sao_Paulo");
        timeZoneIdMap.put("SA Eastern Standard Time", "America/Cayenne");
        timeZoneIdMap.put("Argentina Standard Time", "America/Buenos_Aires");
        timeZoneIdMap.put("Greenland Standard Time", "America/Godthab");
        timeZoneIdMap.put("Montevideo Standard Time", "America/Montevideo");
        timeZoneIdMap.put("Magallanes Standard Time", "America/Punta_Arenas");
        timeZoneIdMap.put("Saint Pierre Standard Time", "America/Miquelon");
        timeZoneIdMap.put("Bahia Standard Time", "America/Bahia");
        timeZoneIdMap.put("UTC-02", "Etc/GMT+2");
        timeZoneIdMap.put("Azores Standard Time", "Atlantic/Azores");
        timeZoneIdMap.put("Cape Verde Standard Time", "Atlantic/Cape_Verde");
        timeZoneIdMap.put("UTC", "Etc/GMT");
        timeZoneIdMap.put("GMT Standard Time", "Europe/London");
        timeZoneIdMap.put("Greenwich Standard Time", "Atlantic/Reykjavik");
        timeZoneIdMap.put("Sao Tome Standard Time", "Africa/Sao_Tome");
        timeZoneIdMap.put("Morocco Standard Time", "Africa/Casablanca");
        timeZoneIdMap.put("W. Europe Standard Time", "Europe/Berlin");
        timeZoneIdMap.put("Central Europe Standard Time", "Europe/Budapest");
        timeZoneIdMap.put("Romance Standard Time", "Europe/Paris");
        timeZoneIdMap.put("Central European Standard Time", "Europe/Warsaw");
        timeZoneIdMap.put("W. Central Africa Standard Time", "Africa/Lagos");
        timeZoneIdMap.put("Jordan Standard Time", "Asia/Amman");
        timeZoneIdMap.put("GTB Standard Time", "Europe/Bucharest");
        timeZoneIdMap.put("Middle East Standard Time", "Asia/Beirut");
        timeZoneIdMap.put("Egypt Standard Time", "Africa/Cairo");
        timeZoneIdMap.put("E. Europe Standard Time", "Europe/Chisinau");
        timeZoneIdMap.put("Syria Standard Time", "Asia/Damascus");
        timeZoneIdMap.put("West Bank Standard Time", "Asia/Hebron");
        timeZoneIdMap.put("South Africa Standard Time", "Africa/Johannesburg");
        timeZoneIdMap.put("FLE Standard Time", "Europe/Kiev");
        timeZoneIdMap.put("Israel Standard Time", "Asia/Jerusalem");
        timeZoneIdMap.put("Kaliningrad Standard Time", "Europe/Kaliningrad");
        timeZoneIdMap.put("Sudan Standard Time", "Africa/Khartoum");
        timeZoneIdMap.put("Libya Standard Time", "Africa/Tripoli");
        timeZoneIdMap.put("Namibia Standard Time", "Africa/Windhoek");
        timeZoneIdMap.put("Arabic Standard Time", "Asia/Baghdad");
        timeZoneIdMap.put("Turkey Standard Time", "Europe/Istanbul");
        timeZoneIdMap.put("Arab Standard Time", "Asia/Riyadh");
        timeZoneIdMap.put("Belarus Standard Time", "Europe/Minsk");
        timeZoneIdMap.put("Russian Standard Time", "Europe/Moscow");
        timeZoneIdMap.put("E. Africa Standard Time", "Africa/Nairobi");
        timeZoneIdMap.put("Iran Standard Time", "Asia/Tehran");
        timeZoneIdMap.put("Arabian Standard Time", "Asia/Dubai");
        timeZoneIdMap.put("Astrakhan Standard Time", "Europe/Astrakhan");
        timeZoneIdMap.put("Azerbaijan Standard Time", "Asia/Baku");
        timeZoneIdMap.put("Russia Time Zone 3", "Europe/Samara");
        timeZoneIdMap.put("Mauritius Standard Time", "Indian/Mauritius");
        timeZoneIdMap.put("Saratov Standard Time", "Europe/Saratov");
        timeZoneIdMap.put("Georgian Standard Time", "Asia/Tbilisi");
        timeZoneIdMap.put("Volgograd Standard Time", "Europe/Volgograd");
        timeZoneIdMap.put("Caucasus Standard Time", "Asia/Yerevan");
        timeZoneIdMap.put("Afghanistan Standard Time", "Asia/Kabul");
        timeZoneIdMap.put("West Asia Standard Time", "Asia/Tashkent");
        timeZoneIdMap.put("Ekaterinburg Standard Time", "Asia/Yekaterinburg");
        timeZoneIdMap.put("Pakistan Standard Time", "Asia/Karachi");
        timeZoneIdMap.put("Qyzylorda Standard Time", "Asia/Qyzylorda");
        timeZoneIdMap.put("India Standard Time", "Asia/Calcutta");
        timeZoneIdMap.put("Sri Lanka Standard Time", "Asia/Colombo");
        timeZoneIdMap.put("Nepal Standard Time", "Asia/Katmandu");
        timeZoneIdMap.put("Central Asia Standard Time", "Asia/Almaty");
        timeZoneIdMap.put("Bangladesh Standard Time", "Asia/Dhaka");
        timeZoneIdMap.put("Omsk Standard Time", "Asia/Omsk");
        timeZoneIdMap.put("Myanmar Standard Time", "Asia/Rangoon");
        timeZoneIdMap.put("SE Asia Standard Time", "Asia/Bangkok");
        timeZoneIdMap.put("Altai Standard Time", "Asia/Barnaul");
        timeZoneIdMap.put("W. Mongolia Standard Time", "Asia/Hovd");
        timeZoneIdMap.put("North Asia Standard Time", "Asia/Krasnoyarsk");
        timeZoneIdMap.put("N. Central Asia Standard Time", "Asia/Novosibirsk");
        timeZoneIdMap.put("Tomsk Standard Time", "Asia/Tomsk");
        timeZoneIdMap.put("China Standard Time", "Asia/Shanghai");
        timeZoneIdMap.put("North Asia East Standard Time", "Asia/Irkutsk");
        timeZoneIdMap.put("Singapore Standard Time", "Asia/Singapore");
        timeZoneIdMap.put("W. Australia Standard Time", "Australia/Perth");
        timeZoneIdMap.put("Taipei Standard Time", "Asia/Taipei");
        timeZoneIdMap.put("Ulaanbaatar Standard Time", "Asia/Ulaanbaatar");
        timeZoneIdMap.put("Aus Central W. Standard Time", "Australia/Eucla");
        timeZoneIdMap.put("Transbaikal Standard Time", "Asia/Chita");
        timeZoneIdMap.put("Tokyo Standard Time", "Asia/Tokyo");
        timeZoneIdMap.put("North Korea Standard Time", "Asia/Pyongyang");
        timeZoneIdMap.put("Korea Standard Time", "Asia/Seoul");
        timeZoneIdMap.put("Yakutsk Standard Time", "Asia/Yakutsk");
        timeZoneIdMap.put("Cen. Australia Standard Time", "Australia/Adelaide");
        timeZoneIdMap.put("AUS Central Standard Time", "Australia/Darwin");
        timeZoneIdMap.put("E. Australia Standard Time", "Australia/Brisbane");
        timeZoneIdMap.put("AUS Eastern Standard Time", "Australia/Sydney");
        timeZoneIdMap.put("West Pacific Standard Time", "Pacific/Port_Moresby");
        timeZoneIdMap.put("Tasmania Standard Time", "Australia/Hobart");
        timeZoneIdMap.put("Vladivostok Standard Time", "Asia/Vladivostok");
        timeZoneIdMap.put("Lord Howe Standard Time", "Australia/Lord_Howe");
        timeZoneIdMap.put("Bougainville Standard Time", "Pacific/Bougainville");
        timeZoneIdMap.put("Russia Time Zone 10", "Asia/Srednekolymsk");
        timeZoneIdMap.put("Magadan Standard Time", "Asia/Magadan");
        timeZoneIdMap.put("Norfolk Standard Time", "Pacific/Norfolk");
        timeZoneIdMap.put("Sakhalin Standard Time", "Asia/Sakhalin");
        timeZoneIdMap.put("Central Pacific Standard Time", "Pacific/Guadalcanal");
        timeZoneIdMap.put("Russia Time Zone 11", "Asia/Kamchatka");
        timeZoneIdMap.put("New Zealand Standard Time", "Pacific/Auckland");
        timeZoneIdMap.put("UTC+12", "Etc/GMT-12");
        timeZoneIdMap.put("Fiji Standard Time", "Pacific/Fiji");
        timeZoneIdMap.put("Chatham Islands Standard Time", "Pacific/Chatham");
        timeZoneIdMap.put("UTC+13", "Etc/GMT-13");
        timeZoneIdMap.put("Tonga Standard Time", "Pacific/Tongatapu");
        timeZoneIdMap.put("Samoa Standard Time", "Pacific/Apia");
        timeZoneIdMap.put("Line Islands Standard Time", "Pacific/Kiritimati");
    }

    public static String getIanaFromWindows(String windowsTimeZone) {
        String iana = timeZoneIdMap.get(windowsTimeZone);

        // If a mapping was not found, assume the value passed
        // was already an IANA identifier
        return (iana == null) ? windowsTimeZone : iana;
    }

    public static ZoneId getZoneIdFromWindows(String windowsTimeZone) {
        String timeZoneId = getIanaFromWindows(windowsTimeZone);

        return ZoneId.of(timeZoneId);
    }
}
Adicione as instruções
importa seguir à parte superior do arquivo CalendarFragment .import android.util.Log; import android.widget.ListView; import com.google.android.material.snackbar.BaseTransientBottomBar; import com.google.android.material.snackbar.Snackbar; import com.microsoft.graph.core.ClientException; import com.microsoft.graph.models.Event; import com.microsoft.identity.client.AuthenticationCallback; import com.microsoft.identity.client.IAuthenticationResult; import com.microsoft.identity.client.exception.MsalException; import java.time.DayOfWeek; import java.time.ZoneId; import java.time.ZonedDateTime; import java.time.temporal.ChronoUnit; import java.time.temporal.TemporalAdjusters; import java.util.List;Adicione o membro a seguir à
CalendarFragmentclasse.private List<Event> mEventList = null;Adicione as seguintes funções à classe para
CalendarFragmentocultar e mostrar a barra de progresso.private void showProgressBar() { getActivity().runOnUiThread(new Runnable() { @Override public void run() { getActivity().findViewById(R.id.progressbar) .setVisibility(View.VISIBLE); getActivity().findViewById(R.id.fragment_container) .setVisibility(View.GONE); } }); } private void hideProgressBar() { getActivity().runOnUiThread(new Runnable() { @Override public void run() { getActivity().findViewById(R.id.progressbar) .setVisibility(View.GONE); getActivity().findViewById(R.id.fragment_container) .setVisibility(View.VISIBLE); } }); }Adicione a função a seguir para saída da lista de eventos para fins de depuração.
private void addEventsToList() { // Temporary for debugging String jsonEvents = GraphHelper.getInstance().serializeObject(mEventList); Log.d("GRAPH", jsonEvents); }Substitua a função existente
onCreateViewna classeCalendarFragmentpelo seguinte.@Nullable @Override public View onCreateView(@NonNull LayoutInflater inflater, @Nullable ViewGroup container, @Nullable Bundle savedInstanceState) { View view = inflater.inflate(R.layout.fragment_calendar, container, false); showProgressBar(); final GraphHelper graphHelper = GraphHelper.getInstance(); ZoneId tzId = GraphToIana.getZoneIdFromWindows(mTimeZone); // Get midnight of the first day of the week (assumed Sunday) // in the user's timezone, then convert to UTC ZonedDateTime startOfWeek = ZonedDateTime.now(tzId) .with(TemporalAdjusters.previousOrSame(DayOfWeek.SUNDAY)) .truncatedTo(ChronoUnit.DAYS) .withZoneSameInstant(ZoneId.of("UTC")); // Add 7 days to get the end of the week ZonedDateTime endOfWeek = startOfWeek.plusDays(7); // Get the user's events graphHelper .getCalendarView(startOfWeek, endOfWeek, mTimeZone) .thenAccept(eventList -> { mEventList = eventList; addEventsToList(); hideProgressBar(); }) .exceptionally(exception -> { hideProgressBar(); Log.e("GRAPH", "Error getting events", exception); Snackbar.make(getView(), exception.getMessage(), BaseTransientBottomBar.LENGTH_LONG).show(); return null; }); return view; }Execute o aplicativo, entre e toque no item de navegação Calendário no menu. Você deve ver um despejo JSON dos eventos no log de depuração no Android Studio.
Exibir os resultados
Agora você pode substituir o despejo JSON por algo para exibir os resultados de maneira amigável. Nesta seção, você adicionará um ListView ao fragmento de calendário, criará um layout para cada item ListViewno , ListView Event TextView e criará um adaptador de lista personalizado para o que mapeia os campos de cada um para o apropriado na exibição.
Substitua o
TextViewaplicativo /res/layout/fragment_calendar.xml por umListView.<?xml version="1.0" encoding="utf-8"?> <RelativeLayout xmlns:android="http://schemas.android.com/apk/res/android" android:layout_width="match_parent" android:layout_height="match_parent"> <ListView android:id="@+id/eventlist" android:layout_width="match_parent" android:layout_height="match_parent" android:divider="?colorPrimary" android:dividerHeight="1dp" /> </RelativeLayout>Clique com o botão direito do mouse na pasta aplicativo/res/layout e selecione Novo e, em seguida, arquivo de recurso layout.
Nomeia o arquivo
event_list_item, altere o elemento Root paraRelativeLayoute selecione OK.Abra o arquivoevent_list_item.xml e substitua seu conteúdo pelo seguinte.
<?xml version="1.0" encoding="utf-8"?> <RelativeLayout xmlns:android="http://schemas.android.com/apk/res/android" android:layout_width="match_parent" android:layout_height="match_parent" android:padding="10dp"> <TextView android:id="@+id/eventsubject" android:layout_width="match_parent" android:layout_height="wrap_content" android:text="Subject" android:textSize="20sp" /> <TextView android:id="@+id/eventorganizer" android:layout_width="match_parent" android:layout_height="wrap_content" android:layout_below="@id/eventsubject" android:text="Adele Vance" android:textSize="15sp" /> <LinearLayout android:layout_width="match_parent" android:layout_height="wrap_content" android:layout_below="@id/eventorganizer" android:orientation="horizontal"> <TextView android:layout_width="wrap_content" android:layout_height="wrap_content" android:paddingEnd="2sp" android:text="Start:" android:textSize="15sp" android:textStyle="bold" /> <TextView android:id="@+id/eventstart" android:layout_width="wrap_content" android:layout_height="wrap_content" android:text="1:30 PM 2/19/2019" android:textSize="15sp" /> <TextView android:layout_width="wrap_content" android:layout_height="wrap_content" android:paddingStart="5sp" android:paddingEnd="2sp" android:text="End:" android:textSize="15sp" android:textStyle="bold" /> <TextView android:id="@+id/eventend" android:layout_width="wrap_content" android:layout_height="wrap_content" android:text="1:30 PM 2/19/2019" android:textSize="15sp" /> </LinearLayout> </RelativeLayout>Clique com o botão direito do mouse na pasta app/java/com.example.graphtutorial e selecione Novo e Java Classe.
Nomeia a classe
EventListAdaptere selecione OK.Abra o arquivo EventListAdapter e substitua seu conteúdo pelo seguinte.
package com.example.graphtutorial; import android.content.Context; import android.view.LayoutInflater; import android.view.View; import android.view.ViewGroup; import android.widget.ArrayAdapter; import android.widget.TextView; import androidx.annotation.NonNull; import com.microsoft.graph.models.DateTimeTimeZone; import com.microsoft.graph.models.Event; import java.time.LocalDateTime; import java.time.ZoneId; import java.time.ZonedDateTime; import java.time.format.DateTimeFormatter; import java.time.format.FormatStyle; import java.util.List; import java.util.TimeZone; public class EventListAdapter extends ArrayAdapter<Event> { private Context mContext; private int mResource; // Used for the ViewHolder pattern // https://developer.android.com/training/improving-layouts/smooth-scrolling static class ViewHolder { TextView subject; TextView organizer; TextView start; TextView end; } public EventListAdapter(Context context, int resource, List<Event> events) { super(context, resource, events); mContext = context; mResource = resource; } @NonNull @Override public View getView(int position, View convertView, ViewGroup parent) { Event event = getItem(position); ViewHolder holder; if (convertView == null) { LayoutInflater inflater = LayoutInflater.from(mContext); convertView = inflater.inflate(mResource, parent, false); holder = new ViewHolder(); holder.subject = convertView.findViewById(R.id.eventsubject); holder.organizer = convertView.findViewById(R.id.eventorganizer); holder.start = convertView.findViewById(R.id.eventstart); holder.end = convertView.findViewById(R.id.eventend); convertView.setTag(holder); } else { holder = (ViewHolder) convertView.getTag(); } holder.subject.setText(event.subject); holder.organizer.setText(event.organizer.emailAddress.name); holder.start.setText(getLocalDateTimeString(event.start)); holder.end.setText(getLocalDateTimeString(event.end)); return convertView; } // Convert Graph's DateTimeTimeZone format to // a LocalDateTime, then return a formatted string private String getLocalDateTimeString(DateTimeTimeZone dateTime) { ZonedDateTime localDateTime = LocalDateTime.parse(dateTime.dateTime) .atZone(GraphToIana.getZoneIdFromWindows(dateTime.timeZone)); return String.format("%s %s", localDateTime.format(DateTimeFormatter.ofLocalizedDate(FormatStyle.MEDIUM)), localDateTime.format(DateTimeFormatter.ofLocalizedTime(FormatStyle.SHORT))); } }Abra a classe CalendarFragment e substitua a função existente
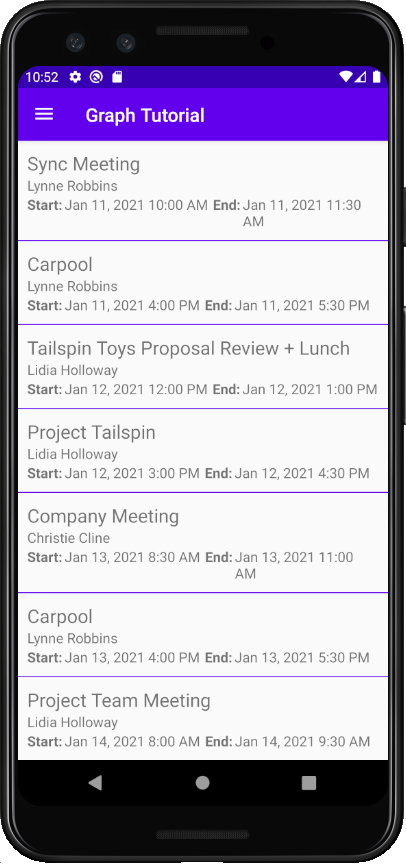
addEventsToListpelo seguinte.private void addEventsToList() { getActivity().runOnUiThread(new Runnable() { @Override public void run() { ListView eventListView = getView().findViewById(R.id.eventlist); EventListAdapter listAdapter = new EventListAdapter(getActivity(), R.layout.event_list_item, mEventList); eventListView.setAdapter(listAdapter); } }); }Execute o aplicativo, entre e toque no item de navegação Calendário. Você deve ver a lista de eventos.
Criar um novo evento
Nesta seção, você adicionará a capacidade de criar eventos no calendário do usuário.
Abra GraphHelper e adicione as instruções
importa seguir à parte superior do arquivo.import com.microsoft.graph.models.Attendee; import com.microsoft.graph.models.DateTimeTimeZone; import com.microsoft.graph.models.EmailAddress; import com.microsoft.graph.models.ItemBody; import com.microsoft.graph.models.AttendeeType; import com.microsoft.graph.models.BodyType;Adicione a seguinte função à classe
GraphHelperpara criar um novo evento.public CompletableFuture<Event> createEvent(String subject, ZonedDateTime start, ZonedDateTime end, String timeZone, String[] attendees, String body) { Event newEvent = new Event(); // Set properties on the event // Subject newEvent.subject = subject; // Start newEvent.start = new DateTimeTimeZone(); // DateTimeTimeZone has two parts: // The date/time expressed as an ISO 8601 Local date/time // Local meaning there is no UTC or UTC offset designation // Example: 2020-01-12T09:00:00 newEvent.start.dateTime = start.format(DateTimeFormatter.ISO_LOCAL_DATE_TIME); // The time zone - can be either a Windows time zone name ("Pacific Standard Time") // or an IANA time zone identifier ("America/Los_Angeles") newEvent.start.timeZone = timeZone; // End newEvent.end = new DateTimeTimeZone(); newEvent.end.dateTime = end.format(DateTimeFormatter.ISO_LOCAL_DATE_TIME); newEvent.end.timeZone = timeZone; // Add attendees if any were provided if (attendees.length > 0) { newEvent.attendees = new LinkedList<>(); for (String attendeeEmail : attendees) { Attendee newAttendee = new Attendee(); // Set the attendee type, in this case required newAttendee.type = AttendeeType.REQUIRED; // Create a new EmailAddress object with the address // provided newAttendee.emailAddress = new EmailAddress(); newAttendee.emailAddress.address = attendeeEmail; newEvent.attendees.add(newAttendee); } } // Add body if provided if (!body.isEmpty()) { newEvent.body = new ItemBody(); // Set the content newEvent.body.content = body; // Specify content is plain text newEvent.body.contentType = BodyType.TEXT; } return mClient.me().events().buildRequest() .postAsync(newEvent); }
Atualizar novo fragmento de evento
Clique com o botão direito do mouse na pasta app/java/com.example.graphtutorial e selecione Novo e Java Classe. Nomeia a classe
EditTextDateTimePickere selecione OK.Abra o novo arquivo e substitua seu conteúdo pelo seguinte.
package com.example.graphtutorial; import android.app.DatePickerDialog; import android.app.TimePickerDialog; import android.content.Context; import android.view.View; import android.widget.DatePicker; import android.widget.EditText; import android.widget.TimePicker; import java.time.ZoneId; import java.time.ZonedDateTime; import java.time.format.DateTimeFormatter; import java.time.format.FormatStyle; // Class to wrap an EditText control to act as a date/time picker // When the user taps it, a date picker is shown, followed by a time picker // The values selected are combined to create a date/time value, which is then // displayed in the EditText public class EditTextDateTimePicker implements View.OnClickListener, DatePickerDialog.OnDateSetListener, TimePickerDialog.OnTimeSetListener { private Context mContext; private EditText mEditText; private ZonedDateTime mDateTime; EditTextDateTimePicker(Context context, EditText editText, ZoneId zoneId) { mContext = context; mEditText = editText; mEditText.setOnClickListener(this); // Initialize to now mDateTime = ZonedDateTime.now(zoneId).withSecond(0).withNano(0); // Round time to closest upcoming half-hour int offset = 30 - (mDateTime.getMinute() % 30); if (offset > 0) { mDateTime = mDateTime.plusMinutes(offset); } updateText(); } @Override public void onClick(View v) { // First, show a date picker DatePickerDialog dialog = new DatePickerDialog(mContext, this, mDateTime.getYear(), mDateTime.getMonthValue(), mDateTime.getDayOfMonth()); dialog.show(); } @Override public void onDateSet(DatePicker view, int year, int month, int dayOfMonth) { // Update the stored date/time with the new date mDateTime = mDateTime.withYear(year).withMonth(month).withDayOfMonth(dayOfMonth); // Show a time picker TimePickerDialog dialog = new TimePickerDialog(mContext, this, mDateTime.getHour(), mDateTime.getMinute(), false); dialog.show(); } @Override public void onTimeSet(TimePicker view, int hourOfDay, int minute) { // Update the stored date/time with the new time mDateTime = mDateTime.withHour(hourOfDay).withMinute(minute); // Update the text in the EditText updateText(); } public ZonedDateTime getZonedDateTime() { return mDateTime; } private void updateText() { mEditText.setText(String.format("%s %s", mDateTime.format(DateTimeFormatter.ofLocalizedDate(FormatStyle.MEDIUM)), mDateTime.format(DateTimeFormatter.ofLocalizedTime(FormatStyle.SHORT)))); } }Essa classe quebra um
EditTextcontrole, mostrando um selador de data e hora quando o usuário toca nele e atualizando o valor com a data e a hora escolhida.Abra aplicativo/res/layout/fragment_new_event.xml e substitua seu conteúdo pelo seguinte.
<?xml version="1.0" encoding="utf-8"?> <LinearLayout xmlns:android="http://schemas.android.com/apk/res/android" android:layout_width="match_parent" android:layout_height="match_parent" android:orientation="vertical" android:padding="10dp"> <TextView android:layout_width="wrap_content" android:layout_height="wrap_content" android:text="Subject" /> <com.google.android.material.textfield.TextInputLayout android:id="@+id/neweventsubject" android:layout_width="match_parent" android:layout_height="wrap_content"> <com.google.android.material.textfield.TextInputEditText android:layout_width="match_parent" android:layout_height="wrap_content" /> </com.google.android.material.textfield.TextInputLayout> <TextView android:layout_width="match_parent" android:layout_height="wrap_content" android:text="Attendees" /> <com.google.android.material.textfield.TextInputLayout android:id="@+id/neweventattendees" android:layout_width="match_parent" android:layout_height="wrap_content"> <com.google.android.material.textfield.TextInputEditText android:layout_width="match_parent" android:layout_height="wrap_content" android:hint="Separate multiple entries with ';'" /> </com.google.android.material.textfield.TextInputLayout> <TextView android:layout_width="match_parent" android:layout_height="wrap_content" android:text="Start" /> <com.google.android.material.textfield.TextInputLayout android:id="@+id/neweventstartdatetime" android:layout_width="match_parent" android:layout_height="wrap_content"> <com.google.android.material.textfield.TextInputEditText android:layout_width="match_parent" android:layout_height="wrap_content" android:focusable="false" android:clickable="true" /> </com.google.android.material.textfield.TextInputLayout> <TextView android:layout_width="match_parent" android:layout_height="wrap_content" android:text="End" /> <com.google.android.material.textfield.TextInputLayout android:id="@+id/neweventenddatetime" android:layout_width="match_parent" android:layout_height="wrap_content"> <com.google.android.material.textfield.TextInputEditText android:layout_width="match_parent" android:layout_height="wrap_content" android:focusable="false" android:clickable="true" /> </com.google.android.material.textfield.TextInputLayout> <TextView android:layout_width="match_parent" android:layout_height="wrap_content" android:text="Body" /> <com.google.android.material.textfield.TextInputLayout android:id="@+id/neweventbody" android:layout_width="match_parent" android:layout_height="0dp" android:layout_weight="1"> <com.google.android.material.textfield.TextInputEditText android:layout_width="match_parent" android:layout_height="match_parent" android:inputType="textMultiLine" android:gravity="top" /> </com.google.android.material.textfield.TextInputLayout> <Button android:id="@+id/createevent" android:layout_width="match_parent" android:layout_height="wrap_content" android:text="Create" /> </LinearLayout>Abra NewEventFragment e adicione as instruções a
importseguir na parte superior do arquivo.import android.util.Log; import android.widget.Button; import com.google.android.material.snackbar.BaseTransientBottomBar; import com.google.android.material.snackbar.Snackbar; import com.google.android.material.textfield.TextInputLayout; import java.time.ZoneId; import java.time.ZonedDateTime;Adicione os membros a seguir à
NewEventFragmentclasse.private TextInputLayout mSubject; private TextInputLayout mAttendees; private TextInputLayout mStartInputLayout; private TextInputLayout mEndInputLayout; private TextInputLayout mBody; private EditTextDateTimePicker mStartPicker; private EditTextDateTimePicker mEndPicker;Adicione as seguintes funções para mostrar e ocultar uma barra de progresso.
private void showProgressBar() {
    getActivity().runOnUiThread(new Runnable() {
        @Override
        public void run() {
            getActivity().findViewById(R.id.progressbar)
                .setVisibility(View.VISIBLE);
            getActivity().findViewById(R.id.fragment_container)
                .setVisibility(View.GONE);
        }
    });
}

private void hideProgressBar() {
    getActivity().runOnUiThread(new Runnable() {
        @Override
        public void run() {
            getActivity().findViewById(R.id.progressbar)
                .setVisibility(View.GONE);
            getActivity().findViewById(R.id.fragment_container)
                .setVisibility(View.VISIBLE);
        }
    });
}
Adicione as seguintes funções para obter os valores dos controles de entrada e chamar a
GraphHelper.createEventfunção.private void createEvent() { String subject = mSubject.getEditText().getText().toString(); String attendees = mAttendees.getEditText().getText().toString(); String body = mBody.getEditText().getText().toString(); ZonedDateTime startDateTime = mStartPicker.getZonedDateTime(); ZonedDateTime endDateTime = mEndPicker.getZonedDateTime(); // Validate boolean isValid = true; // Subject is required if (subject.isEmpty()) { isValid = false; mSubject.setError("You must set a subject"); } // End must be after start if (!endDateTime.isAfter(startDateTime)) { isValid = false; mEndInputLayout.setError("The end must be after the start"); } if (isValid) { // Split the attendees string into an array String[] attendeeArray = attendees.split(";"); GraphHelper.getInstance() .createEvent(subject, startDateTime, endDateTime, mTimeZone, attendeeArray, body) .thenAccept(newEvent -> { hideProgressBar(); Snackbar.make(getView(), "Event created", BaseTransientBottomBar.LENGTH_SHORT).show(); }) .exceptionally(exception -> { hideProgressBar(); Log.e("GRAPH", "Error creating event", exception); Snackbar.make(getView(), exception.getMessage(), BaseTransientBottomBar.LENGTH_LONG).show(); return null; }); } }Substitua o existente pelo
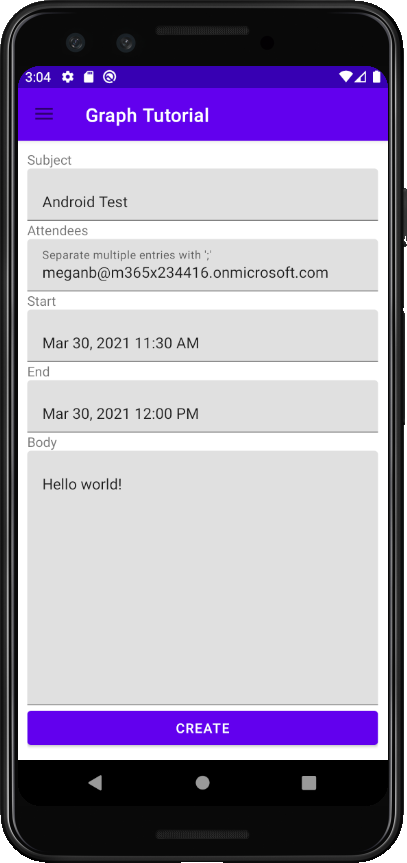
onCreateViewseguinte.@Nullable @Override public View onCreateView(@NonNull LayoutInflater inflater, @Nullable ViewGroup container, @Nullable Bundle savedInstanceState) { View newEventView = inflater.inflate(R.layout.fragment_new_event, container, false); ZoneId userTimeZone = GraphToIana.getZoneIdFromWindows(mTimeZone); mSubject = newEventView.findViewById(R.id.neweventsubject); mAttendees = newEventView.findViewById(R.id.neweventattendees); mBody = newEventView.findViewById(R.id.neweventbody); mStartInputLayout = newEventView.findViewById(R.id.neweventstartdatetime); mStartPicker = new EditTextDateTimePicker(getContext(), mStartInputLayout.getEditText(), userTimeZone); mEndInputLayout = newEventView.findViewById(R.id.neweventenddatetime); mEndPicker = new EditTextDateTimePicker(getContext(), mEndInputLayout.getEditText(), userTimeZone); Button createButton = newEventView.findViewById(R.id.createevent); createButton.setOnClickListener(v -> { // Clear any errors mSubject.setErrorEnabled(false); mEndInputLayout.setErrorEnabled(false); showProgressBar(); createEvent(); }); return newEventView; }Salve suas alterações e reinicie o aplicativo. Selecione o item de menu Novo Evento, preencha o formulário e selecione CRIAR.
Parabéns!
Você concluiu o tutorial do Microsoft Graph Android. Agora que você tem um aplicativo de trabalho que chama a Microsoft Graph, você pode experimentar e adicionar novos recursos. Visite a visão geral do microsoft Graph para ver todos os dados que você pode acessar com o Microsoft Graph.
Comentários
Forneça qualquer comentário sobre este tutorial no repositório GitHub.
Tem algum problema com essa seção? Se tiver, envie seus comentários para que possamos melhorar esta seção.