Criar aplicativos Blazor WebAssembly com o Microsoft Graph
Este tutorial ensina como criar um aplicativo Blazor WebAssembly do lado do cliente que usa a API do Microsoft Graph para recuperar informações de calendário para um usuário.
Dica
Se você preferir apenas baixar o tutorial concluído, poderá baixar ou clonar o GitHub repositório. Consulte o arquivo README na pasta de demonstração para obter instruções sobre como configurar o aplicativo com uma ID do aplicativo e segredo.
Pré-requisitos
Antes de iniciar este tutorial, você deve ter o SDK .NET instalado em sua máquina de desenvolvimento. Se você não tiver o SDK, visite o link anterior para opções de download.
Você também deve ter uma conta pessoal da Microsoft com uma caixa de correio em Outlook.com, ou uma conta de trabalho ou de estudante da Microsoft. Se você não tiver uma conta da Microsoft, há algumas opções para obter uma conta gratuita:
- Você pode se inscrever em uma nova conta pessoal da Microsoft.
- Você pode se inscrever no programa Microsoft 365 desenvolvedor para obter uma assinatura Microsoft 365 gratuita.
Observação
Este tutorial foi escrito com o .NET SDK versão 5.0.302. As etapas neste guia podem funcionar com outras versões, mas que não foram testadas.
Comentários
Forneça qualquer comentário sobre este tutorial no repositório GitHub.
Criar um aplicativo Blazor WebAssembly
Comece criando um aplicativo Blazor WebAssembly.
Abra sua interface de linha de comando (CLI) em um diretório onde você deseja criar o projeto. Execute o seguinte comando:
dotnet new blazorwasm --auth SingleOrg -o GraphTutorialO
--auth SingleOrgparâmetro faz com que o projeto gerado inclua a configuração para autenticação com o plataforma de identidade da Microsoft.Depois que o projeto for criado, verifique se ele funciona alterando o diretório atual para o diretório GraphTutorial e executando o seguinte comando em sua CLI.
dotnet watch runAbra seu navegador e navegue até
https://localhost:5001. Se tudo estiver funcionando, você deverá ver um "Olá, mundo!" Mensagem.
Importante
Se você receber um aviso de que o certificado para localhost não é confiável, você pode usar a CLI do .NET Core para instalar e confiar no certificado de desenvolvimento. Consulte Enforce HTTPS in ASP.NET Core para obter instruções para sistemas operacionais específicos.
Adicionar pacotes NuGet
Antes de continuar, instale alguns pacotes NuGet que você usará posteriormente.
- Microsoft.Graph para fazer chamadas para o Microsoft Graph.
- TimeZoneConverter para traduzir Windows de fuso horário para identificadores IANA.
Execute os seguintes comandos em sua CLI para instalar as dependências.
dotnet add package Microsoft.Graph --version 4.1.0
dotnet add package TimeZoneConverter
Design do aplicativo
Nesta seção, você criará a estrutura básica da interface do usuário do aplicativo.
Remova páginas de exemplo geradas pelo modelo. Exclua os arquivos a seguir.
- ./Pages/Counter.razor
- ./Pages/FetchData.razor
- ./Shared/SurveyPrompt.razor
- ./wwwroot/sample-data/weather.json
Abra ./wwwroot/index.html e adicione o código a seguir pouco antes da marca de
</body>fechamento.<script src="https://code.jquery.com/jquery-3.5.1.slim.min.js" integrity="sha384-DfXdz2htPH0lsSSs5nCTpuj/zy4C+OGpamoFVy38MVBnE+IbbVYUew+OrCXaRkfj" crossorigin="anonymous"></script> <script src="https://cdn.jsdelivr.net/npm/popper.js@1.16.1/dist/umd/popper.min.js" integrity="sha384-9/reFTGAW83EW2RDu2S0VKaIzap3H66lZH81PoYlFhbGU+6BZp6G7niu735Sk7lN" crossorigin="anonymous"></script> <script src="https://stackpath.bootstrapcdn.com/bootstrap/4.5.2/js/bootstrap.min.js" integrity="sha384-B4gt1jrGC7Jh4AgTPSdUtOBvfO8shuf57BaghqFfPlYxofvL8/KUEfYiJOMMV+rV" crossorigin="anonymous"></script>Isso adiciona os arquivos javascript bootstrap .
Abra ./wwwroot/css/app.css e adicione o código a seguir.
.nav-profile-photo {
    width: 36px;
}
Abra ./Shared/NavMenu.razor e substitua seu conteúdo pelo seguinte.
<div class="top-row pl-4 navbar navbar-dark">
    <a class="navbar-brand" href="">GraphTutorial</a>
    <button class="navbar-toggler" @onclick="ToggleNavMenu">
        <span class="navbar-toggler-icon"></span>
    </button>
</div>

<div class="@NavMenuCssClass" @onclick="ToggleNavMenu">
    <ul class="nav flex-column">
        <li class="nav-item px-3">
            <NavLink class="nav-link" href="" Match="NavLinkMatch.All">
                <span class="oi oi-home" aria-hidden="true"></span> Home
            </NavLink>
        </li>
        <li class="nav-item px-3">
            <NavLink class="nav-link" href="calendar">
                <span class="oi oi-calendar" aria-hidden="true"></span> Calendar
            </NavLink>
        </li>
    </ul>
</div>

@code {
    private bool collapseNavMenu = true;

    private string NavMenuCssClass => collapseNavMenu ? "collapse" : null;

    private void ToggleNavMenu()
    {
        collapseNavMenu = !collapseNavMenu;
    }
}
Abra ./Pages/Index.razor e substitua seu conteúdo pelo seguinte.
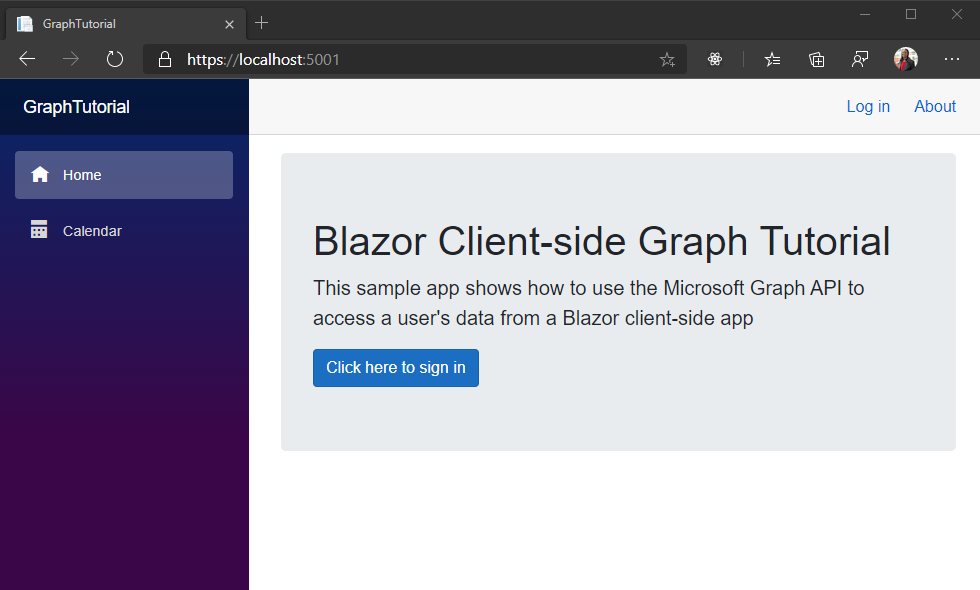
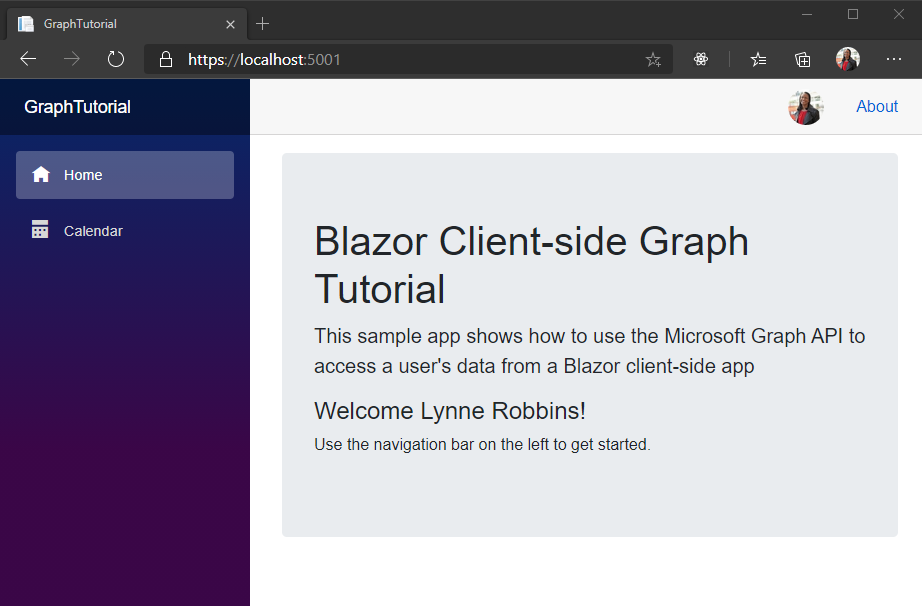
@page "/"

<div class="jumbotron">
    <h1>Blazor Client-side Graph Tutorial</h1>
    <p class="lead">This sample app shows how to use the Microsoft Graph API to access a user's data from a Blazor client-side app</p>
    <AuthorizeView>
        <Authorized>
            <h4>Welcome @context.User.Identity.Name!</h4>
            <p>Use the navigation bar on the left to get started.</p>
        </Authorized>
        <NotAuthorized>
            <a class="btn btn-primary btn-large" href="authentication/login">Click here to sign in</a>
        </NotAuthorized>
    </AuthorizeView>
</div>
Abra ./Shared/LoginDisplay.razor e substitua seu conteúdo pelo seguinte.
@using Microsoft.AspNetCore.Components.Authorization
@using Microsoft.AspNetCore.Components.WebAssembly.Authentication

@inject NavigationManager Navigation
@inject SignOutSessionStateManager SignOutManager

<AuthorizeView>
    <Authorized>
        <a class="text-decoration-none" data-toggle="dropdown" href="#" role="button">
            <img src="/img/no-profile-photo.png" class="nav-profile-photo rounded-circle align-self-center mr-2">
        </a>
        <div class="dropdown-menu dropdown-menu-right">
            <h5 class="dropdown-item-text mb-0">@context.User.Identity.Name</h5>
            <p class="dropdown-item-text text-muted mb-0">placeholder@contoso.com</p>
            <div class="dropdown-divider"></div>
            <button class="dropdown-item" @onclick="BeginLogout">Log out</button>
        </div>
    </Authorized>
    <NotAuthorized>
        <a href="authentication/login">Log in</a>
    </NotAuthorized>
</AuthorizeView>

@code{
    private async Task BeginLogout(MouseEventArgs args)
    {
        await SignOutManager.SetSignOutState();
        Navigation.NavigateTo("authentication/logout");
    }
}
Crie um novo diretório no diretório ./wwwroot chamado img. Adicione um arquivo de imagem de sua escolha chamada no-profile-photo.png neste diretório. Essa imagem será usada como a foto do usuário quando o usuário não tiver nenhuma foto no Microsoft Graph.
Dica
Você pode baixar a imagem usada nessas capturas de tela GitHub.
Salve todas as alterações e atualize a página.
Registrar o aplicativo no portal
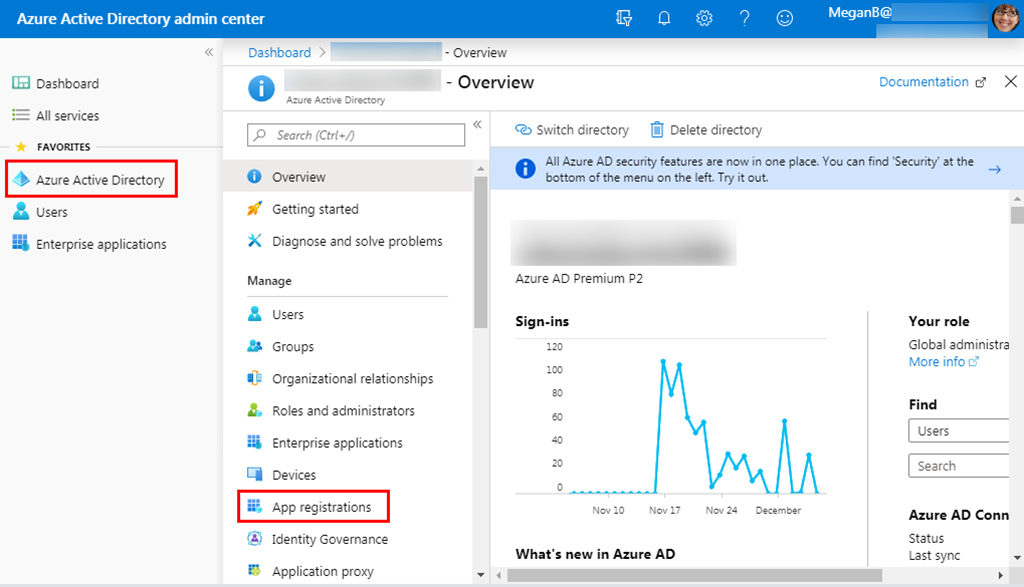
Neste exercício, você criará um novo registro de aplicativo Web do Azure AD usando o Azure Active Directory de administração.
Abra um navegador e navegue até o centro de administração do Azure Active Directory. Faça logon usando uma conta pessoal (também conhecida como Conta da Microsoft) ou Conta Corporativa ou de Estudante.
Selecione Azure Active Directory na navegação esquerda e selecione Registros de aplicativos em Gerenciar.
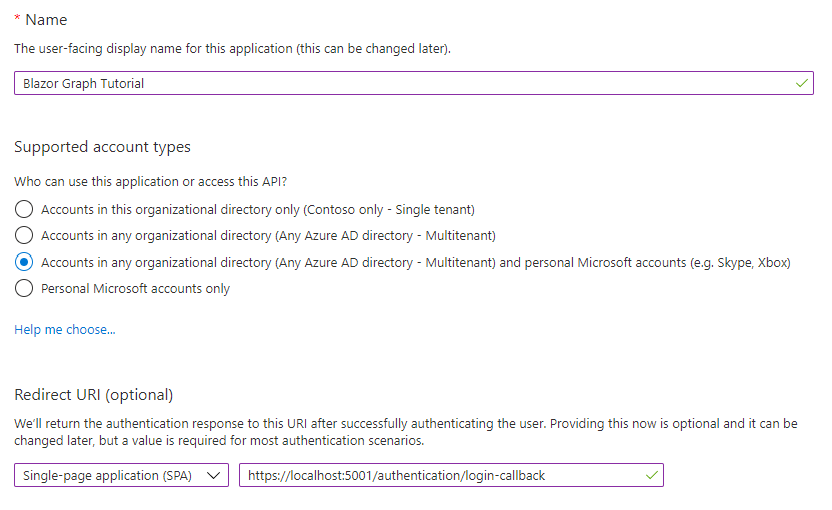
Selecione Novo registro. Na página Registrar um aplicativo, defina os valores da seguinte forma.
- Defina Nome para
Blazor Graph Tutorial. - Defina Tipos de conta com suporte para Contas em qualquer diretório organizacional e contas pessoais da Microsoft.
- Em URI de redirecionamento, de definir o primeiro drop-down como SPA (aplicativo de página única) e definir o valor como
https://localhost:5001/authentication/login-callback.
- Defina Nome para
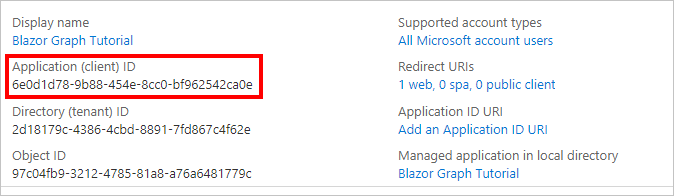
Selecione Registrar. Na página Tutorial do Graph, copie o valor da ID do Aplicativo (cliente) e salve-a, você precisará dele na próxima etapa.
Adicionar autenticação do Azure AD
Neste exercício, você estenderá o aplicativo do exercício anterior para dar suporte à autenticação com o Azure AD. Isso é necessário para obter o token de acesso OAuth necessário para chamar a API do Microsoft Graph.
Abra ./wwwroot/appsettings.json. Adicione uma
GraphScopespropriedade e atualize osAuthorityvalores eClientIdpara corresponder ao seguinte.{ "AzureAd": { "Authority": "https://login.microsoftonline.com/common", "ClientId": "YOUR_APP_ID_HERE", "ValidateAuthority": true }, "GraphScopes": "User.Read;MailboxSettings.Read;Calendars.ReadWrite" }Substitua
YOUR_APP_ID_HEREpela ID do aplicativo do registro do aplicativo.Importante
Se você estiver usando o controle de origem, como git, agora seria um bom momento para excluir o arquivo appsettings.json do controle de origem para evitar o vazamento inadvertida da ID do aplicativo.
Revise os escopos incluídos no
GraphScopesvalor.- User.Read permite que o aplicativo receba o perfil e a foto do usuário.
- MailboxSettings.Read permite que o aplicativo receba configurações de caixa de correio, o que inclui o fuso horário preferencial do usuário.
- Calendars.ReadWrite permite que o aplicativo leia e escreva no calendário do usuário.
Implementar login
Neste ponto, o modelo de projeto do .NET Core adicionou o código para habilitar o login. No entanto, nesta seção, você adicionará código adicional para melhorar a experiência adicionando informações do Microsoft Graph à identidade do usuário.
Abra ./Pages/Authentication.razor e substitua seu conteúdo pelo seguinte.
@page "/authentication/{action}"
@using Microsoft.AspNetCore.Components.WebAssembly.Authentication
<RemoteAuthenticatorView Action="@Action" LogInFailed="LogInFailedFragment" />

@code{
    [Parameter] public string Action { get; set; }

    private static RenderFragment LogInFailedFragment(string message)
    {
        return builder =>
        {
            builder.OpenElement(0, "div");
            builder.AddAttribute(1, "class", "alert alert-danger");
            builder.AddAttribute(2, "role", "alert");
            builder.OpenElement(3, "p");
            builder.AddContent(4, "There was an error trying to log you in.");
            builder.CloseElement();
            if (!string.IsNullOrEmpty(message))
            {
                builder.OpenElement(5, "p");
                builder.AddContent(6, $"Error: {message}");
                builder.CloseElement();
            }
            builder.CloseElement();
        };
    }
}
Isso substitui a mensagem de erro padrão quando o logon falha ao exibir qualquer mensagem de erro retornada pelo processo de autenticação.
Crie um novo diretório na raiz do projeto chamado Graph.
Crie um novo arquivo no diretório ./Graph chamado GraphUserAccountFactory.cs e adicione o código a seguir.
using System.Security.Claims;
using System.Threading.Tasks;
using Microsoft.AspNetCore.Components.WebAssembly.Authentication;
using Microsoft.AspNetCore.Components.WebAssembly.Authentication.Internal;
using Microsoft.Extensions.Logging;
using Microsoft.Graph;

namespace GraphTutorial.Graph
{
    // Extends the AccountClaimsPrincipalFactory that builds
    // a user identity from the identity token.
    // This class adds additional claims to the user's ClaimPrincipal
    // that hold values from Microsoft Graph
    public class GraphUserAccountFactory
        : AccountClaimsPrincipalFactory<RemoteUserAccount>
    {
        private readonly IAccessTokenProviderAccessor accessor;
        private readonly ILogger<GraphUserAccountFactory> logger;

        public GraphUserAccountFactory(IAccessTokenProviderAccessor accessor,
            ILogger<GraphUserAccountFactory> logger)
        : base(accessor)
        {
            this.accessor = accessor;
            this.logger = logger;
        }

        public async override ValueTask<ClaimsPrincipal> CreateUserAsync(
            RemoteUserAccount account,
            RemoteAuthenticationUserOptions options)
        {
            // Create the base user
            var initialUser = await base.CreateUserAsync(account, options);

            // If authenticated, we can call Microsoft Graph
            if (initialUser.Identity.IsAuthenticated)
            {
                try
                {
                    // Add additional info from Graph to the identity
                    await AddGraphInfoToClaims(accessor, initialUser);
                }
                catch (AccessTokenNotAvailableException exception)
                {
                    logger.LogError($"Graph API access token failure: {exception.Message}");
                }
                catch (ServiceException exception)
                {
                    logger.LogError($"Graph API error: {exception.Message}");
                    logger.LogError($"Response body: {exception.RawResponseBody}");
                }
            }

            return initialUser;
        }

        private async Task AddGraphInfoToClaims(
            IAccessTokenProviderAccessor accessor,
            ClaimsPrincipal claimsPrincipal)
        {
            // TEMPORARY: Get the token and log it
            var result = await accessor.TokenProvider.RequestAccessToken();

            if (result.TryGetToken(out var token))
            {
                logger.LogInformation($"Access token: {token.Value}");
            }
        }
    }
}
Essa classe estende a classe AccountClaimsPrincipalFactory e substitui o
CreateUserAsyncmétodo. Por enquanto, esse método registra apenas o token de acesso para fins de depuração. Você implementará as chamadas Graph Microsoft posteriormente neste exercício.Abra ./Program.cs e adicione as instruções a
usingseguir na parte superior do arquivo.using Microsoft.AspNetCore.Components.WebAssembly.Authentication; using GraphTutorial.Graph;Inside
Main, substitua a chamada existentebuilder.Services.AddMsalAuthenticationpelo seguinte.builder.Services.AddMsalAuthentication<RemoteAuthenticationState, RemoteUserAccount>(options => { var scopes = builder.Configuration.GetValue<string>("GraphScopes"); if (string.IsNullOrEmpty(scopes)) { Console.WriteLine("WARNING: No permission scopes were found in the GraphScopes app setting. Using default User.Read."); scopes = "User.Read"; } foreach(var scope in scopes.Split(';')) { Console.WriteLine($"Adding {scope} to requested permissions"); options.ProviderOptions.DefaultAccessTokenScopes.Add(scope); } builder.Configuration.Bind("AzureAd", options.ProviderOptions.Authentication); }) .AddAccountClaimsPrincipalFactory<RemoteAuthenticationState, RemoteUserAccount, GraphUserAccountFactory>();Considere o que esse código faz.
- Ele carrega o valor de
GraphScopesfrom appsettings.json e adiciona cada escopo aos escopos padrão usados pelo provedor MSAL. - Ele substitui o fábrica de contas existente pela classe GraphUserAccountFactory .
- Ele carrega o valor de
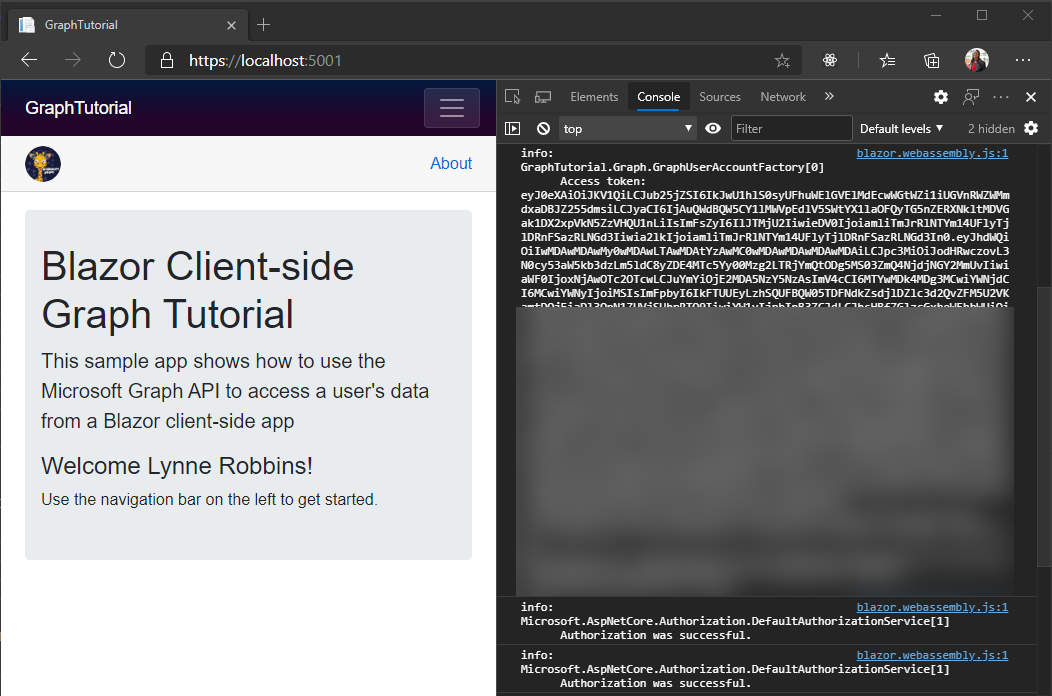
Salve suas alterações e reinicie o aplicativo. Use o link Fazer logoff para fazer logoff. Revise e aceite as permissões solicitadas.
O aplicativo é atualizado com uma mensagem de boas-vindas. Acesse as ferramentas de desenvolvedor do navegador e revise a guia Console . O aplicativo registra o token de acesso.
Obter detalhes do usuário
Depois que o usuário estiver conectado, você pode obter suas informações no Microsoft Graph. Nesta seção, você usará informações da Microsoft Graph adicionar declarações adicionais ao ClaimsPrincipal do usuário.
Crie um novo arquivo no diretório ./Graph chamado GraphClaimsPrincipalExtensions.cs e adicione o código a seguir.
using Microsoft.Graph;
using System;
using System.IO;
using System.Security.Claims;

namespace GraphTutorial
{
    public static class GraphClaimTypes {
        public const string DateFormat = "graph_dateformat";
        public const string Email = "graph_email";
        public const string Photo = "graph_photo";
        public const string TimeZone = "graph_timezone";
        public const string TimeFormat = "graph_timeformat";
    }

    // Helper methods to access Graph user data stored in
    // the claims principal
    public static class GraphClaimsPrincipalExtensions
    {
        public static string GetUserGraphDateFormat(this ClaimsPrincipal claimsPrincipal)
        {
            var claim = claimsPrincipal.FindFirst(GraphClaimTypes.DateFormat);
            return claim == null ? null : claim.Value;
        }

        public static string GetUserGraphEmail(this ClaimsPrincipal claimsPrincipal)
        {
            var claim = claimsPrincipal.FindFirst(GraphClaimTypes.Email);
            return claim == null ? null : claim.Value;
        }

        public static string GetUserGraphPhoto(this ClaimsPrincipal claimsPrincipal)
        {
            var claim = claimsPrincipal.FindFirst(GraphClaimTypes.Photo);
            return claim == null ? null : claim.Value;
        }

        public static string GetUserGraphTimeZone(this ClaimsPrincipal claimsPrincipal)
        {
            var claim = claimsPrincipal.FindFirst(GraphClaimTypes.TimeZone);
            return claim == null ? null : claim.Value;
        }

        public static string GetUserGraphTimeFormat(this ClaimsPrincipal claimsPrincipal)
        {
            var claim = claimsPrincipal.FindFirst(GraphClaimTypes.TimeFormat);
            return claim == null ? null : claim.Value;
        }

        // Adds claims from the provided User object
        public static void AddUserGraphInfo(this ClaimsPrincipal claimsPrincipal, User user)
        {
            var identity = claimsPrincipal.Identity as ClaimsIdentity;

            identity.AddClaim(
                new Claim(GraphClaimTypes.DateFormat,
                    user.MailboxSettings.DateFormat));
            identity.AddClaim(
                new Claim(GraphClaimTypes.Email,
                    user.Mail ?? user.UserPrincipalName));
            identity.AddClaim(
                new Claim(GraphClaimTypes.TimeZone,
                    user.MailboxSettings.TimeZone));
            identity.AddClaim(
                new Claim(GraphClaimTypes.TimeFormat,
                    user.MailboxSettings.TimeFormat));
        }

        // Converts a photo Stream to a Data URI and stores it in a claim
        public static void AddUserGraphPhoto(this ClaimsPrincipal claimsPrincipal, Stream photoStream)
        {
            var identity = claimsPrincipal.Identity as ClaimsIdentity;

            if (photoStream != null)
            {
                // Copy the photo stream to a memory stream
                // to get the bytes out of it
                var memoryStream = new MemoryStream();
                photoStream.CopyTo(memoryStream);
                var photoBytes = memoryStream.ToArray();

                // Generate a date URI for the photo
                var photoUri = $"data:image/png;base64,{Convert.ToBase64String(photoBytes)}";

                identity.AddClaim(
                    new Claim(GraphClaimTypes.Photo, photoUri));
            }
        }
    }
}
Este código implementa métodos de extensão para a classe ClaimsPrincipal que permitem obter e definir declarações com valores de objetos microsoft Graph.
Crie um novo arquivo no diretório ./Graph chamado BlazorAuthProvider.cs e adicione o código a seguir.
using System.Net.Http;
using System.Net.Http.Headers;
using System.Threading.Tasks;
using Microsoft.AspNetCore.Components.WebAssembly.Authentication.Internal;
using Microsoft.Graph;

namespace GraphTutorial.Graph
{
    public class BlazorAuthProvider : IAuthenticationProvider
    {
        private readonly IAccessTokenProviderAccessor accessor;

        public BlazorAuthProvider(IAccessTokenProviderAccessor accessor)
        {
            this.accessor = accessor;
        }

        // Function called every time the GraphServiceClient makes a call
        public async Task AuthenticateRequestAsync(HttpRequestMessage request)
        {
            // Request the token from the accessor
            var result = await accessor.TokenProvider.RequestAccessToken();

            if (result.TryGetToken(out var token))
            {
                // Add the token to the Authorization header
                request.Headers.Authorization =
                    new AuthenticationHeaderValue("Bearer", token.Value);
            }
        }
    }
}
Este código implementa um provedor de autenticação para o SDK do Microsoft Graph que usa o pacote IAccessTokenProviderAccessor fornecido pelo pacote Microsoft.AspNetCore.Components.WebAssembly.Authentication para obter tokens de acesso.
Crie um novo arquivo no diretório ./Graph chamado GraphClientFactory.cs e adicione o código a seguir.
using System.Net.Http;
using Microsoft.AspNetCore.Components.WebAssembly.Authentication.Internal;
using Microsoft.Extensions.Logging;
using Microsoft.Graph;

namespace GraphTutorial.Graph
{
    public class GraphClientFactory
    {
        private readonly IAccessTokenProviderAccessor accessor;
        private readonly HttpClient httpClient;
        private readonly ILogger<GraphClientFactory> logger;
        private GraphServiceClient graphClient;

        public GraphClientFactory(IAccessTokenProviderAccessor accessor,
            HttpClient httpClient,
            ILogger<GraphClientFactory> logger)
        {
            this.accessor = accessor;
            this.httpClient = httpClient;
            this.logger = logger;
        }

        public GraphServiceClient GetAuthenticatedClient()
        {
            // Use the existing one if it's there
            if (graphClient == null)
            {
                // Create a GraphServiceClient using a scoped
                // HttpClient
                graphClient = new GraphServiceClient(httpClient);
                // Configure the auth provider
                graphClient.AuthenticationProvider =
                    new BlazorAuthProvider(accessor);
            }

            return graphClient;
        }
    }
}
Essa classe cria um GraphServiceClient configurado com o BlazorAuthProvider.
Abra ./Program.cs e altere o BaseAddress do novo HttpClient para
"https://graph.microsoft.com".// HttpClient for passing into GraphServiceClient constructor builder.Services.AddScoped(sp => new HttpClient { BaseAddress = new Uri("https://graph.microsoft.com") });Adicione o código a seguir antes da
await builder.Build().RunAsync();linha.builder.Services.AddScoped<GraphClientFactory>();Isso adiciona o GraphClientFactory como um serviço com escopo que podemos disponibilizar por meio da injeção de dependência.
Abra ./Graph/GraphUserAccountFactory.cs e adicione a seguinte propriedade à classe.
private readonly GraphClientFactory clientFactory;Atualize o construtor para pegar um parâmetro GraphClientFactory e atribuí-lo à
clientFactorypropriedade.public GraphUserAccountFactory(IAccessTokenProviderAccessor accessor, GraphClientFactory clientFactory, ILogger<GraphUserAccountFactory> logger) : base(accessor) { this.accessor = accessor; this.clientFactory = clientFactory; this.logger = logger; }Substitua a função
AddGraphInfoToClaimsexistente pela seguinte.private async Task AddGraphInfoToClaims( IAccessTokenProviderAccessor accessor, ClaimsPrincipal claimsPrincipal) { var graphClient = clientFactory.GetAuthenticatedClient(); // Get user profile including mailbox settings // GET /me?$select=displayName,mail,mailboxSettings,userPrincipalName var user = await graphClient.Me .Request() // Request only the properties used to // set claims .Select(u => new { u.DisplayName, u.Mail, u.MailboxSettings, u.UserPrincipalName }) .GetAsync(); logger.LogInformation($"Got user: {user.DisplayName}"); claimsPrincipal.AddUserGraphInfo(user); // Get user's photo // GET /me/photos/48x48/$value var photo = await graphClient.Me .Photos["48x48"] // Smallest standard size .Content .Request() .GetAsync(); claimsPrincipal.AddUserGraphPhoto(photo); }Considere o que esse código faz.
- Obtém o perfil do usuário.
- Ele usa
Selectpara limitar quais propriedades são retornadas.
- Ele usa
- Ele obtém a foto do usuário.
- Ele solicita especificamente a versão de 48 x 48 pixels da foto do usuário.
- Ele adiciona as informações ao ClaimsPrincipal.
- Obtém o perfil do usuário.
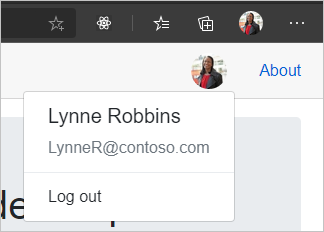
Abra ./Shared/LoginDisplay.razor e faça as seguintes alterações.
- Substitua
/img/no-profile-photo.pngpor@(context.User.GetUserGraphPhoto() ?? "/img/no-profile-photo.png"). - Substitua
placeholder@contoso.compor@context.User.GetUserGraphEmail().
... <img src="@(context.User.GetUserGraphPhoto() ?? "/img/no-profile-photo.png")" class="nav-profile-photo rounded-circle align-self-center mr-2"> ... <p class="dropdown-item-text text-muted mb-0">@context.User.GetUserGraphEmail()</p> ...- Substitua
Salve todas as suas alterações e reinicie o aplicativo. Faça logoff no aplicativo. O aplicativo é atualizado para mostrar a foto do usuário no menu superior. Selecionar a foto do usuário abre um menu suspenso com o nome do usuário, o endereço de email e um botão Sair .
Obter uma exibição de calendário
Nesta seção, você incorporará ainda mais o Microsoft Graph no aplicativo para obter uma exibição do calendário do usuário para a semana atual.
Obter uma exibição de calendário
Crie um novo arquivo no diretório ./Pages chamado Calendar.razor e adicione o código a seguir.
@page "/calendar"
@using Microsoft.Graph
@using TimeZoneConverter

@inject GraphTutorial.Graph.GraphClientFactory clientFactory

<AuthorizeView>
    <Authorized>
        <!-- Temporary JSON dump of events -->
        <code>@graphClient.HttpProvider.Serializer.SerializeObject(events)</code>
    </Authorized>
    <NotAuthorized>
        <RedirectToLogin />
    </NotAuthorized>
</AuthorizeView>

@code{
    [CascadingParameter]
    private Task<AuthenticationState> authenticationStateTask { get; set; }

    private GraphServiceClient graphClient;
    private IList<Event> events = new List<Event>();
    private string dateTimeFormat;
}
Adicione o seguinte código dentro da
@code{}seção.protected override async Task OnInitializedAsync() { // Get the user var user = (await authenticationStateTask).User; var graphTimeZone = user.GetUserGraphTimeZone(); dateTimeFormat = $"{user.GetUserGraphDateFormat()} {user.GetUserGraphTimeFormat()}"; // Calculate the start and end of the current week in user's time zone var startOfWeek = GetUtcStartOfWeekInTimeZone(DateTime.Today, graphTimeZone); var endOfWeek = startOfWeek.AddDays(7); graphClient = clientFactory.GetAuthenticatedClient(); // Specifies the start and end of the view on the calendar // Translates to: ?startDateTime=""&endDateTime="" var viewOptions = new List<QueryOption> { new QueryOption("startDateTime", startOfWeek.ToString("o")), new QueryOption("endDateTime", endOfWeek.ToString("o")) }; var eventPage = await graphClient.Me .CalendarView .Request(viewOptions) // Send user time zone in request so date/time in // response will be in preferred time zone .Header("Prefer", $"outlook.timezone=\"{graphTimeZone}\"") // Get max 50 per request .Top(50) // Only return fields app will use .Select(e => new { e.Subject, e.Organizer, e.Start, e.End }) // Order results chronologically .OrderBy("start/dateTime") .GetAsync(); events = eventPage.CurrentPage; } private DateTime GetUtcStartOfWeekInTimeZone(DateTime today, string timeZoneId) { // Time zone returned by Graph could be Windows or IANA style // TimeZoneConverter can take either TimeZoneInfo userTimeZone = TZConvert.GetTimeZoneInfo(timeZoneId); // Assumes Sunday as first day of week int diff = System.DayOfWeek.Sunday - today.DayOfWeek; // create date as unspecified kind var unspecifiedStart = DateTime.SpecifyKind(today.AddDays(diff), DateTimeKind.Unspecified); // convert to UTC return TimeZoneInfo.ConvertTimeToUtc(unspecifiedStart, userTimeZone); }Considere o que esse código faz.
- Ele obtém o fuso horário, o formato de data e o formato de data do usuário atual das declarações personalizadas adicionadas ao usuário.
- Ele calcula o início e o final da semana atual no fuso horário preferencial do usuário.
- Ele obtém uma exibição de calendário do Microsoft Graph para a semana atual.
- Ele inclui o
Prefer: outlook.timezoneheader para fazer com que a Microsoft Graphstartretornar as propriedadesende no fuso horário especificado. - Ele usa
Top(50)para solicitar até 50 eventos na resposta. - Ele usa
Select(u => new {})para solicitar apenas as propriedades usadas pelo aplicativo. - Ele usa
OrderBy("start/dateTime")para classificar os resultados por hora de início.
- Ele inclui o
Salve todas as suas alterações e reinicie o aplicativo. Escolha o item de nav calendário. O aplicativo exibe uma representação JSON dos eventos retornados do Microsoft Graph.
Exibir os resultados
Agora você pode substituir o despejo JSON por algo mais amigável.
Adicione a seguinte função dentro da
@code{}seção.private string FormatIso8601DateTime(string iso8601DateTime) { // Load into a DateTime var dateTime = DateTime.Parse(iso8601DateTime); if (!string.IsNullOrWhiteSpace(dateTimeFormat)) { // Format it using the user's settings return dateTime.ToString(dateTimeFormat); } // Fallback to return original value return iso8601DateTime; }Esse código pega uma cadeia de caracteres de data ISO 8601 e a converte no formato de data e hora preferencial do usuário.
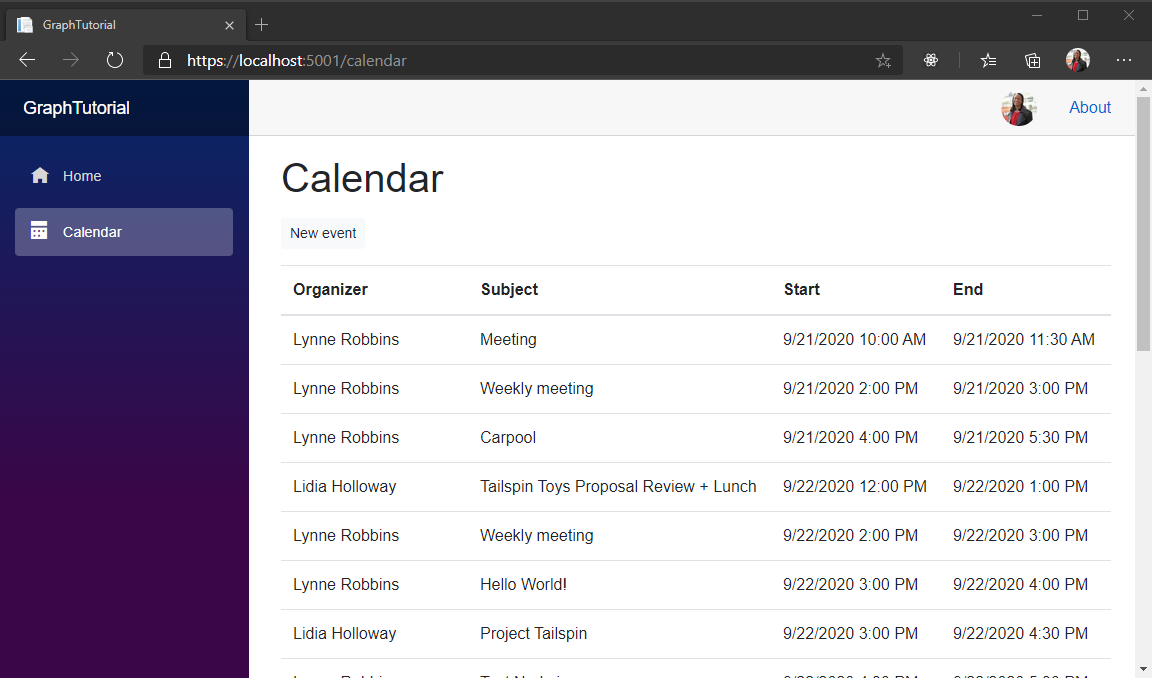
Substitua o
<code>elemento dentro do<Authorized>elemento pelo seguinte.<Authorized> <h1 class="mb-3">Calendar</h1> <a href="/newevent" class="btn btn-light btn-sm mb-3">New event</a> <table class="table"> <thead> <tr> <th>Organizer</th> <th>Subject</th> <th>Start</th> <th>End</th> </tr> </thead> <tbody> @foreach(var calendarEvent in events) { <tr> <td>@calendarEvent.Organizer.EmailAddress.Name</td> <td>@calendarEvent.Subject</td> <td>@FormatIso8601DateTime(calendarEvent.Start.DateTime)</td> <td>@FormatIso8601DateTime(calendarEvent.End.DateTime)</td> </tr> } </tbody> </table> </Authorized>Isso cria uma tabela dos eventos retornados pela Microsoft Graph.
Salve suas alterações e reinicie o aplicativo. Agora, a página Calendário renderiza uma tabela de eventos.
Criar um novo evento
Nesta seção, você adicionará a capacidade de criar eventos no calendário do usuário.
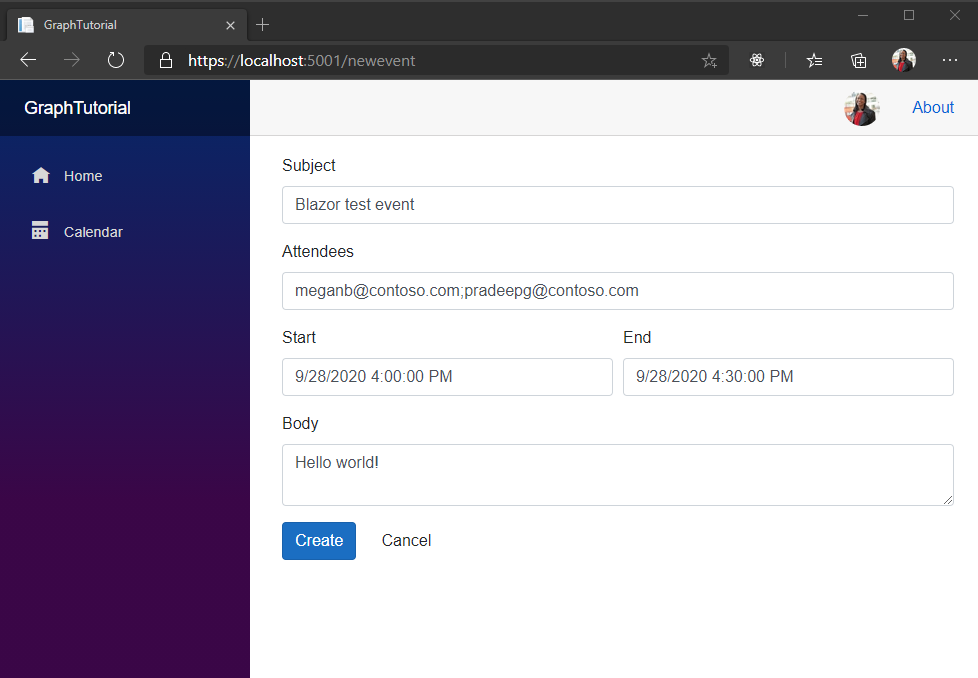
Crie um novo arquivo no diretório ./Pages chamado NewEvent.razor e adicione o código a seguir.
@page "/newevent"
@using Microsoft.Graph

@inject GraphTutorial.Graph.GraphClientFactory clientFactory

<AuthorizeView>
    <Authorized>
        @if (!string.IsNullOrEmpty(status))
        {
            <div class="alert @(isError ? "alert-danger" : "alert-success")">@status</div>
        }
        <form>
            <div class="form-group">
                <label>Subject</label>
                <input @bind="subject" class="form-control" />
            </div>
            <div class="form-group">
                <label>Attendees</label>
                <input @bind="attendees" class="form-control" />
            </div>
            <div class="form-row">
                <div class="col">
                    <div class="form-group">
                        <label>Start</label>
                        <input @bind="start" type="datetime" class="form-control" />
                    </div>
                </div>
                <div class="col">
                    <div class="form-group">
                        <label>End</label>
                        <input @bind="end" type="datetime" class="form-control" />
                    </div>
                </div>
            </div>
            <div class="form-group">
                <label>Body</label>
                <textarea @bind="body" class="form-control"></textarea>
            </div>
        </form>
        <button class="btn btn-primary mr-2" @onclick="CreateEvent">Create</button>
        <a href="/calendar" class="btn btn-secondrary">Cancel</a>
    </Authorized>
    <NotAuthorized>
        <RedirectToLogin />
    </NotAuthorized>
</AuthorizeView>
Isso adiciona um formulário à página para que o usuário possa inserir valores para o novo evento.
Adicione o código a seguir ao final do arquivo.
@code{
    [CascadingParameter]
    private Task<AuthenticationState> authenticationStateTask { get; set; }

    private string status;
    private bool isError;
    private string userTimeZone;
    private string subject;
    private string attendees;
    private DateTime start = new DateTime(DateTime.Today.Ticks);
    private DateTime end = new DateTime(DateTime.Today.Ticks);
    private string body;

    protected override async Task OnInitializedAsync()
    {
        // Get the user's time zone
        var user = (await authenticationStateTask).User;
        userTimeZone = user.GetUserGraphTimeZone() ?? "UTC";
    }

    private async Task CreateEvent()
    {
        // Initalize an Event object
        // with user input
        var newEvent = new Event
        {
            Subject = subject,
            Start = new DateTimeTimeZone
            {
                DateTime = start.ToString("o"),
                TimeZone = userTimeZone
            },
            End = new DateTimeTimeZone
            {
                DateTime = end.ToString("o"),
                TimeZone = userTimeZone
            },
            Body = new ItemBody
            {
                Content = body,
                ContentType = BodyType.Text
            }
        };

        // If the user provided attendees (semicolon-delimited
        // list of email addresses) add them
        if (!string.IsNullOrEmpty(attendees))
        {
            var attendeeList = new List<Attendee>();

            var attendeeArray = attendees.Split(";");
            foreach (var email in attendeeArray)
            {
                Console.WriteLine($"Adding {email}");
                attendeeList.Add(new Attendee
                {
                    // Set to required attendee
                    Type = AttendeeType.Required,
                    EmailAddress = new EmailAddress
                    {
                        Address = email
                    }
                });
            }

            newEvent.Attendees = attendeeList;
        }

        var graphClient = clientFactory.GetAuthenticatedClient();

        try
        {
            // POST /me/events
            await graphClient.Me
                .Events
                .Request()
                .AddAsync(newEvent);

            isError = false;
            status = "Event created";
        }
        catch (ServiceException exception)
        {
            isError = true;
            status = exception.Message;
        }
    }
}
Considere o que esse código faz.
- Nele
OnInitializedAsync, obtém o fuso horário do usuário autenticado. - In
CreateEventit initializes a new Event object using the values from the form. - Ele usa o Graph SDK para adicionar o evento ao calendário do usuário.
- Nele
Salve todas as suas alterações e reinicie o aplicativo. Na página Calendário , selecione Novo evento. Preencha o formulário e escolha Criar.
Parabéns!
Você concluiu o tutorial Do Microsoft WebAssembly Graph Blazor. Agora que você tem um aplicativo de trabalho que chama a Microsoft Graph, você pode experimentar e adicionar novos recursos. Visite a visão geral do microsoft Graph para ver todos os dados que você pode acessar com o Microsoft Graph.
Comentários
Forneça qualquer comentário sobre este tutorial no repositório GitHub.
Tem algum problema com essa seção? Se tiver, envie seus comentários para que possamos melhorar esta seção.