Criar Microsoft Teams aplicativos com o Microsoft Graph
Este tutorial ensina como criar um aplicativo Microsoft Teams usando ASP.NET Core e a API do Microsoft Graph para recuperar informações de calendário para um usuário.
Dica
Se você preferir apenas baixar o tutorial concluído, você pode baixar ou clonar o GitHub repositório. Consulte o arquivo README na pasta de demonstração para obter instruções sobre como configurar o aplicativo com uma ID do aplicativo e segredo.
Pré-requisitos
Antes de iniciar este tutorial, você deve ter o seguinte instalado em sua máquina de desenvolvimento.
Você também deve ter uma conta de estudante ou de trabalho da Microsoft em um locatário Microsoft 365 que tenha habilitado o sideload personalizadoTeams aplicativo. Se você não tiver uma conta de estudante ou de trabalho da Microsoft ou sua organização não tiver habilitado o sideload de aplicativos Teams personalizado, você poderá inscrever-se no Programa de Desenvolvedores do Microsoft 365 para obter uma assinatura gratuita Office 365 desenvolvedor.
Observação
Este tutorial foi escrito com o .NET SDK versão 5.0.302. As etapas neste guia podem funcionar com outras versões, mas que não foram testadas.
Comentários
Forneça qualquer comentário sobre este tutorial no repositório GitHub .
Criar um ASP.NET Core web MVC
Microsoft Teams aplicativos de guia têm várias opções para autenticar o usuário e chamar o Microsoft Graph. Neste exercício, você implementará uma guia que faz logor único para obter um token de auth no cliente e, em seguida, usa o fluxo em nome do servidor para trocar esse token para obter acesso ao Microsoft Graph.
Para outras alternativas, consulte o seguinte.
- Crie uma Microsoft Teams com o Microsoft Graph Toolkit. Este exemplo é completamente do lado do cliente e usa o microsoft Graph Toolkit para lidar com autenticação e fazer chamadas para o Microsoft Graph.
- Microsoft Teams exemplo de autenticação. Este exemplo contém vários exemplos que abrangem diferentes cenários de autenticação.
Criar o projeto
Comece criando um aplicativo ASP.NET Core Web.
Abra sua interface de linha de comando (CLI) em um diretório onde você deseja criar o projeto. Execute o seguinte comando:
dotnet new webapp -o GraphTutorialDepois que o projeto for criado, verifique se ele funciona alterando o diretório atual para o diretório GraphTutorial e executando o seguinte comando em sua CLI.
dotnet runAbra seu navegador e navegue até
https://localhost:5001. Se tudo estiver funcionando, você deverá ver uma página ASP.NET Core padrão.
Importante
Se você receber um aviso de que o certificado para localhost não é confiável, você pode usar a CLI do .NET Core para instalar e confiar no certificado de desenvolvimento. Consulte Enforce HTTPS in ASP.NET Core para obter instruções para sistemas operacionais específicos.
Adicionar pacotes NuGet
Antes de continuar, instale alguns pacotes NuGet que você usará posteriormente.
- Microsoft.Identity.Web para autenticar e solicitar tokens de acesso.
- Microsoft.Identity.Web.MicrosoftGraph para adicionar suporte Graph Microsoft configurado com Microsoft.Identity.Web.
- Microsoft. Graph para atualizar a versão deste pacote instalado por Microsoft.Identity.Web.MicrosoftGraph.
- TimeZoneConverter para traduzir Windows de fuso horário para identificadores IANA.
Execute os seguintes comandos em sua CLI para instalar as dependências.
dotnet add package Microsoft.Identity.Web --version 1.15.2
dotnet add package Microsoft.Identity.Web.MicrosoftGraph --version 1.15.2
dotnet add package Microsoft.Graph --version 4.1.0
dotnet add package TimeZoneConverter
Design do aplicativo
Nesta seção, você criará a estrutura básica da interface do usuário do aplicativo.
Dica
Você pode usar qualquer editor de texto para editar os arquivos de origem deste tutorial. No entanto, Visual Studio Code fornece recursos adicionais, como depuração e Intellisense.
Abra ./Pages/Shared/_Layout.cshtml e substitua todo o conteúdo pelo código a seguir para atualizar o layout global do aplicativo.
<!DOCTYPE html>
<html lang="en">
<head>
  <meta charset="utf-8" />
  <meta name="viewport" content="width=device-width, initial-scale=1.0" />
  <title>@ViewData["Title"] - GraphTutorial</title>
  <link
    rel="stylesheet"
    href="https://static2.sharepointonline.com/files/fabric/office-ui-fabric-core/11.0.0/css/fabric.min.css"
  />
  <link rel="stylesheet" href="~/css/site.css" />
</head>
<body class="ms-Fabric">
  <div class="container">
    <main role="main">
      @RenderBody()
    </main>
  </div>

  <script src="~/lib/jquery/dist/jquery.min.js"></script>
  <script src="https://statics.teams.cdn.office.net/sdk/v1.7.0/js/MicrosoftTeams.min.js"></script>
  <script src="~/js/site.js" asp-append-version="true"></script>

  @RenderSection("Scripts", required: false)
</body>
</html>
Isso substitui Bootstrap por Fluent interfacedo usuário, adiciona o Microsoft Teams SDKe simplifica o layout.
Abra ./wwwroot/js/site.js e adicione o código a seguir.
(function () {
  // Support Teams themes
  microsoftTeams.initialize();

  // On load, match the current theme
  microsoftTeams.getContext((context) => {
    if(context.theme !== 'default') {
      // For Dark and High contrast, set text to white
      document.body.style.color = '#fff';
      document.body.style.setProperty('--border-style', 'solid');
    }
  });

  // Register event listener for theme change
  microsoftTeams.registerOnThemeChangeHandler((theme)=> {
    if(theme !== 'default') {
      document.body.style.color = '#fff';
      document.body.style.setProperty('--border-style', 'solid');
    } else {
      // For default theme, remove inline style
      document.body.style.color = '';
      document.body.style.setProperty('--border-style', 'none');
    }
  });
})();
Isso adiciona um manipulador de alteração de tema simples para alterar a cor de texto padrão para temas escuros e de alto contraste.
Abra ./wwwroot/css/site.css e substitua seu conteúdo pelo seguinte.
:root {
  --border-style: none;
}

.tab-title {
  margin-bottom: .5em;
}

.event-card {
  margin: .5em;
  padding: 1em;
  border-style: var(--border-style);
  border-width: 1px;
  border-color: #fff;
}

.event-card div {
  margin-bottom: .25em;
}

.event-card .ms-Icon {
  margin-right: 10px;
  float: left;
  position: relative;
  top: 3px;
}

.event-card .ms-Icon--MapPin {
  top: 2px;
}

.form-container {
  max-width: 720px;
}

.form-label {
  display: block;
  margin-bottom: .25em;
}

.form-input {
  width: 100%;
  margin-bottom: .25em;
  padding: .5em;
  box-sizing: border-box;
}

.form-button {
  padding: .5em;
}

.result-panel {
  display: none;
  padding: 1em;
  margin: 1em;
}

.error-msg {
  color: red;
}

.success-msg {
  color: green;
}
Abra ./Pages/Index.cshtml e substitua seu conteúdo pelo código a seguir.
@page
@model IndexModel
@{
  ViewData["Title"] = "Home page";
}

<div id="tab-container">
  <h1 class="ms-fontSize-24 ms-fontWeight-semibold">Loading...</h1>
</div>

@section Scripts
{
  <script>
  </script>
}
Abra ./Startup.cs e remova
app.UseHttpsRedirection();a linha noConfiguremétodo. Isso é necessário para que o túnel de ngrok funcione.
Executar ngrok
Microsoft Teams não dá suporte à hospedagem local para aplicativos. O servidor que hospeda seu aplicativo deve estar disponível na nuvem usando pontos de extremidade HTTPS. Para depurar localmente, você pode usar o ngrok para criar uma URL pública para seu projeto hospedado localmente.
Abra sua CLI e execute o seguinte comando para iniciar o ngrok.
ngrok http 5000Depois que o ngrok começar, copie a URL de Encaminhamento HTTPS. Deve ter a aparência
https://50153897dd4d.ngrok.iode . Você precisará desse valor nas etapas posteriores.
Importante
Se você estiver usando a versão gratuita do ngrok, a URL de encaminhamento será modificada sempre que você reiniciar o ngrok. É recomendável que você deixe o ngrok em execução até concluir este tutorial para manter a mesma URL. Se você precisar reiniciar o ngrok, será necessário atualizar sua URL em todos os lugares em que ela for usada e reinstalar o aplicativo Microsoft Teams.
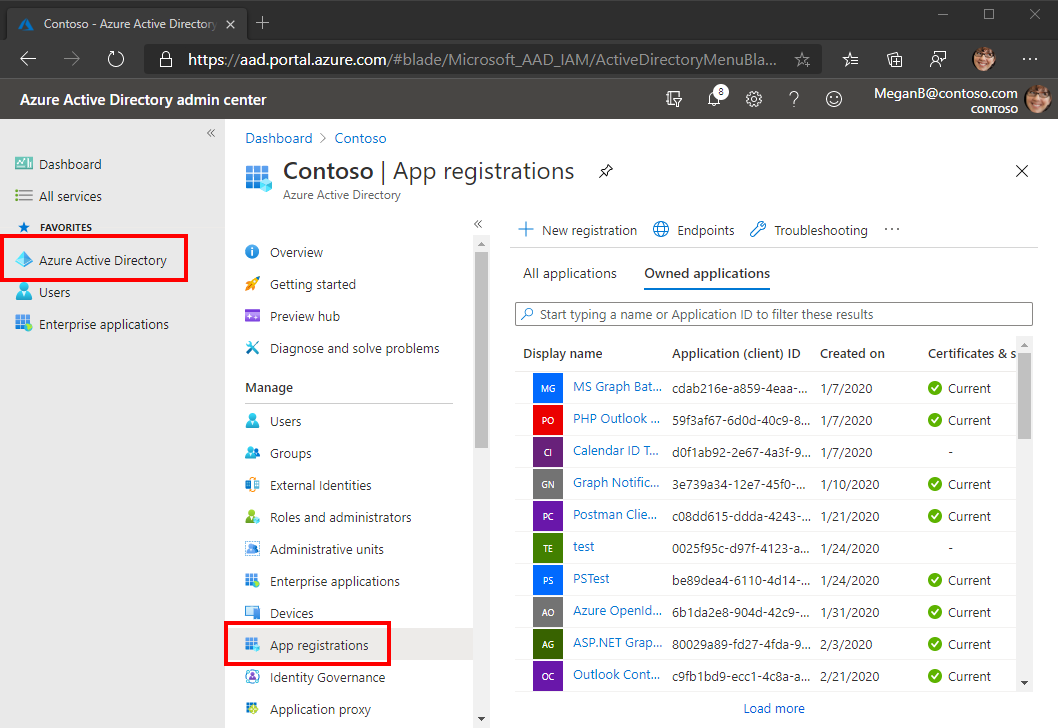
Registrar o aplicativo no portal
Neste exercício, você criará um novo registro de aplicativo Web do Azure AD usando o Azure Active Directory de administração.
Abra um navegador e navegue até o centro de administração do Azure Active Directory. Faça logon usando uma conta pessoal (também conhecida como Conta da Microsoft) ou Conta Corporativa ou de Estudante.
Selecione Azure Active Directory na navegação esquerda e selecione Registros de aplicativos em Gerenciar.
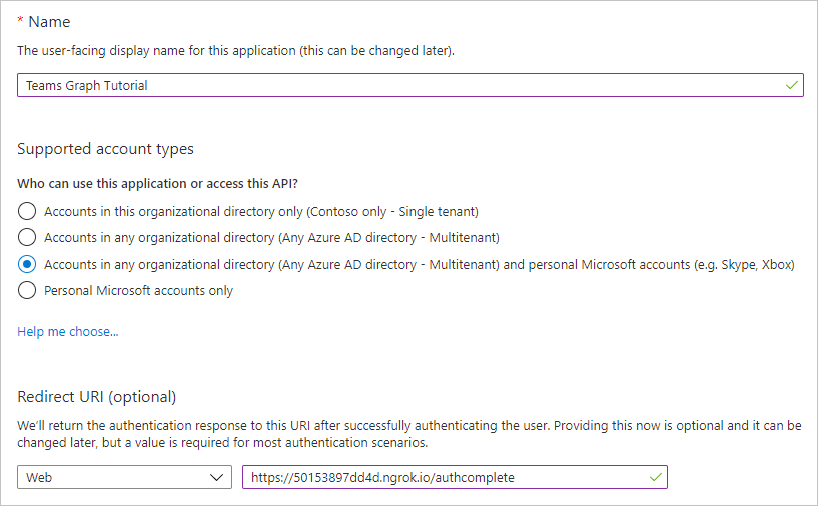
Selecione Novo registro. Na página Registrar um aplicativo, de definir os valores da seguinte forma, onde está a URL de encaminhamento de ngrok que você
YOUR_NGROK_URLcopiou na seção anterior.- Defina Nome para
Teams Graph Tutorial. - Defina Tipos de conta com suporte para Contas em qualquer diretório organizacional e contas pessoais da Microsoft.
- Em URI de Redirecionamento, defina o primeiro menu suspenso para
Webe defina o valor comoYOUR_NGROK_URL/authcomplete.
- Defina Nome para
Selecione Registrar. Na página Teams Graph Tutorial, copie o valor da ID do Aplicativo (cliente) e salve-a, você precisará dela na próxima etapa.
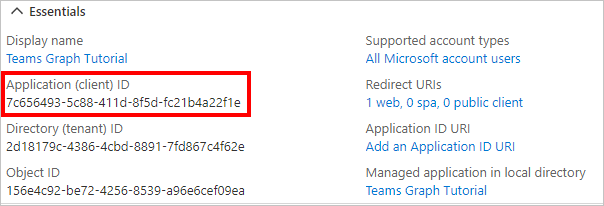
Selecione Autenticação em Gerenciar. Localize a seção Concessão Implícita e habilita tokens de Acesso e tokens de ID. Selecione Salvar.
Selecione Certificados e segredos sob Gerenciar. Selecione o botão Novo segredo do cliente. Insira um valor em Descrição e selecione uma das opções para Expira em e selecione Adicionar.
Copie o valor secreto do cliente antes de sair desta página. Você precisará dele na próxima etapa.
Importante
Este segredo do cliente nunca é mostrado novamente, portanto, copie-o agora.
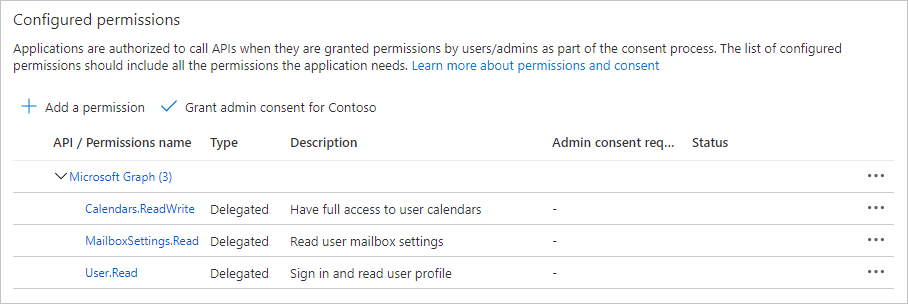
Selecione permissões de API em Gerenciar, em seguida, selecione Adicionar uma permissão.
Selecione Microsoft Graph, em seguida, Permissões delegadas.
Selecione as seguintes permissões e selecione Adicionar permissões.
- Calendars.ReadWrite - isso permitirá que o aplicativo leia e escreva no calendário do usuário.
- MailboxSettings.Read - isso permitirá que o aplicativo receba o fuso horário, o formato de data e o formato de hora do usuário a partir de suas configurações de caixa de correio.
Configurar Teams login único
Nesta seção, você atualizará o registro do aplicativo para dar suporte ao login único no Teams.
Selecione Expor uma API. Selecione o link Definir ao lado de ID do Aplicativo URI. Insira o nome de domínio da URL de encaminhamento de ngrok (com uma barra de encaminhamento "/" anexada ao final) entre as barras de avanço duplo e o GUID. A ID inteira deve ser semelhante a:
api://50153897dd4d.ngrok.io/ae7d8088-3422-4c8c-a351-6ded0f21d615.Na seção Escopos definidos por esta API, selecione Adicionar um escopo. Preencha os campos da seguinte forma e selecione Adicionar escopo.
- Nome do escopo:
access_as_user - Who podem consentir?: Administradores e usuários
- Nome de exibição de consentimento do administrador:
Access the app as the user - Descrição do consentimento do administrador:
Allows Teams to call the app's web APIs as the current user. - Nome de exibição de consentimento do usuário:
Access the app as you - Descrição do consentimento do usuário:
Allows Teams to call the app's web APIs as you. - Estado: Habilitado
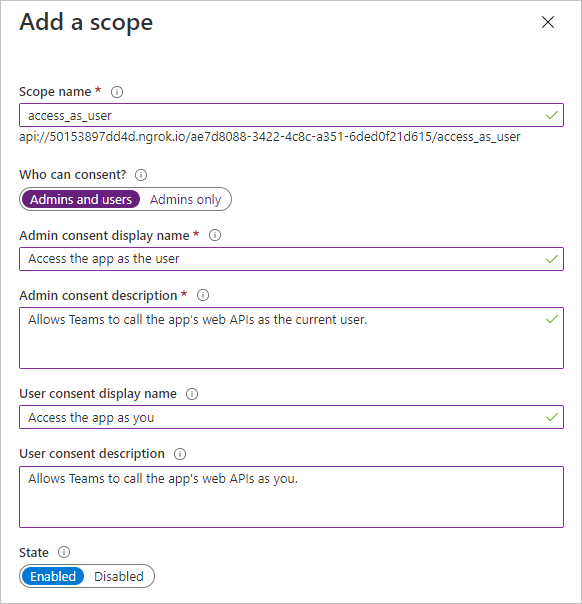
- Nome do escopo:
Na seção Aplicativos cliente autorizados, selecione Adicionar um aplicativo cliente. Insira uma ID do cliente na lista a seguir, habilita o escopo em Escopos Autorizados e selecione Adicionar aplicativo. Repita esse processo para cada uma das IDs do cliente na lista.
1fec8e78-bce4-4aaf-ab1b-5451cc387264(Teams aplicativo móvel/desktop)5e3ce6c0-2b1f-4285-8d4b-75ee78787346(Teams web)
Criar manifesto do aplicativo
O manifesto do aplicativo descreve como o aplicativo se integra ao Microsoft Teams e é necessário instalar aplicativos. Nesta seção, você usará o App Studio no cliente Microsoft Teams para gerar um manifesto.
Se você ainda não tiver o App Studio instalado no Teams, instale-o agora.
Iniciar o App Studio no Microsoft Teams e selecione o editor de manifesto.
Selecione Criar um novo aplicativo.

Na página Detalhes do aplicativo, preencha os campos necessários.
Observação
Você pode usar os ícones padrão na seção Identidade Visual ou carregar seus próprios.
No menu à esquerda, selecione Guias em Recursos.
Selecione Adicionar em Adicionar uma guia pessoal.
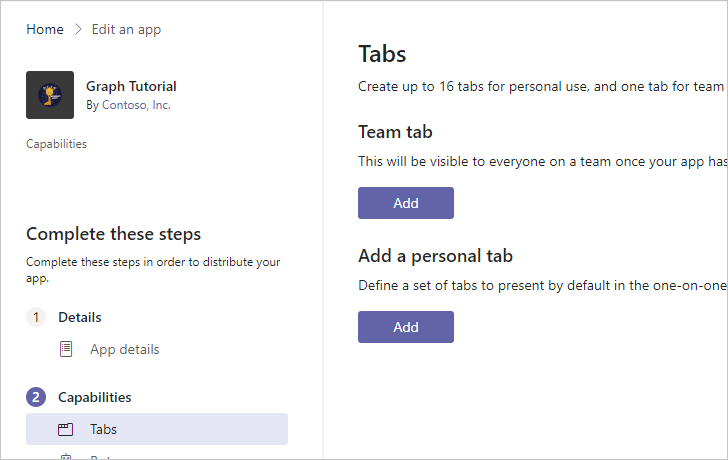
Preencha os campos da seguinte forma, onde está a URL de encaminhamento que você
YOUR_NGROK_URLcopiou na seção anterior. Selecione salvar quando terminar.- Nome:
Create event - ID da entidade:
createEventTab - URL de conteúdo:
YOUR_NGROK_URL/newevent
- Nome:
Selecione Adicionar em Adicionar uma guia pessoal.
Preencha os campos da seguinte forma, onde está a URL de encaminhamento que você
YOUR_NGROK_URLcopiou na seção anterior. Selecione salvar quando terminar.- Nome:
Graph calendar - ID da entidade:
calendarTab - URL de conteúdo:
YOUR_NGROK_URL
- Nome:
No menu à esquerda, selecione Domínios e permissões em Concluir.
De definir a ID do Aplicativo AAD para a ID do aplicativo a partir do registro do aplicativo.
De definir o campo Single-Sign-On como o URI de ID do aplicativo a partir do registro do aplicativo.
No menu à esquerda, selecione Testar e distribuir em Concluir. Selecione Baixar.
Crie um novo diretório na raiz do projeto chamado Manifesto. Extraia o conteúdo do arquivo ZIP baixado para este diretório.
Adicionar autenticação do Azure AD
Neste exercício, você estenderá o aplicativo do exercício anterior para dar suporte à autenticação de login único com o Azure AD. Isso é necessário para obter o token de acesso OAuth necessário para chamar a API do Microsoft Graph. Nesta etapa, você configurará a biblioteca Microsoft.Identity.Web.
Importante
Para evitar armazenar a ID do aplicativo e o segredo na origem, você usará o .NET Secret Manager para armazenar esses valores. O Gerenciador Secreto é apenas para fins de desenvolvimento, os aplicativos de produção devem usar um gerente secreto confiável para armazenar segredos.
Abra ./appsettings.jse substitua seu conteúdo pelo seguinte.
{
  "AzureAd": {
    "Instance": "https://login.microsoftonline.com/",
    "TenantId": "common"
  },
  "Graph": {
    "Scopes": "https://graph.microsoft.com/.default"
  },
  "Logging": {
    "LogLevel": {
      "Default": "Information",
      "Microsoft": "Warning",
      "Microsoft.Hosting.Lifetime": "Information"
    }
  },
  "AllowedHosts": "*"
}
Abra sua CLI no diretório onde GraphTutorial.csproj está localizado e execute os comandos a seguir, substituindo com sua ID de aplicativo do portal do Azure e com seu segredo do
YOUR_APP_IDYOUR_APP_SECRETaplicativo.dotnet user-secrets init dotnet user-secrets set "AzureAd:ClientId" "YOUR_APP_ID" dotnet user-secrets set "AzureAd:ClientSecret" "YOUR_APP_SECRET"
Implementar login
Primeiro, implemente o logom único no código JavaScript do aplicativo. Você usará o Microsoft Teams JavaScript SDK para obter um token de acesso que permite que o código JavaScript em execução no cliente Teams faça chamadas AJAX para a API Web que você implementará posteriormente.
Abra ./Pages/Index.cshtml e adicione o seguinte código dentro da
<script>marca.(function () { if (microsoftTeams) { microsoftTeams.initialize(); microsoftTeams.authentication.getAuthToken({ successCallback: (token) => { // TEMPORARY: Display the access token for debugging $('#tab-container').empty(); $('<code/>', { text: token, style: 'word-break: break-all;' }).appendTo('#tab-container'); }, failureCallback: (error) => { renderError(error); } }); } })(); function renderError(error) { $('#tab-container').empty(); $('<h1/>', { text: 'Error' }).appendTo('#tab-container'); $('<code/>', { text: JSON.stringify(error, Object.getOwnPropertyNames(error)), style: 'word-break: break-all;' }).appendTo('#tab-container'); }Isso chama a
microsoftTeams.authentication.getAuthTokenautenticação silenciosa como o usuário que está Teams. Normalmente, não há nenhum prompt de interface do usuário envolvido, a menos que o usuário tenha que consentir. Em seguida, o código exibe o token na guia.Salve suas alterações e inicie seu aplicativo executando o seguinte comando em sua CLI.
dotnet runImportante
Se você reiniciou o ngrok e sua URL ngrok foi alterada, certifique-se de atualizar o valor ngrok no local a seguir antes de testar.
- O URI de redirecionamento no registro do aplicativo
- O URI de ID do aplicativo no registro do aplicativo
contentUrlem manifest.jsonvalidDomainsem manifest.jsonresourceem manifest.json
Crie um arquivo ZIP commanifest.jsem, color.png e outline.png.
Em Microsoft Teams, selecione Aplicativos na barra à esquerda, selecione Upload um aplicativo personalizado e selecione Upload para mim ou minhas equipes.
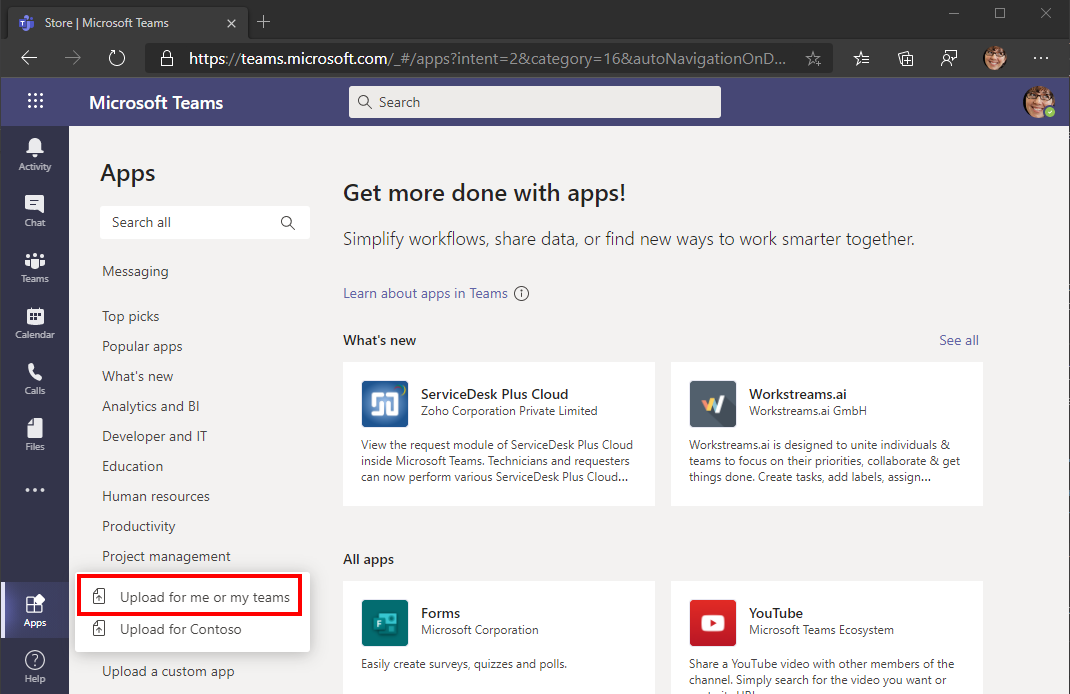
Navegue até o arquivo ZIP criado anteriormente e selecione Abrir.
Revise as informações do aplicativo e selecione Adicionar.
O aplicativo é aberto Teams e exibe um token de acesso.
Se você copiar o token, poderá colar em jwt.ms. Verifique se a audiência (a declaração) é sua ID do aplicativo e o único escopo (a declaração) é o escopo aud da API que você scp access_as_user criou. Isso significa que esse token não concede acesso direto à Microsoft Graph! Em vez disso, a API Da Web que você implementará em breve precisará trocar esse token usando o fluxo em nome do fluxo para obter um token que funcionará com as chamadas Graph Microsoft.
Configurar autenticação no ASP.NET Core aplicativo
Comece adicionando os serviços da plataforma Microsoft Identity ao aplicativo.
Abra o arquivo ./Startup.cs e adicione a
usinginstrução a seguir à parte superior do arquivo.using Microsoft.Identity.Web;Adicione a seguinte linha pouco antes
app.UseAuthorization();da linha naConfigurefunção.app.UseAuthentication();Adicione a seguinte linha logo após
endpoints.MapRazorPages();a linha naConfigurefunção.endpoints.MapControllers();Substitua a função
ConfigureServicesexistente pela seguinte.public void ConfigureServices(IServiceCollection services) { // Use Web API authentication (default JWT bearer token scheme) services.AddMicrosoftIdentityWebApiAuthentication(Configuration) // Enable token acquisition via on-behalf-of flow .EnableTokenAcquisitionToCallDownstreamApi() // Specify that the down-stream API is Graph .AddMicrosoftGraph(Configuration.GetSection("Graph")) // Use in-memory token cache // See https://github.com/AzureAD/microsoft-identity-web/wiki/token-cache-serialization .AddInMemoryTokenCaches(); services.AddRazorPages(); services.AddControllers().AddNewtonsoftJson(); }Esse código configura o aplicativo para permitir que as chamadas para APIs da Web sejam autenticadas com base no token de portador JWT no
Authorizationheader. Ele também adiciona os serviços de aquisição de token que podem trocar esse token por meio do fluxo em nome do fluxo.
Criar o controlador da API Web
Crie um novo diretório na raiz do projeto chamado Controladores.
Crie um novo arquivo no diretório ./Controllers chamado CalendarController.cs e adicione o código a seguir.
using System;
using System.Collections.Generic;
using System.Net;
using System.Threading.Tasks;
using Microsoft.AspNetCore.Authorization;
using Microsoft.AspNetCore.Http;
using Microsoft.AspNetCore.Mvc;
using Microsoft.Extensions.Logging;
using Microsoft.Identity.Web;
using Microsoft.Identity.Web.Resource;
using Microsoft.Graph;
using TimeZoneConverter;

namespace GraphTutorial.Controllers
{
    [ApiController]
    [Route("[controller]")]
    [Authorize]
    public class CalendarController : ControllerBase
    {
        private static readonly string[] apiScopes = new[] { "access_as_user" };

        private readonly GraphServiceClient _graphClient;
        private readonly ITokenAcquisition _tokenAcquisition;
        private readonly ILogger<CalendarController> _logger;

        public CalendarController(ITokenAcquisition tokenAcquisition, GraphServiceClient graphClient, ILogger<CalendarController> logger)
        {
            _tokenAcquisition = tokenAcquisition;
            _graphClient = graphClient;
            _logger = logger;
        }

        [HttpGet]
        public async Task<ActionResult<string>> Get()
        {
            // This verifies that the access_as_user scope is
            // present in the bearer token, throws if not
            HttpContext.VerifyUserHasAnyAcceptedScope(apiScopes);

            // To verify that the identity libraries have authenticated
            // based on the token, log the user's name
            _logger.LogInformation($"Authenticated user: {User.GetDisplayName()}");

            try
            {
                // TEMPORARY
                // Get a Graph token via OBO flow
                var token = await _tokenAcquisition
                    .GetAccessTokenForUserAsync(new[]{
                        "User.Read",
                        "MailboxSettings.Read",
                        "Calendars.ReadWrite" });

                // Log the token
                _logger.LogInformation($"Access token for Graph: {token}");
                return Ok("{ \"status\": \"OK\" }");
            }
            catch (MicrosoftIdentityWebChallengeUserException ex)
            {
                _logger.LogError(ex, "Consent required");
                // This exception indicates consent is required.
                // Return a 403 with "consent_required" in the body
                // to signal to the tab it needs to prompt for consent
                return new ContentResult {
                    StatusCode = (int)HttpStatusCode.Forbidden,
                    ContentType = "text/plain",
                    Content = "consent_required"
                };
            }
            catch (Exception ex)
            {
                _logger.LogError(ex, "Error occurred");
                throw;
            }
        }
    }
}
Isso implementa uma API da Web ( ) que pode ser chamada a partir
GET /calendarda guia Teams. Por enquanto, ele simplesmente tenta trocar o token do portador por um Graph token. Na primeira vez que um usuário carregar a guia, isso falhará porque ele ainda não consentiu em permitir o acesso do aplicativo à Microsoft Graph em seu nome.Abra ./Pages/Index.cshtml e substitua a
successCallbackfunção pelo seguinte.successCallback: (token) => { // TEMPORARY: Call the Web API fetch('/calendar', { headers: { 'Authorization': `Bearer ${token}` } }).then(response => { response.text() .then(body => { $('#tab-container').empty(); $('<code/>', { text: body }).appendTo('#tab-container'); }); }).catch(error => { console.error(error); renderError(error); }); }Isso chamará a API da Web e exibirá a resposta.
Salve suas alterações e reinicie o aplicativo. Atualize a guia no Microsoft Teams. A página deve exibir
consent_required.Revise a saída de log em sua CLI. Observe duas coisas.
- Uma entrada como
Authenticated user: MeganB@contoso.com. A API Da Web autentica o usuário com base no token enviado com a solicitação de API. - Uma entrada como
AADSTS65001: The user or administrator has not consented to use the application with ID.... Isso é esperado, já que o usuário ainda não foi solicitado a consentir para os escopos de permissão solicitados da Microsoft Graph permissão.
- Uma entrada como
Implementar prompt de consentimento
Como a API Da Web não pode solicitar ao usuário, Teams guia de Teams precisará implementar um prompt. Isso só precisará ser feito uma vez para cada usuário. Depois que um usuário consentir, ele não precisará reavaler, a menos que ele revoque explicitamente o acesso ao seu aplicativo.
Crie um novo arquivo no diretório ./Pages chamado Authenticate.cshtml.cs e adicione o código a seguir.
using Microsoft.AspNetCore.Mvc.RazorPages;
using Microsoft.Extensions.Configuration;
using Microsoft.Extensions.Logging;

namespace GraphTutorial.Pages
{
    public class AuthenticateModel : PageModel
    {
        private readonly ILogger<IndexModel> _logger;
        public string ApplicationId { get; private set; }
        public string State { get; private set; }
        public string Nonce { get; private set; }

        public AuthenticateModel(IConfiguration configuration,
          ILogger<IndexModel> logger)
        {
            _logger = logger;

            // Read the application ID from the
            // configuration. This is used to build
            // the authorization URL for the consent prompt
            ApplicationId = configuration
                .GetSection("AzureAd")
                .GetValue<string>("ClientId");

            // Generate a GUID for state and nonce
            State = System.Guid.NewGuid().ToString();
            Nonce = System.Guid.NewGuid().ToString();
        }
    }
}
Crie um novo arquivo no diretório ./Pages chamado Authenticate.cshtml e adicione o código a seguir.
@page
<!-- Copyright (c) Microsoft Corporation.
     Licensed under the MIT License. -->
@model AuthenticateModel

@section Scripts
{
  <script>
    (function () {
      microsoftTeams.initialize();

      // Save the state so it can be verified in
      // AuthComplete.cshtml
      localStorage.setItem('auth-state', '@Model.State');

      // Get the context for tenant ID and login hint
      microsoftTeams.getContext((context) => {
        // Set all of the query parameters for an
        // authorization request
        const queryParams = {
          client_id: '@Model.ApplicationId',
          response_type: 'id_token token',
          response_mode: 'fragment',
          scope: 'https://graph.microsoft.com/.default openid',
          redirect_uri: `${window.location.origin}/authcomplete`,
          nonce: '@Model.Nonce',
          state: '@Model.State',
          login_hint: context.loginHint,
        };

        // Generate the URL
        const authEndpoint = `https://login.microsoftonline.com/${context.tid}/oauth2/v2.0/authorize?${toQueryString(queryParams)}`;

        // Browse to the URL
        window.location.assign(authEndpoint);
      });
    })();

    // Helper function to build a query string from an object
    function toQueryString(queryParams) {
      let encodedQueryParams = [];
      for (let key in queryParams) {
        encodedQueryParams.push(key + '=' + encodeURIComponent(queryParams[key]));
      }
      return encodedQueryParams.join('&');
    }
  </script>
}
Crie um novo arquivo no diretório ./Pages chamado AuthComplete.cshtml e adicione o código a seguir.
@page
<!-- Copyright (c) Microsoft Corporation.
     Licensed under the MIT License. -->

@section Scripts
{
  <script>
    (function () {
      microsoftTeams.initialize();

      const hashParams = getHashParameters();
      if (hashParams['error']) {
        microsoftTeams.authentication.notifyFailure(hashParams['error']);
      } else if (hashParams['access_token']) {
        // Check the state parameter
        const expectedState = localStorage.getItem('auth-state');
        if (expectedState !== hashParams['state']) {
          microsoftTeams.authentication.notifyFailure('StateDoesNotMatch');
        } else {
          // State parameter matches, report success
          localStorage.removeItem('auth-state');
          microsoftTeams.authentication.notifySuccess('Success');
        }
      } else {
        microsoftTeams.authentication.notifyFailure('NoTokenInResponse');
      }
    })();

    // Helper function to generate a hash from
    // a query string
    function getHashParameters() {
      let hashParams = {};
      location.hash.substr(1).split('&').forEach(function(item) {
        let s = item.split('='),
        k = s[0],
        v = s[1] && decodeURIComponent(s[1]);
        hashParams[k] = v;
      });
      return hashParams;
    }
  </script>
}
Abra ./Pages/Index.cshtml e adicione as seguintes funções dentro da
<script>marca.function loadUserCalendar(token, callback) { // Call the API fetch('/calendar', { headers: { 'Authorization': `Bearer ${token}` } }).then(response => { if (response.ok) { // Get the JSON payload response.json() .then(events => { callback(events); }); } else if (response.status === 403) { response.text() .then(body => { // If the API sent 'consent_required' // we need to prompt the user if (body === 'consent_required') { promptForConsent((error) => { if (error) { renderError(error); } else { // Retry API call loadUserCalendar(token, callback); } }); } }); } }).catch(error => { renderError(error); }); } function promptForConsent(callback) { // Cause Teams to popup a window for consent microsoftTeams.authentication.authenticate({ url: `${window.location.origin}/authenticate`, width: 600, height: 535, successCallback: (result) => { callback(null); }, failureCallback: (error) => { callback(error); } }); }Adicione a seguinte função dentro da
<script>marca para exibir um resultado bem-sucedido da API Web.function renderCalendar(events) { $('#tab-container').empty(); $('<pre/>').append($('<code/>', { text: JSON.stringify(events, null, 2), style: 'word-break: break-all;' })).appendTo('#tab-container'); }Substitua o existente
successCallbackpelo código a seguir.successCallback: (token) => { loadUserCalendar(token, (events) => { renderCalendar(events); }); }Salve suas alterações e reinicie o aplicativo. Atualize a guia no Microsoft Teams. Você deve obter uma janela pop-up solicitando consentimento para os escopos Graph permissões da Microsoft. Depois de aceitar, a guia deve exibir
{ "status": "OK" }.Observação
Se a guia for
"FailedToOpenWindow"exibida, desabilite bloqueadores pop-up no navegador e recarregue a página.Revise a saída do log. Você deve ver a
Access token for Graphentrada. Se você analisar esse token, você perceberá que ele contém os escopos Graph Microsoft configurados emappsettings.js em.
Armazenar e atualizar tokens
Neste ponto, seu aplicativo tem um token de acesso, que é enviado no Authorization header de chamadas da API. Este é o token que permite que o aplicativo acesse o Microsoft Graph em nome do usuário.
No entanto, esse token tem vida curta. O token expira uma hora após a emissão. É aqui que o token de atualização se torna útil. O token de atualização permite que o aplicativo solicite um novo token de acesso sem exigir que o usuário faça login novamente.
Como o aplicativo está usando a biblioteca Microsoft.Identity.Web, você não precisa implementar nenhum armazenamento de token ou lógica de atualização.
O aplicativo usa o cache de token na memória, o que é suficiente para aplicativos que não precisam persistir tokens quando o aplicativo é reiniciado. Em vez disso, os aplicativos de produção podem usar as opções de cache distribuído na biblioteca Microsoft.Identity.Web.
O GetAccessTokenForUserAsync método lida com a expiração do token e a atualização para você. Ele primeiro verifica o token armazenado em cache e, se não estiver expirado, ele o retornará. Se expirar, ele usará o token de atualização em cache para obter um novo.
O GraphServiceClient que os controladores obterem por injeção de dependência é pré-configurado com um provedor de autenticação que GetAccessTokenForUserAsync usa para você.
Obter uma exibição de calendário
Nesta seção, você incorporará o Microsoft Graph no aplicativo. Para este aplicativo, você usará a Biblioteca de Clientes do Microsoft Graph para .NET para fazer chamadas para o Microsoft Graph.
Obter uma exibição de calendário
Uma exibição de calendário é um conjunto de eventos do calendário do usuário que ocorrem entre dois pontos de tempo. Você usará isso para obter os eventos do usuário para a semana atual.
Abra ./Controllers/CalendarController.cs e adicione a seguinte função à classe CalendarController.
private DateTime GetUtcStartOfWeekInTimeZone(DateTime today, string timeZoneId)
{
    // Time zone returned by Graph could be Windows or IANA style
    // TimeZoneConverter can take either
    TimeZoneInfo userTimeZone = TZConvert.GetTimeZoneInfo(timeZoneId);

    // Assumes Sunday as first day of week
    int diff = System.DayOfWeek.Sunday - today.DayOfWeek;

    // create date as unspecified kind
    var unspecifiedStart = DateTime.SpecifyKind(today.AddDays(diff), DateTimeKind.Unspecified);

    // convert to UTC
    return TimeZoneInfo.ConvertTimeToUtc(unspecifiedStart, userTimeZone);
}
Adicione a função a seguir para lidar com exceções retornadas do Microsoft Graph chamadas.
private async Task HandleGraphException(Exception exception)
{
    if (exception is MicrosoftIdentityWebChallengeUserException)
    {
        _logger.LogError(exception, "Consent required");
        // This exception indicates consent is required.
        // Return a 403 with "consent_required" in the body
        // to signal to the tab it needs to prompt for consent
        HttpContext.Response.ContentType = "text/plain";
        HttpContext.Response.StatusCode = (int)HttpStatusCode.Forbidden;
        await HttpContext.Response.WriteAsync("consent_required");
    }
    else if (exception is ServiceException)
    {
        var serviceException = exception as ServiceException;
        _logger.LogError(serviceException, "Graph service error occurred");
        HttpContext.Response.ContentType = "text/plain";
        HttpContext.Response.StatusCode = (int)serviceException.StatusCode;
        await HttpContext.Response.WriteAsync(serviceException.Error.ToString());
    }
    else
    {
        _logger.LogError(exception, "Error occurred");
        HttpContext.Response.ContentType = "text/plain";
        HttpContext.Response.StatusCode = (int)HttpStatusCode.InternalServerError;
        await HttpContext.Response.WriteAsync(exception.ToString());
    }
}
Substitua a função
Getexistente pela seguinte.[HttpGet] public async Task<IEnumerable<Event>> Get() { // This verifies that the access_as_user scope is // present in the bearer token, throws if not HttpContext.VerifyUserHasAnyAcceptedScope(apiScopes); // To verify that the identity libraries have authenticated // based on the token, log the user's name _logger.LogInformation($"Authenticated user: {User.GetDisplayName()}"); try { // Get the user's mailbox settings var me = await _graphClient.Me .Request() .Select(u => new { u.MailboxSettings }) .GetAsync(); // Get the start and end of week in user's time // zone var startOfWeek = GetUtcStartOfWeekInTimeZone( DateTime.Today, me.MailboxSettings.TimeZone); var endOfWeek = startOfWeek.AddDays(7); // Set the start and end of the view var viewOptions = new List<QueryOption> { new QueryOption("startDateTime", startOfWeek.ToString("o")), new QueryOption("endDateTime", endOfWeek.ToString("o")) }; // Get the user's calendar view var results = await _graphClient.Me .CalendarView .Request(viewOptions) // Send user time zone in request so date/time in // response will be in preferred time zone .Header("Prefer", $"outlook.timezone=\"{me.MailboxSettings.TimeZone}\"") // Get max 50 per request .Top(50) // Only return fields app will use .Select(e => new { e.Subject, e.Organizer, e.Start, e.End, e.Location }) // Order results chronologically .OrderBy("start/dateTime") .GetAsync(); return results.CurrentPage; } catch (Exception ex) { await HandleGraphException(ex); return null; } }Revise as alterações. Esta nova versão da função:
- Retorna
IEnumerable<Event>em vez destring. - Obtém as configurações de caixa de correio do usuário usando o Microsoft Graph.
- Usa o fuso horário do usuário para calcular o início e o final da semana atual.
- Obtém um exibição de calendário
- Usa a função para incluir um header, que faz com que os eventos retornados tenham seus horários de início e término convertidos no
.Header()Prefer: outlook.timezonetimezone do usuário. - Usa a
.Top()função para solicitar no máximo 50 eventos. - Usa a
.Select()função para solicitar apenas os campos usados pelo aplicativo. - Usa a
OrderBy()função para classificar os resultados pela hora de início.
- Usa a função para incluir um header, que faz com que os eventos retornados tenham seus horários de início e término convertidos no
- Retorna
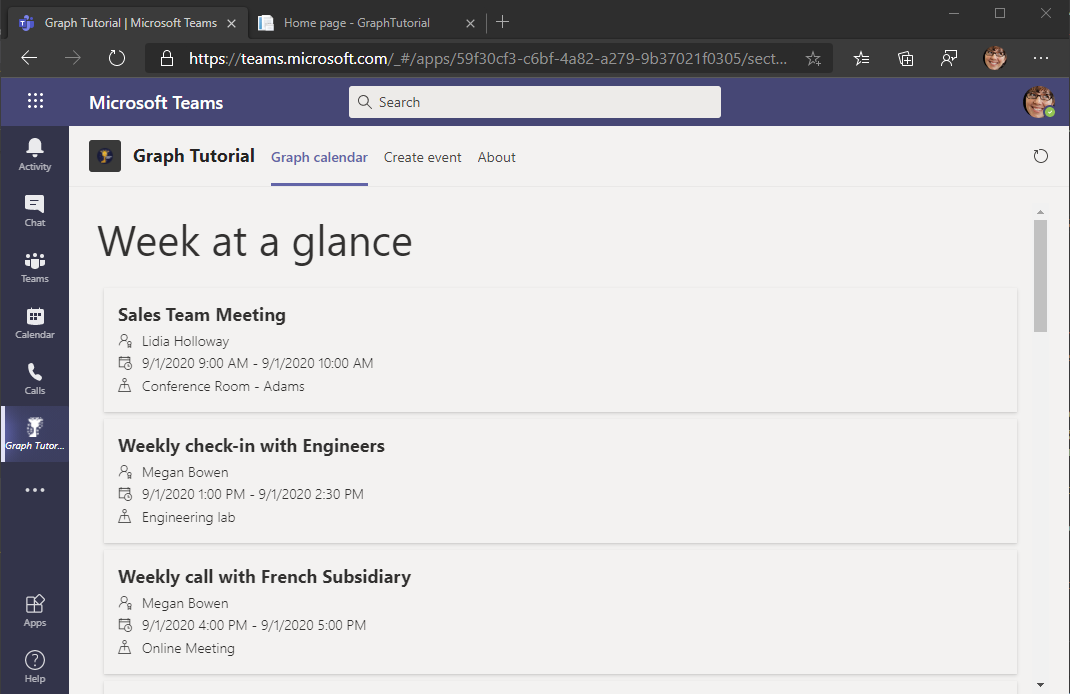
Salve suas alterações e reinicie o aplicativo. Atualize a guia no Microsoft Teams. O aplicativo exibe uma listagem JSON dos eventos.
Exibir os resultados
Agora você pode exibir a lista de eventos de uma maneira mais amigável.
Abra ./Pages/Index.cshtml e adicione as seguintes funções dentro da
<script>marca.function renderSubject(subject) { if (!subject || subject.length <= 0) { subject = '<No subject>'; } return $('<div/>', { class: 'ms-fontSize-18 ms-fontWeight-bold', text: subject }); } function renderOrganizer(organizer) { return $('<div/>', { class: 'ms-fontSize-14 ms-fontWeight-semilight', text: organizer.emailAddress.name }).append($('<i/>', { class: 'ms-Icon ms-Icon--PartyLeader', style: 'margin-right: 10px;' })); } function renderTimeSpan(start, end) { return $('<div/>', { class: 'ms-fontSize-14 ms-fontWeight-semilight', text: `${formatDateTime(start.dateTime)} - ${formatDateTime(end.dateTime)}` }).append($('<i/>', { class: 'ms-Icon ms-Icon--DateTime2', style: 'margin-right: 10px;' })); } function formatDateTime(dateTime) { const date = new Date(dateTime); // Format like 10/14/2020 4:00 PM let hours = date.getHours(); const minutes = date.getMinutes(); const ampm = hours >= 12 ? 'PM' : 'AM'; hours = hours % 12; hours = hours ? hours : 12; const minStr = minutes < 10 ? `0${minutes}` : minutes; return `${date.getMonth()+1}/${date.getDate()}/${date.getFullYear()} ${hours}:${minStr} ${ampm}`; } function renderLocation(location) { if (!location || location.displayName.length <= 0) { return null; } return $('<div/>', { class: 'ms-fontSize-14 ms-fontWeight-semilight', text: location.displayName }).append($('<i/>', { class: 'ms-Icon ms-Icon--MapPin', style: 'margin-right: 10px;' })); }Substitua a função
renderCalendarexistente pela seguinte.function renderCalendar(events) { $('#tab-container').empty(); // Add title $('<div/>', { class: 'tab-title ms-fontSize-42', text: 'Week at a glance' }).appendTo('#tab-container'); // Render each event events.map(event => { const eventCard = $('<div/>', { class: 'event-card ms-depth-4', }); eventCard.append(renderSubject(event.subject)); eventCard.append(renderOrganizer(event.organizer)); eventCard.append(renderTimeSpan(event.start, event.end)); const location = renderLocation(event.location); if (location) { eventCard.append(location); } eventCard.appendTo('#tab-container'); }); }Salve suas alterações e reinicie o aplicativo. Atualize a guia no Microsoft Teams. O aplicativo exibe eventos no calendário do usuário.
Criar um novo evento
Nesta seção, você adicionará a capacidade de criar eventos no calendário do usuário.
Criar a nova guia de eventos
Crie um novo arquivo no diretório ./Pages chamado NewEvent.cshtml e adicione o código a seguir.
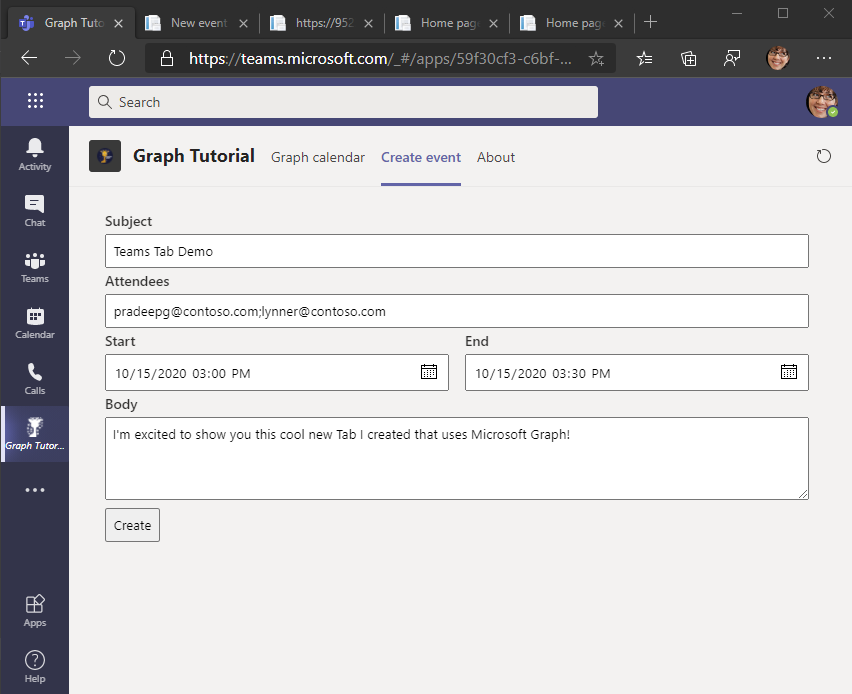
@page
<!-- Copyright (c) Microsoft Corporation.
     Licensed under the MIT License. -->
@{
  ViewData["Title"] = "New event";
}

<div class="form-container">
  <form id="newEventForm">
    <div class="ms-Grid" dir="ltr">
      <div class="ms-Grid-row">
        <div class="ms-Grid-col ms-sm12">
          <label class="ms-fontWeight-semibold form-label" for="subject">Subject</label>
          <input class="form-input" type="text" id="subject" name="subject" />
        </div>
      </div>
      <div class="ms-Grid-row">
        <div class="ms-Grid-col ms-sm12">
          <label class="ms-fontWeight-semibold form-label" for="attendees">Attendees</label>
          <input class="form-input" type="text" id="attendees" name="attendees" placeholder="Enter email addresses of attendees. Separate multiple with ';'. Leave blank for no attendees." />
        </div>
      </div>
      <div class="ms-Grid-row">
        <div class="ms-Grid-col ms-sm6">
          <label class="ms-fontWeight-semibold form-label" for="start">Start</label>
          <input class="form-input" type="datetime-local" id="start" name="start" />
        </div>
        <div class="ms-Grid-col ms-sm6">
          <label class="ms-fontWeight-semibold form-label" for="end">End</label>
          <input class="form-input" type="datetime-local" id="end" name="end" />
        </div>
      </div>
      <div class="ms-Grid-row">
        <div class="ms-Grid-col ms-sm12">
          <label class="ms-fontWeight-semibold form-label" for="body">Body</label>
          <textarea class="form-input" id="body" name="body" rows="4"></textarea>
        </div>
      </div>
      <input class="form-button" type="submit" value="Create"/>
    </div>
  </form>
  <div class="ms-depth-16 result-panel"></div>
</div>

@section Scripts
{
  <script>
    (function () {
      if (microsoftTeams) {
        microsoftTeams.initialize();
      }

      $('#newEventForm').on('submit', async (e) => {
        e.preventDefault();
        $('.result-panel').empty();
        $('.result-panel').hide();

        const formData = new FormData(newEventForm);

        // Basic validation
        // Require subject, start, and end
        const subject = formData.get('subject');
        const start = formData.get('start');
        const end = formData.get('end');

        if (subject.length <= 0 || start.length <= 0 || end.length <= 0) {
          $('<div/>', {
            class: 'error-msg',
            text: 'Subject, Start, and End are required.'
          }).appendTo('.result-panel');
          $('.result-panel').show();
          return;
        }

        // Get the auth token from Teams
        microsoftTeams.authentication.getAuthToken({
          successCallback: (token) => {
            createEvent(token, formData);
          },
          failureCallback: (error) => {
            $('<div/>', {
              class: 'error-msg',
              text: `Error getting token: ${error}`
            }).appendTo('.result-panel');
            $('.result-panel').show();
          }
        });
      });
    })();

    async function createEvent(token, formData) {
      // Convert the form to a JSON payload
      jsonFormData = formDataToJson();

      // Post the payload to the web API
      const response = await fetch('/calendar', {
        headers: {
          'Authorization': `Bearer ${token}`,
          'Content-Type': 'application/json'
        },
        method: 'POST',
        body: jsonFormData
      });

      if (response.ok) {
        $('<div/>', {
          class: 'success-msg',
          text: 'Event added to your calendar'
        }).appendTo('.result-panel');
        $('.result-panel').show();
      } else {
        const error = await response.text();
        $('<div/>', {
          class: 'error-msg',
          text: `Error creating event: ${error}`
        }).appendTo('.result-panel');
        $('.result-panel').show();
      }
    }

    // Helper method to serialize the form fields
    // as JSON
    function formDataToJson() {
      const array = $('#newEventForm').serializeArray();
      const jsonObj = {};

      array.forEach((kvp) => {
        jsonObj[kvp.name] = kvp.value;
      });

      return JSON.stringify(jsonObj);
    }
  </script>
}
Isso implementa um formulário simples e adiciona JavaScript para postar os dados do formulário na API Da Web.
Implementar a API da Web
Crie um novo diretório denominado Modelos na raiz do projeto.
Crie um novo arquivo no diretório ./Models chamado NewEvent.cs e adicione o código a seguir.
namespace GraphTutorial.Models
{
    public class NewEvent
    {
        public string Subject { get; set; }
        public string Attendees { get; set; }
        public string Start { get; set; }
        public string End { get; set; }
        public string Body { get; set; }
    }
}
Abra ./Controllers/CalendarController.cs e adicione a seguinte instrução
usingna parte superior do arquivo.using GraphTutorial.Models;Adicione a seguinte função à classe CalendarController.
[HttpPost]
public async Task<string> Post(NewEvent newEvent)
{
    HttpContext.VerifyUserHasAnyAcceptedScope(apiScopes);

    try
    {
        // Get the user's mailbox settings
        var me = await _graphClient.Me
            .Request()
            .Select(u => new {
                u.MailboxSettings
            })
            .GetAsync();

        // Create a Graph Event
        var graphEvent = new Event
        {
            Subject = newEvent.Subject,
            Start = new DateTimeTimeZone
            {
                DateTime = newEvent.Start,
                TimeZone = me.MailboxSettings.TimeZone
            },
            End = new DateTimeTimeZone
            {
                DateTime = newEvent.End,
                TimeZone = me.MailboxSettings.TimeZone
            }
        };

        // If there are attendees, add them
        if (!string.IsNullOrEmpty(newEvent.Attendees))
        {
            var attendees = new List<Attendee>();
            var emailArray = newEvent.Attendees.Split(';');
            foreach (var email in emailArray)
            {
                attendees.Add(new Attendee
                {
                    Type = AttendeeType.Required,
                    EmailAddress = new EmailAddress
                    {
                        Address = email
                    }
                });
            }

            graphEvent.Attendees = attendees;
        }

        // If there is a body, add it
        if (!string.IsNullOrEmpty(newEvent.Body))
        {
            graphEvent.Body = new ItemBody
            {
                ContentType = BodyType.Text,
                Content = newEvent.Body
            };
        }

        // Create the event
        await _graphClient.Me
            .Events
            .Request()
            .AddAsync(graphEvent);

        return "success";
    }
    catch (Exception ex)
    {
        await HandleGraphException(ex);
        return null;
    }
}
Isso permite um HTTP POST para a API da Web com os campos do formulário.
Salve todas as alterações e reinicie o aplicativo. Atualize o aplicativo Microsoft Teams e selecione a guia Criar evento. Preencha o formulário e selecione Criar para adicionar um evento ao calendário do usuário.
Parabéns!
Você concluiu o Microsoft Teams com o tutorial Graph Microsoft. Agora que você tem um aplicativo de trabalho que chama a Microsoft Graph, você pode experimentar e adicionar novos recursos. Visite a visão geral do microsoft Graph para ver todos os dados que você pode acessar com o Microsoft Graph.
Comentários
Forneça qualquer comentário sobre este tutorial no repositório GitHub .
Tem algum problema com essa seção? Se tiver, envie seus comentários para que possamos melhorar esta seção.