Python projects in Visual Studio
Applies to: ![]() Visual Studio
Visual Studio ![]() Visual Studio for Mac
Visual Studio for Mac
Note
This article applies to Visual Studio 2017. If you're looking for the latest Visual Studio documentation, see Visual Studio documentation. We recommend upgrading to the latest version of Visual Studio. Download it here
Python applications are typically defined using only folders and files, but this structure can become complex as applications become larger and perhaps involve auto-generated files, JavaScript for web applications, and so on. A Visual Studio project helps manage this complexity. The project (a .pyproj file) identifies all the source and content files associated with your project, contains build information for each file, maintains the information to integrate with source-control systems, and helps you organize your application into logical components.
In addition, projects are always managed within a Visual Studio solution, which can contain any number of projects that might reference one another. For example, a Python project can reference a C++ project that implements an extension module. With this relationship, Visual Studio automatically builds the C++ project (if necessary) when you start debugging the Python project. (For a general discussion, see Solutions and projects in Visual Studio.)
Visual Studio provides a variety of Python project templates to quickly set up a number of application structures, including a template to create a project from an existing folder tree and a template to create a clean, empty project. See Project templates for an index.
Tip
Without a project, all versions of Visual Studio work well with Python code. For example, you can open a Python file by itself and enjoy auto-complete, IntelliSense, and debugging (by right-clicking in the editor and selecting Start with Debugging). Because such code always uses the default global environment, however, you may see incorrect completions or errors if the code is meant for a different environment. Furthermore, Visual Studio analyzes all files and packages in the folder from which the single file is opened, which could consume considerable CPU time.
It's a simple matter to create a Visual Studio project from existing code, as described in Create a project from existing files.
Add files, assign a startup file, and set environments
As you develop your application, you typically need to add new files of different types to the project. Adding such files is done by right-clicking the project and selecting Add > Existing Item with which you browse for a file to add, or Add > New Item, which brings up a dialog with a variety of item templates. As described on the item templates reference, options include empty Python files, a Python class, a unit test, and various files related to web applications. You can explore these options with a test project to learn what's available in your version of Visual Studio.
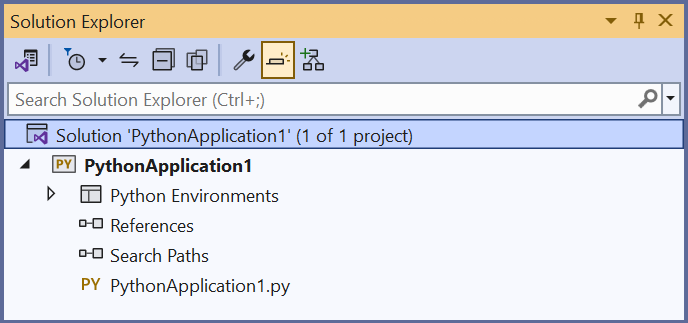
Each Python project has one assigned start-up file, shown in boldface in Solution Explorer. The startup file is the file that's run when you start debugging (F5 or Debug > Start Debugging) or when you run your project in the Interactive window (Shift+Alt+F5 or Debug > Execute Project in Python Interactive). To change it, right-click the new file and select Set as Startup Item (or Set as Startup File in older versions of Visual Studio).
Tip
If you remove the selected startup file from a project and don't select a new one, Visual Studio doesn't know what Python file to start with when you try to run the project. In this case, Visual Studio 2017 version 15.6 and later shows an error; earlier versions either open an output window with the Python interpreter running, or you see the output window appear but then disappear almost immediately. If you encounter any of these behaviors, check that you have an assigned startup file.
If you want to keep the output window open for any reason, right-click your project, select Properties, select the Debug tab, then add -i to the Interpreter Arguments field. This argument causes the interpreter to go into interactive mode after a program completes, thereby keeping the window open until you enter Ctrl+Z > Enter to exit.
A new project is always associated with the default global Python environment. To associate the project with a different environment (including virtual environments), right-click the Python Environments node in the project, select Add/Remove Python Environments, and select the ones you want.
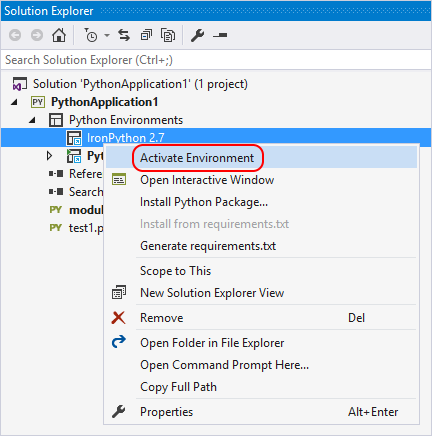
To change the active environment, right-click the desired environment in Solution Explorer and select Activate Environment as shown below. For more information, see Select an environment for a project.
Project templates
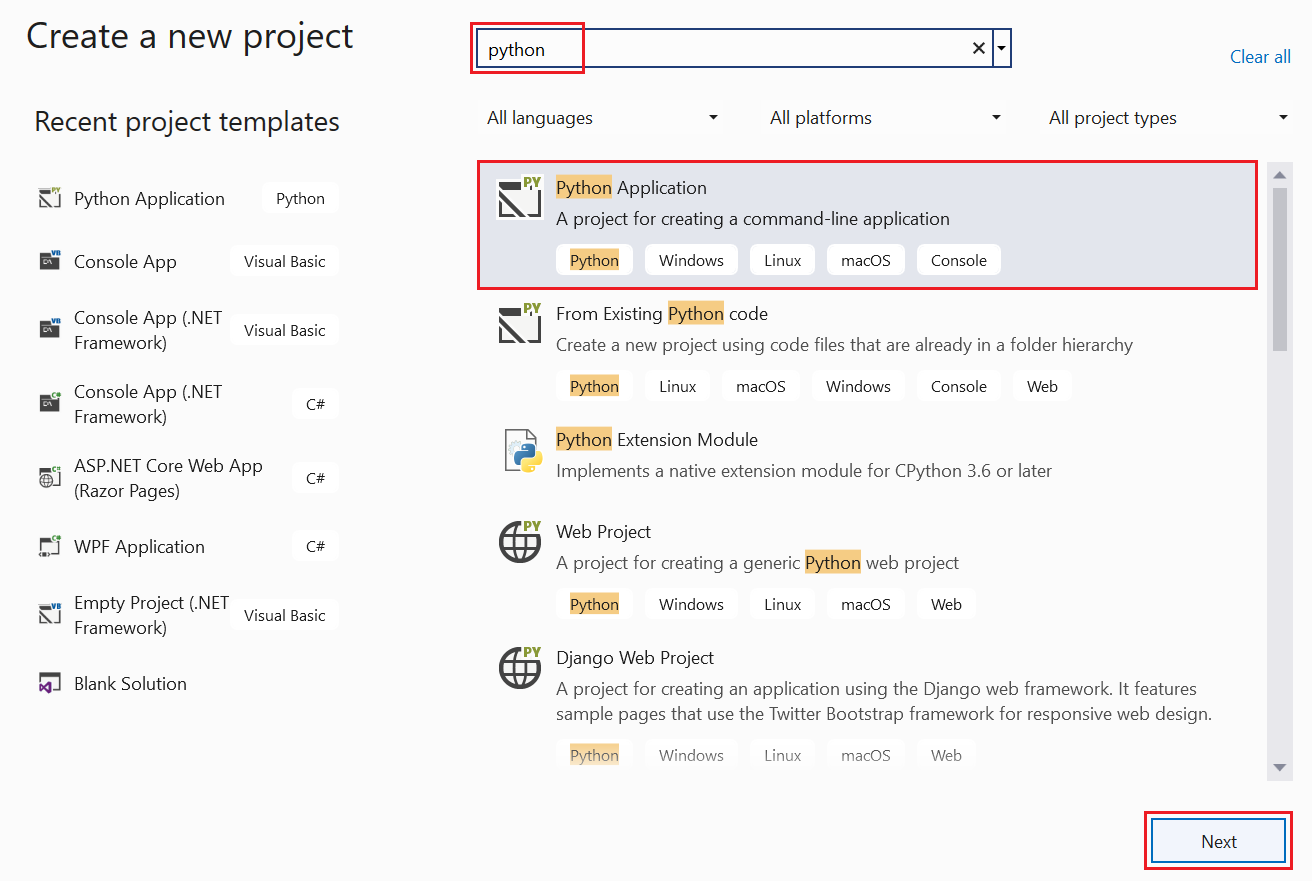
Visual Studio gives you a number of ways to set up a Python project, either from scratch or from existing code. To use a template, select the File > New > Project menu command or right-click the solution in Solution Explorer and select Add > New Project, both of which bring up the New Project dialog below. To see Python-specific templates, either search on "Python" or select the Installed > Python node:
The following table summarizes the templates available in Visual Studio 2017 (not all templates are available in all previous versions):
| Template | Description |
|---|---|
| From existing Python code | Creates a Visual Studio project from existing Python code in a folder structure. |
| Python Application | A basic project structure for a new Python application with a single, empty source file. By default, the project runs in the console interpreter of the default global environment, which you can change by assigning a different environment. |
| Web projects | Projects for web apps based on various frameworks including Bottle, Django, and Flask. |
| IronPython Application | Similar to the Python Application template, but uses IronPython by default enabling .NET interop and mixed-mode debugging with .NET languages. |
| IronPython Silverlight Web Page | An IronPython project that runs in a browser using Silverlight. The application's Python code is included in the web page as script. A boilerplate script tag pulls down some JavaScript code that initializes IronPython running inside of Silverlight, from which your Python code can interact with the DOM. |
| IronPython Windows Forms Application | A project structure using IronPython with UI created using code with Windows Forms. The application runs without displaying a console. |
| Background Application (IoT) | Supports deploying Python projects to run as background services on devices. Visit the Windows IoT Dev Center for more information. |
| Python Extension Module | This template appears under Visual C++ if you've installed the Python native development tools with the Python workload in Visual Studio 2017 or later (see Installation). It provides the core structure for a C++ extension DLL, similar to what's described on Create a C++ extension for Python. |
Note
Because Python is an interpreted language, Python projects in Visual Studio don't produce a stand-alone executable like other compiled language projects (C#, for example). For more information, see questions and answers.
Create a project from existing files
Important
The process described here does not move or copy the original source files. If you want to work with a copy, duplicate the folder first.
Launch Visual Studio and select File > New > Project.
In the New Project dialog, search for "Python", select the From Existing Python code template, give the project a name and location, and select OK.
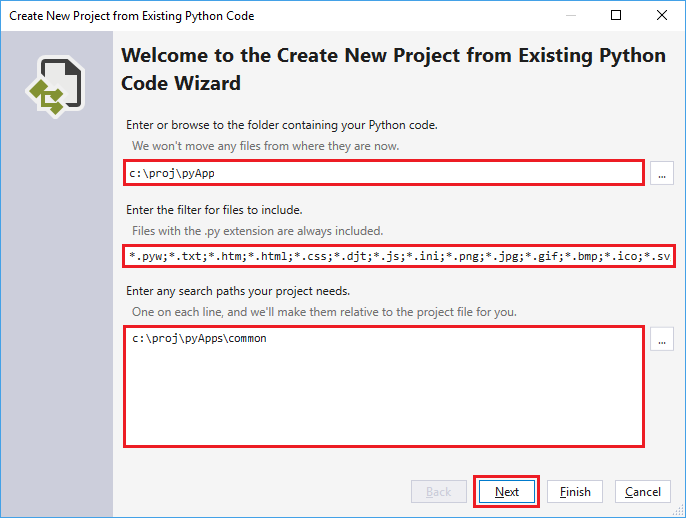
In the wizard that appears, set the path to your existing code, set a filter for file types, and specify any search paths that your project requires, then select Next. If you don't know what search paths are, leave that field blank.
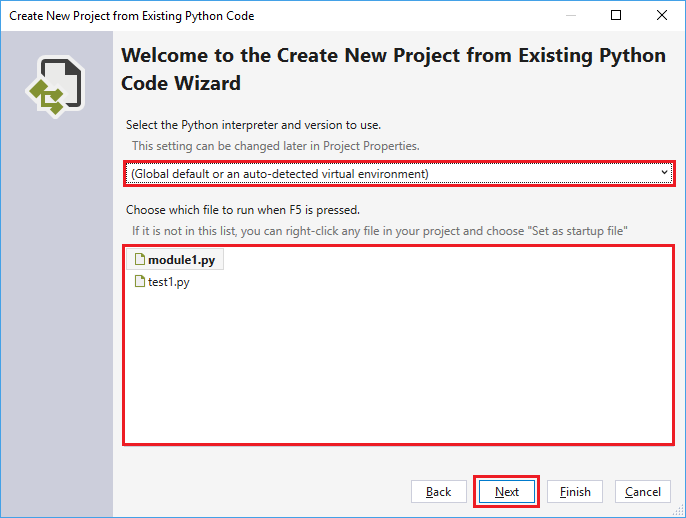
In the next dialog, select the startup file for your project and select Next. (If desired, select an environment; otherwise accept the defaults.) Note that the dialog shows only files in the root folder; if the file you want is in a subfolder, leave the startup file blank and set it later in Solution Explorer (described below).
Select the location in which to save the project file (which is a .pyproj file on disk). If applicable, you can also include auto-detection of virtual environments and customize the project for different web frameworks. If you're unsure of these options, leave them set to the defaults.

Select Finish and Visual Studio creates the project and opens it in Solution Explorer. If you want to move the .pyproj file elsewhere, select it in Solution Explorer and choose File > Save As. This action updates file references in the project but does not move any code files.
To set a different startup file, locate the file in Solution Explorer, right-click, and select Set as Startup File.
Linked files
Linked files are files that are brought into a project but typically reside outside of the application's project folders. They appear in Solution Explorer as normal files with an overlaid shortcut icon: ![]()
Linked files are specified in the .pyproj file using the <Compile Include="..."> element. Linked files are implicit if they use a relative path outside of the directory structure, or explicit if they use paths within Solution Explorer:
<Compile Include="..\test2.py">
    <Link>MyProject\test2.py</Link>
</Compile>
Linked files are ignored under any of the following conditions:
- The linked file contains Link metadata and the path specified in the Include attribute lives within the project directory
- The linked file duplicates a file that exists within the project hierarchy
- The linked file contains Link metadata and the Link path is a relative path outside of the project hierarchy
- The link path is rooted
Work with linked files
To add an existing item as a link, right-click the folder in the project where you wish to add the file, then select Add > Existing Item. In the dialog that appears, select a file and choose Add as Link from the drop-down on the Add button. Provided that there are no conflicting files, this command creates a link in the selected folder. However, the link is not added if there is already a file with the same name or a link to that file already exists in the project.
If you attempt to link to a file that already exists in the project folders, it is added as a normal file and not as a link. To convert a file into a link, select File > Save As to save the file to a location outside of the project hierarchy; Visual Studio automatically converts it into a link. Similarly, a link can be converted back by using File > Save As to save the file somewhere within the project hierarchy.
If you move a linked file in Solution Explorer, the link is moved but the actual file is unaffected. Similarly, deleting a link removes the link without affecting the file.
Linked files cannot be renamed.
References
Visual Studio projects support adding references to projects and extensions, which appear under the References node in Solution Explorer:

Extension references typically indicate dependencies between projects and are used to provide IntelliSense at design time or linking at compile time. Python projects use references in a similar fashion, but due to the dynamic nature of Python they are primarily used at design time to provide improved IntelliSense. They can also be used for deployment to Microsoft Azure to install additional dependencies.
Extension modules
A reference to a .pyd file enables IntelliSense for the generated module. Visual Studio loads the .pyd file into the Python interpreter and introspects its types and functions. It also attempts to parse the doc strings for functions to provide signature help.
If at any time the extension module is updated on disk, Visual Studio reanalyzes the module in the background. This action has no effect on run-time behavior but some completions aren't available until analysis is complete.
You may also need to add a search path to the folder containing the module.
.NET projects
When working with IronPython, you can add references to .NET assemblies to enable IntelliSense. For .NET projects in your solution, right-click the References node in your Python project, select Add Reference, select the Projects tab, and browse to the desired project. For DLLs that you've downloaded separately, select the Browse tab instead and browse to the desired DLL.
Because references in IronPython are not available until a call to clr.AddReference('<AssemblyName>') is made, you also need to add an appropriate clr.AddReference call to the assembly, typically at the beginning of your code. For example, the code created by the IronPython Windows Forms Application project template in Visual Studio includes two calls at the top of the file:
import clr
clr.AddReference('System.Drawing')
clr.AddReference('System.Windows.Forms')

from System.Drawing import *
from System.Windows.Forms import *

# Other code omitted
WebPI projects
You can add references to WebPI product entries for deployment to Microsoft Azure Cloud Services where you can install additional components via the WebPI feed. By default, the feed displayed is Python-specific and includes Django, CPython, and other core components. You can also select your own feed as shown below. When publishing to Microsoft Azure, a setup task installs all of the referenced products.
Important
WebPI projects is not available in Visual Studio 2017 or Visual Studio 2019.
