Xamarin.Forms StackLayout
Um StackLayout organiza exibições filho em uma pilha unidimensional, horizontal ou verticalmente. Por padrão, a orientação do StackLayout é vertical. Além disso, um StackLayout pode ser usado como um layout pai que contém outros layouts filho.
A StackLayout classe define as seguintes propriedades:
Orientation, do tipoStackOrientation, representa a direção na qual as exibições filho são posicionadas. O valor padrão dessa propriedade éVertical.Spacing, do tipodouble, indica a quantidade de espaço entre cada exibição filho. O valor padrão dessa propriedade é seis unidades independentes do dispositivo.
Essas propriedades são apoiadas por BindableProperty objetos , o que significa que as propriedades podem ser destinos de associações de dados e estilizadas.
A StackLayout classe deriva da Layout<T> classe , que define uma Children propriedade do tipo IList<T>. A Children propriedade é a ContentPropertyLayout<T> da classe e, portanto, não precisa ser definida explicitamente a partir de XAML.
Dica
Para obter o melhor desempenho de layout possível, siga as diretrizes em Otimizar o desempenho do layout.
Orientação vertical
O XAML a seguir mostra como criar um orientado StackLayout verticalmente que contém diferentes modos de exibição filho:
<ContentPage xmlns="http://xamarin.com/schemas/2014/forms"
             xmlns:x="http://schemas.microsoft.com/winfx/2009/xaml"
             x:Class="StackLayoutDemos.Views.VerticalStackLayoutPage"
             Title="Vertical StackLayout demo">
    <StackLayout Margin="20">
        <Label Text="Primary colors" />
        <BoxView Color="Red" />
        <BoxView Color="Yellow" />
        <BoxView Color="Blue" />
        <Label Text="Secondary colors" />
        <BoxView Color="Green" />
        <BoxView Color="Orange" />
        <BoxView Color="Purple" />
    </StackLayout>
</ContentPage>
Este exemplo cria um objeto e BoxView de contenção Label verticalStackLayout. Por padrão, há seis unidades de espaço independentes do dispositivo entre as exibições filho:
Este é o código C# equivalente:
public class VerticalStackLayoutPageCS : ContentPage
{
    public VerticalStackLayoutPageCS()
    {
        Title = "Vertical StackLayout demo";
        Content = new StackLayout
        {
            Margin = new Thickness(20),
            Children =
            {
                new Label { Text = "Primary colors" },
                new BoxView { Color = Color.Red },
                new BoxView { Color = Color.Yellow },
                new BoxView { Color = Color.Blue },
                new Label { Text = "Secondary colors" },
                new BoxView { Color = Color.Green },
                new BoxView { Color = Color.Orange },
                new BoxView { Color = Color.Purple }
            }
        };
    }
}
Observação
O valor da Margin propriedade representa a distância entre um elemento e seus elementos adjacentes. Para saber mais, confira Margens e preenchimento.
Orientação horizontal
O XAML a seguir mostra como criar um orientado StackLayout horizontalmente definindo sua Orientation propriedade Horizontalcomo :
<ContentPage xmlns="http://xamarin.com/schemas/2014/forms"
             xmlns:x="http://schemas.microsoft.com/winfx/2009/xaml"
             x:Class="StackLayoutDemos.Views.HorizontalStackLayoutPage"
             Title="Horizontal StackLayout demo">
    <StackLayout Margin="20"
                 Orientation="Horizontal"
                 HorizontalOptions="Center">
        <BoxView Color="Red" />
        <BoxView Color="Yellow" />
        <BoxView Color="Blue" />
        <BoxView Color="Green" />
        <BoxView Color="Orange" />
        <BoxView Color="Purple" />
    </StackLayout>
</ContentPage>
Este exemplo cria um objeto de contenção BoxView horizontalStackLayout, com seis unidades de espaço independentes do dispositivo entre as exibições filho:
Este é o código C# equivalente:
public HorizontalStackLayoutPageCS()
{
    Title = "Horizontal StackLayout demo";
    Content = new StackLayout
    {
        Margin = new Thickness(20),
        Orientation = StackOrientation.Horizontal,
        HorizontalOptions = LayoutOptions.Center,
        Children =
        {
            new BoxView { Color = Color.Red },
            new BoxView { Color = Color.Yellow },
            new BoxView { Color = Color.Blue },
            new BoxView { Color = Color.Green },
            new BoxView { Color = Color.Orange },
            new BoxView { Color = Color.Purple }
        }
    };
}
Espaço entre exibições filho
O espaçamento entre exibições filho em um StackLayout pode ser alterado definindo a Spacing propriedade como um double valor:
<ContentPage xmlns="http://xamarin.com/schemas/2014/forms"
             xmlns:x="http://schemas.microsoft.com/winfx/2009/xaml"
             x:Class="StackLayoutDemos.Views.StackLayoutSpacingPage"
             Title="StackLayout Spacing demo">
    <StackLayout Margin="20"
                 Spacing="0">
        <Label Text="Primary colors" />
        <BoxView Color="Red" />
        <BoxView Color="Yellow" />
        <BoxView Color="Blue" />
        <Label Text="Secondary colors" />
        <BoxView Color="Green" />
        <BoxView Color="Orange" />
        <BoxView Color="Purple" />
    </StackLayout>
</ContentPage>
Este exemplo cria uma vertical StackLayout contendo Label objetos e BoxView que não têm espaçamento entre eles:
Dica
A Spacing propriedade pode ser definida como valores negativos para fazer com que as exibições filho se sobreponham.
Este é o código C# equivalente:
public class StackLayoutSpacingPageCS : ContentPage
{
    public StackLayoutSpacingPageCS()
    {
        Title = "StackLayout Spacing demo";
        Content = new StackLayout
        {
            Margin = new Thickness(20),
            Spacing = 0,
            Children =
            {
                new Label { Text = "Primary colors" },
                new BoxView { Color = Color.Red },
                new BoxView { Color = Color.Yellow },
                new BoxView { Color = Color.Blue },
                new Label { Text = "Secondary colors" },
                new BoxView { Color = Color.Green },
                new BoxView { Color = Color.Orange },
                new BoxView { Color = Color.Purple }
            }
        };
    }
}
Posição e tamanho das exibições filho
O tamanho e a posição das exibições filho em um StackLayout dependem dos valores das propriedades e WidthRequest das exibições HeightRequest filho e dos valores de suas HorizontalOptions propriedades e VerticalOptions . Em um vertical StackLayout, as exibições filho se expandem para preencher a largura disponível quando o tamanho não estiver definido explicitamente. Da mesma forma, em um horizontal StackLayout, as exibições filho se expandem para preencher a altura disponível quando o tamanho não estiver definido explicitamente.
As HorizontalOptions propriedades e VerticalOptions de um StackLayoute suas exibições filho podem ser definidas como campos do LayoutOptions struct, que encapsula duas preferências de layout:
- O alinhamento determina a posição e o tamanho de uma exibição filho dentro de seu layout pai.
- A expansão indica se o modo de exibição filho deve usar espaço extra, se estiver disponível.
Dica
Não defina as HorizontalOptions propriedades e VerticalOptions de um StackLayout , a menos que seja necessário. Os valores padrão de LayoutOptions.Fill e LayoutOptions.FillAndExpand permitem a melhor otimização de layout. Alterar essas propriedades tem um custo e consome memória, mesmo ao defini-las de volta para os valores padrão.
Alinhamento
O exemplo XAML a seguir define as preferências de alinhamento em cada exibição filho no StackLayout:
<ContentPage xmlns="http://xamarin.com/schemas/2014/forms"
             xmlns:x="http://schemas.microsoft.com/winfx/2009/xaml"
             x:Class="StackLayoutDemos.Views.AlignmentPage"
             Title="Alignment demo">
    <StackLayout Margin="20">
        <Label Text="Start"
               BackgroundColor="Gray"
               HorizontalOptions="Start" />
        <Label Text="Center"
               BackgroundColor="Gray"
               HorizontalOptions="Center" />
        <Label Text="End"
               BackgroundColor="Gray"
               HorizontalOptions="End" />
        <Label Text="Fill"
               BackgroundColor="Gray"
               HorizontalOptions="Fill" />
    </StackLayout>
</ContentPage>
Neste exemplo, as preferências de alinhamento são definidas nos Label objetos para controlar sua posição dentro do StackLayout. Os Startcampos , Center, Ende Fill são usados para definir o alinhamento dos Label objetos dentro do pai StackLayout:
Um StackLayout respeita somente as preferências de alinhamento em exibições filho que estão na direção oposta à orientação StackLayout. Portanto, as exibições filho de Label dentro do StackLayout orientado verticalmente definem suas propriedades HorizontalOptions como um dos campos de alinhamento:
Start, que posiciona oLabelno lado esquerdo doStackLayout.Center, que centraliza oLabelnoStackLayout.End, que posiciona oLabelno lado direito doStackLayout.Fill, que garante que oLabelpreencha a largura doStackLayout.
Este é o código C# equivalente:
public class AlignmentPageCS : ContentPage
{
    public AlignmentPageCS()
    {
        Title = "Alignment demo";
        Content = new StackLayout
        {
            Margin = new Thickness(20),
            Children =
            {
                new Label { Text = "Start", BackgroundColor = Color.Gray, HorizontalOptions = LayoutOptions.Start },
                new Label { Text = "Center", BackgroundColor = Color.Gray, HorizontalOptions = LayoutOptions.Center },
                new Label { Text = "End", BackgroundColor = Color.Gray, HorizontalOptions = LayoutOptions.End },
                new Label { Text = "Fill", BackgroundColor = Color.Gray, HorizontalOptions = LayoutOptions.Fill }
            }
        };
    }
}
Expansão
O exemplo de XAML a seguir define as preferências de expansão em cada Label um dos StackLayout:
<ContentPage xmlns="http://xamarin.com/schemas/2014/forms"
             xmlns:x="http://schemas.microsoft.com/winfx/2009/xaml"
             x:Class="StackLayoutDemos.Views.ExpansionPage"
             Title="Expansion demo">
    <StackLayout Margin="20">
        <BoxView BackgroundColor="Red"
                 HeightRequest="1" />
        <Label Text="Start"
               BackgroundColor="Gray"
               VerticalOptions="StartAndExpand" />
        <BoxView BackgroundColor="Red"
                 HeightRequest="1" />
        <Label Text="Center"
               BackgroundColor="Gray"
               VerticalOptions="CenterAndExpand" />
        <BoxView BackgroundColor="Red"
                 HeightRequest="1" />
        <Label Text="End"
               BackgroundColor="Gray"
               VerticalOptions="EndAndExpand" />
        <BoxView BackgroundColor="Red"
                 HeightRequest="1" />
        <Label Text="Fill"
               BackgroundColor="Gray"
               VerticalOptions="FillAndExpand" />
        <BoxView BackgroundColor="Red"
                 HeightRequest="1" />
    </StackLayout>
</ContentPage>
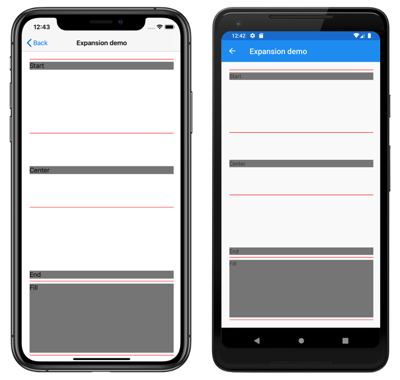
Neste exemplo, as preferências de expansão são definidas nos Label objetos para controlar seu tamanho dentro do StackLayout. Os StartAndExpandcampos , CenterAndExpand, EndAndExpande FillAndExpand são usados para definir a preferência de alinhamento e se o Label ocupará mais espaço se disponível dentro do pai StackLayout:
Um StackLayout só pode expandir exibições filho na direção de sua orientação. Portanto, o StackLayout orientado verticalmente pode expandir exibições filho de Label que definem suas propriedades VerticalOptions como um dos campos de expansão. Isso significa que, para o alinhamento vertical, cada Label ocupa a mesma quantidade de espaço dentro do StackLayout. No entanto, somente o último Label, que define sua propriedade VerticalOptions como FillAndExpand tem um tamanho diferente.
Dica
Ao usar um StackLayout, verifique se apenas uma exibição filho está definida LayoutOptions.Expandscomo . Essa propriedade garante que o filho especificado ocupe o maior espaço que o StackLayout pode dar a ele e é um desperdício executar esses cálculos mais de uma vez.
Este é o código C# equivalente:
public ExpansionPageCS()
{
    Title = "Expansion demo";
    Content = new StackLayout
    {
        Margin = new Thickness(20),
        Children =
        {
            new BoxView { BackgroundColor = Color.Red, HeightRequest = 1 },
            new Label { Text = "StartAndExpand", BackgroundColor = Color.Gray, VerticalOptions = LayoutOptions.StartAndExpand },
            new BoxView { BackgroundColor = Color.Red, HeightRequest = 1 },
            new Label { Text = "CenterAndExpand", BackgroundColor = Color.Gray, VerticalOptions = LayoutOptions.CenterAndExpand },
            new BoxView { BackgroundColor = Color.Red, HeightRequest = 1 },
            new Label { Text = "EndAndExpand", BackgroundColor = Color.Gray, VerticalOptions = LayoutOptions.EndAndExpand },
            new BoxView { BackgroundColor = Color.Red, HeightRequest = 1 },
            new Label { Text = "FillAndExpand", BackgroundColor = Color.Gray, VerticalOptions = LayoutOptions.FillAndExpand },
            new BoxView { BackgroundColor = Color.Red, HeightRequest = 1 }
        }
    };
}
Importante
Quando todo o espaço em um StackLayout é usado, as preferências de expansão não têm nenhum efeito.
Para obter mais informações sobre alinhamento e expansão, consulte Opções de layout em Xamarin.Forms.
Objetos StackLayout aninhados
Um StackLayout pode ser usado como um layout pai que contém objetos filho StackLayout aninhados ou outros layouts filho.
O XAML a seguir mostra um exemplo de objetos de aninhamento StackLayout :
<ContentPage xmlns="http://xamarin.com/schemas/2014/forms"
             xmlns:x="http://schemas.microsoft.com/winfx/2009/xaml"
             x:Class="StackLayoutDemos.Views.CombinedStackLayoutPage"
             Title="Combined StackLayouts demo">
    <StackLayout Margin="20">
        ...
        <Frame BorderColor="Black"
               Padding="5">
            <StackLayout Orientation="Horizontal"
                         Spacing="15">
                <BoxView Color="Red" />
                <Label Text="Red"
                       FontSize="Large"
                       VerticalOptions="Center" />
            </StackLayout>
        </Frame>
        <Frame BorderColor="Black"
               Padding="5">
            <StackLayout Orientation="Horizontal"
                         Spacing="15">
                <BoxView Color="Yellow" />
                <Label Text="Yellow"
                       FontSize="Large"
                       VerticalOptions="Center" />
            </StackLayout>
        </Frame>
        <Frame BorderColor="Black"
               Padding="5">
            <StackLayout Orientation="Horizontal"
                         Spacing="15">
                <BoxView Color="Blue" />
                <Label Text="Blue"
                       FontSize="Large"
                       VerticalOptions="Center" />
            </StackLayout>
        </Frame>
        ...
    </StackLayout>
</ContentPage>
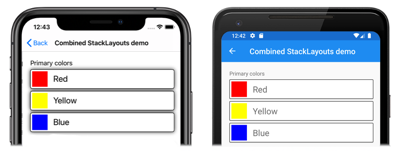
Neste exemplo, o pai StackLayout contém objetos aninhados StackLayout dentro Frame de objetos . O pai StackLayout é orientado verticalmente, enquanto os objetos filho StackLayout são orientados horizontalmente:
Importante
Quanto mais profundo você aninhar StackLayout objetos e outros layouts, mais os layouts aninhados afetarão o desempenho. Para obter mais informações, consulte Escolher o layout correto.
Este é o código C# equivalente:
public class CombinedStackLayoutPageCS : ContentPage
{
    public CombinedStackLayoutPageCS()
    {
        Title = "Combined StackLayouts demo";
        Content = new StackLayout
        {
            Margin = new Thickness(20),
            Children =
            {
                new Label { Text = "Primary colors" },
                new Frame
                {
                    BorderColor = Color.Black,
                    Padding = new Thickness(5),
                    Content = new StackLayout
                    {
                        Orientation = StackOrientation.Horizontal,
                        Spacing = 15,
                        Children =
                        {
                            new BoxView { Color = Color.Red },
                            new Label { Text = "Red", FontSize = Device.GetNamedSize(NamedSize.Large, typeof(Label)), VerticalOptions = LayoutOptions.Center }
                        }
                    }
                },
                new Frame
                {
                    BorderColor = Color.Black,
                    Padding = new Thickness(5),
                    Content = new StackLayout
                    {
                        Orientation = StackOrientation.Horizontal,
                        Spacing = 15,
                        Children =
                        {
                            new BoxView { Color = Color.Yellow },
                            new Label { Text = "Yellow", FontSize = Device.GetNamedSize(NamedSize.Large, typeof(Label)), VerticalOptions = LayoutOptions.Center }
                        }
                    }
                },
                new Frame
                {
                    BorderColor = Color.Black,
                    Padding = new Thickness(5),
                    Content = new StackLayout
                    {
                        Orientation = StackOrientation.Horizontal,
                        Spacing = 15,
                        Children =
                        {
                            new BoxView { Color = Color.Blue },
                            new Label { Text = "Blue", FontSize = Device.GetNamedSize(NamedSize.Large, typeof(Label)), VerticalOptions = LayoutOptions.Center }
                        }
                    }
                },
                // ...
            }
        };
    }
}
 Baixar o exemplo


