Transfer an Azure subscription to a different Microsoft Entra directory
Organizations might have several Azure subscriptions. Each subscription is associated with a particular Microsoft Entra directory. To make management easier, you might want to transfer a subscription to a different Microsoft Entra directory. When you transfer a subscription to a different Microsoft Entra directory, some resources are not transferred to the target directory. For example, all role assignments and custom roles in Azure role-based access control (Azure RBAC) are permanently deleted from the source directory and are not transferred to the target directory.
This article describes the basic steps you can follow to transfer a subscription to a different Microsoft Entra directory and re-create some of the resources after the transfer.
If you want to instead block the transfer of subscriptions to different directories in your organization, you can configure a subscription policy. For more information, see Manage Azure subscription policies.
Note
For Azure Cloud Solution Providers (CSP) subscriptions, changing the Microsoft Entra directory for the subscription isn't supported.
Overview
Transferring an Azure subscription to a different Microsoft Entra directory is a complex process that must be carefully planned and executed. Many Azure services require security principals (identities) to operate normally or even manage other Azure resources. This article tries to cover most of the Azure services that depend heavily on security principals, but is not comprehensive.
Important
In some scenarios, transferring a subscription might require downtime to complete the process. Careful planning is required to assess whether downtime will be required for your transfer.
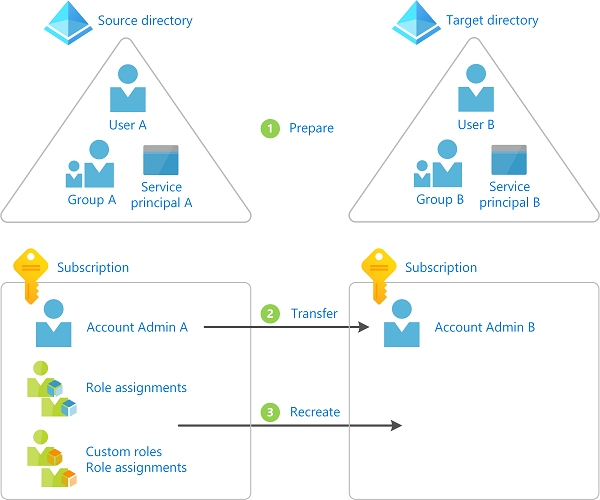
The following diagram shows the basic steps you must follow when you transfer a subscription to a different directory.
Prepare for the transfer
Transfer the Azure subscription to a different directory
Re-create resources in the target directory such as role assignments, custom roles, and managed identities
Deciding whether to transfer a subscription to a different directory
The following are some reasons why you might want to transfer a subscription:
- Because of a company merger or acquisition, you want to manage an acquired subscription in your primary Microsoft Entra directory.
- Someone in your organization created a subscription and you want to consolidate management to a particular Microsoft Entra directory.
- You have applications that depend on a particular subscription ID or URL and it isn't easy to modify the application configuration or code.
- A portion of your business has been split into a separate company and you need to move some of your resources into a different Microsoft Entra directory.
- You want to manage some of your resources in a different Microsoft Entra directory for security isolation purposes.
Alternate approaches
Transferring a subscription requires downtime to complete the process. Depending on your scenario, you can consider the following alternate approaches:
- Re-create the resources and copy data to the target directory and subscription.
- Adopt a multi-directory architecture and leave the subscription in the source directory. Use Azure Lighthouse to delegate resources so that users in the target directory can access the subscription in the source directory. For more information, see Azure Lighthouse in enterprise scenarios.
Understand the impact of transferring a subscription
Several Azure resources have a dependency on a subscription or a directory. Depending on your situation, the following table lists the known impact of transferring a subscription. By performing the steps in this article, you can re-create some of the resources that existed prior to the subscription transfer.
Important
This section lists the known Azure services or resources that depend on your subscription. Because resource types in Azure are constantly evolving, there might be additional dependencies not listed here that can cause a breaking change to your environment.
| Service or resource | Impacted | Recoverable | Are you impacted? | What you can do |
|---|---|---|---|---|
| Role assignments | Yes | Yes | List role assignments | All role assignments are permanently deleted. You must map users, groups, and service principals to corresponding objects in the target directory. You must re-create the role assignments. |
| Custom roles | Yes | Yes | List custom roles | All custom roles are permanently deleted. You must re-create the custom roles and any role assignments. |
| System-assigned managed identities | Yes | Yes | List managed identities | You must disable and re-enable the managed identities. You must re-create the role assignments. |
| User-assigned managed identities | Yes | Yes | List managed identities | You must delete, re-create, and attach the managed identities to the appropriate resource. You must re-create the role assignments. |
| Azure Key Vault | Yes | Yes | List Key Vault access policies | You must update the tenant ID associated with the key vaults. You must remove and add new access policies. |
| Azure SQL databases with Microsoft Entra authentication integration enabled | Yes | No | Check Azure SQL databases with Microsoft Entra authentication | You cannot transfer an Azure SQL database with Microsoft Entra authentication enabled to a different directory. For more information, see Use Microsoft Entra authentication. |
| Azure database for MySQL with Microsoft Entra authentication integration enabled | Yes | No | You cannot transfer an Azure database for MySQL (Single and Flexible server) with Microsoft Entra authentication enabled to a different directory. | |
| Azure Storage and Azure Data Lake Storage Gen2 | Yes | Yes | You must re-create any ACLs. | |
| Azure Data Lake Storage Gen1 | Yes | Yes | You must re-create any ACLs. | |
| Azure Files | Yes | Yes | You must re-create any ACLs. | |
| Azure File Sync | Yes | Yes | The storage sync service and/or storage account can be moved to a different directory. For more information, see Frequently asked questions (FAQ) about Azure Files | |
| Azure Managed Disks | Yes | Yes | If you are using Disk Encryption Sets to encrypt Managed Disks with customer-managed keys, you must disable and re-enable the system-assigned identities associated with Disk Encryption Sets. And you must re-create the role assignments i.e. again grant required permissions to Disk Encryption Sets in the Key Vaults. | |
| Azure Kubernetes Service | Yes | No | You cannot transfer your AKS cluster and its associated resources to a different directory. For more information, see Frequently asked questions about Azure Kubernetes Service (AKS) | |
| Azure Policy | Yes | No | All Azure Policy objects, including custom definitions, assignments, exemptions, and compliance data. | You must export, import, and re-assign definitions. Then, create new policy assignments and any needed policy exemptions. |
| Microsoft Entra Domain Services | Yes | No | You cannot transfer a Microsoft Entra Domain Services managed domain to a different directory. For more information, see Frequently asked questions (FAQs) about Microsoft Entra Domain Services | |
| App registrations | Yes | Yes | ||
| Microsoft Dev Box | Yes | No | You cannot transfer a dev box and its associated resources to a different directory. Once a subscription moves to another tenant, you will not be able to perform any actions on your dev box | |
| Azure Deployment Environments | Yes | No | You cannot transfer an environment and its associated resources to a different directory. Once a subscription moves to another tenant, you will not be able to perform any actions on your environment | |
| Azure Service Fabric | Yes | No | You must re-create the cluster. For more information, see SF Clusters FAQ or SF Managed Clusters FAQ | |
| Azure Service Bus | Yes | Yes | You must delete, re-create, and attach the managed identities to the appropriate resource. You must re-create the role assignments. | |
| Azure Synapse Analytics Workspace | Yes | Yes | You must update the tenant ID associated with the Synapse Analytics Workspace. If the workspace is associated with a Git repository, you must update the workspace's Git configuration. For more information, see Recovering Synapse Analytics workspace after transferring a subscription to a different Microsoft Entra directory (tenant). | |
| Azure Databricks | Yes | No | Currently, Azure Databricks does not support moving workspaces to a new tenant. For more information, see Manage your Azure Databricks account. |
Warning
If you are using encryption at rest for a resource, such as a storage account or SQL database, that has a dependency on a key vault that is being transferred, it can lead to an unrecoverable scenario. If you have this situation, you should take steps to use a different key vault or temporarily disable customer-managed keys to avoid this unrecoverable scenario.
To get a list of some of the Azure resources that are impacted when you transfer a subscription, you can also run a query in Azure Resource Graph. For a sample query, see List impacted resources when transferring an Azure subscription.
Prerequisites
To complete these steps, you will need:
- Bash in Azure Cloud Shell or Azure CLI
- Billing account owner of the subscription you want to transfer in the source directory
- A user account in both the source and target directory for the user making the directory change
Step 1: Prepare for the transfer
Sign in to source directory
Sign in to Azure as an administrator.
Get a list of your subscriptions with the az account list command.
az account list --output tableUse az account set to set the active subscription you want to transfer.
az account set --subscription "Marketing"
Install the Azure Resource Graph extension
The Azure CLI extension for Azure Resource Graph, resource-graph, enables you to use the az graph command to query resources managed by Azure Resource Manager. You'll use this command in later steps.
Use az extension list to see if you have the resource-graph extension installed.
az extension listIf you are using a preview version or an older version of the resource-graph extension, use az extension update to update the extension.
az extension update --name resource-graphIf the resource-graph extension is not installed, use az extension add to install the extension.
az extension add --name resource-graph
Save all role assignments
Use az role assignment list to list all the role assignments (including inherited role assignments).
To make it easier to review the list, you can export the output as JSON, TSV, or a table. For more information, see List role assignments using Azure RBAC and Azure CLI.
az role assignment list --all --include-inherited --output json > roleassignments.json
az role assignment list --all --include-inherited --output tsv > roleassignments.tsv
az role assignment list --all --include-inherited --output table > roleassignments.txt
Save the list of role assignments.
When you transfer a subscription, all of the role assignments are permanently deleted so it is important to save a copy.
Review the list of role assignments. There might be role assignments you won't need in the target directory.
Save custom roles
Use the az role definition list to list your custom roles. For more information, see Create or update Azure custom roles using Azure CLI.
az role definition list --custom-role-only true --output json --query '[].{roleName:roleName, roleType:roleType}'Save each custom role that you will need in the target directory as a separate JSON file.
az role definition list --name <custom_role_name> > customrolename.jsonMake copies of the custom role files.
Modify each copy to use the following format.
You'll use these files later to re-create the custom roles in the target directory.
{
  "Name": "",
  "Description": "",
  "Actions": [],
  "NotActions": [],
  "DataActions": [],
  "NotDataActions": [],
  "AssignableScopes": []
}
Determine user, group, and service principal mappings
Based on your list of role assignments, determine the users, groups, and service principals you will map to in the target directory.
You can identify the type of principal by looking at the
principalTypeproperty in each role assignment.If necessary, in the target directory, create any users, groups, or service principals you will need.
List role assignments for managed identities
Managed identities do not get updated when a subscription is transferred to another directory. As a result, any existing system-assigned or user-assigned managed identities will be broken. After the transfer, you can re-enable any system-assigned managed identities. For user-assigned managed identities, you will have to re-create and attach them in the target directory.
Review the list of Azure services that support managed identities to note where you might be using managed identities.
Use az ad sp list to list your system-assigned and user-assigned managed identities.
az ad sp list --all --filter "servicePrincipalType eq 'ManagedIdentity'"In the list of managed identities, determine which are system-assigned and which are user-assigned. You can use the following criteria to determine the type.
Criteria Managed identity type alternativeNamesproperty includesisExplicit=FalseSystem-assigned alternativeNamesproperty does not includeisExplicitSystem-assigned alternativeNamesproperty includesisExplicit=TrueUser-assigned You can also use az identity list to just list user-assigned managed identities. For more information, see Create, list, or delete a user-assigned managed identity using the Azure CLI.
az identity listGet a list of the
objectIdvalues for your managed identities.Search your list of role assignments to see if there are any role assignments for your managed identities.
List key vaults
When you create a key vault, it is automatically tied to the default Microsoft Entra tenant ID for the subscription in which it is created. All access policy entries are also tied to this tenant ID. For more information, see Moving an Azure Key Vault to another subscription.
Warning
If you are using encryption at rest for a resource, such as a storage account or SQL database, that has a dependency on a key vault that is being transferred, it can lead to an unrecoverable scenario. If you have this situation, you should take steps to use a different key vault or temporarily disable customer-managed keys to avoid this unrecoverable scenario.
If you have a key vault, use az keyvault show to list the access policies. For more information, see Assign a Key Vault access policy.
az keyvault show --name MyKeyVault
List Azure SQL databases with Microsoft Entra authentication
Use az sql server ad-admin list and the az graph extension to see if you are using Azure SQL databases with Microsoft Entra authentication integration enabled. For more information, see Configure and manage Microsoft Entra authentication with SQL.
az sql server ad-admin list --ids $(az graph query -q "resources | where type == 'microsoft.sql/servers' | project id" --query data[*].[id] -o tsv)
List ACLs
If you are using Azure Data Lake Storage Gen1, list the ACLs that are applied to any file by using the Azure portal or PowerShell.
If you are using Azure Data Lake Storage Gen2, list the ACLs that are applied to any file by using the Azure portal or PowerShell.
If you are using Azure Files, list the ACLs that are applied to any file.
List other known resources
Use az account show to get your subscription ID (in
bash).subscriptionId=$(az account show --output tsv --query id)Use the az graph extension to list other Azure resources with known Microsoft Entra directory dependencies (in
bash).az graph query -q 'resources | where type != "microsoft.azureactivedirectory/b2cdirectories" | where identity <> "" or properties.tenantId <> "" or properties.encryptionSettingsCollection.enabled == true | project name, type, kind, identity, tenantId, properties.tenantId' --subscriptions $subscriptionId --output yaml
Step 2: Transfer the subscription
In this step, you transfer the subscription from the source directory to the target directory. The steps will be different depending on whether you want to also transfer the billing ownership.
Warning
When you transfer the subscription, all role assignments in the source directory are permanently deleted and cannot be restored. You cannot go back once you transfer the subscription. Be sure you complete the previous steps before performing this step.
Determine whether you want to also transfer the billing ownership to another account.
Transfer the subscription to a different directory.
- If you want to keep the current billing ownership, follow the steps in Associate or add an Azure subscription to your Microsoft Entra tenant.
- If you want to also transfer the billing ownership, follow the steps in Transfer billing ownership of an Azure subscription to another account. To transfer the subscription to a different directory, you must check the Subscription Microsoft Entra tenant check box.
Once you finish transferring the subscription, return back to this article to re-create the resources in the target directory.
Step 3: Re-create resources
Sign in to target directory
In the target directory, sign in as the user that accepted the transfer request.
Only the user in the new account who accepted the transfer request will have access to manage the resources.
Get a list of your subscriptions with the az account list command.
az account list --output tableUse az account set to set the active subscription you want to use.
az account set --subscription "Contoso"
Create custom roles
Use az role definition create to create each custom role from the files you created earlier. For more information, see Create or update Azure custom roles using Azure CLI.
az role definition create --role-definition <role_definition>
Assign roles
Use az role assignment create to assign roles to users, groups, and service principals. For more information, see Assign Azure roles using Azure CLI.
az role assignment create --role <role_name_or_id> --assignee <assignee> --scope "/subscriptions/<subscriptionId>/resourceGroups/<resource_group>"
Update system-assigned managed identities
Disable and re-enable system-assigned managed identities.
Azure service More information Virtual machines Configure managed identities for Azure resources on an Azure VM using Azure CLI Virtual machine scale sets Configure managed identities for Azure resources on a virtual machine scale set using Azure CLI Other services Services that support managed identities for Azure resources Use az role assignment create to assign roles to system-assigned managed identities. For more information, see Assign a managed identity access to a resource using Azure CLI.
az role assignment create --assignee <objectid> --role '<role_name_or_id>' --scope "/subscriptions/<subscriptionId>/resourceGroups/<resource_group>"
Update user-assigned managed identities
Delete, re-create, and attach user-assigned managed identities.
Azure service More information Virtual machines Configure managed identities for Azure resources on an Azure VM using Azure CLI Virtual machine scale sets Configure managed identities for Azure resources on a virtual machine scale set using Azure CLI Other services Services that support managed identities for Azure resources
Create, list, or delete a user-assigned managed identity using the Azure CLIUse az role assignment create to assign roles to user-assigned managed identities. For more information, see Assign a managed identity access to a resource using Azure CLI.
az role assignment create --assignee <objectid> --role '<role_name_or_id>' --scope "/subscriptions/<subscriptionId>/resourceGroups/<resource_group>"
Update key vaults
This section describes the basic steps to update your key vaults. For more information, see Moving an Azure Key Vault to another subscription.
Update the tenant ID associated with all existing key vaults in the subscription to the target directory.
Remove all existing access policy entries.
Add new access policy entries associated with the target directory.
Update ACLs
If you are using Azure Data Lake Storage Gen1, assign the appropriate ACLs. For more information, see Securing data stored in Azure Data Lake Storage Gen1.
If you are using Azure Data Lake Storage Gen2, assign the appropriate ACLs. For more information, see Access control in Azure Data Lake Storage Gen2.
If you are using Azure Files, assign the appropriate ACLs.
Review other security methods
Even though role assignments are removed during the transfer, users in the original owner account might continue to have access to the subscription through other security methods, including:
- Access keys for services like Storage.
- Management certificates that grant the user administrator access to subscription resources.
- Remote Access credentials for services like Azure Virtual Machines.
If your intent is to remove access from users in the source directory so that they don't have access in the target directory, you should consider rotating any credentials. Until the credentials are updated, users will continue to have access after the transfer.
Rotate storage account access keys. For more information, see Manage storage account access keys.
If you are using access keys for other services such as Azure SQL Database or Azure Service Bus Messaging, rotate access keys.
For resources that use secrets, open the settings for the resource and update the secret.
For resources that use certificates, update the certificate.
Next steps
Feedback
În curând: Pe parcursul anului 2024, vom elimina treptat Probleme legate de GitHub ca mecanism de feedback pentru conținut și îl vom înlocui cu un nou sistem de feedback. Pentru mai multe informații, consultați: https://aka.ms/ContentUserFeedback.
Trimiteți și vizualizați feedback pentru