Руководство. Пошаговые инструкции по созданию нового приложения Android с помощью пространственных привязок Azure
В этом учебнике описывается, как создать новое приложение Android, в котором функции ARCore интегрируются с Пространственными привязками Azure.
Необходимые компоненты
В рамках этого руководства вам потребуются:
- Компьютер под управлением macOS или Windows с Android Studio 3.4 или более поздних версий.
- Устройство Android с включенным режимом разработчика и поддержкой ARCore.
Начало работы
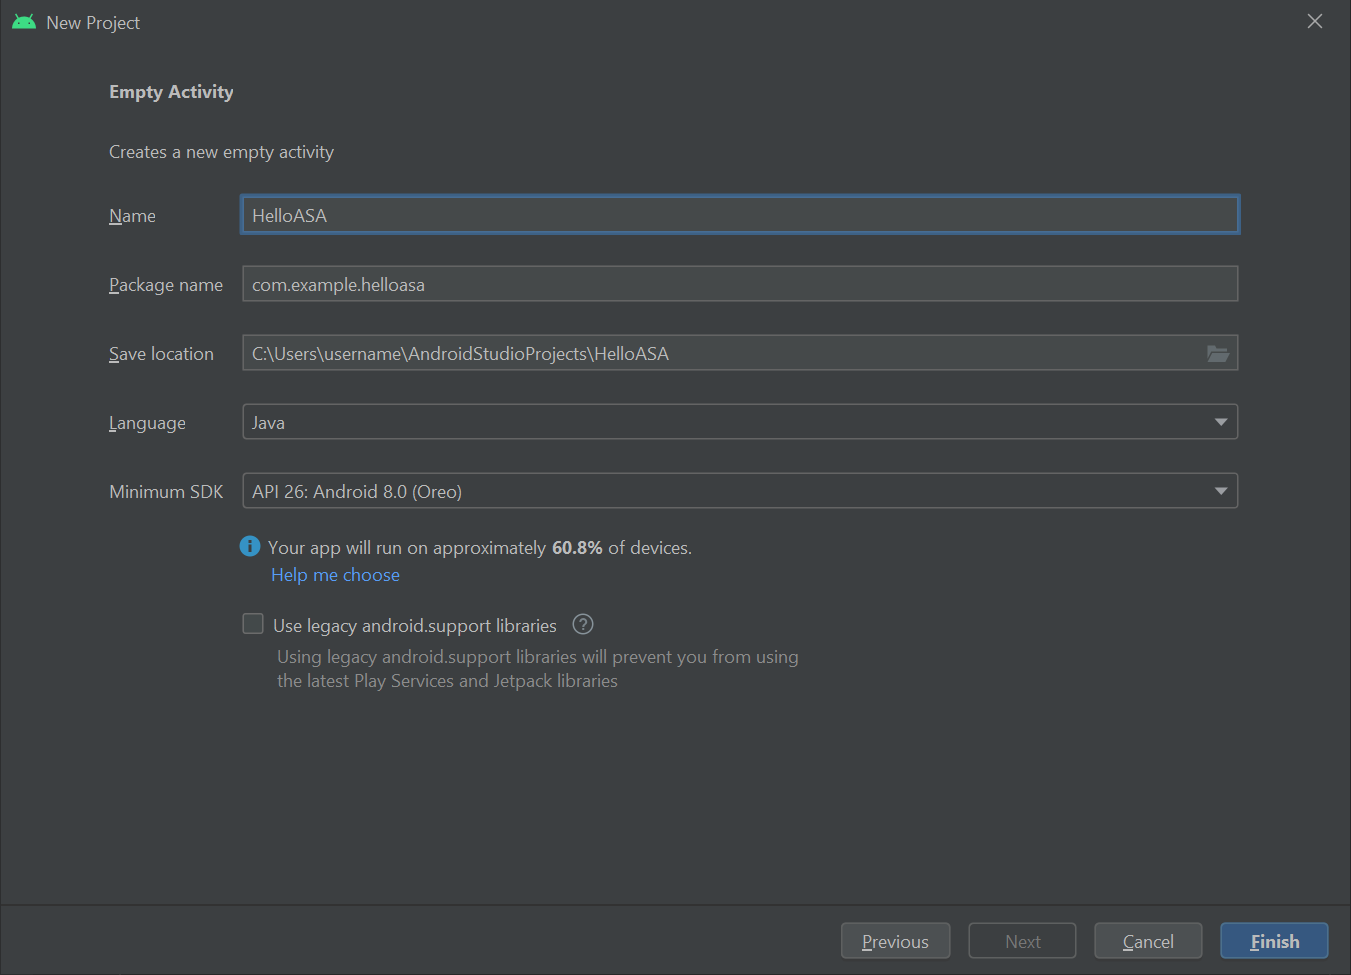
Запустите Android Studio. В окне приветствия Android Studio щелкните Start a new Android Studio project (Создать проект Android Studio).
- Выберите проект "Создать файл>".
- В окне создания нового проекта в разделе Phone and Tablet (Телефоны и планшеты) выберите Empty Activity (Пустое действие) и щелкните Далее.
- В окне "Новый проект — пустое действие" измените следующие значения:
- Измените параметры Имя, Имя пакета и Расположение сохранения, указав нужные значения.
- Задайте для параметра Язык значение
Java. - Задайте для параметра Минимальный уровень API значение
API 26: Android 8.0 (Oreo). - Сохраните значения остальных параметров неизменными.
- Нажмите кнопку Готово.
- Запустится установщик компонентов. После некоторой подготовки Android Studio откроет интегрированную среду разработки.
Проверка работы
Чтобы протестировать новое приложение, подключите устройство с поддержкой функций разработки к локальному компьютеру разработки с помощью кабеля USB. В правом верхнем углу Android Studio выберите подключенное устройство и щелкните значок Запустить приложение. Android Studio установит приложение на подключенном устройстве и запустит его. Теперь вы увидите "Hello World!", отображаемое в приложении, работающем на устройстве. Нажмите кнопку "Остановить запуск>" приложения.

Интеграция ARCore
ARCore — это платформа Google для создания функций дополненной реальности, которая позволяет устройству отслеживать положение в пространстве и генерировать собственное представление о реальном мире.
Измените файл app\manifests\AndroidManifest.xml, включив следующие записи в корневой узел <manifest>. Этот фрагмент кода выполняет несколько задач:
- предоставляет приложению доступ к камере устройства;
- настраивает видимость приложения в Google Play Маркет, чтобы оно отображалось только для устройств с поддержкой ARCore;
- настраивает скачивание и установку ARCore при установке приложения из Google Play Маркет, если этот компонент еще не установлен.
<manifest ...>

    <uses-permission android:name="android.permission.CAMERA" />
    <uses-feature android:name="android.hardware.camera.ar" />

    <application>
        ...
        <meta-data android:name="com.google.ar.core" android:value="required" />
        ...
    </application>

</manifest>
Измените Gradle Scripts\build.gradle (Module: app), добавив указанный ниже фрагмент. Этот код обеспечит использование приложением ARCore версии 1.25. Если после этого изменения вы получите уведомление из Gradle с предложением выполнить синхронизацию, щелкните Sync now (Синхронизировать сейчас).
dependencies {
    ...
    implementation 'com.google.ar:core:1.25.0'
    ...
}
Интеграция Sceneform
Sceneform упрощает отрисовку реалистичных объемных сцен в приложениях дополненной реальности, не требуя при этом изучать OpenGL.
Измените Gradle Scripts\build.gradle (Module: app), добавив указанный ниже фрагмент. Этот код позволяет приложению использовать языковые конструкции из Java 8, что необходимо для Sceneform. Кроме того, приложение будет предназначено для Sceneform версии 1.15. Если после этого изменения вы получите уведомление из Gradle с предложением выполнить синхронизацию, щелкните Sync now (Синхронизировать сейчас).
android {
    ...

    compileOptions {
        sourceCompatibility JavaVersion.VERSION_1_8
        targetCompatibility JavaVersion.VERSION_1_8
    }
}

dependencies {
    ...
    implementation 'com.google.ar.sceneform.ux:sceneform-ux:1.15.0'
    ...
}
Откройте app\res\layout\activity_main.xml и замените существующий элемент "Hello World" <TextView ... /> указанным ниже кодом ArFragment. Этот код отображает на экране видео с камеры, что позволяет ARCore отслеживать местоположение устройства при его перемещении.
<fragment android:name="com.google.ar.sceneform.ux.ArFragment"
    android:id="@+id/ux_fragment"
    android:layout_width="match_parent"
    android:layout_height="match_parent" />
Примечание.
Чтобы просмотреть необработанный XML-код основного действия, нажмите кнопку "Код" или "Разделить" в правом верхнем углу Android Studio.
Повторно разверните приложение на устройстве, чтобы проверить его еще раз. На этот раз вы получите запрос на предоставление разрешений для камеры. Подтвердив этот запрос, вы увидите на экране видео с камеры.
Размещение объекта в реальном мире
Давайте создадим новый объект и разместим его с помощью приложения. Сначала добавьте следующие операторы import в файл app\java\<PackageName>\MainActivity:
import com.google.ar.core.HitResult;
import com.google.ar.core.Plane;
import com.google.ar.sceneform.AnchorNode;
import com.google.ar.sceneform.math.Vector3;
import com.google.ar.sceneform.rendering.Color;
import com.google.ar.sceneform.rendering.MaterialFactory;
import com.google.ar.sceneform.rendering.Renderable;
import com.google.ar.sceneform.rendering.ShapeFactory;
import com.google.ar.sceneform.ux.ArFragment;

import android.view.MotionEvent;
Затем добавьте следующие переменные-члены в класс MainActivity:
private boolean tapExecuted = false;
private final Object syncTaps = new Object();
private ArFragment arFragment;
private AnchorNode anchorNode;
private Renderable nodeRenderable = null;
private float recommendedSessionProgress = 0f;
Теперь добавьте указанный ниже код в метод app\java\<PackageName>\MainActivityonCreate(). Этот код подключает прослушиватель с именем handleTap(), который отслеживает касание экрана пользователем устройства. Если это касание происходит на поверхности из реального мира, которая распознана функцией отслеживания в ARCore, выполняется код прослушивателя.
@Override
protected void onCreate(Bundle savedInstanceState) {
    super.onCreate(savedInstanceState);
    setContentView(R.layout.activity_main);

    this.arFragment = (ArFragment) getSupportFragmentManager().findFragmentById(R.id.ux_fragment);
    this.arFragment.setOnTapArPlaneListener(this::handleTap);
}
Наконец, добавьте указанный ниже метод handleTap(), который выполняет компоновку. Этот код создает сферу и помещает ее в том расположении, где произошло касание. Изначально эта сфера будет черной, так как параметр this.recommendedSessionProgress имеет значение 0. Мы скорректируем это значение позднее.
protected void handleTap(HitResult hitResult, Plane plane, MotionEvent motionEvent) {
    synchronized (this.syncTaps) {
        if (this.tapExecuted) {
            return;
        }

        this.tapExecuted = true;
    }

    this.anchorNode = new AnchorNode();
    this.anchorNode.setAnchor(hitResult.createAnchor());

    MaterialFactory.makeOpaqueWithColor(this, new Color(
            this.recommendedSessionProgress,
            this.recommendedSessionProgress,
            this.recommendedSessionProgress))
            .thenAccept(material -> {
                this.nodeRenderable = ShapeFactory.makeSphere(0.1f, new Vector3(0.0f, 0.15f, 0.0f), material);
                this.anchorNode.setRenderable(nodeRenderable);
                this.anchorNode.setParent(arFragment.getArSceneView().getScene());
            });
}
Повторно разверните приложение на устройстве, чтобы проверить его еще раз. Теперь измените положение устройства в пространстве, чтобы запустить распознавание окружающей среды с помощью ARCore. Затем коснитесь экрана, чтобы создать черную сферу и поместить ее на выбранную поверхность.
Присоединение локальной пространственной привязки Azure
Измените Gradle Scripts\build.gradle (Module: app), добавив указанный ниже фрагмент. Этот пример фрагмента кода нацелен на пакет SDK для Пространственных привязок Azure версии 2.10.2. Обратите внимание, что в настоящее время версия 2.7.0 пакета SDK — это минимальная поддерживаемая версия и ссылки на более позднюю версию Пространственных привязок Azure также должны работать. Мы рекомендуем использовать последнюю версию пакета SDK для Пространственных привязок Azure. См. заметки о выпуске пакета SDK.
dependencies {
    ...
    implementation 'com.microsoft.azure.spatialanchors:spatialanchors_jni:[2.10.2]'
    implementation 'com.microsoft.azure.spatialanchors:spatialanchors_java:[2.10.2]'
    ...
}
Если вы нацелены на пакет SDK для Пространственных привязок Azure 2.10.0 или более поздней версии, добавьте следующую запись в раздел repositories файла settings.gradle в проекте. Она содержит URL-адрес веб-канала пакетов Maven, в котором размещаются пакеты Android для Пространственных привязок Azure для пакета SDK 2.10.0 или более поздней версии:
dependencyResolutionManagement {
    ...
    repositories {
        ...
        maven {
            url 'https://pkgs.dev.azure.com/aipmr/MixedReality-Unity-Packages/_packaging/Maven-packages/maven/v1'
        }
        ...
    }
}
Щелкните правой кнопкой мыши app\java\<PackageName>>класс -New-Java.> Задайте для параметра Имя значение MyFirstApp и выберите Класс. Будет создан файл с именем MyFirstApp.java. Добавьте в него следующую инструкцию import:
import com.microsoft.CloudServices;
Определите android.app.Application в качестве суперкласса.
public class MyFirstApp extends android.app.Application {...
Затем добавьте в новый класс MyFirstApp указанный ниже код, который выполняет инициализацию Пространственных привязок Azure с контекстом вашего приложения.
    @Override
    public void onCreate() {
        super.onCreate();
        CloudServices.initialize(this);
    }
Измените файл app\manifests\AndroidManifest.xml, включив указанную ниже запись в корневой узел <application>. Этот код присоединит класс Application, который вы создали в приложении.
    <application
        android:name=".MyFirstApp"
        ...
    </application>
Вернитесь к файлу app\java\<PackageName>\MainActivity и добавьте в него следующие операторы import:
import android.view.MotionEvent;
import android.util.Log;

import com.google.ar.sceneform.ArSceneView;
import com.google.ar.sceneform.Scene;
import com.microsoft.azure.spatialanchors.CloudSpatialAnchor;
import com.microsoft.azure.spatialanchors.CloudSpatialAnchorSession;
import com.microsoft.azure.spatialanchors.SessionLogLevel;
Затем добавьте следующие переменные-члены в класс MainActivity:
private float recommendedSessionProgress = 0f;

private ArSceneView sceneView;
private CloudSpatialAnchorSession cloudSession;
private boolean sessionInitialized = false;
Теперь добавим указанный ниже метод initializeSession() в класс mainActivity. При вызове он создает настройки, необходимые для создания и правильной инициализации сеанса Пространственных привязок Azure при запуске приложения. Этот код гарантирует, что сеанс sceneView, переданный в сеанс ASA через вызов cloudSession.setSession, не равен NULL из-за раннего возврата.
private void initializeSession() {
    if (sceneView.getSession() == null) {
        //Early return if the ARCore Session is still being set up
        return;
    }

    if (this.cloudSession != null) {
        this.cloudSession.close();
    }
    this.cloudSession = new CloudSpatialAnchorSession();
    this.cloudSession.setSession(sceneView.getSession());
    this.cloudSession.setLogLevel(SessionLogLevel.Information);
    this.cloudSession.addOnLogDebugListener(args -> Log.d("ASAInfo", args.getMessage()));
    this.cloudSession.addErrorListener(args -> Log.e("ASAError", String.format("%s: %s", args.getErrorCode().name(), args.getErrorMessage())));

    sessionInitialized = true;
}
Поскольку initializeSession() может выполнить ранний возврат, если сеанс sceneView еще не настроен (т. е. если sceneView.getSession() имеет значение NULL), мы добавим вызов onUpdate, чтобы убедиться, что сеанс ASA инициализируется после создания сеанса sceneView.
private void scene_OnUpdate(FrameTime frameTime) {
    if (!sessionInitialized) {
        //retry if initializeSession did an early return due to ARCore Session not yet available (i.e. sceneView.getSession() == null)
        initializeSession();
    }
}
Теперь подключим метод initializeSession() и scene_OnUpdate(...) к методу onCreate(). Мы также настроим отправку кадров с камеры в пакет SDK Пространственных привязок Azure для обработки.
@Override
protected void onCreate(Bundle savedInstanceState) {
    super.onCreate(savedInstanceState);
    setContentView(R.layout.activity_main);

    this.arFragment = (ArFragment) getSupportFragmentManager().findFragmentById(R.id.ux_fragment);
    this.arFragment.setOnTapArPlaneListener(this::handleTap);

    this.sceneView = arFragment.getArSceneView();
    Scene scene = sceneView.getScene();
    scene.addOnUpdateListener(frameTime -> {
        if (this.cloudSession != null) {
            this.cloudSession.processFrame(sceneView.getArFrame());
        }
    });
    scene.addOnUpdateListener(this::scene_OnUpdate);
    initializeSession();
}
Наконец, добавьте указанный ниже код в метод handleTap(). Он присоединит локальную пространственную привязку службы "Пространственные привязки Azure" к черной сфере, которую мы размещаем в реальном мире.
protected void handleTap(HitResult hitResult, Plane plane, MotionEvent motionEvent) {
    synchronized (this.syncTaps) {
        if (this.tapExecuted) {
            return;
        }

        this.tapExecuted = true;
    }

    this.anchorNode = new AnchorNode();
    this.anchorNode.setAnchor(hitResult.createAnchor());
    CloudSpatialAnchor cloudAnchor = new CloudSpatialAnchor();
    cloudAnchor.setLocalAnchor(this.anchorNode.getAnchor());

    MaterialFactory.makeOpaqueWithColor(this, new Color(
            this.recommendedSessionProgress,
            this.recommendedSessionProgress,
            this.recommendedSessionProgress))
            .thenAccept(material -> {
                this.nodeRenderable = ShapeFactory.makeSphere(0.1f, new Vector3(0.0f, 0.15f, 0.0f), material);
                this.anchorNode.setRenderable(nodeRenderable);
                this.anchorNode.setParent(arFragment.getArSceneView().getScene());
            });
}
Разверните приложение еще раз. Переместите устройство, а затем коснитесь экрана для размещения черной сферы. Но на этот раз код создаст локальную пространственную привязку и прикрепит ее к созданной сфере.
Чтобы продолжить работу, вам следует создать учетную запись службы "Пространственные привязки Azure" для получения идентификатора, ключа и домена учетной записи, если у вас их еще нет. Чтобы получить эти элементы, выполните инструкции из следующего раздела.
Создание ресурса Пространственных привязок
Переход на портал Azure.
В области слева выберите Создать ресурс.
Выполните поиск по запросу Пространственные привязки с помощью поля поиска.
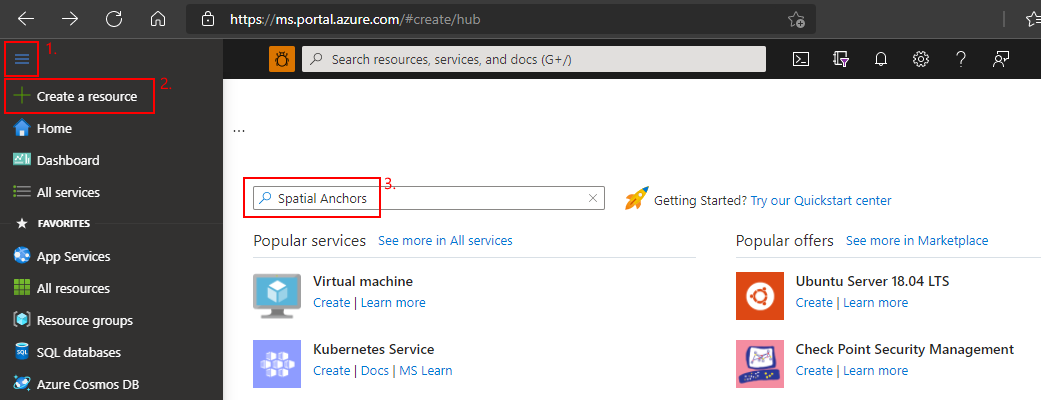
Выберите Пространственные привязки, а затем щелкните Создать.
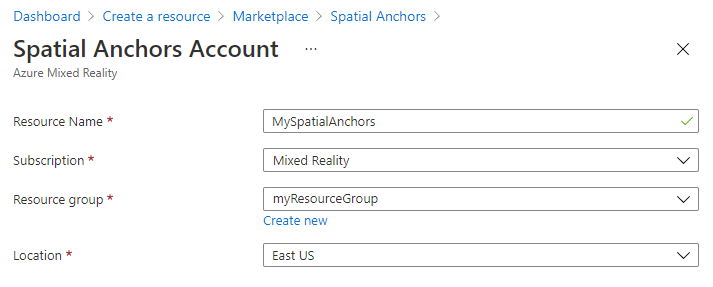
В области Учетная запись Пространственных привязок выполните следующие действия.
Введите уникальное имя ресурса, используя обычные буквенно-цифровые символы.
Выберите подписку, к которой нужно присоединить ресурс.
Создайте группу ресурсов, нажав Создать. Назовите ее myResourceGroup и нажмите ОК.
Группа ресурсов — это логический контейнер, в котором происходит развертывание ресурсов Azure (например, веб-приложений, баз данных и учетных записей хранения) и управление ими. Например, в дальнейшем можно удалить всю группу ресурсов при помощи одного простого действия.
Выберите расположение (регион), в котором будет размещен ресурс.
Выберите Создать, чтобы начать создание ресурса.
После создания ресурса на портале Azure отобразится оповещение о завершении развертывания.
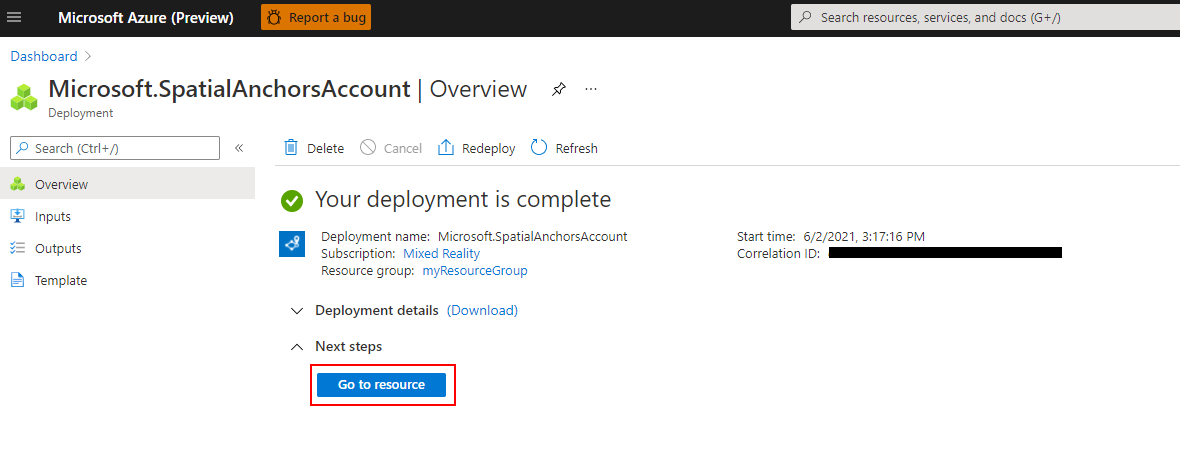
Выберите Перейти к ресурсу. Теперь можно просмотреть свойства ресурса.
Скопируйте значение идентификатора учетной записи ресурса в текстовый редактор для дальнейшего использования.
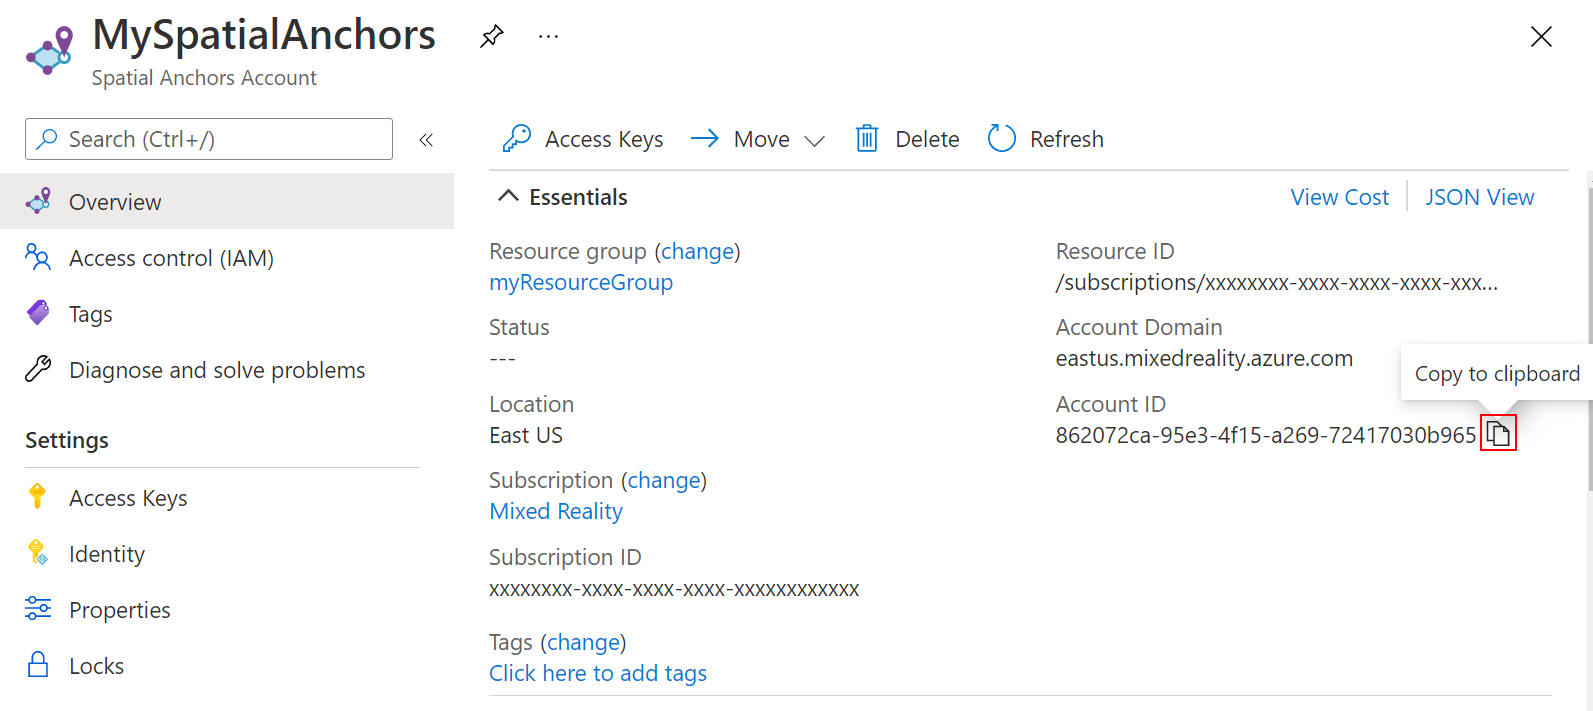
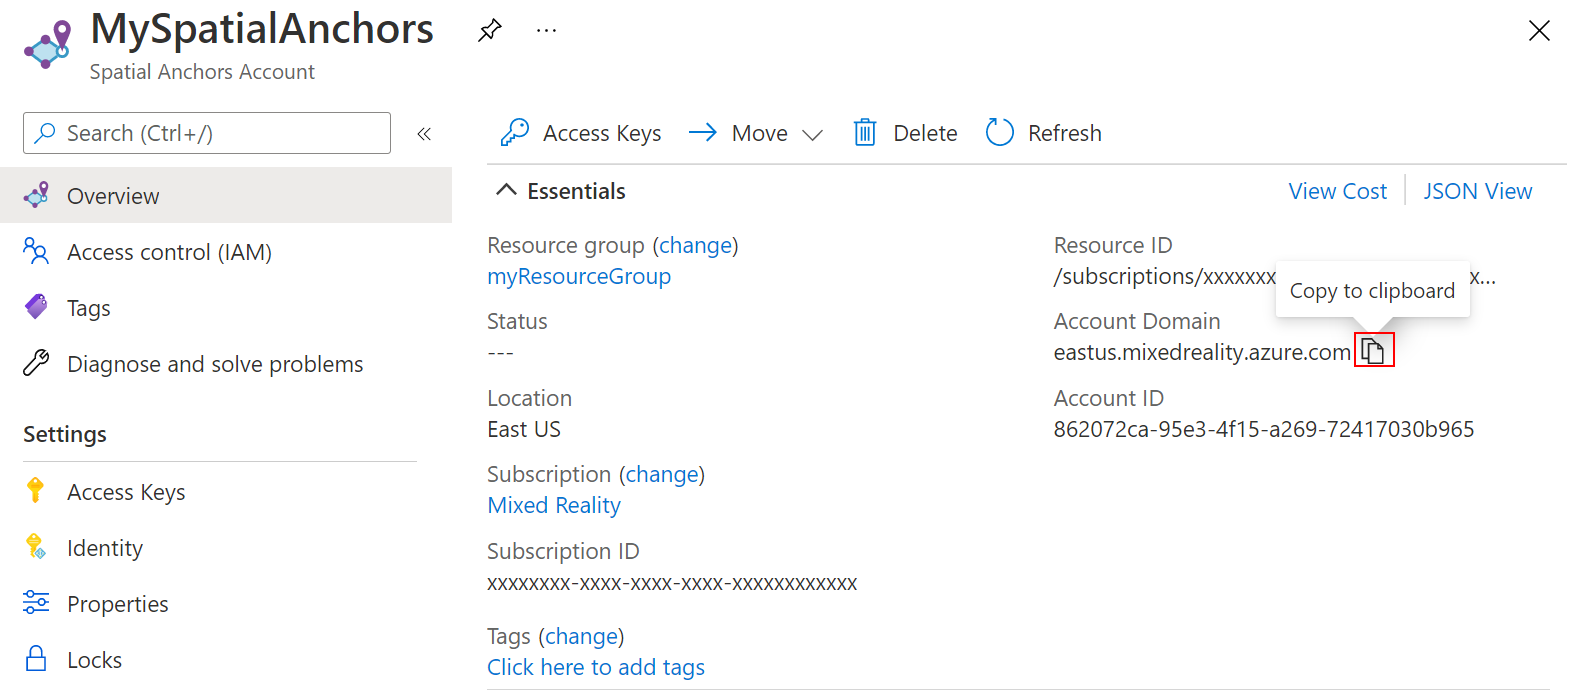
Скопируйте также значение домена учетной записи ресурса в текстовый редактор для дальнейшего использования.
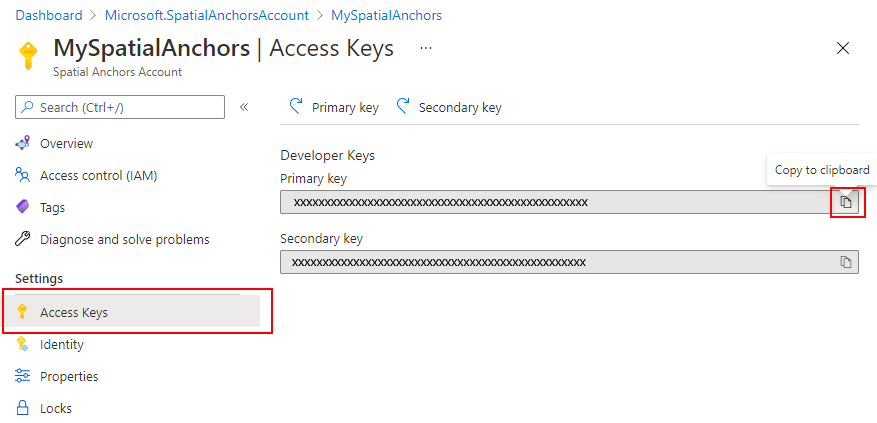
В разделе Параметры выберите элемент Ключ доступа. Скопируйте значение первичного ключа (ключа учетной записи) в текстовый редактор для дальнейшего использования.

Отправка локальной привязки в облако
Получив идентификатор, ключ и домен учетной записи Пространственных привязок Azure, вернитесь к файлу app\java\<PackageName>\MainActivity и добавьте в него следующие операторы import:
import com.microsoft.azure.spatialanchors.SessionLogLevel;

import java.util.concurrent.CompletableFuture;
import java.util.concurrent.ExecutionException;
import java.util.concurrent.ExecutorService;
import java.util.concurrent.Executors;
Затем добавьте следующие переменные-члены в класс MainActivity:
private boolean sessionInitialized = false;

private String anchorId = null;
private boolean scanningForUpload = false;
private final Object syncSessionProgress = new Object();
private ExecutorService executorService = Executors.newSingleThreadExecutor();
Теперь добавьте указанный ниже код в метод initializeSession(). Этот код, прежде всего, позволяет приложению отслеживать, как пакет SDK Пространственных привязок Azure получает кадры от камеры. По мере выполнения этого процесса цвет сферы изменится с исходного черного на серый. Когда будет получено достаточное количество кадров, чтобы отправить привязку в облако, сфера станет белой. Во-вторых, этот код предоставляет необходимые учетные данные для взаимодействия с облачной серверной частью платформы. Так вы настроите идентификатор, ключ и домен учетной записи для использования в приложении. Вы скопировали их в текстовый редактор, когда выполняли настройку ресурсов пространственных привязок.
private void initializeSession() {
    if (sceneView.getSession() == null) {
        //Early return if the ARCore Session is still being set up
        return;
    }

    if (this.cloudSession != null) {
        this.cloudSession.close();
    }
    this.cloudSession = new CloudSpatialAnchorSession();
    this.cloudSession.setSession(sceneView.getSession());
    this.cloudSession.setLogLevel(SessionLogLevel.Information);
    this.cloudSession.addOnLogDebugListener(args -> Log.d("ASAInfo", args.getMessage()));
    this.cloudSession.addErrorListener(args -> Log.e("ASAError", String.format("%s: %s", args.getErrorCode().name(), args.getErrorMessage())));

    sessionInitialized = true;

    this.cloudSession.addSessionUpdatedListener(args -> {
        synchronized (this.syncSessionProgress) {
            this.recommendedSessionProgress = args.getStatus().getRecommendedForCreateProgress();
            Log.i("ASAInfo", String.format("Session progress: %f", this.recommendedSessionProgress));
            if (!this.scanningForUpload) {
                return;
            }
        }

        runOnUiThread(() -> {
            synchronized (this.syncSessionProgress) {
                MaterialFactory.makeOpaqueWithColor(this, new Color(
                        this.recommendedSessionProgress,
                        this.recommendedSessionProgress,
                        this.recommendedSessionProgress))
                        .thenAccept(material -> {
                            this.nodeRenderable.setMaterial(material);
                        });
            }
        });
    });

    this.cloudSession.getConfiguration().setAccountId(/* Copy your account Identifier in here */);
    this.cloudSession.getConfiguration().setAccountKey(/* Copy your account Key in here */);
    this.cloudSession.getConfiguration().setAccountDomain(/* Copy your account Domain in here */);
    this.cloudSession.start();
}
Теперь добавьте указанный ниже метод uploadCloudAnchorAsync() в класс mainActivity. Этот метод асинхронно ожидает получения достаточного количества кадров с устройства. Когда информации будет достаточно, он переключит цвет сферы на желтый и начнет передавать локальную пространственную привязку в облако. После завершения отправки код возвращает идентификатор привязки.
private CompletableFuture<String> uploadCloudAnchorAsync(CloudSpatialAnchor anchor) {
    synchronized (this.syncSessionProgress) {
        this.scanningForUpload = true;
    }


    return CompletableFuture.runAsync(() -> {
        try {
            float currentSessionProgress;
            do {
                synchronized (this.syncSessionProgress) {
                    currentSessionProgress = this.recommendedSessionProgress;
                }
                if (currentSessionProgress < 1.0) {
                    Thread.sleep(500);
                }
            }
            while (currentSessionProgress < 1.0);

            synchronized (this.syncSessionProgress) {
                this.scanningForUpload = false;
            }
            runOnUiThread(() -> {
                MaterialFactory.makeOpaqueWithColor(this, new Color(android.graphics.Color.YELLOW))
                        .thenAccept(yellowMaterial -> {
                            this.nodeRenderable.setMaterial(yellowMaterial);
                        });
            });

            this.cloudSession.createAnchorAsync(anchor).get();
        } catch (InterruptedException | ExecutionException e) {
            Log.e("ASAError", e.toString());
            throw new RuntimeException(e);
        }
    }, executorService).thenApply(ignore -> anchor.getIdentifier());
}
Наконец, соединим все компоненты. Добавьте указанный ниже код в метод handleTap(). Он будет вызывать метод uploadCloudAnchorAsync() сразу после создания новой сферы. После завершения работы метода указанный ниже код выполнит последнее обновление параметров сферы, изменив ее цвет на синий.
protected void handleTap(HitResult hitResult, Plane plane, MotionEvent motionEvent) {
    synchronized (this.syncTaps) {
        if (this.tapExecuted) {
            return;
        }

        this.tapExecuted = true;
    }

    this.anchorNode = new AnchorNode();
    this.anchorNode.setAnchor(hitResult.createAnchor());
    CloudSpatialAnchor cloudAnchor = new CloudSpatialAnchor();
    cloudAnchor.setLocalAnchor(this.anchorNode.getAnchor());

    MaterialFactory.makeOpaqueWithColor(this, new Color(
            this.recommendedSessionProgress,
            this.recommendedSessionProgress,
            this.recommendedSessionProgress))
            .thenAccept(material -> {
                this.nodeRenderable = ShapeFactory.makeSphere(0.1f, new Vector3(0.0f, 0.15f, 0.0f), material);
                this.anchorNode.setRenderable(nodeRenderable);
                this.anchorNode.setParent(arFragment.getArSceneView().getScene());
            });


    uploadCloudAnchorAsync(cloudAnchor)
            .thenAccept(id -> {
                this.anchorId = id;
                Log.i("ASAInfo", String.format("Cloud Anchor created: %s", this.anchorId));
                runOnUiThread(() -> {
                    MaterialFactory.makeOpaqueWithColor(this, new Color(android.graphics.Color.BLUE))
                            .thenAccept(blueMaterial -> {
                                this.nodeRenderable.setMaterial(blueMaterial);
                                synchronized (this.syncTaps) {
                                    this.tapExecuted = false;
                                }
                            });
                });
            });
}
Разверните приложение еще раз. Переместите устройство, затем коснитесь экрана для размещения сферы. На этот раз вы увидите, как цвет сферы будет меняться от черного до белого по мере сбора кадров с камеры. Когда будет собрано достаточное количество кадров, цвет сферы станет желтым и начнется передача данных в облако. Убедитесь, что телефон подключен к Интернету. Когда отправка данных завершится, цвет сферы станет синим. При желании вы можете отслеживать окно Logcat в Android Studio для просмотра сообщений, которые приложение отправляет в журнал. Примеры сообщений, которые будут занесены в журнал: ход выполнения сеанса при захвате кадров и идентификатор привязки, возвращаемый облаком после завершения передачи.
Примечание.
Если вы не видите значение recommendedSessionProgress (в журналах отладки называемое Session progress), убедитесь, что перемещаете и вращаете телефон вокруг размещенной сферы.
Поиск облачной пространственной привязки
Когда привязка будет отправлена в облако, вы можете попытаться найти ее. Для этого добавим следующие операторы import в код приложения:
import java.util.concurrent.Executors;

import com.microsoft.azure.spatialanchors.AnchorLocateCriteria;
import com.microsoft.azure.spatialanchors.LocateAnchorStatus;
Теперь добавьте указанный ниже код в метод handleTap(). Этот код будет:
- Удаляет с экрана синюю сферу.
- Повторно инициализирует сеанс Пространственных привязок Azure. Это действие гарантирует, что будет получена новая привязка из облака, а не созданная ранее локальная привязка.
- Направляет запрос на получение привязки, которую мы отправили в облако.
protected void handleTap(HitResult hitResult, Plane plane, MotionEvent motionEvent) {
    synchronized (this.syncTaps) {
        if (this.tapExecuted) {
            return;
        }

        this.tapExecuted = true;
    }

    if (this.anchorId != null) {
        this.anchorNode.getAnchor().detach();
        this.anchorNode.setParent(null);
        this.anchorNode = null;
        initializeSession();
        AnchorLocateCriteria criteria = new AnchorLocateCriteria();
        criteria.setIdentifiers(new String[]{this.anchorId});
        cloudSession.createWatcher(criteria);
        return;
    }

    this.anchorNode = new AnchorNode();
    this.anchorNode.setAnchor(hitResult.createAnchor());
    CloudSpatialAnchor cloudAnchor = new CloudSpatialAnchor();
    cloudAnchor.setLocalAnchor(this.anchorNode.getAnchor());

    MaterialFactory.makeOpaqueWithColor(this, new Color(
            this.recommendedSessionProgress,
            this.recommendedSessionProgress,
            this.recommendedSessionProgress))
            .thenAccept(material -> {
                this.nodeRenderable = ShapeFactory.makeSphere(0.1f, new Vector3(0.0f, 0.15f, 0.0f), material);
                this.anchorNode.setRenderable(nodeRenderable);
                this.anchorNode.setParent(arFragment.getArSceneView().getScene());
            });


    uploadCloudAnchorAsync(cloudAnchor)
            .thenAccept(id -> {
                this.anchorId = id;
                Log.i("ASAInfo", String.format("Cloud Anchor created: %s", this.anchorId));
                runOnUiThread(() -> {
                    MaterialFactory.makeOpaqueWithColor(this, new Color(android.graphics.Color.BLUE))
                            .thenAccept(blueMaterial -> {
                                this.nodeRenderable.setMaterial(blueMaterial);
                                synchronized (this.syncTaps) {
                                    this.tapExecuted = false;
                                }
                            });
                });
            });
}
Теперь подключим код, который будет вызываться при обнаружении нужной привязки. Добавьте следующий код в метод initializeSession(): Этот фрагмент кода создает и размещает зеленую сферу, когда будет найдена облачная пространственная привязка. Также он снова включает отслеживание касания экрана, чтобы вы могли повторить весь процесс: создать новую локальную привязку, передать ее в облако и снова найти.
private void initializeSession() {
    if (sceneView.getSession() == null) {
        //Early return if the ARCore Session is still being set up
        return;
    }

    if (this.cloudSession != null) {
        this.cloudSession.close();
    }
    this.cloudSession = new CloudSpatialAnchorSession();
    this.cloudSession.setSession(sceneView.getSession());
    this.cloudSession.setLogLevel(SessionLogLevel.Information);
    this.cloudSession.addOnLogDebugListener(args -> Log.d("ASAInfo", args.getMessage()));
    this.cloudSession.addErrorListener(args -> Log.e("ASAError", String.format("%s: %s", args.getErrorCode().name(), args.getErrorMessage())));

    sessionInitialized = true;

    this.cloudSession.addSessionUpdatedListener(args -> {
        synchronized (this.syncSessionProgress) {
            this.recommendedSessionProgress = args.getStatus().getRecommendedForCreateProgress();
            Log.i("ASAInfo", String.format("Session progress: %f", this.recommendedSessionProgress));
            if (!this.scanningForUpload) {
                return;
            }
        }

        runOnUiThread(() -> {
            synchronized (this.syncSessionProgress) {
                MaterialFactory.makeOpaqueWithColor(this, new Color(
                        this.recommendedSessionProgress,
                        this.recommendedSessionProgress,
                        this.recommendedSessionProgress))
                        .thenAccept(material -> {
                            this.nodeRenderable.setMaterial(material);
                        });
            }
        });
    });

    this.cloudSession.addAnchorLocatedListener(args -> {
        if (args.getStatus() == LocateAnchorStatus.Located) {
            runOnUiThread(() -> {
                this.anchorNode = new AnchorNode();
                this.anchorNode.setAnchor(args.getAnchor().getLocalAnchor());
                MaterialFactory.makeOpaqueWithColor(this, new Color(android.graphics.Color.GREEN))
                        .thenAccept(greenMaterial -> {
                            this.nodeRenderable = ShapeFactory.makeSphere(0.1f, new Vector3(0.0f, 0.15f, 0.0f), greenMaterial);
                            this.anchorNode.setRenderable(nodeRenderable);
                            this.anchorNode.setParent(arFragment.getArSceneView().getScene());

                            this.anchorId = null;
                            synchronized (this.syncTaps) {
                                this.tapExecuted = false;
                            }
                        });
            });
        }
    });

    this.cloudSession.getConfiguration().setAccountId(/* Copy your account Identifier in here */);
    this.cloudSession.getConfiguration().setAccountKey(/* Copy your account Key in here */);
    this.cloudSession.getConfiguration().setAccountDomain(/* Copy your account Domain in here */);
    this.cloudSession.start();
}
Вот и все! В последний раз повторно разверните приложение, чтобы полностью протестировать весь сценарий работы с ним. Переместите устройство, а затем разместите черную сферу. Продолжайте перемещать устройство, чтобы собрать достаточное количество кадров с камеры, пока сфера не станет желтой. Локальная привязка будет отправлена в облако, и цвет этой сферы изменится на синий. Наконец, еще раз коснитесь экрана, чтобы удалить локальную привязку, и попытайтесь получить облачную версию этой привязки. Продолжайте перемещать устройство, пока не обнаружите облачную пространственную привязку. В выбранном ранее месте появится зеленая сфера. Теперь вы можете повторить весь процесс.
Итоговое объединение
Вот так выглядит завершенный файл класса MainActivity после объединения различных элементов. Этот файл можно использовать для сравнения с вашим файлом для обнаружения расхождений.
package com.example.myfirstapp;

import android.os.Bundle;
import android.util.Log;
import android.view.MotionEvent;

import androidx.appcompat.app.AppCompatActivity;

import com.google.ar.core.HitResult;
import com.google.ar.core.Plane;
import com.google.ar.sceneform.AnchorNode;
import com.google.ar.sceneform.ArSceneView;
import com.google.ar.sceneform.FrameTime;
import com.google.ar.sceneform.Scene;
import com.google.ar.sceneform.math.Vector3;
import com.google.ar.sceneform.rendering.Color;
import com.google.ar.sceneform.rendering.MaterialFactory;
import com.google.ar.sceneform.rendering.Renderable;
import com.google.ar.sceneform.rendering.ShapeFactory;
import com.google.ar.sceneform.ux.ArFragment;

import com.microsoft.azure.spatialanchors.AnchorLocateCriteria;
import com.microsoft.azure.spatialanchors.CloudSpatialAnchor;
import com.microsoft.azure.spatialanchors.CloudSpatialAnchorSession;
import com.microsoft.azure.spatialanchors.LocateAnchorStatus;
import com.microsoft.azure.spatialanchors.SessionLogLevel;

import java.util.concurrent.CompletableFuture;
import java.util.concurrent.ExecutionException;
import java.util.concurrent.ExecutorService;
import java.util.concurrent.Executors;

public class MainActivity extends AppCompatActivity {

    private boolean tapExecuted = false;
    private final Object syncTaps = new Object();
    private ArFragment arFragment;
    private AnchorNode anchorNode;
    private Renderable nodeRenderable = null;
    private float recommendedSessionProgress = 0f;

    private ArSceneView sceneView;
    private CloudSpatialAnchorSession cloudSession;
    private boolean sessionInitialized = false;

    private String anchorId = null;
    private boolean scanningForUpload = false;
    private final Object syncSessionProgress = new Object();
    private ExecutorService executorService = Executors.newSingleThreadExecutor();

    @Override
    protected void onCreate(Bundle savedInstanceState) {
        super.onCreate(savedInstanceState);
        setContentView(R.layout.activity_main);

        this.arFragment = (ArFragment) getSupportFragmentManager().findFragmentById(R.id.ux_fragment);
        this.arFragment.setOnTapArPlaneListener(this::handleTap);

        this.sceneView = arFragment.getArSceneView();
        Scene scene = sceneView.getScene();
        scene.addOnUpdateListener(frameTime -> {
            if (this.cloudSession != null) {
                this.cloudSession.processFrame(sceneView.getArFrame());
            }
        });
        scene.addOnUpdateListener(this::scene_OnUpdate);
        initializeSession();
    }

    // <scene_OnUpdate>
    private void scene_OnUpdate(FrameTime frameTime) {
        if (!sessionInitialized) {
            //retry if initializeSession did an early return due to ARCore Session not yet available (i.e. sceneView.getSession() == null)
            initializeSession();
        }
    }
    // </scene_OnUpdate>

    // <initializeSession>
    private void initializeSession() {
        if (sceneView.getSession() == null) {
            //Early return if the ARCore Session is still being set up
            return;
        }

        if (this.cloudSession != null) {
            this.cloudSession.close();
        }
        this.cloudSession = new CloudSpatialAnchorSession();
        this.cloudSession.setSession(sceneView.getSession());
        this.cloudSession.setLogLevel(SessionLogLevel.Information);
        this.cloudSession.addOnLogDebugListener(args -> Log.d("ASAInfo", args.getMessage()));
        this.cloudSession.addErrorListener(args -> Log.e("ASAError", String.format("%s: %s", args.getErrorCode().name(), args.getErrorMessage())));

        sessionInitialized = true;

        this.cloudSession.addSessionUpdatedListener(args -> {
            synchronized (this.syncSessionProgress) {
                this.recommendedSessionProgress = args.getStatus().getRecommendedForCreateProgress();
                Log.i("ASAInfo", String.format("Session progress: %f", this.recommendedSessionProgress));
                if (!this.scanningForUpload) {
                    return;
                }
            }

            runOnUiThread(() -> {
                synchronized (this.syncSessionProgress) {
                    MaterialFactory.makeOpaqueWithColor(this, new Color(
                            this.recommendedSessionProgress,
                            this.recommendedSessionProgress,
                            this.recommendedSessionProgress))
                            .thenAccept(material -> {
                                this.nodeRenderable.setMaterial(material);
                            });
                }
            });
        });

        this.cloudSession.addAnchorLocatedListener(args -> {
            if (args.getStatus() == LocateAnchorStatus.Located) {
                runOnUiThread(() -> {
                    this.anchorNode = new AnchorNode();
                    this.anchorNode.setAnchor(args.getAnchor().getLocalAnchor());
                    MaterialFactory.makeOpaqueWithColor(this, new Color(android.graphics.Color.GREEN))
                            .thenAccept(greenMaterial -> {
                                this.nodeRenderable = ShapeFactory.makeSphere(0.1f, new Vector3(0.0f, 0.15f, 0.0f), greenMaterial);
                                this.anchorNode.setRenderable(nodeRenderable);
                                this.anchorNode.setParent(arFragment.getArSceneView().getScene());

                                this.anchorId = null;
                                synchronized (this.syncTaps) {
                                    this.tapExecuted = false;
                                }
                            });
                });
            }
        });

        this.cloudSession.getConfiguration().setAccountId(/* Copy your account Identifier in here */);
        this.cloudSession.getConfiguration().setAccountKey(/* Copy your account Key in here */);
        this.cloudSession.getConfiguration().setAccountDomain(/* Copy your account Domain in here */);
        this.cloudSession.start();
    }
    // </initializeSession>

    // <handleTap>
    protected void handleTap(HitResult hitResult, Plane plane, MotionEvent motionEvent) {
        synchronized (this.syncTaps) {
            if (this.tapExecuted) {
                return;
            }

            this.tapExecuted = true;
        }

        if (this.anchorId != null) {
            this.anchorNode.getAnchor().detach();
            this.anchorNode.setParent(null);
            this.anchorNode = null;
            initializeSession();
            AnchorLocateCriteria criteria = new AnchorLocateCriteria();
            criteria.setIdentifiers(new String[]{this.anchorId});
            cloudSession.createWatcher(criteria);
            return;
        }

        this.anchorNode = new AnchorNode();
        this.anchorNode.setAnchor(hitResult.createAnchor());
        CloudSpatialAnchor cloudAnchor = new CloudSpatialAnchor();
        cloudAnchor.setLocalAnchor(this.anchorNode.getAnchor());

        MaterialFactory.makeOpaqueWithColor(this, new Color(
                this.recommendedSessionProgress,
                this.recommendedSessionProgress,
                this.recommendedSessionProgress))
                .thenAccept(material -> {
                    this.nodeRenderable = ShapeFactory.makeSphere(0.1f, new Vector3(0.0f, 0.15f, 0.0f), material);
                    this.anchorNode.setRenderable(nodeRenderable);
                    this.anchorNode.setParent(arFragment.getArSceneView().getScene());
                });


        uploadCloudAnchorAsync(cloudAnchor)
                .thenAccept(id -> {
                    this.anchorId = id;
                    Log.i("ASAInfo", String.format("Cloud Anchor created: %s", this.anchorId));
                    runOnUiThread(() -> {
                        MaterialFactory.makeOpaqueWithColor(this, new Color(android.graphics.Color.BLUE))
                                .thenAccept(blueMaterial -> {
                                    this.nodeRenderable.setMaterial(blueMaterial);
                                    synchronized (this.syncTaps) {
                                        this.tapExecuted = false;
                                    }
                                });
                    });
                });
    }
    // </handleTap>

    // <uploadCloudAnchorAsync>
    private CompletableFuture<String> uploadCloudAnchorAsync(CloudSpatialAnchor anchor) {
        synchronized (this.syncSessionProgress) {
            this.scanningForUpload = true;
        }


        return CompletableFuture.runAsync(() -> {
            try {
                float currentSessionProgress;
                do {
                    synchronized (this.syncSessionProgress) {
                        currentSessionProgress = this.recommendedSessionProgress;
                    }
                    if (currentSessionProgress < 1.0) {
                        Thread.sleep(500);
                    }
                }
                while (currentSessionProgress < 1.0);

                synchronized (this.syncSessionProgress) {
                    this.scanningForUpload = false;
                }
                runOnUiThread(() -> {
                    MaterialFactory.makeOpaqueWithColor(this, new Color(android.graphics.Color.YELLOW))
                            .thenAccept(yellowMaterial -> {
                                this.nodeRenderable.setMaterial(yellowMaterial);
                            });
                });

                this.cloudSession.createAnchorAsync(anchor).get();
            } catch (InterruptedException | ExecutionException e) {
                Log.e("ASAError", e.toString());
                throw new RuntimeException(e);
            }
        }, executorService).thenApply(ignore -> anchor.getIdentifier());
    }
    // </uploadCloudAnchorAsync>

}
Следующие шаги
В этом руководстве вы научились создавать приложение Android, в котором функции ARCore интегрируются с Пространственными привязками Azure. Чтобы узнать больше о библиотеке Пространственных привязок Azure, перейдите к руководству по созданию и поиску привязок.