Краткое руководство. Присоединение вызывающего приложения к автосекретарю Teams
В этом кратком руководстве вы узнаете, как начать звонок от Службы коммуникации Azure пользователя к Автосекретарю Teams. Вы собираетесь достичь этого с помощью следующих действий:
- Включите федерацию ресурсов Службы коммуникации Azure с клиентом Teams.
- Выберите или создайте автосекретарь Teams через Центр Администратор Teams.
- Получение адреса электронной почты автосекретаря через Центр Администратор Teams.
- Получение идентификатора объекта автосекретаря с помощью API Graph.
- Запустите вызов с помощью пакета SDK для вызовов Службы коммуникации Azure.
Если вы хотите сразу перейти к завершающему этапу, можно скачать это краткое руководство в качестве примера с портала GitHub.
Включение взаимодействия в клиенте Teams
Пользователь Microsoft Entra с ролью администратора Teams может запустить командлет PowerShell с модулем MicrosoftTeams, чтобы включить ресурс Служб коммуникации в клиенте.
1. Подготовка модуля Microsoft Teams
Сначала откройте PowerShell и проверьте существование модуля Teams с помощью следующей команды:
Get-module *teams*
Если модуль не отображается MicrosoftTeams , сначала установите его. Чтобы установить модуль, необходимо запустить PowerShell от имени администратора. Затем выполните следующую команду.
Install-Module -Name MicrosoftTeams
Вы будете проинформированы о модулях, которые будут установлены, которые можно подтвердить с помощью Y или A ответа. Если модуль установлен, но устарел, можно выполнить следующую команду, чтобы обновить модуль:
Update-Module MicrosoftTeams
2. модуль Подключение в Microsoft Teams
После установки и готовности модуля можно подключиться к модулю MicrosftTeams с помощью следующей команды. Вам будет предложено выполнить вход в интерактивное окно. Учетная запись пользователя, которую вы собираетесь использовать, должны иметь разрешения администратора Teams. В противном случае вы можете получить access denied ответ в следующих шагах.
Connect-MicrosoftTeams
3. Включение конфигурации клиента
Взаимодействие с ресурсами Служб коммуникации управляется с помощью конфигурации клиента и назначенной политики. Клиент Teams имеет одну конфигурацию клиента, а пользователи Teams назначили глобальную политику или пользовательскую политику. Дополнительные сведения см. в разделе "Назначение политик" в Teams.
После успешного входа можно запустить командлет Set-CsTeamsAcsFederationConfiguration , чтобы включить ресурс Служб коммуникации в клиенте. Замените текст IMMUTABLE_RESOURCE_ID неизменяемым идентификатором ресурса в ресурсе связи. Дополнительные сведения см . здесь.
$allowlist = @('IMMUTABLE_RESOURCE_ID')
Set-CsTeamsAcsFederationConfiguration -EnableAcsUsers $True -AllowedAcsResources $allowlist
4. Включение политики клиента
Каждому пользователю Teams назначено значение, определяющее External Access Policy , могут ли пользователи Служб коммуникации вызывать этого пользователя Teams. Используйте командлет Set-CsExternalAccessPolicy, чтобы убедиться, что политика, назначенная пользователю Teams, имеет значение EnableAcsFederationAccess$true
Set-CsExternalAccessPolicy -Identity Global -EnableAcsFederationAccess $true
Создание или выбор автосекретаря Teams
Автосекретарь Teams — это система, которая предоставляет автоматическую систему обработки вызовов для входящих вызовов. Он служит виртуальным приемом, что позволяет абонентам автоматически направляться на соответствующего человека или отдела без необходимости оператора человека. Вы можете выбрать существующий или создать автосекретарь с помощью Центра Администратор Teams.
Узнайте больше о том, как создать автосекретаря с помощью Центра Администратор Teams.
Поиск идентификатора объекта для автосекретаря
После создания автосекретаря необходимо найти сопоставленный идентификатор объекта, чтобы использовать его позже для вызовов. Идентификатор объекта подключен к учетной записи ресурсов, подключенной к автосекретарю, откройте вкладку "Учетные записи ресурсов" в Teams Администратор и найдите электронную почту учетной записи.
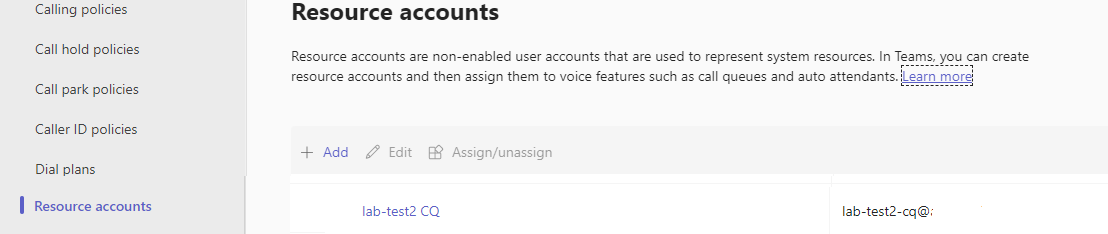 Все необходимые сведения для учетной записи ресурсов можно найти в Microsoft Graph Обозреватель с помощью этого сообщения электронной почты в поиске.
https://graph.microsoft.com/v1.0/users/lab-test2-cq-@contoso.com
В результатах мы сможем найти поле "ID"
    "userPrincipalName": "lab-test2-cq@contoso.com",
    "id": "31a011c2-2672-4dd0-b6f9-9334ef4999db"
Необходимые компоненты
- Получите учетную запись Azure с активной подпиской. Создайте учетную запись бесплатно .
- Node.js: версии Active LTS и Maintenance LTS (8.11.1 и 10.14.1).
- Создайте активный ресурс Служб коммуникации. Создайте ресурс Служб коммуникации.
Установка
Создание нового приложения Node.js
Откройте терминал или командное окно, создайте новый каталог для приложения и перейдите к каталогу.
mkdir calling-quickstart && cd calling-quickstart
Установка пакета
Используйте команду npm install, чтобы установить пакет SDK Служб коммуникации Azure для реализации вызовов на JavaScript.
Внимание
В этом кратком руководстве используется версия пакета SDK Служб коммуникации Azure для вызовов next.
npm install @azure/communication-common@next --save
npm install @azure/communication-calling@next --save
Настройка платформы приложения
В этом кратком руководстве для объединения ресурсов приложения используется webpack. Выполните следующую команду, чтобы установить пакеты npm webpack, webpack-cli и webpack-dev-server, а также указать их в качестве зависимостей разработки в package.json:
npm install copy-webpack-plugin@^11.0.0 webpack@^5.88.2 webpack-cli@^5.1.4 webpack-dev-server@^4.15.1 --save-dev
index.html Создайте файл в корневом каталоге проекта. Мы будем использовать этот файл для настройки базового макета, с помощью которого пользователь сможет осуществить персональный видеовызов.
Вот этот код:
<!-- index.html -->
<!DOCTYPE html>
<html>
    <head>
        <title>Azure Communication Services - Calling Web SDK</title>
    </head>
    <body>
        <h4>Azure Communication Services - Calling Web SDK</h4>
        <input id="user-access-token"
            type="text"
            placeholder="User access token"
            style="margin-bottom:1em; width: 500px;"/>
        <button id="initialize-teams-call-agent" type="button">Initialize Call Agent</button>
        <br>
        <br>
        <input id="application-object-id"
            type="text"
            placeholder="Enter application objectId identity in format: 'APP_GUID'"
            style="margin-bottom:1em; width: 500px; display: block;"/>
        <button id="start-call-button" type="button" disabled="true">Start Call</button>
        <button id="hangup-call-button" type="button" disabled="true">Hang up Call</button>
        <button id="accept-call-button" type="button" disabled="true">Accept Call</button>
        <button id="start-video-button" type="button" disabled="true">Start Video</button>
        <button id="stop-video-button" type="button" disabled="true">Stop Video</button>
        <br>
        <br>
        <div id="connectedLabel" style="color: #13bb13;" hidden>Call is connected!</div>
        <br>
        <div id="remoteVideoContainer" style="width: 40%;" hidden>Remote participants' video streams:</div>
        <br>
        <div id="localVideoContainer" style="width: 30%;" hidden>Local video stream:</div>
        <!-- points to the bundle generated from client.js -->
        <script src="./main.js"></script>
    </body>
</html>
объектная модель веб-пакета SDK Службы коммуникации Azure
Следующие классы и интерфейсы обрабатывают некоторые основные функции пакета SDK для вызовов Службы коммуникации Azure:
| Имя | Описание |
|---|---|
CallClient |
Основная точка входа в пакет SDK для вызовов. |
CallAgent |
Используется для инициирования вызовов и управления ими. |
DeviceManager |
Используется для управления устройствами мультимедиа. |
Call |
Используется для представления вызова. |
LocalVideoStream |
Используется для создания локального видеопотока для устройства камеры в локальной системе. |
RemoteParticipant |
Используется для представления удаленного участника в вызове. |
RemoteVideoStream |
Используется для представления удаленного видеопотока от удаленного участника. |
Создайте файл в корневом каталоге проекта, который будет client.js содержать логику приложения для этого краткого руководства. Добавьте следующий код в файл client.js:
// Make sure to install the necessary dependencies
const { CallClient, VideoStreamRenderer, LocalVideoStream } = require('@azure/communication-calling');
const { AzureCommunicationTokenCredential } = require('@azure/communication-common');
const { AzureLogger, setLogLevel } = require("@azure/logger");
// Set the log level and output
setLogLevel('verbose');
AzureLogger.log = (...args) => {
    console.log(...args);
};
// Calling web sdk objects
let callAgent;
let deviceManager;
let call;
let incomingCall;
let localVideoStream;
let localVideoStreamRenderer;
// UI widgets
let userAccessToken = document.getElementById('user-access-token');
let applicationObjectId = document.getElementById('application-object-id');
let initializeCallAgentButton = document.getElementById('initialize-teams-call-agent');
let startCallButton = document.getElementById('start-call-button');
let hangUpCallButton = document.getElementById('hangup-call-button');
let acceptCallButton = document.getElementById('accept-call-button');
let startVideoButton = document.getElementById('start-video-button');
let stopVideoButton = document.getElementById('stop-video-button');
let connectedLabel = document.getElementById('connectedLabel');
let remoteVideoContainer = document.getElementById('remoteVideoContainer');
let localVideoContainer = document.getElementById('localVideoContainer');
/**
 * Create an instance of CallClient. Initialize a CallAgent instance with a AzureCommunicationTokenCredential via created CallClient. CallAgent enables us to make outgoing calls and receive incoming calls.
 * You can then use the CallClient.getDeviceManager() API instance to get the DeviceManager.
 */
initializeCallAgentButton.onclick = async () => {
    try {
        const callClient = new CallClient();
        tokenCredential = new AzureCommunicationTokenCredential(userAccessToken.value.trim());
        callAgent = await callClient.createCallAgent(tokenCredential)
        // Set up a camera device to use.
        deviceManager = await callClient.getDeviceManager();
        await deviceManager.askDevicePermission({ video: true });
        await deviceManager.askDevicePermission({ audio: true });
        // Listen for an incoming call to accept.
        callAgent.on('incomingCall', async (args) => {
            try {
                incomingCall = args.incomingCall;
                acceptCallButton.disabled = false;
                startCallButton.disabled = true;
            } catch (error) {
                console.error(error);
            }
        });
        startCallButton.disabled = false;
        initializeCallAgentButton.disabled = true;
    } catch(error) {
        console.error(error);
    }
}
/**
 * Place a 1:1 outgoing video call to an Teams Auto attendant
 * Add an event listener to initiate a call when the `startCallButton` is selected.
 * Enumerate local cameras using the deviceManager `getCameraList` API.
 * In this quickstart, we're using the first camera in the collection. Once the desired camera is selected, a
 * LocalVideoStream instance will be constructed and passed within `videoOptions` as an item within the
 * localVideoStream array to the call method. When the call connects, your application will be sending a video stream to the other participant.
 */
startCallButton.onclick = async () => {
    try {
        const localVideoStream = await createLocalVideoStream();
        const videoOptions = localVideoStream ? { localVideoStreams: [localVideoStream] } : undefined;
        call = callAgent.startCall([{ teamsAppId: applicationObjectId.value.trim(), cloud:"public" }], { videoOptions: videoOptions });
        // Subscribe to the call's properties and events.
        subscribeToCall(call);
    } catch (error) {
        console.error(error);
    }
}
/**
 * Accepting an incoming call with a video
 * Add an event listener to accept a call when the `acceptCallButton` is selected.
 * You can accept incoming calls after subscribing to the `CallAgent.on('incomingCall')` event.
 * You can pass the local video stream to accept the call with the following code.
 */
acceptCallButton.onclick = async () => {
    try {
        const localVideoStream = await createLocalVideoStream();
        const videoOptions = localVideoStream ? { localVideoStreams: [localVideoStream] } : undefined;
        call = await incomingCall.accept({ videoOptions });
        // Subscribe to the call's properties and events.
        subscribeToCall(call);
    } catch (error) {
        console.error(error);
    }
}
// Subscribe to a call obj.
// Listen for property changes and collection udpates.
subscribeToCall = (call) => {
    try {
        // Inspect the initial call.id value.
        console.log(`Call Id: ${call.id}`);
        //Subsribe to call's 'idChanged' event for value changes.
        call.on('idChanged', () => {
            console.log(`Call ID changed: ${call.id}`);
        });
        // Inspect the initial call.state value.
        console.log(`Call state: ${call.state}`);
        // Subscribe to call's 'stateChanged' event for value changes.
        call.on('stateChanged', async () => {
            console.log(`Call state changed: ${call.state}`);
            if(call.state === 'Connected') {
                connectedLabel.hidden = false;
                acceptCallButton.disabled = true;
                startCallButton.disabled = true;
                hangUpCallButton.disabled = false;
                startVideoButton.disabled = false;
                stopVideoButton.disabled = false;
            } else if (call.state === 'Disconnected') {
                connectedLabel.hidden = true;
                startCallButton.disabled = false;
                hangUpCallButton.disabled = true;
                startVideoButton.disabled = true;
                stopVideoButton.disabled = true;
                console.log(`Call ended, call end reason={code=${call.callEndReason.code}, subCode=${call.callEndReason.subCode}}`);
            }
        });

        call.on('isLocalVideoStartedChanged', () => {
            console.log(`isLocalVideoStarted changed: ${call.isLocalVideoStarted}`);
        });
        console.log(`isLocalVideoStarted: ${call.isLocalVideoStarted}`);
        call.localVideoStreams.forEach(async (lvs) => {
            localVideoStream = lvs;
            await displayLocalVideoStream();
        });
        call.on('localVideoStreamsUpdated', e => {
            e.added.forEach(async (lvs) => {
                localVideoStream = lvs;
                await displayLocalVideoStream();
            });
            e.removed.forEach(lvs => {
               removeLocalVideoStream();
            });
        });

        // Inspect the call's current remote participants and subscribe to them.
        call.remoteParticipants.forEach(remoteParticipant => {
            subscribeToRemoteParticipant(remoteParticipant);
        });
        // Subscribe to the call's 'remoteParticipantsUpdated' event to be
        // notified when new participants are added to the call or removed from the call.
        call.on('remoteParticipantsUpdated', e => {
            // Subscribe to new remote participants that are added to the call.
            e.added.forEach(remoteParticipant => {
                subscribeToRemoteParticipant(remoteParticipant)
            });
            // Unsubscribe from participants that are removed from the call
            e.removed.forEach(remoteParticipant => {
                console.log('Remote participant removed from the call.');
            });
        });
    } catch (error) {
        console.error(error);
    }
}
// Subscribe to a remote participant obj.
// Listen for property changes and collection udpates.
subscribeToRemoteParticipant = (remoteParticipant) => {
    try {
        // Inspect the initial remoteParticipant.state value.
        console.log(`Remote participant state: ${remoteParticipant.state}`);
        // Subscribe to remoteParticipant's 'stateChanged' event for value changes.
        remoteParticipant.on('stateChanged', () => {
            console.log(`Remote participant state changed: ${remoteParticipant.state}`);
        });
        // Inspect the remoteParticipants's current videoStreams and subscribe to them.
        remoteParticipant.videoStreams.forEach(remoteVideoStream => {
            subscribeToRemoteVideoStream(remoteVideoStream)
        });
        // Subscribe to the remoteParticipant's 'videoStreamsUpdated' event to be
        // notified when the remoteParticiapant adds new videoStreams and removes video streams.
        remoteParticipant.on('videoStreamsUpdated', e => {
            // Subscribe to newly added remote participant's video streams.
            e.added.forEach(remoteVideoStream => {
                subscribeToRemoteVideoStream(remoteVideoStream)
            });
            // Unsubscribe from newly removed remote participants' video streams.
            e.removed.forEach(remoteVideoStream => {
                console.log('Remote participant video stream was removed.');
            })
        });
    } catch (error) {
        console.error(error);
    }
}
/**
 * Subscribe to a remote participant's remote video stream obj.
 * You have to subscribe to the 'isAvailableChanged' event to render the remoteVideoStream. If the 'isAvailable' property
 * changes to 'true' a remote participant is sending a stream. Whenever the availability of a remote stream changes
 * you can choose to destroy the whole 'Renderer' a specific 'RendererView' or keep them. Displaying RendererView without a video stream will result in a blank video frame.
 */
subscribeToRemoteVideoStream = async (remoteVideoStream) => {
    // Create a video stream renderer for the remote video stream.
    let videoStreamRenderer = new VideoStreamRenderer(remoteVideoStream);
    let view;
    const renderVideo = async () => {
        try {
            // Create a renderer view for the remote video stream.
            view = await videoStreamRenderer.createView();
            // Attach the renderer view to the UI.
            remoteVideoContainer.hidden = false;
            remoteVideoContainer.appendChild(view.target);
        } catch (e) {
            console.warn(`Failed to createView, reason=${e.message}, code=${e.code}`);
        }
    }

    remoteVideoStream.on('isAvailableChanged', async () => {
        // Participant has switched video on.
        if (remoteVideoStream.isAvailable) {
            await renderVideo();
        // Participant has switched video off.
        } else {
            if (view) {
                view.dispose();
                view = undefined;
            }
        }
    });
    // Participant has video on initially.
    if (remoteVideoStream.isAvailable) {
        await renderVideo();
    }
}
// Start your local video stream.
// This will send your local video stream to remote participants so they can view it.
startVideoButton.onclick = async () => {
    try {
        const localVideoStream = await createLocalVideoStream();
        await call.startVideo(localVideoStream);
    } catch (error) {
        console.error(error);
    }
}
// Stop your local video stream.
// This will stop your local video stream from being sent to remote participants.
stopVideoButton.onclick = async () => {
    try {
        await call.stopVideo(localVideoStream);
    } catch (error) {
        console.error(error);
    }
}
/**
 * To render a LocalVideoStream, you need to create a new instance of VideoStreamRenderer, and then
 * create a new VideoStreamRendererView instance using the asynchronous createView() method.
 * You may then attach view.target to any UI element.
 */
// Create a local video stream for your camera device
createLocalVideoStream = async () => {
    const camera = (await deviceManager.getCameras())[0];
    if (camera) {
        return new LocalVideoStream(camera);
    } else {
        console.error(`No camera device found on the system`);
    }
}
// Display your local video stream preview in your UI
displayLocalVideoStream = async () => {
    try {
        localVideoStreamRenderer = new VideoStreamRenderer(localVideoStream);
        const view = await localVideoStreamRenderer.createView();
        localVideoContainer.hidden = false;
        localVideoContainer.appendChild(view.target);
    } catch (error) {
        console.error(error);
    }
}
// Remove your local video stream preview from your UI
removeLocalVideoStream = async() => {
    try {
        localVideoStreamRenderer.dispose();
        localVideoContainer.hidden = true;
    } catch (error) {
        console.error(error);
    }
}
// End the current call
hangUpCallButton.addEventListener("click", async () => {
    // end the current call
    await call.hangUp();
});
Добавление кода локального сервера webpack
Создайте файл в корневом каталоге проекта с именем webpack.config.js , чтобы содержать логику локального сервера для этого краткого руководства. Добавьте следующий код в webpack.config.js:
const path = require('path');
const CopyPlugin = require("copy-webpack-plugin");

module.exports = {
    mode: 'development',
    entry: './client.js',
    output: {
        filename: 'main.js',
        path: path.resolve(__dirname, 'dist'),
    },
    devServer: {
        static: {
            directory: path.join(__dirname, './')
        },
    },
    plugins: [
        new CopyPlugin({
            patterns: [
                './index.html'
            ]
        }),
    ]
};
Выполнение кода
Чтобы создать и запустить приложение, используйте webpack-dev-server. Выполните следующую команду, чтобы создать пакет узла приложения на локальном веб-сервере.
npx webpack serve --config webpack.config.js
Инструкции по настройке вызова вручную:
- Откройте браузер и перейдите к http://localhost:8080/.
- Введите допустимый маркер доступа пользователя. Обратитесь к документации по маркерам доступа пользователя, если у вас еще нет маркеров доступа, доступных для использования.
- Нажмите кнопки "Инициализировать агент вызова".
- Введите идентификатор объекта автосекретаря и нажмите кнопку "Пуск вызова". Приложение запустит исходящий вызов автосекретаря с заданным идентификатором объекта.
- Вызов подключен к автосекретарю.
- Пользователь служб коммуникации направляется через автосекретарь на основе конфигурации.
Очистка ресурсов
Если вы хотите отменить и удалить подписку на Службы коммуникации, можно удалить ресурс или группу ресурсов. При удалении группы ресурсов также удаляются все связанные с ней ресурсы. См. сведения об очистке ресурсов.
Следующие шаги
Дополнительные сведения см. в следующих статьях:
- Начало работы с вызовом пользовательского интерфейса в голосовых приложениях Teams
- Узнайте больше о возможностях пакета SDK для вызовов
- Узнайте больше о принципе работы функции вызовов.