Define triggers
APPLIES TO: Composer v1.x and v2.x
In Bot Framework Composer, each dialog includes a set of triggers (event handlers), and each trigger contains actions (instructions) for how the bot will respond to inputs received when the dialog is active. There are several different types of triggers in Composer. They all work in a similar manner and can even be interchanged in some cases. This article explains how to define each type of trigger. Before you walk through this article, read the events and triggers concept article.
The table below lists the different types of triggers in Composer and their descriptions.
| Trigger Type | Description |
|---|---|
| Intent recognized | When either a LUIS or regular expression intent is recognized the Intent recognized trigger fires. |
| QnA Intent recognized | When an intent (QnAMaker) is recognized the QnA Intent recognized trigger fires. |
| Unknown intent | When user input is unrecognized or no match is found in any of the Intent recognized triggers, the Unknown intent trigger fires. |
| Dialog events | This type of trigger handles dialog specific events, such as a Begin dialog event. |
| Activities | This trigger type enables you to associate actions to an incoming activity, such as when a new user joins and the bot begins a new conversation (ConversationUpdate Activity). |
| Duplicated intents recognized | The Duplicated intents recognized trigger fires when multiple intents are recognized. It compares recognition results from more than one recognizer to decide a winner. |
| Custom events | When an Emit a custom event occurs the Custom event trigger fires. |
Note
Azure QnA Maker will be retired on 31 March 2025. Beginning 1 October 2022, you won't be able to create new QnA Maker resources or knowledge bases. A newer version of the question and answering capability is now available as part of Azure AI Language.
Custom question answering, a feature of Azure AI Language, is the updated version of the QnA Maker service. For more information about question-and-answer support in Composer, see Natural language processing.
Note
Language Understanding (LUIS) will be retired on 1 October 2025. Beginning 1 April 2023, you won't be able to create new LUIS resources. A newer version of language understanding is now available as part of Azure AI Language.
Conversational language understanding (CLU), a feature of Azure AI Language, is the updated version of LUIS. For more information about question-and-answer support in Composer, see Natural language processing.
Intent recognized
Note
Language Understanding (LUIS) will be retired on 1 October 2025. Beginning 1 April 2023, you won't be able to create new LUIS resources. A newer version of language understanding is now available as part of Azure AI Language.
Conversational language understanding (CLU), a feature of Azure AI Language, is the updated version of LUIS. For more information about question-and-answer support in Composer, see Natural language processing.
The Intent recognized trigger is used to define actions to take when an intent is recognized. This trigger works with the LUIS recognizer and the regular expression recognizer.
While LUIS offers the flexibility of a more fully featured language understanding technology, the regular expression recognizer works well when you need to match a narrow set of highly structured commands or keywords.
Note
In Bot Framework Composer, there are three types of recognizers: Default recognizer (which includes LUIS and QnA Maker), Regular expression recognizer, and Custom recognizer. Read more about recognizers in the dialogs concept article. You'll also find the recognizers in adaptive dialogs article from the Bot Framework SDK documentation helpful. Additionally, you can use the Orchestrator recognizer by downloading the Orchestrator package in Package manager.
Follow the steps to define an Intent recognized trigger with Regular expression recognizer:
Select a dialog from the bot explorer of Composer's Create page.
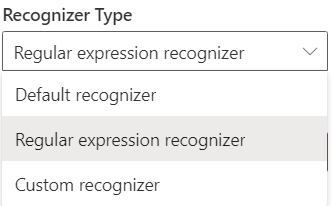
In the properties pane of your selected dialog, go to Recognizer/Dispatch type on the right and select Change. On the Choose a recognizer window that opens, select Regular expression and then select Done.
A regular expression (regex) is a special text string for describing a search pattern that can be used to match simple or sophisticated patterns in a string. Composer exposes the ability to define intents using regular expressions and also allows regular expressions to extract simple entity values.
After you select the recognizer type, create an Intent recognized trigger in the dialog.
Select the three dots next to the dialog you selected previously. Then select + Add a trigger.
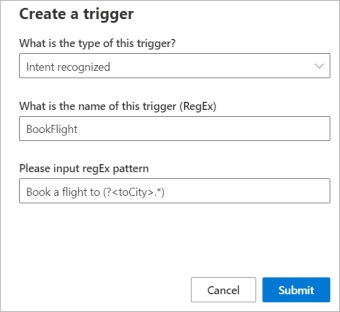
In the trigger creation screen, select Intent recognized from the drop-down list.
Enter a name in the What is the name of this trigger? field. This is also the name of the intent.
Enter a regular expression pattern in the Please input regEx pattern field. Select Submit.
For example, the regular expression
Book a flight to (?<toCity>.*)will only match the narrow pattern "book flight to [somewhere]", whereas the LUIS recognizer will be able to match a much wider variety of messages.
Learn how to define an Intent recognized trigger with the LUIS recognizer in the Add LUIS for language understanding article.
QnA Intent recognized
Note
Azure QnA Maker will be retired on 31 March 2025. Beginning 1 October 2022, you won't be able to create new QnA Maker resources or knowledge bases. A newer version of the question and answering capability is now available as part of Azure AI Language.
Custom question answering, a feature of Azure AI Language, is the updated version of the QnA Maker service. For more information about question-and-answer support in Composer, see Natural language processing.
The QnA Intent recognized trigger is used to define actions to take when a QnA Maker intent is recognized. This trigger works with the QnA Maker recognizer.
Note
The Default recognizer can work as a QnA Maker recognizer when you define a QnA Maker knowledge base. Read more about recognizers in the dialogs concept article.
Follow these steps to define a QnA Intent recognized trigger:
In Composer, open a bot project.
Go to the Create page and select a dialog from the bot explorer.
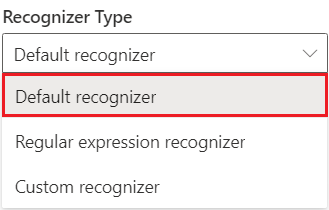
In the properties pane of your selected dialog, go to Recognizer/Dispatch type on the right and select Change. On the Choose a recognizer window that opens, select Default and then select Done.
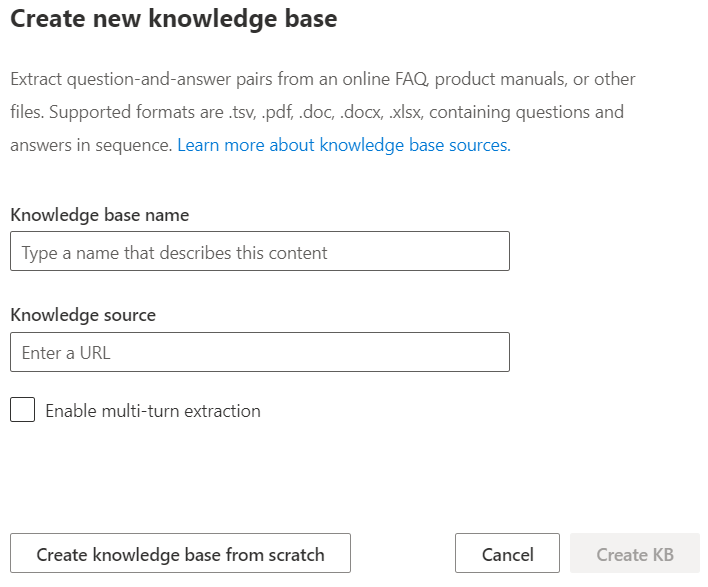
Select the three dots next to the dialog you selected previously and click + Add QnA Maker knowledge base to create a new QnA knowledge base. You can upload a knowledge source by entering the URL, add one uploaded to QnA Maker, or create one from scratch by selecting the Create custom knowledge base button.
The questions defined in the knowledge base will be used as the QnA Maker intent to be recognized for the QnA Intent recognized trigger to fire.
Choose the type of knowledge base you want to create, enter the necessary values, and then select Create.
A QnA Intent recognized trigger with pre-configured actions will appear in the authoring canvas.
Unknown intent
The Unknown intent trigger is used to define actions to take when a user input is unrecognized or no match is found in any of the Intent recognized triggers. You can also use this as your first trigger in your main dialog in place of the OnBeginDialog to perform any needed tasks when the dialog first starts.
Follow these steps to define an Unknown intent trigger:
Go to the Create page and select a dialog from the bot explorer.
Select the three dots next to the dialog Then select + Add a trigger. Select Unknown intent and select Submit.
You'll see an empty Unknown intent trigger in the authoring canvas.
Select the + sign under the Unknown intent trigger node to add action node(s). For example, if you select Send a response and enter
This is an unknown intent trigger!in the Text box. The message will be sent to the user anytime the Unknown intent trigger fires.
Tip
Read more about actions in the dialogs concept article.
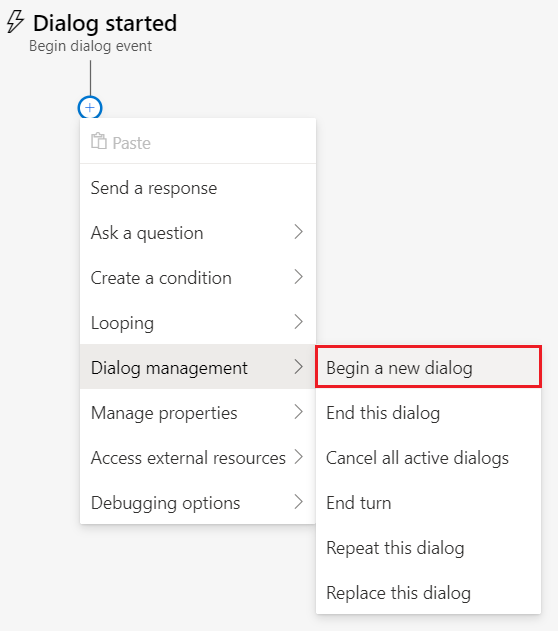
Dialog events
The Dialog events triggers handle dialog specific events, like Dialog started (Begin dialog event). Most dialogs will include a trigger configured to respond to the BeginDialog event, which fires when the dialog begins and allows the bot to respond immediately.
Follow these steps to define a Dialog started trigger:
- Go to the Create page and select a dialog from the bot explorer.
- Select the three dots next to the dialog. Then select + Add a trigger.
- In the trigger creation window, select Dialog events from the drop-down list.
- Select Dialog started (Begin dialog event) from the Which event? drop-down list then select Submit.
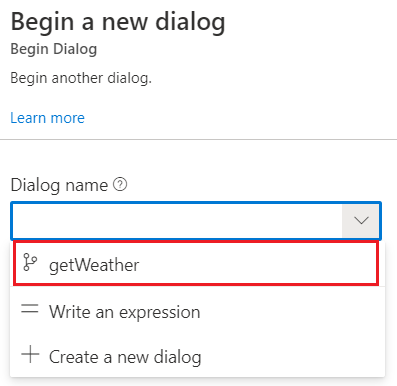
- Select the + sign under the Dialog started node and then select Begin a new dialog from the Dialog management menu.
- Before you can use this trigger, you need to associate a dialog to it. You do this by selecting a dialog from the Dialog name drop-down list in the properties pane on the right side of the Composer window. You can select an existing dialog or create a new one.

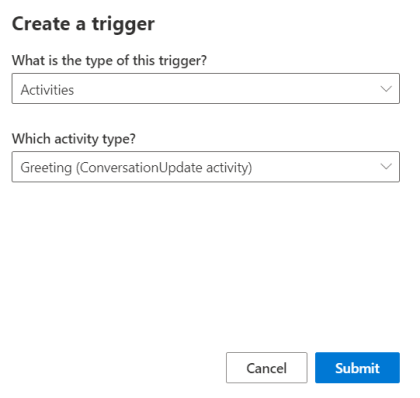
Activities
The Activities triggers are used to handle activity events such as your bot receiving a ConversationUpdate Activity. This indicates a new conversation begins and you should use a Greeting (ConversationUpdate activity) trigger to handle it.
Follow the steps to create a Greeting (ConversationUpdate activity) trigger to send a welcome message:
- Go to the Create page and select a dialog from the bot explorer.
- Select the three dots next to the dialog you selected previously. Then select + Add a trigger.
- In the trigger creation window, select Activities from the drop-down list.
- Select Greeting (ConversationUpdate activity) from the Which activity type? drop-down list then select Submit.
- After you select Submit, you'll see the trigger node created in the authoring canvas.
- You'll see pre-configured actions on the authoring canvas after creating the trigger. Add a welcome message in the Send a response action to greet users.
Duplicated intents recognized
Note
Azure QnA Maker will be retired on 31 March 2025. Beginning 1 October 2022, you won't be able to create new QnA Maker resources or knowledge bases. A newer version of the question and answering capability is now available as part of Azure AI Language.
Custom question answering, a feature of Azure AI Language, is the updated version of the QnA Maker service. For more information about question-and-answer support in Composer, see Natural language processing.
Note
Language Understanding (LUIS) will be retired on 1 October 2025. Beginning 1 April 2023, you won't be able to create new LUIS resources. A newer version of language understanding is now available as part of Azure AI Language.
Conversational language understanding (CLU), a feature of Azure AI Language, is the updated version of LUIS. For more information about question-and-answer support in Composer, see Natural language processing.
The Duplicated intents recognized trigger is used to define actions to take when multiple intents are recognized. It compares recognition results from more than one recognizer to decide a winner. This trigger works with a cross-trained recognizer.
Note
The Default recognizer can work as a cross-trained recognizer when you define both LUIS and QnA Maker intents. Read more about recognizers in the dialogs concept article.
Follow the steps to define a Duplicated intents recognized trigger:
Go to the Create page and select a dialog from the bot explorer.
In the properties pane of your selected dialog, select Change under Recognizer/Dispatch type. Select Default and then select Done on the bottom right.
Select the three dots next to the dialog you selected previously. Then select + Add a trigger.
In the trigger creation screen, select Duplicated intents recognized from the drop-down list.
After you select Submit, you'll see in the authoring canvas a Duplicated intents recognized trigger created with some pre-configured actions.
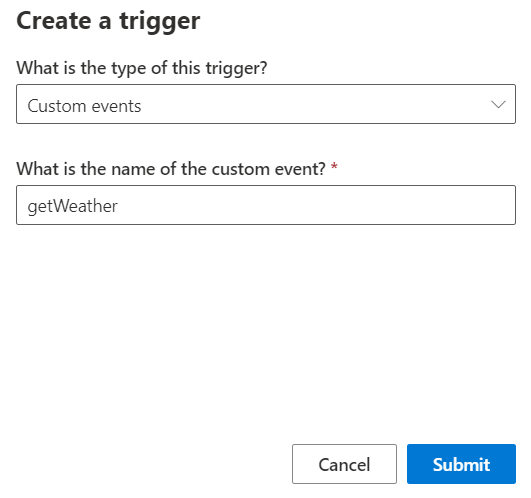
Custom events
The Custom events trigger will only fire when a matching Emit a custom event occurs. It's a trigger that any dialog in your bot can consume. To define and consume a Custom events trigger, you need to first create an Emit a custom event and then create a Custom events trigger to handle the event.
Create an Emit a custom event
Select the trigger you want to associate your Custom event with. Select the + sign and then select Emit a custom event from the Access external resources drop-down list.
In the Properties pane on the right side of Composer, select the abc button under the Event name box and then select abc custom event. Enter a name and set Bubble event to be true.
Tip
When Bubble event is true, any event that isn't handled in the current dialog will bubble up to that dialog's parent dialog, where it will continue to look for handlers for the custom event.
Now that your Emit a custom event has been created, you can create a Custom event trigger to handle this event. When the Emit a custom event occurs, any matching Custom event trigger at any dialog level will fire. Follow the steps to create a Custom event trigger to be associated with the previously defined Emit a custom event.
Create a Custom events trigger
- Go to the Create page and select a dialog from the bot explorer.
- Select + Add from the toolbar then select Add new trigger.
- In the trigger creation window, select Custom events from the drop-down list.
- Enter the event name of the Emit a custom event you created in the previous section in the What is the name of the custom event? field. Select Submit.
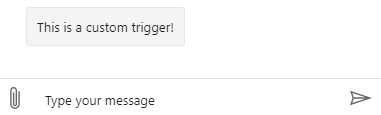
- Now you can add an action to your custom event trigger, which defines what will happen when it's triggered. Do this by selecting the + sign and then Send a response from the actions menu. Enter the desired response for this action in the Language Generation editor, for this example enter
This is a custom trigger!.
Now you've completed both of the required steps needed to create and execute a custom event. When Emit a custom event fires, it's handled by the Custom events trigger by sending the response you defined.
Next
- Learn how to control conversation flow.
Обратная связь
Ожидается в ближайшее время: в течение 2024 года мы постепенно откажемся от GitHub Issues как механизма обратной связи для контента и заменим его новой системой обратной связи. Дополнительные сведения см. в разделе https://aka.ms/ContentUserFeedback.
Отправить и просмотреть отзыв по