Finance and operations project type in Visual Studio
The finance and operations project type is part of the development tools. This project type resembles other projects in Visual Studio. It helps you organize and manage the elements that you're working with for a model. For example, the project can have folders that help you group the elements. A Visual Studio solution can contain multiple projects. There is one important constraint for a project: it can contain elements from only one model. If you must work with elements from different models, you must use multiple projects in your Visual Studio solution.
Create a new project
To create a new, empty project, follow these steps.
- On the File menu, point to New, and then click Project.
- In the list of template types, expand the Installed node.
- Expand the Templates node.
- Select the finance and operations category.
- Select the Operations Project template.
- Enter the name and location for the new project.
- Specify whether you want to create a new solution or add the project to the current solution.
- Click OK.
Every project has several important properties. To set the properties for a project, right-click the project in Solution Explorer, and then click Properties. The following table describes these properties.
| Property | Description |
|---|---|
| Startup Object type | The type of object that will be used as the Startup Object when the project is run. The following types are available: Form Class Output menu item |
| Startup Object | The object that will be invoked when the project is run. |
| Company | The default company that will be used when the project is run. |
| Partition | The partition that will be used when the project is run. |
| Project File | The name of the file that contains information about the project. |
| Project Folder | The location of the project. |
| Model | The model that the project is associated with. All elements in the project must be in the selected model. |
| Model Publisher | A read-only value that indicates the publisher of the model. |
| Layer | A read-only value that indicates the application layer that the model is located in. |
| Synchronize database on build | A value that indicates whether the synchronize operation for tables will be performed when the build action is performed for the project. |
Of these properties, the Model property is particularly important. You must specify which model the project is associated with. All the elements that you create or add to the project must be part of this model. The Startup Object type and Startup Object properties are useful when you test and debug your application. When you start your project (by pressing F5 for debugging or Ctrl+F5 for no debugging), the specified form will be loaded, or the main() method from the specified class will be run. The method must have the following signature: public static void main(Args _args)
Add elements to a project
There are several ways to add existing elements to a project. Here are the most typical:
- After you select the project in Solution Explorer, you can find the element in Application Explorer, right-click it, and then click Add to Project. This is the simplest method.
- You can use drag-and-drop operations to add an element from Application Explorer to a project.
- If you're limiting your search results to a single model, you can add the results of a filter in Application Explorer to a project.
After you've added the elements, you might want to use Solution Explorer to group them into folders, so that they are easier to find. The location of the project file and the folders that you create in the project don’t affect the location of the XML files that represent the model elements. The model elements are always stored in the appropriate folder in the model store. To organize elements into folders, select the Organize projects by element type option. On the Dynamics 365 menu, click Options. Select the Projects category to see this option. When this option is selected, elements that are added to a new or existing project (such as when search results in Application Explorer are added to a project) are grouped into folders, based on the element type name. To create a new element for a project, follow these steps.
- In Solution Explorer, right-click the project, point to Add, and then click New Item.
- In the Operations Artifacts list, select the category of element to create.
- Select the specific element type.
- Enter a name for the element.
- Click Add. The element will be added to the project. It will also be added to the model in the model store that the project is associated with.
After you've added the new element, you might want to use Solution Explorer to move it into a folder in the project, so that it's easier to find.
Export a projects as an .axpp file
To transfer elements to a different installation, you can use a project package file. Project package files have the .axpp file name extension. A project package contains all the elements from the project. To export a project, follow these steps.
- In Solution Explorer, select the project to export.
- On the Project menu, click Export Project. (The command on the menu will contain the name of the selected project.)
- Enter a name for the project package file, and select a location.
- Click Save.
Import an .axpp file
To use the contents of a project package file, you must import the .axpp file into an installation. The elements from the project package file will be imported into the same model that they were exported from. If that model doesn’t exist in the installation, it will be created during the import process. To import a project package file, follow these steps.
On the Dynamics 365 menu, click Import Project.
In the Import Project dialog box, specify the location of the project package (.axpp) file to import.
If you want elements from the project package file to overwrite any existing elements, select Overwrite Elements.
Specify whether you want to open the project in the current selection, in a new solution, or not at all.
In the Details field, review the elements that will be imported. You can clear the check box next to any elements that you don't want to import.
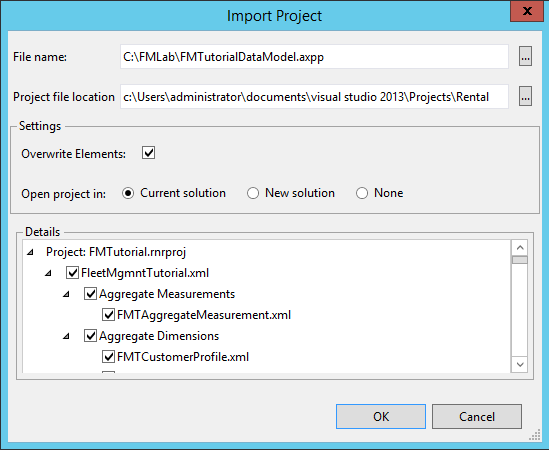
Click OK to complete the import process.
Обратная связь
Ожидается в ближайшее время: в течение 2024 года мы постепенно откажемся от GitHub Issues как механизма обратной связи для контента и заменим его новой системой обратной связи. Дополнительные сведения см. в разделе https://aka.ms/ContentUserFeedback.
Отправить и просмотреть отзыв по