Update environments from version 8.0 to 10.0.X
This article explains the steps required to update existing finance and operations 8.0 environments to 10.0.X application releases.
Background
Traditionally, moving to a newer application version has involved a rigorous upgrade that includes deployment of additional virtual machines, code upgrade, data upgrade, and scheduling several days in advance with the Microsoft Dynamics Service Engineering (DSE) team. You will notice that we are making the uptake of the latest version simpler, and this will continue to improve over time.
Note
We are supporting an update experience as compared to a full upgrade. This is possible because there are no Data Upgrade or Code Upgrade steps between the 8.0 and 10.0.X application schema. The target environments will be updated just like you would apply a Platform update.
The high-level process to update from version 8.0 to 10.0.X includes the following:
- Deploy 10.0.X developer and build environments.
- Branch in version control and remove any application hotfixes.
- Recompile custom extensions and/or ISV solutions.
- Produce a single software deployable package.
- Merge a deployable package with the 10.0.X binary update package.
- Deploy to target environments for validation.
- Deploy to Production.
Deploy 10.0.X developer and build environments
Using Lifecycle Services, deploy at least one developer environment and a single, new build environment on application 10.0.X release.
On average this takes 3-4 hours and can be done simultaneously. For the build environment, Create a new agent pool and assign it to this environment on the Advanced options screen.
In Azure DevOps, visit your existing Build Definition and ensure that it is not using your new agent pool for 10.0.X. This will keep your new build agent from trying to compile older application code.
Apply the latest binary update to your build and development servers
In Lifecycle Services, go to the build server that you deployed in step 1. Using the Update tiles at the bottom of the Environment details page, grab the latest updates available and store it in your project's Asset Library using the Save package button. For example, this could be saving the 10.0 Platform update 24 package to the Asset Library.
Apply this same package back to the build server where you saved the package, as well as any of the new 10.0.X developer environments you have deployed.
Note
We recommend taking the latest updates such as 10.0 Platform update 24 which will be available from the Update tiles when you deploy your 10.0 Platform update 24 build server. If your tiles show a count of "0" on the build server, then you can pull the related package from the shared asset library for your version. If your tiles show a count greater than 0, this is the better package to pull and use.
Begin branch work for version control and remove any application hotfixes
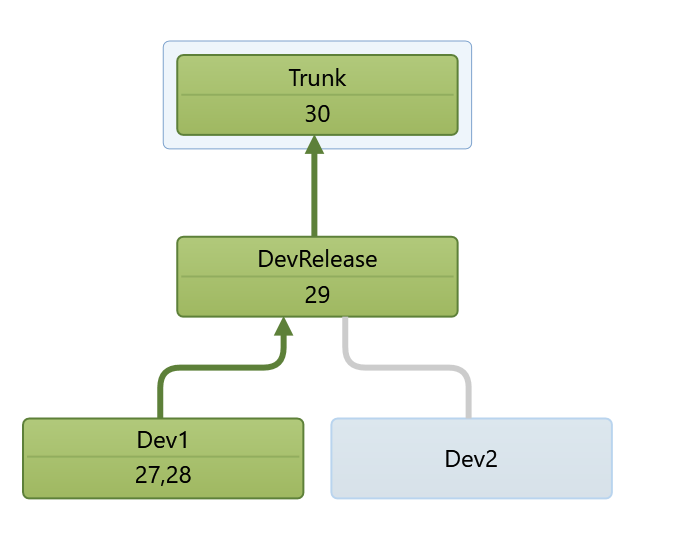
While the new environments are deploying, begin the branching work for your update. Use the following branch structure in version control as an example. Branching design varies for each customer, so be careful to adjust your steps accordingly based on how your branches are set up.
Prepare using Visual Studio
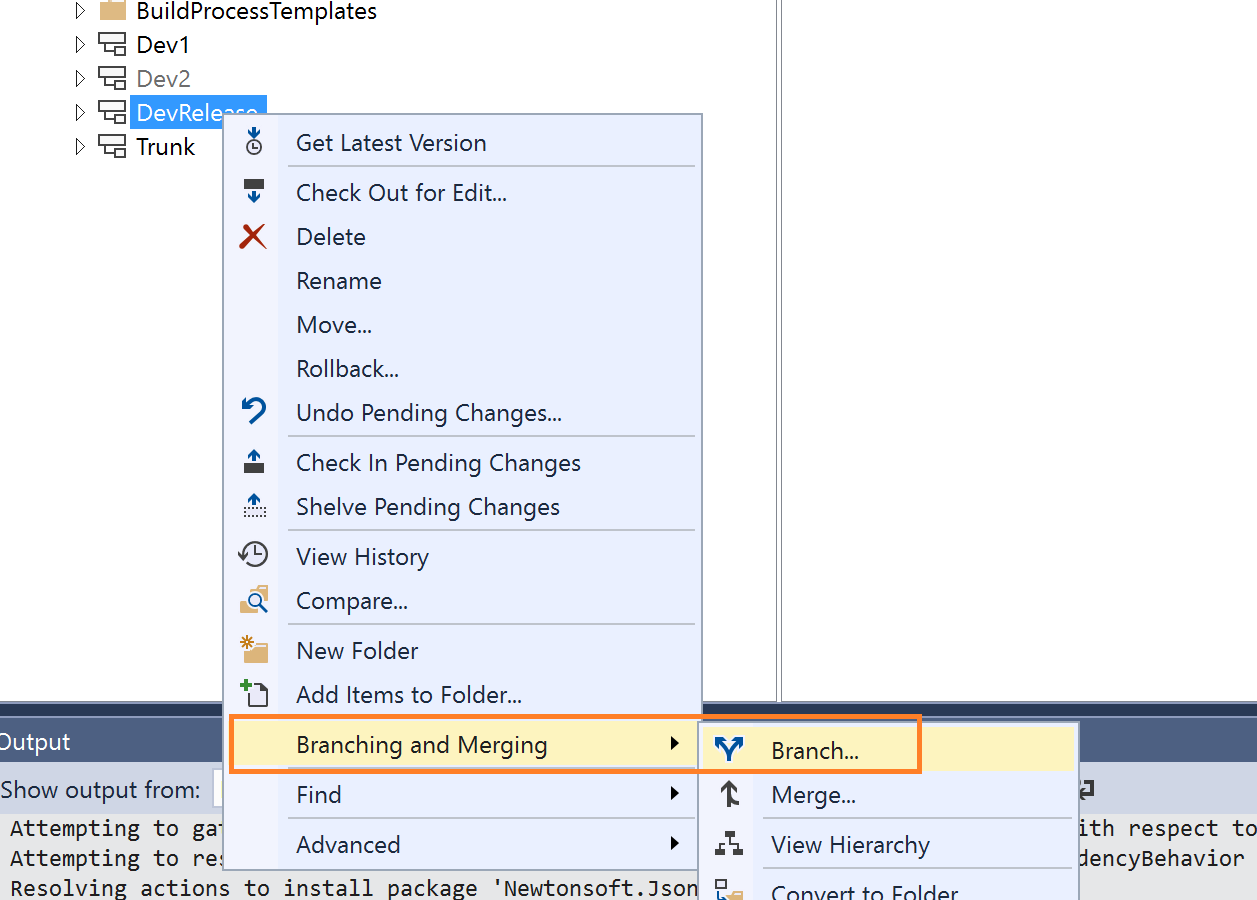
On any other development machine (other than the new ones being deployed), open Visual Studio and visit the Source Control Explorer. You will create a new branch that will be isolated for the 10.0.X update.
Next, delete any Microsoft package folders in this branch. You can have packages, such as ApplicationSuite, checked in from applying hotfixes on 8.0 which need to be removed. When only your custom packages or ISVs remain, check these changes in to the branch.
Important
It is critical that this is done before you map version control workspaces on your new development environments. This is to avoid the deletion of the Microsoft hotfixes to cascade to your working environment and delete untouched 10.0.X application code.
Recompile custom extensions and/or ISV solutions
Now you are ready to map this branch to a new development environment and compile your extensions and ISV solutions if they have provided you with source code. If your ISVs have only provided binary packages, you can check them in to source control, and the build environment will merge the binaries with your extension package to produce a single software deployable package. Additional information on this process can be found at Deployable packages from third parties. This will help later when you merge your package with the 10.0.X binary update.
Note
This step is necessary as the 10.0.X application code is not backward compatible with 8.0 from a binary level. In future application releases this step will be optional.
Produce a single software deployable package
After you have compiled in a developer environment and there are no errors to resolve, start a build in Azure DevOps using your new 10.0.X build environment agent that was setup earlier. When this is complete, a deployable package artifact will be attached to your build results. Download this package and upload it to the Lifecycle Services Asset Library. This single package should have all of your extensions and ISV solutions.
Merge the deployable package with the 10.0.X binary update package
In your project's Asset Library, locate both your new 10.0.X software deployable package (your customization package that includes your ISVs) and the 10.0.X PU2X binary update package that was saved in Step 1 at the beginning of the article. Highlight both packages and select Merge. This will combine the files into a merged update package. You can now apply this package to your various test environments.
Note
You can't move this merged package between different Lifecycle Services projects. The merge references other packages in your Asset library, and those packages won't be found in a different project.
Deploy to target environments for validation
Using the merged update package, deploy this to your various test environments. For more on how to do this, see Apply updates to cloud environments. This merged update package can be deployed to your Tier1/OneBox environments as well as Tier-2 sandboxes. At a minimum, you must deploy this to the sandbox Tier-2 environment that comes with your subscription. After you have finished with validation, mark the merged update package as a Release Candidate.
Deploy to Production
After you have marked the Release Candidate in your Asset Library, you can schedule the deployment to your Production environment. This will follow the same process for applying other software deployable packages.
Known issues
GlobalUpdate script for service model: AOSService with error 'The specified module 'C:\Program Files\Microsoft Security Client\MpProvider'
This error is transient and can be ignored. To bypass, hit the Resume button from Lifecycle Services.
Deploying the 10.0.X binary update to Developer environments causes ApplicationSuite compilation errors
The package can be applied to your 8.0 environments and it will update your source code. Compiling of your extension packages should not be impacted. If you had overlayering and have removed objects from the ApplicationSuite package, and try to recompile it, you may run in to errors. Until this is resolved, please redeploy your developer environments on 10.0.X and sync in your source code from version control.
Cannot find 10.0.X binary update package on the All Binary Updates tile on the My environment details page
It was originally communicated that the package would be found on the All Binary Updates tile. To prevent customers who want to simply get the latest binaries for release 8.0 from accidentally updating to release 10.0.X, we have moved the binary package to the Shared Asset Library. This article has been updated to reflect this change.
Deployment of my environment fails with error on duplicate objects
By default, in Visual Studio when an object is extended, it is created with a name of Object.Extension1. This name could clash if Microsoft introduces new extensions of the same object. If this occurs, your deployment will fail with an error similar to the following:
Exception calling "CreateRuntimeProvider" with "1" argument(s): "Runtime metadata is invalid because the same metadata artifact has been defined in multiple assemblies. \nFirst 10 conflicting names: SystemAdministration.Extension1. \nSee metadata events for complete list."
To prevent this from occurring, ensure that you compile your extensions on an 10.0.X developer machine. To resolve this issue, rename any of your extension objects with a vanity extension naming convention, such as SystemAdministration.Customer.
Deployment on my environment fails with error on DVTs or ETWs
There is a known issue where IIS/Application Pools are not fully restarted when the DVT or ETW step runs. The failure occurs because the DVTs are trying to connect to your environment's URL. To resolve this issue, click Resume on your deployment in LCS to retry the step. We are working to add a timer and automatic retry to resolve this issue.
Обратная связь
Ожидается в ближайшее время: в течение 2024 года мы постепенно откажемся от GitHub Issues как механизма обратной связи для контента и заменим его новой системой обратной связи. Дополнительные сведения см. в разделе https://aka.ms/ContentUserFeedback.
Отправить и просмотреть отзыв по