Manage finance and operations updates and your custom code lifecycle
This article describes application lifecycle use cases for finance and operations implementations. It's focused on the following scenarios:
- Managing your source code development branches
- Applying the next version of a Microsoft service update
- Applying a new version of your custom code
This article applies to Microsoft Dynamics 365 Finance, Dynamics 365 Supply Chain Management, Dynamics 365 Commerce, and Dynamics 365 Project Operations.
The main goal is to show how to complete the following tasks:
- Stay up to date and manage Microsoft service updates (or quality updates) for finance and operations apps (including Dynamics 365 Commerce) in incremental phases, independently of the lifecycle of your own customization. This approach simplifies the update process, and reduces the cost and risk of regressions that are associated with all-in-one upgrade projects.
- Take advantage of source code branches for version control of your custom code. By using version control, you can isolate the rollout of critical changes and hotfixes from the development of new features and capabilities.
This article doesn't explain how to use the different tools in Azure DevOps and Microsoft Dynamics Lifecycle Services (LCS). Instead, it's focused on processes and best practices. The Apply the next version of a Microsoft service update and Apply a new version of your custom code sections contain both an overview of the phases and the steps of the process.
This article includes the following sections:
Environments
This section describes the collection of finance and operations environments that the application lifecycle management (ALM) scenarios in this article rely on. This configuration is typical for organizations that have implementations that rely on custom code (extensions). This custom code includes customizations that are provided by independent software vendors (ISVs).
Environments that run your current release
The following environments are the environments in your current release:
Dev 1 – A development environment that runs the same version of finance and operations apps as the production environment. The Dev 1 environment uses Azure DevOps for version control of custom code. It's connected to the current release branch of your custom code. For more information, see the Manage source code branches section.
- There are many options for development environments, both cloud and on-premises. For more information, see Deploy and access development environments.
- For build automation, use the new Azure DevOps Hosted Agents functionality. For more information, see Build automation that uses Microsoft-hosted agents and Azure Pipelines.
Test 1 – A Tier-1 test environment that is used for functional and configuration testing. The Test 1 environment runs the same version of finance and operations apps as the production environment. It also runs the latest release version of your custom code extensions.
UAT – A pre-production environment that is used for user acceptance testing. The UAT environment is a Tier-2 (Standard Acceptance Test) or higher environment. It runs the same version of finance and operations apps as the production environment. It also runs the latest release version of your custom code extensions. This environment is typically connected to a copy of the production database.
Prod – Your live production environment that runs on your production database.
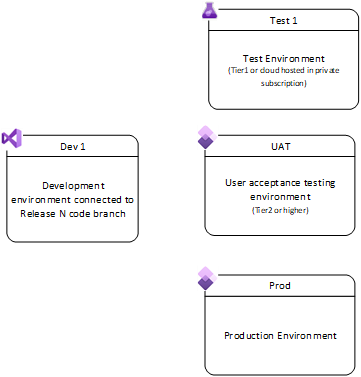
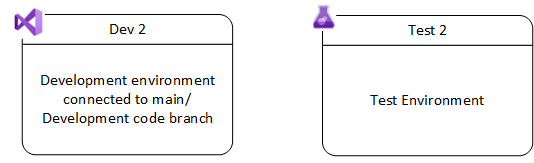
Environments that run the next version of your custom code
The following environments run the next version of your custom code:
- Dev 2 – A development environment that is used for development of the next version of your custom code extensions. It uses Azure DevOps for version control of custom code. It's connected to the development branch (main branch) of your custom code. For more information, see the Manage source code branches section.
- Test 2 – A functional test environment that is used for testing of the next version of your custom code extensions.
Manage source code branches
It's important that you follow best practices as you manage branches of custom code. In this way, you help minimize cost, and ensure the quality of your releases and updates.
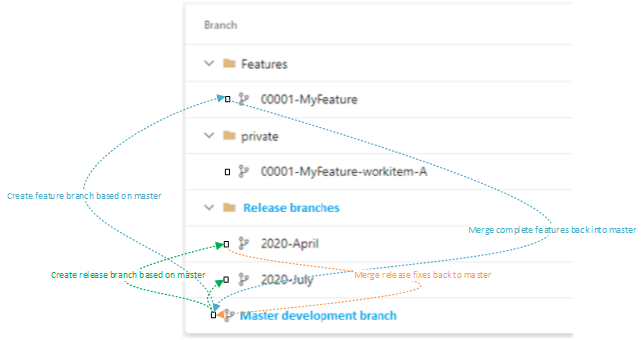
The main branch (development branch) contains the latest functioning version of the next release of your code.
When you work on new features, create a new feature branch out of the main branch. Then, when the feature work is completed, integrate the feature branch back into the main branch.
The release branches contain the code base of your official releases. In the preceding illustration, the assumption is that you have only one release branch, release/2020-April. 2020-April isn't a build. It's a source code branch. Because you'll probably create hotfixes for your release, you'll make changes and produce builds out of this release branch.
- Don't use release branches to develop new features. Use them only for critical fixes or changes that are required in your live environment.
- After you've made a change in a release branch, integrate the branch back into the main branch. In this way, you ensure that your next release also contains the fix.
- Among the example environments that were described earlier, the Dev 1 environment will be connected to the release/2020-April branch.
When you're ready to release a new version of your custom code, create a new release branch that is based on the main branch. For this example, you'll create a new release branch that is based on main and named 2020-July.
You might have private branches that individual developers work in while they work on a specific work item that is based on a specific branch of your code. Private branches are merged back into their parent branch when the work is completed. For more information, see Learn about branching strategies for Team Foundation Version Control (TFVC) and how to select an effective strategy.
Apply the next version of a Microsoft service update
By using a phased approach, you help maximize the efficiency when service updates are taken. Each phase updates one component of your implementation.
Phase 1 – Update your finance and operations environments.
Your current version of Commerce Scale Unit (CSU) and Point of Sale (POS) will work correctly with the new finance and operations update. For example, version 10.0.7 of CSU is compatible with version 10.0.11 of finance and operations apps.
Phase 2 – Update CSU.
Phase 3 – Update POS.
When you take a Microsoft update, you don't have to update your custom code to the next version. By taking Microsoft updates without bundling them with custom code updates, you help simplify the update process. You also help reduce the cost and risk of regressions that are associated with all-in-one upgrade projects.
Backward compatibility of Microsoft updates
It's important that you understand what Microsoft means by backward compatibility of service updates, so that you've context for the next sections of this article. Service and quality updates are runtime backward-compatible. However, they aren't always design-time (compile-time) backward-compatible.
Runtime compatibility
All Microsoft updates are intended to be runtime backward-compatible. This compatibility covers both binary compatibility and functional compatibility. Runtime compatibility means that customizations that exist in production and sandbox environments will continue to work after Microsoft service updates are deployed to those environments. Those updates include service updates and quality updates. Runtime compatibility also means that Microsoft updates are backward-compatible with customizations that were compiled on an earlier platform.
Binary compatibility is backward only. You can compile a customization on an older application version and platform version, and deploy it to an environment that is running a later version. However, you can't deploy code to an environment that is running a version that is earlier than the version that the code was compiled on.
Important
Personalizations are covered by runtime compatibility and will continue to work after Microsoft service updates are deployed to these environments. Because of this, re-importing all personalizations after a service update (or at any other time) is unnecessary and highly discouraged.
Design-time compatibility
Design-time (compile-time) backward compatibility means that developers can apply updates to their development environments and successfully compile their code without having to make any changes.
Microsoft aims for design-time compatibility. However, some updates might include changes that aren't compatible at design time, but that are binary-compatible. Therefore, after an update is applied, new errors or warnings might occur when your code is compiled. Here are some examples of these changes:
- Microsoft makes an enumeration extensible.
- Microsoft marks an API as obsolete or internal.
- Microsoft introduces a new compiler error to help prevent unsafe coding practices.
All these changes might require work on your solution. Design-time breaking changes that are binary-compatible don't require a 12-month deprecation notice. These breaking changes are documented for each service update. For more information, see What's new and changed in Platform updates.
Phase 1: Update the finance and operations implementation
This section summarizes the process that you use to update your finance and operations implementation to the latest service update. An update from version 10.0.7 to version 10.0.11 is used as an example.
This phase is divided into two tracks. These tracks can occur in parallel.
- Track 1 – Update your runtime environments.
- Track 2 – Update your development environments.
After you complete track 1, you'll be live on version 10.0.11, unless you encounter one of the error situations that are described in the Error situations section.
Track 1: Update your runtime environments
By completing track 1, you essentially complete your finance and operations update to version 10.0.11, because your production environment will be live on version 10.0.11. You don't have to recompile your custom code as part of this track.
Update Test 1
The Test 1 environment is running version 10.0.7 together with the latest released version of your custom extension. Although an update of Test 1 isn't a prerequisite in this flow, it's recommended, because it adds another level of functional verification and predictability. This update should be completed before the UAT environment is updated. The sooner that you update Test 1 and validate on it, the more predictable your "real" update (that is, the update of the UAT and Prod environments) will be.
- Apply version 10.0.11 of finance and operations apps to Test 1.
- Sign off on functional scenarios. You can use the Regression Suite Automation Tool to automate user acceptance testing on test and UAT environments.
- If regressions are encountered, see the Error situations section.
Update UAT
The UAT environment is running version 10.0.7 together with a released version of your custom extension. (The UAT environment is the same as the Prod environment.)
Apply version 10.0.11 of finance and operations apps to UAT.
Your UAT environment might be configured so that it's automatically updated by Microsoft. However, you can always pull the update as soon as it's available.
Complete user acceptance testing, and sign off.
If regressions are encountered, see the Error situations section.
Update Prod
Apply version 10.0.11 of finance and operations apps to Prod.
Your Prod environment might be configured so that it's automatically updated by Microsoft. However, you can always pull the update as soon as it's available.
Sign off.
Track 2: Update your development environments
The purpose of track 2 is to update the Dev 1 environment to version 10.0.11. Dev 1 is your main development environment that is connected to the current release branch of your custom code. It's running version 10.0.7 of finance and operations apps. By completing track 2, you ensure that Dev 1 runs version 10.0.11 together with your latest release, and that it's ready for any future hotfixes that are required for your code.
Apply version 10.0.11 of finance and operations apps to Dev 1.
Compile your custom code, and do testing.
Make any required changes to your custom code.
Check code changes in to the release branch.
If you have more than one development environment, follow these steps for each environment:
- Apply version 10.0.11 of finance and operations apps to the development environment.
- Sync and compile your latest custom code from the target code branch.
Error situations
Case 1
During track 1, a bug is found that requires a Microsoft quality update. If Microsoft releases the update in a timely manner, use the new Microsoft update instead of the original service update to complete track 1.
Case 2
During track 1, a bug is found that requires a Microsoft service update. However, the update can't be released in a timely manner.
As a workaround for this issue, Microsoft proposes a change to your custom code.
- Modify your code in Dev 1 (in the release branch), and test your updates.
- Check code changes in to the release branch.
- Create a new deployable package out of the release branch.
- Apply the new deployable package to Test 1 and/or UAT.
Note
Custom code that is compiled on version 10.0.7 can be deployed to any runtime environment that is running version 10.0.7 or later. Therefore, you don't yet have to update Dev 1 to version 10.0.11. However, you might already have done that update as part of track 2.
Case 3
During track 1, a bug is found that requires a change to your custom code. This bug might be in either your code or the ISV code.
- Modify your code in Dev 1 (in the release branch), and test your updates.
- Check code changes in to the release branch.
- Create a new deployable package out of the release branch.
- Apply the new deployable package to Test 1 and/or UAT.
Phase 2: Update CSU to version 10.0.11
This section summarizes the process that you use to update your Commerce Scale Units to the latest service update. An update from release 10.0.7 (Commerce version 9.17) to release 10.0.11 (Commerce version 9.21) is used as an example.
Phase 2 prerequisites
Before you update your CSUs, you must update the Commerce headquarters environments (in the finance and operations app) to the same release or a later release. For this example, that release is 10.0.11.
This phase is divided into two tracks. These tracks can occur in parallel.
- Track 1 – Update your CSU runtime environments.
- Track 2 – Update your development environments.
After you complete track 1, you'll be live on release 10.0.11 (Commerce version 9.21), unless you encounter one of the error situations that were described for phase 1.
Track 1: Update your CSU runtime environments
By completing track 1, you essentially complete your CSU update to version 10.0.11, because your production environment will be live on version 10.0.11. You don't have to recompile your custom code as part of this track.
Update Test 1
The software as a service (SaaS) components of Commerce aren't currently supported in Tier-1 environments (development/test environments). A copy of Retail Server runs locally in each Tier-1 environment, and the deployment of both Microsoft code for Retail Server and retail customizations will be done through the previous system, where application binary packages and retail deployable packages are applied against the infrastructure as a service (IaaS) instance.
Update UAT
The UAT environment is running CSU that corresponds to release 10.0.7, together with the same version of your retail extension that the production environment is running.
- Update the Commerce Scale Unit. Select 9.21 (10.0.11) as the target version. For more information, see Phase 2: Update CSU to version 10.0.11
- Complete user acceptance testing, and sign off.
- If regressions are encountered, see the Error situations section.
Update Prod
- Update the Commerce Scale Unit. Select 9.21 (10.0.11) as the target version. For more information, see Phase 2: Update CSU to version 10.0.11
- Sign off.
Track 2: Update your development environments
Get the latest version of the Retail software development kit (SDK).
- Apply the finance and operations service update for release 10.0.11 to Dev 1.
- Get the updated version of the Retail SDK from %ServiceDrive%\RetailSDK\Update\<newest directory>
In your main (development) branch, update the Retail artifacts from the new version of the Retail SDK.
Compile. The new version should be backward-compatible and should not require any changes to your code.
Commit the change that includes the Retail SDK update.
Make any required changes to your custom code.
Commit code changes to the target branch.
Optional: If you have more than one development environment, merge the latest changes from step 4, and compile the latest custom code.
Phase 3: Update POS to version 10.0.11
This section summarizes the process that you use to update your store components, such as Modern POS (Store Commerce in the newer versions) and Hardware Station, to the latest service update. An update from release 10.0.7 (Commerce version 9.17) to release 10.0.11 (Commerce version 9.21) is used as an example.
Unlike updates for Commerce headquarters (in the finance and operations app) and CSU, updates for store components are delivered in the same packages. After you update Commerce headquarters and CSU, you have the following options:
- Option 0 (no operation is required) – Leave the store components in their previous release if the version is supported and in-policy.
- Option 1 – Update the store components runtime (Microsoft code) so that it matches the same release as CSU.
- Option 2 – Update the store components runtime (Microsoft code) and customization together.
In the rest of this section, the assumption is that you want or have to update the store components (option 1 or option 2).
After you complete this phase, you'll be live on release 10.0.11 (Commerce version 9.21) for store components, unless you encounter one of the error situations that are described for phase 1.
Phase 3 prerequisites
Phase 3 has the following prerequisites:
- The Commerce headquarters components (in the finance and operations app) were updated to the same release or a later release before the CSUs were updated. In this example, the version is 10.0.11.
- The CSUs were updated to the same release as, or a later release than, the store components. In this example, the release is 10.0.11.
Update your Commerce development environment
Follow the steps in the Track 2: Update your development environments section.
Option 1: Store component updates that include only runtime changes
This option generates a new retail deployable package that contains your store components. It includes changes only from the Microsoft code.
- Update your release branch, which has the code that is currently being used in the production environment, to the Retail SDK that matches your target release. In this example, the version is 10.0.11 (9.21). Follow the steps in the Track 2: Update your development environments section.
- Generate a new build for the retail deployable package. This build contains the same set of customizations that is currently in the production environment, plus version 10.0.11 (9.21) of the Microsoft code.
Option 2: Store component updates that include runtime and custom changes
This option generates a new retail deployable package that contains your store components. It includes changes from both the Microsoft code and customizations.
- Update your release branch, which has the code that is currently being used in the production environment, to the Retail SDK that matches your target release. In this example, the version is 10.0.11 (9.21). Follow the steps in the Track 2: Update your development environments section.
- Commit changes.
- Update custom code for store components, or update references to ISV-updated components.
- Generate a new build for the retail deployable package. This build contains updated custom code plus version 10.0.11 (9.21) of the Microsoft code.
Update process
Update Test 1
The SaaS components of Commerce aren't currently supported in development or test one-box environments. A copy of Retail Server runs locally in each development or test one-box environment, and the deployment of both Microsoft code for Retail Server and retail customizations will be done through the previous system, where application binary packages and retail deployable packages are applied against the IaaS instance.
The Test 1 environment is running version 10.0.11 of Commerce headquarters and a local version of CSU from previous phases. An update of Test 1 isn't a prerequisite in this flow. Because there is no CSU in this environment, this step is mostly for verification.
- Upload, update, and deploy the store components. For more information, see the Upload, update, and deploy store components section.
- Sign off on functional scenarios.
- If regressions are encountered, see the Error situations section.
Update UAT
Clients that point to the UAT environment are running applications (for example, Modern POS) for release 10.0.7 (the same version that is currently running in the production environment).
- Upload, update, and deploy the store components. For more information, see the Upload, update, and deploy store components section.
- Sign off on functional scenarios.
- If regressions are encountered, see the Error situations section.
Update Prod
- Upload, update, and deploy the store components.
- Sign off.
Apply a new version of your custom code
This section describes the recommended flow for two use cases that require that you update your UAT and/or Prod environment with a new build of your custom extension.
Create a hotfix of your code
When a critical bug is found in the UAT or Prod environment, fix the bug in the release branch (not in the main or development branch), and use the standard process to apply a deployable package to UAT and Prod.
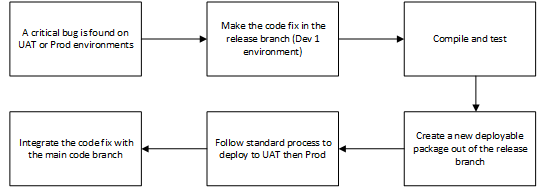
- In Dev 1, make the code fix in the release branch. If the required fix is in ISV code, ask the ISV to send you a new build of the current release, not the next version of the solution.
- Compile and test.
- Create a new deployable package out of the release branch.
- Deploy on Test 1, and sign off if sign-off is required.
- Use the standard process to deploy custom code first to UAT and then to Prod.
- Integrate the code fix with your main code branch.
Update your custom code from release N to release N+1
When you're ready to release the next version of your custom code, use the following process to create and deploy the new release.
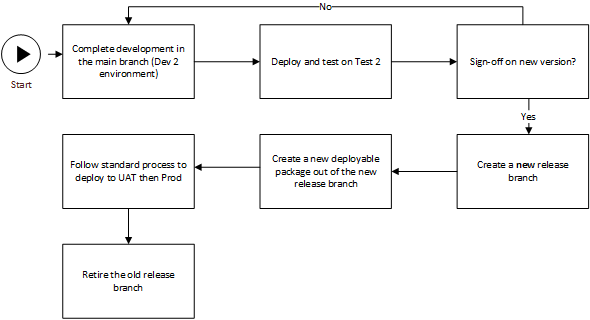
- In the Dev 2 environment, or another environment that is connected to the main branch, complete development in the main branch.
- Deploy and test on Test 2.
- Repeat steps 1 through 2 until the new version is signed-off on.
- Create a new release branch.
- Create a new deployable package out of the new release branch.
- Use the standard process to deploy custom code first to UAT and then to Prod.
- Retire the old release branch.
Upload, update, and deploy store components
Upload the retail deployable package to LCS.
Update Application Object Server (AOS) with the latest client.
Upload the retail deployable package to your Asset library:
- Older deployments (earlier than version 10.0.11): Software deployable package
- New deployments (version 10.0.11 and later): Retail self-service installers
Update Commerce headquarters with the new self-service installers for store components:
- Older deployments (earlier than version 10.0.11): Deploy the retail deployable package to Commerce headquarters via LCS.
- New deployments (version 10.0.11 and later): In Commerce headquarters, on the Commerce parameters form, on the Channel deployment tab, select Check for package updates. This update will bring in the packages that are available on the Retail Self-service package tab in the LCS Asset library.
Assign the client versions to your devices.
Download the installers for the desired client type and device.
Install in target device.
Test and validate.
Обратная связь
Ожидается в ближайшее время: в течение 2024 года мы постепенно откажемся от GitHub Issues как механизма обратной связи для контента и заменим его новой системой обратной связи. Дополнительные сведения см. в разделе https://aka.ms/ContentUserFeedback.
Отправить и просмотреть отзыв по