Создание пакетов NuGetCreating NuGet packages
Независимо от назначения вашего пакета или содержащегося в нем кода, вы можете создать с помощью программы nuget.exe
компонент, которым можно поделиться с любым количеством разработчиков для совместного использования.No matter what your package does or what code it contains, you use nuget.exe
to package that functionality into a component that can be shared with and used by any number of other developers. Инструкции по установке nuget.exe
см. в разделе Установка интерфейса командной строки NuGet.To install nuget.exe
, see Install NuGet CLI. Обратите внимание на то, что программа nuget.exe
не входит в состав Visual Studio по умолчанию.Note that Visual Studio does not automatically include nuget.exe
.
С технической точки зрения, пакет NuGet — это просто ZIP-файл, расширение которого изменено на .nupkg
и содержимое которого соответствует определенным соглашениям.Technically speaking, a NuGet package is just a ZIP file that's been renamed with the .nupkg
extension and whose contents match certain conventions. В этом разделе подробно описывается создание пакета, в котором соблюдаются эти соглашения.This topic describes the detailed process of creating a package that meets those conventions. Краткое руководство приводится в статье по созданию и публикации пакета.For a focused walkthrough, refer to Quickstart: create and publish a package.
Создание пакета начинается с подготовки скомпилированного кода (сборок), символов и других файлов, которые должны быть включены в пакет (см. раздел Процесс создания пакета).Packaging begins with the compiled code (assemblies), symbols, and/or other files that you want to deliver as a package (see Overview and workflow). Этот процесс не зависит от компиляции и других задач по созданию файлов для пакета, хотя вы можете использовать информацию из файла проекта для синхронизации скомпилированных сборок и пакетов.This process is independent from compiling or otherwise generating the files that go into the package, although you can draw from information in a project file to keep the compiled assemblies and packages in sync.
Примечание
Этот раздел относится к любым типам проектов, кроме проектов .NET Core с использованием Visual Studio 2017 и NuGet 4.0 или более поздней версии.This topic applies to project types other than .NET Core projects using Visual Studio 2017 and NuGet 4.0+. В таких проектах .NET Core NuGet использует сведения в файле проекта напрямую.In those .NET Core projects, NuGet uses information in the project file directly. Подробные сведения см. в разделах Создание пакетов .NET Standard с помощью Visual Studio 2017 и Пакет NuGet и восстановление целевых объектов MSBuild.For details, see Create .NET Standard Packages with Visual Studio 2017 and NuGet pack and restore as MSBuild targets.
Выбор сборок для добавления в пакетDeciding which assemblies to package
Большинство пакетов общего назначения содержат одну или несколько сборок, которые другие разработчики могут использовать в собственных проектах.Most general-purpose packages contain one or more assemblies that other developers can use in their own projects.
Как правило, для каждой сборки лучше создавать собственный пакет NuGet, если эти сборки используются независимо.In general, it's best to have one assembly per NuGet package, provided that each assembly is independently useful. Например, если есть сборка
Utilities.dll
, которая зависит от сборкиParser.dll
, но сборкаParser.dll
также полезна сама по себе, создайте для каждой из этих сборок отдельный пакет.For example, if you have aUtilities.dll
that depends onParser.dll
, andParser.dll
is useful on its own, then create one package for each. Это позволит разработчикам использоватьParser.dll
независимо отUtilities.dll
.Doing so allows developers to useParser.dll
independently ofUtilities.dll
.Если библиотека состоит из нескольких сборок, которые не используются сами по себе, то их предпочтительнее объединить в одном пакете.If your library is composed of multiple assemblies that aren't independently useful, then it's fine to combine them into one package. В продолжение предыдущего примера, если сборка
Parser.dll
содержит код, который используется только сборкойUtilities.dll
, то сборкуParser.dll
лучше включить в тот же пакет.Using the previous example, ifParser.dll
contains code that's used only byUtilities.dll
, then it's fine to keepParser.dll
in the same package.Аналогичным образом, если сборка
Utilities.dll
зависит от сборкиUtilities.resources.dll
, которая не используется сама по себе, включите их в один пакет.Similarly, ifUtilities.dll
depends onUtilities.resources.dll
, where again the latter is not useful on its own, then put both in the same package.
Ресурсы представляют собой особый случай.Resources are, in fact, a special case. Когда пакет устанавливается в проекте, NuGet автоматически добавляет ссылки на библиотеки DLL сборок в пакете, кроме тех из них, в именах которых есть .resources.dll
, так как они считаются локализованными вспомогательными сборками (см. раздел Создание локализованных пакетов).When a package is installed into a project, NuGet automatically adds assembly references to the package's DLLs, excluding those that are named .resources.dll
because they are assumed to be localized satellite assemblies (see Creating localized packages). По этой причине следует избегать использования .resources.dll
в именах файлов пакета, которые содержат важный код.For this reason, avoid using .resources.dll
for files that otherwise contain essential package code.
Если библиотека содержит сборки COM-взаимодействия, следуйте дополнительным указаниям в разделе Разработка пакетов, содержащих сборки COM-взаимодействия.If your library contains COM interop assemblies, follow additional the guidelines in Authoring packages with COM interop assemblies.
Назначение и структура файла NUSPECThe role and structure of the .nuspec file
После того как вы решите, какие файлы нужно включить в пакет, следует создать манифест пакета в XML-файле .nuspec
.Once you know what files you want to package, the next step is creating a package manifest in a .nuspec
XML file.
Манифест служит следующим целям:The manifest:
- Описывает содержимое пакета и сам включается в него.Describes the package's contents and is itself included in the package.
- Управляет созданием пакета и предоставляет диспетчеру NuGet указания по установке пакета в проекте.Drives both the creation of the package and instructs NuGet on how to install the package into a project. Например, в манифесте определяются другие зависимости пакета, чтобы диспетчер NuGet мог также установить их при установке основного пакета.For example, the manifest identifies other package dependencies such that NuGet can also install those dependencies when the main package is installed.
- Содержит обязательные и необязательные свойства, как описано ниже.Contains both required and optional properties as described below. Полные сведения, включая описание свойств, которые не упомянуты в этом разделе, см. в справочнике по файлам NUSPEC.For exact details, including other properties not mentioned here, see the .nuspec reference.
Обязательные свойства:Required properties:
- идентификатор пакета, который должен быть уникальным в пределах коллекции, содержащей пакет;The package identifier, which must be unique across the gallery that hosts the package.
- определенный номер версии в формате основной_номер.дополнительный_номер.исправление[-суффикс], где -суффикс указывает на предварительные версии;A specific version number in the form Major.Minor.Patch[-Suffix] where -Suffix identifies pre-release versions
- название пакета, которое должно отображаться на сайте размещения (например, nuget.org);The package title as it should appear on the host (like nuget.org)
- сведения об авторе и владельце;Author and owner information.
- подробное описание пакета.A long description of the package.
Часто используемые необязательные свойства:Common optional properties:
- заметки о выпуске;Release notes
- сведения об авторских правах;Copyright information
- краткое описание для пользовательского интерфейса диспетчера пакетов в Visual Studio;A short description for the Package Manager UI in Visual Studio
- код языка;A locale ID
- URL проекта;Project URL
- лицензия в виде выражения или файла (
licenseUrl
скоро станет нерекомендуемым, используйте nuspec-элемент метаданныхlicense
);License as an expression or file (licenseUrl
is being deprecated, use thelicense
nuspec metadata element) - URL-адрес значка;An icon URL
- список зависимостей и ссылок;Lists of dependencies and references
- теги, упрощающие поиск в коллекции.Tags that assist in gallery searches
Ниже приведен типичный (но вымышленный) файл .nuspec
с комментариями, описывающими свойства.The following is a typical (but fictitious) .nuspec
file, with comments describing the properties:
<?xml version="1.0"?>
<package xmlns="http://schemas.microsoft.com/packaging/2013/05/nuspec.xsd">
<metadata>
<!-- The identifier that must be unique within the hosting gallery -->
<id>Contoso.Utility.UsefulStuff</id>
<!-- The package version number that is used when resolving dependencies -->
<version>1.8.3-beta</version>
<!-- Authors contain text that appears directly on the gallery -->
<authors>Dejana Tesic, Rajeev Dey</authors>
<!--
Owners are typically nuget.org identities that allow gallery
users to easily find other packages by the same owners.
-->
<owners>dejanatc, rjdey</owners>
<!-- Project URL provides a link for the gallery -->
<projectUrl>http://github.com/contoso/UsefulStuff</projectUrl>
<!-- License information is displayed on the gallery -->
<license type="expression">Apache-2.0</license>
<!-- The icon is used in Visual Studio's package manager UI -->
<iconUrl>http://github.com/contoso/UsefulStuff/nuget_icon.png</iconUrl>
<!--
If true, this value prompts the user to accept the license when
installing the package.
-->
<requireLicenseAcceptance>false</requireLicenseAcceptance>
<!-- Any details about this particular release -->
<releaseNotes>Bug fixes and performance improvements</releaseNotes>
<!--
The description can be used in package manager UI. Note that the
nuget.org gallery uses information you add in the portal.
-->
<description>Core utility functions for web applications</description>
<!-- Copyright information -->
<copyright>Copyright ©2016 Contoso Corporation</copyright>
<!-- Tags appear in the gallery and can be used for tag searches -->
<tags>web utility http json url parsing</tags>
<!-- Dependencies are automatically installed when the package is installed -->
<dependencies>
<dependency id="Newtonsoft.Json" version="9.0" />
</dependencies>
</metadata>
<!-- A readme.txt to display when the package is installed -->
<files>
<file src="readme.txt" target="" />
</files>
</package>
Подробные сведения об объявлении зависимостей и указании номеров версий см. в разделе Управление версиями пакета.For details on declaring dependencies and specifying version numbers, see Package versioning. Доступ к ресурсам зависимостей в пакете можно также предоставлять напрямую с помощью атрибутов include
и exclude
элемента dependency
.It is also possible to surface assets from dependencies directly in the package by using the include
and exclude
attributes on the dependency
element. См. подраздел "Зависимости" в разделе Справочник по файлам NUSPEC.See .nuspec Reference - Dependencies.
Так как манифест включается в пакет, создаваемый на его основе, вы можете получить дополнительные примеры, изучив существующие пакеты.Because the manifest is included in the package created from it, you can find any number of additional examples by examining existing packages. Хорошим их источником может служить папка global-packages на компьютере, расположение которой можно получить с помощью следующей команды:A good source is the global-packages folder on your computer, the location of which is returned by the following command:
nuget locals -list global-packages
Перейдите в любую папку пакет\версия, скопируйте файл .nupkg
в файл .zip
, затем откройте этот файл .zip
и изучите содержимое файла .nuspec
в нем.Go into any package\version folder, copy the .nupkg
file to a .zip
file, then open that .zip
file and examine the .nuspec
within it.
Примечание
При создании файла .nuspec
из проекта Visual Studio манифест содержит токены, которые заменяются сведениями из проекта при сборке пакета.When creating a .nuspec
from a Visual Studio project, the manifest contains tokens that are replaced with information from the project when the package is built. См. раздел Создание файла NUSPEC на основе проекта Visual Studio.See Creating the .nuspec from a Visual Studio project.
Создание файла NUSPECCreating the .nuspec file
Создание полного манифеста, как правило, начинается с базового файла .nuspec
, который создается одним из следующих способов на основе:Creating a complete manifest typically begins with a basic .nuspec
file generated through one of the following methods:
- рабочего каталога, соответствующего соглашениям;A convention-based working directory
- библиотеки DLL сборки;An assembly DLL
- проекта Visual Studio;A Visual Studio project
- нового файла со значениями по умолчанию.New file with default values
Затем нужно отредактировать файл вручную так, чтобы он описывал содержимое итогового пакета.You then edit the file by hand so that it describes the exact content you want in the final package.
Важно!
Автоматически формируемые файлы .nuspec
содержат заполнители, которые нужно изменить перед созданием пакета с помощью команды nuget pack
.Generated .nuspec
files contain placeholders that must be modified before creating the package with the nuget pack
command. Если файл .nuspec
содержит заполнители, эта команда завершается сбоем.That command fails if the .nuspec
contains any placeholders.
На основе рабочего каталога, соответствующего соглашениямFrom a convention-based working directory
Так как пакет NuGet — это просто ZIP-файл, расширение которого изменено на .nupkg
, зачастую проще всего создать нужную структуру папок в локальной файловой системе, а затем создать файл .nuspec
на основе этой структуры.Because a NuGet package is just a ZIP file that's been renamed with the .nupkg
extension, it's often easiest to create the folder structure you want on your local file system, then create the .nuspec
file directly from that structure. Команда nuget pack
автоматически добавляет все файлы, имеющиеся в этой структуре папок (кроме папок, начинающихся с .
, что позволяет иметь закрытые файлы в этой же структуре).The nuget pack
command then automatically adds all files in that folder structure (excluding any folders that begin with .
, allowing you to keep private files in the same structure).
Преимущество такого подхода в том, что вам не нужно указывать в манифесте файлы, которые требуется включить в пакет (как описано далее в этом разделе).The advantage to this approach is that you don't need to specify in the manifest which files you want to include in the package (as explained later in this topic). В процессе сборки можно создать структуру папок, которая будет в точности перенесена в пакет, и легко включить в него другие файлы, которые в противном случае не были бы добавлены в проект:You can simply have your build process produce the exact folder structure that goes into the package, and you can easily include other files that might not be part of a project otherwise:
- содержимое и исходный код, которые следует внедрить в конечный проект;Content and source code that should be injected into the target project.
- скрипты PowerShell (пакеты в NuGet 2.x могут также включать в себя скрипты установки, которые не поддерживаются в NuGet 3.x и более поздних версиях);PowerShell scripts (packages used in NuGet 2.x can include installation scripts as well, which is not supported in NuGet 3.x and later).
- преобразования существующих файлов конфигурации и исходного кода в проекте.Transformations to existing configuration and source code files in a project.
Ниже представлены соглашения в отношении папок.The folder conventions are as follows:
ПапкаFolder | Описание:Description | Действие при установке пакетаAction upon package install |
---|---|---|
(корневая)(root) | Расположение файла readme.txtLocation for readme.txt | При установке пакета в Visual Studio отображается файл readme.txt в корневой папке проекта.Visual Studio displays a readme.txt file in the package root when the package is installed. |
lib/{tfm}lib/{tfm} | Файлы сборки (.dll ), документации (.xml ) и символов (.pdb ) для данного моникера целевой платформы (TFM)Assembly (.dll ), documentation (.xml ), and symbol (.pdb ) files for the given Target Framework Moniker (TFM) |
Сборки добавляются как ссылки для использования во время компиляции или выполнения. Файлы .xml и .pdb копируются в папки проекта.Assemblies are added as references for compile as well as runtime; .xml and .pdb copied into project folders. Сведения о создании вложенных папок для определенных целевых платформ см. в разделе Поддержка нескольких целевых платформ.See Supporting multiple target frameworks for creating framework target-specific sub-folders. |
ref/{tfm}ref/{tfm} | Файлы сборки (.dll ) и символов (.pdb ) для определенного моникера целевой платформы (TFM)Assembly (.dll ), and symbol (.pdb ) files for the given Target Framework Moniker (TFM) |
Сборки добавляются как ссылки для использования только во время компиляции. Поэтому в папку bin проекта ничего не копируется.Assemblies are added as references only for compile time; So nothing will be copied into project bin folder. |
runtimesruntimes | Файлы сборки (.dll ), символов (.pdb ) и машинных ресурсов (.pri ) для определенной архитектурыArchitecture-specific assembly (.dll ), symbol (.pdb ), and native resource (.pri ) files |
Сборки добавляются как ссылки для использования только во время выполнения. Остальные файлы копируются в папки проекта.Assemblies are added as references only for runtime; other files are copied into project folders. В папке /ref/{tfm} всегда должна быть соответствующая сборка (TFM) для AnyCPU , чтобы предоставить соответствующие сборки, используемые во время компиляции.There should always be a corresponding (TFM) AnyCPU specific assembly under /ref/{tfm} folder to provide corresponding compile time assembly. См. раздел Поддержка нескольких целевых платформ.See Supporting multiple target frameworks. |
содержаниеcontent | Произвольные файлыArbitrary files | Содержимое копируется в корневую папку проекта.Contents are copied to the project root. Папку content можно представить как корневую папку целевого приложения, которое будет использовать пакет.Think of the content folder as the root of the target application that ultimately consumes the package. Чтобы пакет добавил изображение в папку /images приложения, поместите это изображение в папку content/images пакета.To have the package add an image in the application's /images folder, place it in the package's content/images folder. |
выполнить сборкуbuild | Файлы MSBuild .targets и .props MSBuild .targets and .props files |
Автоматически вставляются в файл проекта или файл project.lock.json (NuGet 3.x или более поздней версии).Automatically inserted into the project file or project.lock.json (NuGet 3.x+). |
средстваtools | Скрипты и программы PowerShell, доступные из консоли диспетчера пакетовPowershell scripts and programs accessible from the Package Manager Console | Папка tools добавляется в переменную среды PATH только для консоли диспетчера пакетов (в частности, она не добавляется в переменную PATH для среды MSBuild при сборке проекта).The tools folder is added to the PATH environment variable for the Package Manager Console only (Specifically, not to the PATH as set for MSBuild when building the project). |
Так как в структуре папок может быть сколько угодно сборок для любого числа целевых платформ, этот метод обязателен при создании пакетов, поддерживающих несколько платформ.Because your folder structure can contain any number of assemblies for any number of target frameworks, this method is necessary when creating packages that support multiple frameworks.
После того как вы подготовите нужную структуру папок, выполните в ней следующую команду, чтобы создать файл .nuspec
:In any case, once you have the desired folder structure in place, run the following command in that folder to create the .nuspec
file:
nuget spec
Созданный файл .nuspec
не содержит явных ссылок на файлы в структуре папок.Again, the generated .nuspec
contains no explicit references to files in the folder structure. NuGet автоматически включает все файлы при создании пакета.NuGet automatically includes all files when the package is created. Однако вам необходимо отредактировать значения-заполнители в других частях манифеста.You still need to edit placeholder values in other parts of the manifest, however.
На основе библиотеки DLL сборкиFrom an assembly DLL
В такой простой ситуации, как создание пакета на основе сборки, вы можете создать файл .nuspec
из содержащихся в сборке метаданных с помощью следующей команды:In the simple case of creating a package from an assembly, you can generate a .nuspec
file from the metadata in the assembly using the following command:
nuget spec <assembly-name>.dll
При использовании такого формата ряд заполнителей в манифесте заменяется конкретными значениями из сборки.Using this form replaces a few placeholders in the manifest with specific values from the assembly. Например, свойству <id>
присваивается имя сборки, а свойству <version>
— ее версия.For example, the <id>
property is set to the assembly name, and <version>
is set to the assembly version. Однако остальные свойства в манифесте не имеют соответствующих значений в сборке и поэтому по-прежнему содержат заполнители.Other properties in the manifest, however, don't have matching values in the assembly and thus still contain placeholders.
На основе проекта Visual StudioFrom a Visual Studio project
Создавать файл .nuspec
на основе файла .csproj
или .vbproj
удобно, так как ссылки на другие пакеты, установленные в проекте, как и на зависимости, создаются автоматически.Creating a .nuspec
from a .csproj
or .vbproj
file is convenient because other packages that have been installed into those project are automatically referenced as dependencies. Просто выполните следующую команду в папке, в которой находится файл проекта:Simply use the following command in the same folder as the project file:
# Use in a folder containing a project file <project-name>.csproj or <project-name>.vbproj
nuget spec
Получившийся файл <project-name>.nuspec
содержит токены, которые заменяются во время создания пакета значениями их проекта, включая ссылки на другие пакеты, которые уже установлены.The resulting <project-name>.nuspec
file contains tokens that are replaced at packaging time with values from the project, including references to any other packages that have already been installed.
Токен отделяется символами $
с обеих сторон свойства проекта.A token is delimited by $
symbols on both sides of the project property. Например, значение <id>
в созданном таким образом манифесте, как правило, имеет следующий вид:For example, the <id>
value in a manifest generated in this way typically appears as follows:
<id>$id$</id>
Этот токен заменяется значением AssemblyName
из файла проекта во время упаковки.This token is replaced with the AssemblyName
value from the project file at packing time. Точные сведения о том, как значения из проекта сопоставляются с токенами .nuspec
, см. в справочнике по токенам замены.For the exact mapping of project values to .nuspec
tokens, see the Replacement Tokens reference.
Токены избавляют от необходимости изменять критически важные значения, такие как номер версии, в файле .nuspec
при обновлении пакета.Tokens relieve you from needing to update crucial values like the version number in the .nuspec
as you update the project. (При необходимости токены всегда можно заменить на конкретные значения.)(You can always replace the tokens with literal values, if desired).
Обратите внимание на то, что при работе с проектом Visual Studio доступно несколько дополнительных параметров создания пакета, которые описываются далее в подразделе Выполнение команды nuget pack для создания файла NUPKG.Note that there are several additional packaging options available when working from a Visual Studio project, as described in Running nuget pack to generate the .nupkg file later on.
Пакеты на уровне решенияSolution-level packages
Только в NuGet 2.x. Недоступно в NuGet 3.0 и более поздних версиях.NuGet 2.x only. Not available in NuGet 3.0+.
В NuGet 2.x поддерживалась концепция пакетов на уровне решения, которые устанавливают средства или дополнительные команды для консоли диспетчера команд (содержимое папки tools
), но не добавляют ссылки, содержимое или настройки сборки в проекты решения.NuGet 2.x supported the notion of a solution-level package that installs tools or additional commands for the Package Manager Console (the contents of the tools
folder), but does not add references, content, or build customizations to any projects in the solution. Такие пакеты не содержат файлов непосредственно в папках lib
, content
или build
, а их зависимости не содержат файлов в соответствующих папках lib
, content
или build
.Such packages contain no files in its direct lib
, content
, or build
folders, and none of its dependencies have files in their respective lib
, content
, or build
folders.
NuGet отслеживает установленные пакеты уровня решения в файле packages.config
в папке .nuget
, а не в файле packages.config
проекта.NuGet tracks installed solution-level packages in a packages.config
file in the .nuget
folder, rather than the project's packages.config
file.
Новый файл со значениями по умолчаниюNew file with default values
Следующая команда создает манифест по умолчанию с заполнителями, формируя надлежащую структуру файлов:The following command creates a default manifest with placeholders, which ensures you start with the proper file structure:
nuget spec [<package-name>]
Если не указать параметр <package-name>, получившийся файл будет иметь имя Package.nuspec
.If you omit <package-name>, the resulting file is Package.nuspec
. Если указать имя, например Contoso.Utility.UsefulStuff
, файл будет иметь имя Contoso.Utility.UsefulStuff.nuspec
.If you provide a name such as Contoso.Utility.UsefulStuff
, the file is Contoso.Utility.UsefulStuff.nuspec
.
Полученный файл .nuspec
содержит заполнители для значений, например projectUrl
.The resulting .nuspec
contains placeholders for values like the projectUrl
. Прежде чем использовать этот файл для создания итогового файла .nupkg
, его необходимо отредактировать.Be sure to edit the file before using it to create the final .nupkg
file.
Выбор уникального идентификатора пакета и задание номера версииChoosing a unique package identifier and setting the version number
Идентификатор пакета (элемент <id>
) и номер версии (элемент <version>
) — два самых важных значения в манифесте, так как они однозначно определяют код, содержащийся в пакете.The package identifier (<id>
element) and the version number (<version>
element) are the two most important values in the manifest because they uniquely identify the exact code that's contained in the package.
Рекомендации в отношении идентификатора пакетаBest practices for the package identifier:
- Уникальность. Идентификатор должен быть уникальным в пределах nuget.org или другой коллекции, в которой размещается пакет.Uniqueness: The identifier must be unique across nuget.org or whatever gallery hosts the package. Прежде чем задавать идентификатор, проверьте, не используется ли оно уже в соответствующей коллекции.Before deciding on an identifier, search the applicable gallery to check if the name is already in use. Во избежание конфликтов рекомендуется использовать в качестве первой части идентификатора название организации, например
Contoso.
.To avoid conflicts, a good pattern is to use your company name as the first part of the identifier, such asContoso.
. - Имена в стиле пространств имен. Используйте шаблон, по которому строятся имена пространств имен в .NET, используя нотацию с точками, а не с дефисами.Namespace-like names: Follow a pattern similar to namespaces in .NET, using dot notation instead of hyphens. Например, используйте идентификатор
Contoso.Utility.UsefulStuff
вместоContoso-Utility-UsefulStuff
илиContoso_Utility_UsefulStuff
.For example, useContoso.Utility.UsefulStuff
rather thanContoso-Utility-UsefulStuff
orContoso_Utility_UsefulStuff
. Пользователям также удобно, когда идентификатор пакета соответствует пространствам имен, используемым в коде.Consumers also find it helpful when the package identifier matches the namespaces used in the code. - Образцы пакетов. Если вы создаете пакет с образцом кода, демонстрирующим использование другого пакета, добавьте к идентификатору суффикс
.Sample
, напримерContoso.Utility.UsefulStuff.Sample
.Sample Packages: If you produce a package of sample code that demonstrates how to use another package, attach.Sample
as a suffix to the identifier, as inContoso.Utility.UsefulStuff.Sample
. (Образец пакета, конечно, должен иметь зависимость от другого пакета.) При создании образца пакета используйте описанный выше метод на основе рабочего каталога, соответствующего соглашениям.(The sample package would of course have a dependency on the other package.) When creating a sample package, use the convention-based working directory method described earlier. В папкеcontent
разместите код образца в папке с именем\Samples\<identifier>
, например\Samples\Contoso.Utility.UsefulStuff.Sample
.In thecontent
folder, arrange the sample code in a folder called\Samples\<identifier>
as in\Samples\Contoso.Utility.UsefulStuff.Sample
.
Рекомендации в отношении версии пакетаBest practices for the package version:
- Как правило, версия пакета должна соответствовать версии библиотеки, хотя это не строгое требование.In general, set the version of the package to match the library, though this is not strictly required. Это легко реализовать, если пакет ограничен единственной сборкой, как было описано выше в подразделе Выбор сборок для добавления в пакет.This is a simple matter when you limit a package to a single assembly, as described earlier in Deciding which assemblies to package. В целом помните, что при разрешении зависимостей диспетчер NuGet ориентируется на версии пакетов, а не на версии сборок.Overall, remember that NuGet itself deals with package versions when resolving dependencies, not assembly versions.
- При применении нестандартной схемы версий обязательно учитывайте правила управления версиями в NuGet, которые изложены в разделе Управление версиями пакета.When using a non-standard version scheme, be sure to consider the NuGet versioning rules as explained in Package versioning.
Разобраться в принципах управления версиями также может помочь следующая серия коротких записей блога:The following series of brief blog posts are also helpful to understand versioning:
Указание типа пакетаSetting a package type
В NuGet 3.5 и более поздних версиях пакету можно присвоить определенный тип пакета, указывающий на его предполагаемое назначение.With NuGet 3.5+, packages can be marked with a specific package type to indicate its intended use. Пакеты, которым не назначен тип, включая все пакеты, созданные в более ранних версиях NuGet, по умолчанию имеют тип Dependency
.Packages not marked with a type, including all packages created with earlier versions of NuGet, default to the Dependency
type.
Пакеты типа
Dependency
добавляют ресурсы времени сборки или времени выполнения в библиотеки и приложения, и их можно устанавливать в проектах любого типа (при условии, что они совместимы).Dependency
type packages add build- or run-time assets to libraries and applications, and can be installed in any project type (assuming they are compatible).Пакеты типа
DotnetCliTool
являются расширениями интерфейса командной строки .NET и вызываются из командной строки.DotnetCliTool
type packages are extensions to the .NET CLI and are invoked from the command line. Такие пакеты можно устанавливать только в проектах .NET Core, и они не влияют на операции восстановления.Such packages can be installed only in .NET Core projects and have no effect on restore operations. Дополнительные сведения об этих расширениях проекта можно найти в документации по расширяемости .NET Core.More details about these per-project extensions are available in the .NET Core extensibility documentation.Для пакетов пользовательского типа применяются произвольные идентификаторы, в которых соблюдаются те же правила формата, что и в идентификаторах пакетов.Custom type packages use an arbitrary type identifier that conforms to the same format rules as package IDs. Типы, отличные от
Dependency
иDotnetCliTool
, однако, не распознаются диспетчером пакетов NuGet в Visual Studio.Any type other thanDependency
andDotnetCliTool
, however, are not recognized by the NuGet Package Manager in Visual Studio.
Типы пакетов задаются в файле .nuspec
.Package types are set in the .nuspec
file. В целях обратной совместимости лучше не задавать тип Dependency
явным образом, позволив диспетчеру NuGet определить его автоматически, что происходит, если тип не указан.It's best for backwards compatibility to not explicitly set the Dependency
type and to instead rely on NuGet assuming this type when no type is specified.
.nuspec
: укажите тип пакета в узлеpackageTypes\packageType
элемента<metadata>
:.nuspec
: Indicate the package type within apackageTypes\packageType
node under the<metadata>
element:<?xml version="1.0" encoding="utf-8"?> <package xmlns="http://schemas.microsoft.com/packaging/2012/06/nuspec.xsd"> <metadata> <!-- ... --> <packageTypes> <packageType name="DotnetCliTool" /> </packageTypes> </metadata> </package>
Добавление файла сведений и других файловAdding a readme and other files
Чтобы явным образом указать файлы, которые следует включить в пакет, используйте узел <files>
в файле .nuspec
, который находится после тега <metadata>
:To directly specify files to include in the package, use the <files>
node in the .nuspec
file, which follows the <metadata>
tag:
<?xml version="1.0"?>
<package xmlns="http://schemas.microsoft.com/packaging/2013/05/nuspec.xsd">
<metadata>
<!-- ... -->
</metadata>
<files>
<!-- Add a readme -->
<file src="readme.txt" target="" />
<!-- Add files from an arbitrary folder that's not necessarily in the project -->
<file src="..\..\SomeRoot\**\*.*" target="" />
</files>
</package>
Совет
При использовании подхода на основе рабочего каталога, соответствующего соглашениям, файл readme.txt можно поместить в корневую папку пакета, а другое содержимое — в папку content
.When using the convention-based working directory approach, you can place the readme.txt in the package root and other content in the content
folder. Элементы <file>
в манифесте не требуются.No <file>
elements are necessary in the manifest.
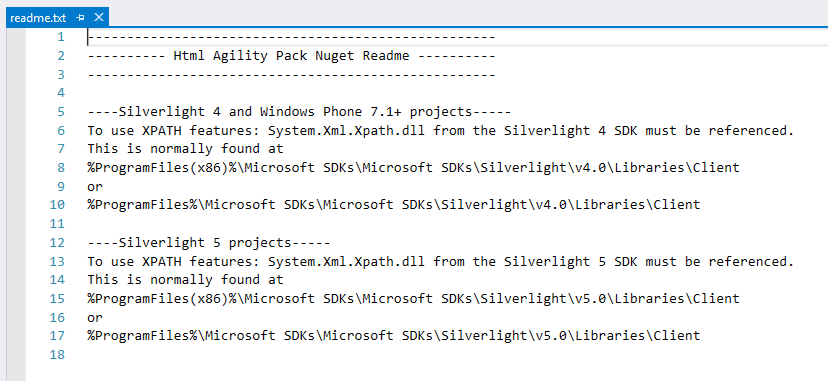
Если в корневую папку пакета добавлен файл с именем readme.txt
, Visual Studio отображает содержимое этого файла в виде обычного текста сразу после установки пакета напрямую.When you include a file named readme.txt
in the package root, Visual Studio displays the contents of that file as plain text immediately after installing the package directly. (Файлы сведений не отображаются для пакетов, устанавливаемых как зависимости.)(Readme files are not displayed for packages installed as dependencies). Например, вот как выглядит файл сведений для пакета HtmlAgilityPack:For example, here's how the readme for the HtmlAgilityPack package appears:
Примечание
Если узел <files>
в файле .nuspec
пуст, NuGet включает в пакет только содержимое из папки lib
.If you include an empty <files>
node in the .nuspec
file, NuGet doesn't include any other content in the package other than what's in the lib
folder.
Включение в пакет свойств и целевых объектов MSBuildIncluding MSBuild props and targets in a package
В некоторых случаях в проекты, использующие пакет, необходимо добавить пользовательские целевые объекты сборки или свойства, например, если во время сборки должно запускаться пользовательское средство или процесс.In some cases, you might want to add custom build targets or properties in projects that consume your package, such as running a custom tool or process during build. Для этого нужно поместить файлы в формате <package_id>.targets
или <package_id>.props
(например, Contoso.Utility.UsefulStuff.targets
) в папку \build
проекта.You do this by placing files in the form <package_id>.targets
or <package_id>.props
(such as Contoso.Utility.UsefulStuff.targets
) within the \build
folder of the project.
Файлы в корневой папке \build
считаются пригодными для всех целевых платформ.Files in the root \build
folder are considered suitable for all target frameworks. Чтобы предоставить файлы для определенных платформ, сначала поместите их в соответствующие вложенные папки, например следующие:To provide framework-specific files, first place them within appropriate subfolders, such as the following:
\build
\netstandard1.4
\Contoso.Utility.UsefulStuff.props
\Contoso.Utility.UsefulStuff.targets
\net462
\Contoso.Utility.UsefulStuff.props
\Contoso.Utility.UsefulStuff.targets
Затем в файле .nuspec
укажите ссылки на эти файлы в узле <files>
:Then in the .nuspec
file, be sure to refer to these files in the <files>
node:
<?xml version="1.0"?>
<package >
<metadata minClientVersion="2.5">
<!-- ... -->
</metadata>
<files>
<!-- Include everything in \build -->
<file src="build\**" target="build" />
<!-- Other files -->
<!-- ... -->
</files>
</package>
Включение свойств и целевых объектов MSBuild в пакет появилось в NuGet 2.5, поэтому рекомендуется добавить атрибут minClientVersion="2.5"
в элемент metadata
, чтобы указать минимальную версию клиента NuGet, необходимую для использования пакета.Including MSBuild props and targets in a package was introduced with NuGet 2.5, therefore it is recommended to add the minClientVersion="2.5"
attribute to the metadata
element, to indicate the minimum NuGet client version required to consume the package.
Когда NuGet устанавливает пакет с \build
файлом, он добавляет элементы MSBuild <Import>
в файл проекта, указывая на .targets
и .props
файла.When NuGet installs a package with \build
files, it adds MSBuild <Import>
elements in the project file pointing to the .targets
and .props
files. (Файлы .props
добавляются в начале файла проекта, а файлы .targets
— в конце.) Отдельный условный элемент MSBuild <Import>
добавляется в каждую требуемую версию .NET Framework.(.props
is added at the top of the project file; .targets
is added at the bottom.) A separate conditional MSBuild <Import>
element is added for each target framework.
Файлы MSBuild .props
и .targets
для трансграничного таргетинга можно поместить в папку \buildCrossTargeting
.MSBuild .props
and .targets
files for cross-framework targeting can be placed in the \buildCrossTargeting
folder. Во время установки пакета NuGet добавляет соответствующие элементы <Import>
в файл проекта с условием, что требуемую версию .NET Framework не задано (свойство MSBuild $(TargetFramework)
должно быть пустым).During package installation, NuGet adds the corresponding <Import>
elements to the project file with the condition, that the target framework is not set (the MSBuild property $(TargetFramework)
must be empty).
В NuGet 3.x целевые платформы не добавляются в проект, а предоставляются через файл project.lock.json
.With NuGet 3.x, targets are not added to the project but are instead made available through the project.lock.json
.
Разработка пакетов, содержащих сборки COM-взаимодействияAuthoring packages with COM interop assemblies
Пакеты, содержащие сборки COM-взаимодействия, должны включать в себя соответствующий файл целей, чтобы в проекты были добавлены правильные метаданные EmbedInteropTypes
в формате PackageReference.Packages that contain COM interop assemblies must include an appropriate targets file so that the correct EmbedInteropTypes
metadata is added to projects using the PackageReference format. По умолчанию метаданные EmbedInteropTypes
всегда имеют значение false для всех сборок при использовании PackageReference, поэтому файл целей добавляет эти метаданные явным образом.By default, the EmbedInteropTypes
metadata is always false for all assemblies when PackageReference is used, so the targets file adds this metadata explicitly. Во избежание конфликтов имя цели должно быть уникальным. В идеале следует использовать сочетание имен пакета и внедряемой сборки, заменив им элемент {InteropAssemblyName}
в приведенном ниже примере.To avoid conflicts, the target name should be unique; ideally, use a combination of your package name and the assembly being embedded, replacing the {InteropAssemblyName}
in the example below with that value. (Пример см. также на странице NuGet.Samples.Interop.)(Also see NuGet.Samples.Interop for an example.)
<Target Name="Embedding**AssemblyName**From**PackageId**" AfterTargets="ResolveReferences" BeforeTargets="FindReferenceAssembliesForReferences">
<ItemGroup>
<ReferencePath Condition=" '%(FileName)' == '{InteropAssemblyName}' AND '%(ReferencePath.NuGetPackageId)' == '$(MSBuildThisFileName)' ">
<EmbedInteropTypes>true</EmbedInteropTypes>
</ReferencePath>
</ItemGroup>
</Target>
Имейте в виду, что при использовании формата управления packages.config
добавление ссылок на сборки из пакетов приводит к тому, что NuGet и Visual Studio проверяют наличие сборок COM-взаимодействия и присваивают свойству EmbedInteropTypes
в файле проекта значение true.Note that when using the packages.config
management format, adding references to the assemblies from the packages causes NuGet and Visual Studio to check for COM interop assemblies and set the EmbedInteropTypes
to true in the project file. В этом случае цели переопределяются.In this case the targets are overriden.
Кроме того, по умолчанию ресурсы сборки не передаются транзитивно.Additionally, by default the build assets do not flow transitively. Пакеты, созданные описанным здесь способом, работают иначе, если они извлекаются в качестве транзитивной зависимости из проекта в ссылку на проект.Packages authored as described here work differently when they are pulled as a transitive dependency from a project to project reference. Пользователь пакета может разрешить их передачу, изменив значение PrivateAssets по умолчанию так, чтобы сборка не включалась.The package consumer can allow them to flow by modifying the PrivateAssets default value to not include build.
Выполнение команды nuget pack для создания файла NUPKGRunning nuget pack to generate the .nupkg file
Чтобы создать пакет на основе сборки или рабочего каталога, соответствующего соглашениям, выполните команду nuget pack
, указав файл .nuspec
, где <project-name>
необходимо заменить на имя файла:When using an assembly or the convention-based working directory, create a package by running nuget pack
with your .nuspec
file, replacing <project-name>
with your specific filename:
nuget pack <project-name>.nuspec
При использовании проекта Visual Studio выполните команду nuget pack
, указав файл проекта. В результате автоматически загрузится файл .nuspec
проекта, и все токены в нем будут заменены значениями из файла проекта.When using a Visual Studio project, run nuget pack
with your project file, which automatically loads the project's .nuspec
file and replaces any tokens within it using values in the project file:
nuget pack <project-name>.csproj
Примечание
Использование файла проекта напрямую является необходимым для замены токенов, так как проект является источником значений токенов.Using the project file directly is necessary for token replacement because the project is the source of the token values. Замена токенов не производится при использовании команды nuget pack
с файлом .nuspec
.Token replacement does not happen if you use nuget pack
with a .nuspec
file.
В любом случае команда nuget pack
исключает папки, начинающиеся с точки, например .git
или .hg
.In all cases, nuget pack
excludes folders that start with a period, such as .git
or .hg
.
NuGet указывает, есть ли в файле .nuspec
ошибки, требующие исправления, например, если вы забыли изменить значения-заполнители в манифесте.NuGet indicates if there are any errors in the .nuspec
file that need correcting, such as forgetting to change placeholder values in the manifest.
После успешного выполнения команды nuget pack
вы получаете файл .nupkg
, который можно опубликовать в подходящей коллекции, как описано в разделе Публикация пакета.Once nuget pack
succeeds, you have a .nupkg
file that you can publish to a suitable gallery as described in Publishing a Package.
Совет
После создания пакета его полезно просмотреть, открыв в средстве Обозреватель пакетов.A helpful way to examine a package after creating it is to open it in the Package Explorer tool. В нем в графической форме представлено содержимое пакета и его манифест.This gives you a graphical view of the package contents and its manifest. Вы также можете переименовать полученный файл .nupkg
в файл .zip
и просмотреть его содержимое напрямую.You can also rename the resulting .nupkg
file to a .zip
file and explore its contents directly.
Дополнительные параметрыAdditional options
С командой nuget pack
можно использовать различные параметры командной строки для исключения файлов, переопределения номера версии в манифесте, изменения папки выходных данных и совершения других действий.You can use various command-line switches with nuget pack
to exclude files, override the version number in the manifest, and change the output folder, among other features. Полный список параметров см. в справочнике по команде pack.For a complete list, refer to the pack command reference.
Ниже приводятся некоторые часто используемые с проектами Visual Studio параметры.The following options are a few that are common with Visual Studio projects:
Проекты, на которые указывают ссылки. Если проект ссылается на другие проекты, вы можете включить их в пакет или добавить в качестве зависимостей с помощью параметра
-IncludeReferencedProjects
:Referenced projects: If the project references other projects, you can add the referenced projects as part of the package, or as dependencies, by using the-IncludeReferencedProjects
option:nuget pack MyProject.csproj -IncludeReferencedProjects
Включение является рекурсивным, поэтому если
MyProject.csproj
ссылается на проекты B и C, а они ссылаются на проекты D, E и F, в пакет включаются файлы из проектов B, C, D, E и F.This inclusion process is recursive, so ifMyProject.csproj
references projects B and C, and those projects reference D, E, and F, then files from B, C, D, E, and F are included in the package.Если в проекте, на который указывает ссылка, есть собственный файл
.nuspec
, NuGet вместо этого добавляет проект как зависимость.If a referenced project includes a.nuspec
file of its own, then NuGet adds that referenced project as a dependency instead. Такой проект необходимо упаковать и опубликовать отдельно.You need to package and publish that project separately.Конфигурация сборки. По умолчанию NuGet использует стандартную конфигурацию сборки, указанную в файле проекта. Обычно это конфигурация Debug.Build configuration: By default, NuGet uses the default build configuration set in the project file, typically Debug. Чтобы упаковать файлы из другой конфигурации сборки, например Release, используйте параметр
-properties
, указав конфигурацию:To pack files from a different build configuration, such as Release, use the-properties
option with the configuration:nuget pack MyProject.csproj -properties Configuration=Release
Символы. Чтобы включить символы, позволяющие пользователям осуществлять пошаговое выполнение кода в пакете, используйте параметр
-Symbols
:Symbols: to include symbols that allow consumers to step through your package code in the debugger, use the-Symbols
option:nuget pack MyProject.csproj -symbols
Тестирование установки пакетаTesting package installation
Перед публикацией пакета, как правило, необходимо протестировать процесс его установки в проекте.Before publishing a package, you typically want to test the process of installing a package into a project. Это позволяет убедиться в том, что все необходимые файлы помещаются в нужные места.The tests make sure that the necessarily files all end up in their correct places in the project.
Установку можно протестировать вручную в Visual Studio или в командной строке, выполнив стандартную процедуру установки пакета.You can test installations manually in Visual Studio or on the command line using the normal package installation steps.
Для автоматического тестирования выполните указанные ниже основные действия.For automated testing, the basic process is as follows:
- Скопируйте файл
.nupkg
в локальную папку.Copy the.nupkg
file to a local folder. - Добавьте эту папку в источники пакета с помощью команды
nuget sources add -name <name> -source <path>
(см. описание команды nuget sources).Add the folder to your package sources using thenuget sources add -name <name> -source <path>
command (see nuget sources). Обратите внимание на то, что на каждом компьютере этот локальный источник необходимо задать только один раз.Note that you need only set this local source once on any given computer. - Установите пакет из источника с помощью команды
nuget install <packageID> -source <name>
, где<name>
соответствует имени источника, предоставленному командеnuget sources
.Install the package from that source usingnuget install <packageID> -source <name>
where<name>
matches the name of your source as given tonuget sources
. Указание источника позволяет гарантировать, что пакет будет устанавливаться только из него.Specifying the source ensures that the package is installed from that source alone. - В файловой системе проверьте, правильно ли установились файлы.Examine your file system to check that files are installed correctly.
Следующие шагиNext Steps
Создав пакет, то есть файл .nupkg
, вы можете опубликовать его в любой коллекции на ваш выбор, как описано в разделе Публикация пакета.Once you've created a package, which is a .nupkg
file, you can publish it to the gallery of your choice as described on Publishing a Package.
Вы также можете расширить возможности пакета или обеспечить поддержку других сценариев, как описано в следующих разделах:You might also want to extend the capabilities of your package or otherwise support other scenarios as described in the following topics:
- Управление версиями пакетаPackage versioning
- Поддержка нескольких целевых платформSupporting multiple target frameworks
- Преобразования исходных файлов и файлов конфигурацииTransformations of source and configuration files
- ЛокализацияLocalization
- Предварительные версииPre-release versions
Наконец, существуют дополнительные типы пакетов, о которых нужно знать:Finally, there are additional package types to be aware of:
Обратная связь
Мы бы хотели узнать ваше мнение. Укажите, о чем вы хотите рассказать нам.
Наша система обратной связи основана на принципах работы с вопросами на GitHub. Дополнительные сведения см. в нашем блоге.
Загрузка отзыва...