Meeting exclusion rule walkthroughs
Important
This article is for the legacy Workplace Analytics app and does not reflect functionality available on the updated Viva Insights platform. Access current documentation for Viva Insights advanced insights here: advanced insights documentation.
As an analyst, you can work with meeting exclusion rules in the following ways:
- View existing meeting exclusion rules - Get acquainted with the default rule and with the rules that you or others have published.
- Create new meeting exclusion rules - Define up to five individual meeting exclusions and then publish them together as one meeting exclusion rule.
- Edit a draft rule - You can edit a saved draft of an exclusion rule before publishing it.
- Select a rule for use - Select a rule to apply to data in Explore the stats or in Query designer.
- Archive a rule - You can archive a rule for later reference.
Owners – Viva Insights Analysts have full access to this page and limited Analysts have read-only access. For details, see Assign roles to admins and analysts.
For more information
Tools and concepts has more information about screen areas, the on-screen tools, and ideas to help you work with meeting exclusion rules. It contains the following sections:
Progress summaries show your progress, including which step you are on and the effects of the current and completed meeting exclusion steps.
Customization working area describes the on-screen tools that you can use to define effective meeting exclusions, including the following:
- Word cloud consists of keywords taken from subject lines of meetings, which helps you understand what customizations you might want to make to your exclusion.
- Keyword search is used to find a particular keyword that might be used in meeting subject lines.
- Phrase table shows you the context in which keywords are found. Knowing this context helps you decide whether to retain or exclude the keyword and its associated meetings.
Multiple meeting exclusion rules can exist simultaneously. To learn how they are applied in Viva Insights, see Application of meeting exclusion rules. For a high-level overview of meeting exclusion rules, see Meeting exclusion rules introduction.
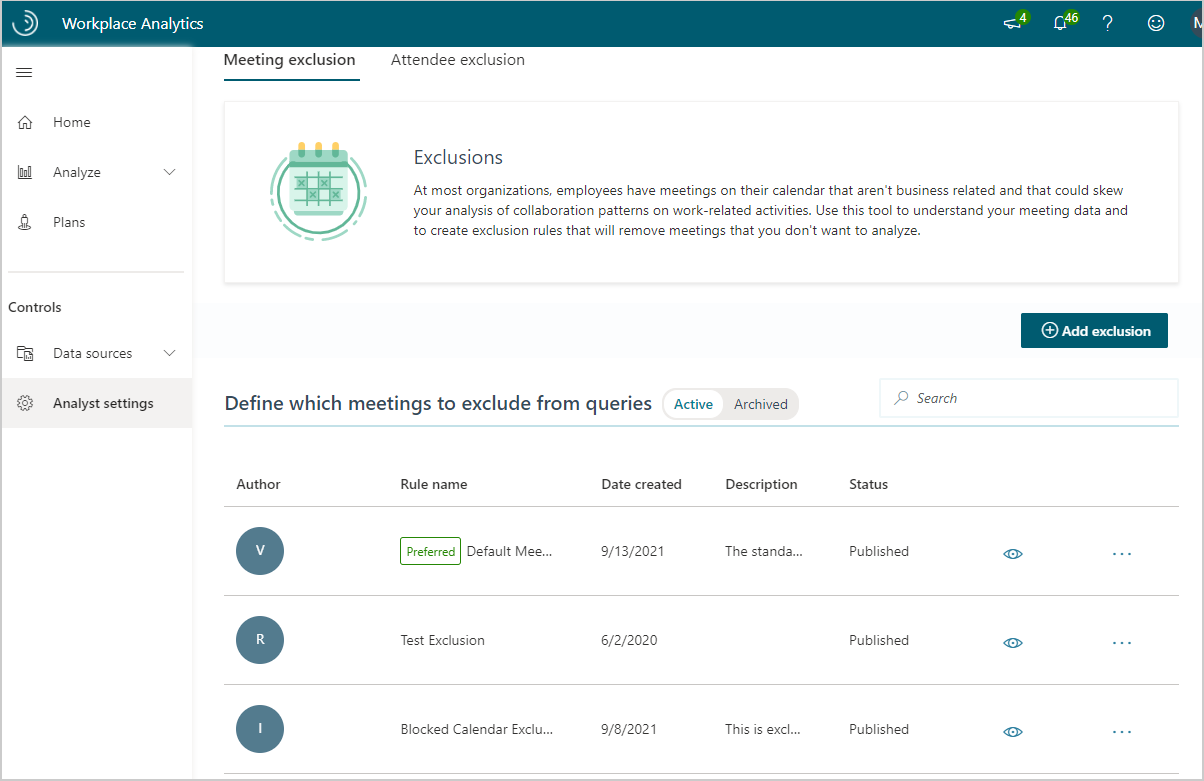
To view meeting exclusion rules
You can view existing meeting exclusion rules or create new ones in Analyst settings. Meeting exclusions shows all the rules that you or other analysts have created and published, and rules that people have started to define and then saved in draft form.
Open Viva Insights. (If that link doesn't work, try this link instead.) If prompted, enter your work credentials.
In Analyst settings > Meeting exclusions, select Active to list the active rules, which includes the following:
- Rules in the Published state are available for use. See Select which rule to use.
- Rules in the Draft state are in development. An analyst can edit a draft rule and then publish it. See Edit a draft rule.
List order of rules
Active rules are listed in the following order:
- The preferred rule - The "preferred" rule will be at the top of the list. See Select which rule to use. When you first start using Viva Insights, this is the Default meeting exclusion rule.
- Favorite rules - You can select a rule as a favorite. This moves it to the top of the list after the preferred rule, among other rules marked as favorites.
- Other rules - Rules that are not the preferred rule and that have not been marked as favorites are listed after the favorites.
Create a meeting exclusion rule
A meeting exclusion rule is a filter applied to your meeting data.
Defining what kind of meeting exclusion to use is part of the data-preparation work that you, as an analyst, must do before you start working with Viva Insights data. You can create these rules only after you've uploaded your organizational data.
When you start a new meeting exclusion rule and before you have added any exclusions to it, the set of meetings to be analyzed includes 100 percent of the meetings that were found in the Outlook mailboxes of licensed employees who use Microsoft 365. As you add filter terms, or exclusions, to this exclusion rule, you gradually reduce the number of meetings and meeting hours that will be used in metrics calculations while performing analysis in Viva Insights.
Walkthrough how to add a meeting exclusion rule
Viva Insights steps you through the creation of a customized meeting exclusion rule. The meeting exclusion flow, which is described in the second task that follows, contains five steps, one for each meeting type that is commonly excluded from analysis.
To start a meeting exclusion rule
In this task, you open the meeting exclusions page and name the rule that you will create.
Open Viva Insights. (If that link doesn't work, try this link instead.) If prompted, enter your organization credentials.
In Analyst settings, select Add exclusion rule.
In New exclusion, select either Meeting exclusion or Attendee exclusion:

For information about choosing between Meeting exclusion and Attendee exclusion, see Select exclusion type.
If you selected Attendee exclusion, choose the types of invitees whose data you want to exclude from analysis, including those who did not respond to meeting invitations, those who responded as Tentative to meeting invitations, or both types of invitees:
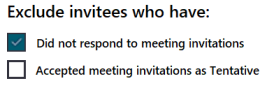
After you select one or both of these options, you'll see the number of invitees who will be excluded from analysis.
For more information, see Attendee exclusions.
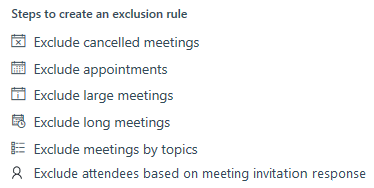
In New exclusion, you'll see the types of meetings that are commonly excluded from analysis. The following steps enable you to customize each of these exclusions.
You can choose to use the system-suggested exclusion for each step or customize the exclusion by retaining or excluding additional meetings. If you don't want to use a suggested exclusion, you can always choose not to apply it. After you have customized exclusions for each of the five steps, you can make edits to your exclusion rule before publishing it for future use.
Note
The first five steps in this list are for excluding data about meetings based on the type of meeting. In the sixth step on the list, you exclude data about attendees, based on the response they gave to the meeting invitation. For more information, see Select exclusion type.
Enter a name and optionally a description for the exclusion rule, select Next, and then do the following steps to create a meeting exclusion rule.
Note
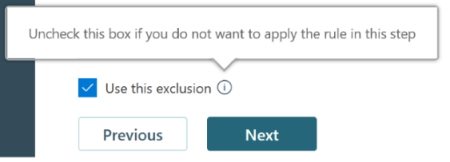
You can skip adding the exclusion by clearing the Use this exclusion checkbox before you select Next:
To create a meeting exclusion rule
Now that you've created a framework for your new rule, use the following steps to add and optionally, customize individual exclusions.
Caution
While authoring an exclusion rule (at any time before you select Publish), do not close your browser. Any work you've done to create a rule will be lost if you close the browser.
Note
While defining exclusions in the following steps, you can save the exclusion rule as a draft at any time. (To do this, select Save as draft in the lower right.) After you have save a draft of a rule, you can continue to define the rule or you can safely close your browser. For more information about editing a rule that you have saved, see Edit a draft rule.
Exclude cancelled meetings - The first step is to exclude meetings that have been cancelled. For this step, you cannot change the default filter. To add this exclusion to your rule, select Next.
Exclude small meetings - Just as for cancelled meetings, you cannot change the default filter for this exclusion. However, you can change the way it is applied by specifying exceptions to the exclusion. You do this with the following on-screen tools: Word cloud, Keyword search, and Phrase table.
Optionally, select words from the word cloud, inspect their impact in the Phrases that contain the selected keyword table, and designate one or more as exceptions to this exclusion. You can search for additional keywords or phrases that are not present in your word cloud by typing them in the search box above the phrase table. For more information, see Make an exception to an exclusion.
When you have finished making exceptions to the small-meetings exclusion and you are ready to add the exclusion to the rule, select Next. In the page for excluding large meetings, notice that the values near the top of the page for Attendee meeting hours and Number of meetings have decreased as a result of the exclusions that were applied in the preceding steps.
Exclude large meetings - This exclusion differs from the first two in that you can change the value in the "Exclude meetings where" filter from the default value of 250 attendees.
Important
In certain cases, the meeting exclusion for large meetings has limitations. For details, see Meeting exclusion rules: Large-meeting limitation.
(Optional) Select words from the word cloud, inspect their impact in the Phrases that contain the selected keyword table, and designate one or more as exceptions to this exclusion. You can search for additional keywords or phrases that are not present in your word cloud by typing them in the search box above the phrase table. For more information, see Make an exception to an exclusion.
Note
If you change the default filter value after you designate exceptions, the exceptions will be lost.
When you have finished making exceptions, select Next.
Exclude long meetings - To exclude meetings by duration, under Exclude meetings where, specify the maximum length of meetings that you want your analysis to include. The default value is 8 hours.
(Optional) Select words from the word cloud, inspect their impact in the Phrases that contain the selected keyword table, and designate one or more as exceptions to this exclusion. You can search for additional keywords or phrases that are not present in your word cloud by typing them in the search box above the phrase table. For more information, see Make an exception to an exclusion.
Note
If you change the default filter value after you designate exceptions, the exceptions will be lost.
When you have finished making exceptions, select Next.
Exclude meetings by topic - Use the subject lines of meetings to identify and exclude meetings that are not work related. The left side of the page lists several categories of common keywords, grouped by topic, that you can select to exclude.
Viva Insights also preselects some topics for you. For example, in the following illustration, Administrative, Medical, and Out of Office are selected for exclusion:
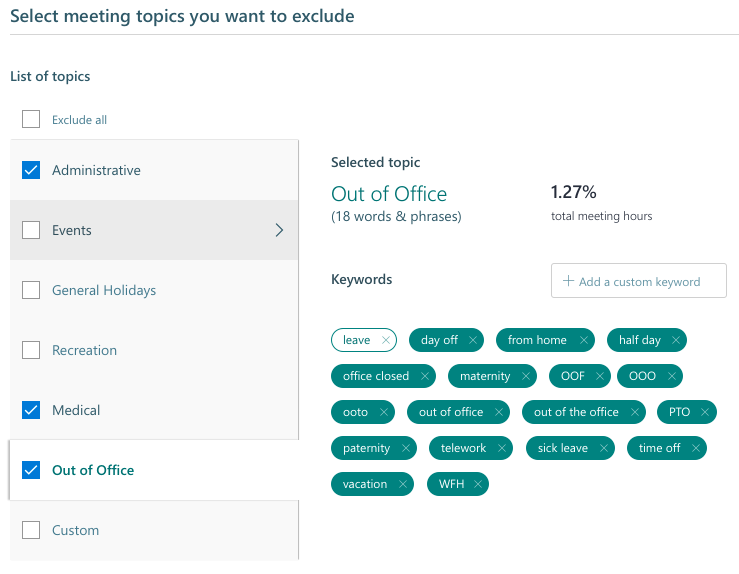
Each topic that is listed under List of topics is also a tab. Select a tab to see keywords and phrases that relate to the topic. For example, Out of Office includes the phrase "day off." These related keywords are excluded from analysis. Select the 'X next to a keyword to remove it from this list. This exempts the keyword from exclusion; in other words, meetings whose subject line contains that keyword are removed from the exclusion and, therefore, available for analysis.
You might know of a specific word or phrase that you want to exclude from analysis; that is, to add to this exclusion. If it is not listed under Keywords, search for it by typing it in the Add a custom keyword field. For more information, see Keyword search.
This meetings-by-topic page also offers the Phrases that contain the selected keyword table and the functionality as described in the step to exclude small meetings.
Select Next. Viva Insights now calculates your new meeting exclusion rule. This might take a few minutes.
After the calculation finishes, as on each of the preceding steps, the cumulative summary shows the effect of all the exclusions in your new rule -- in particular, the percentages of original meeting hours and of meetings that are retained for analysis:
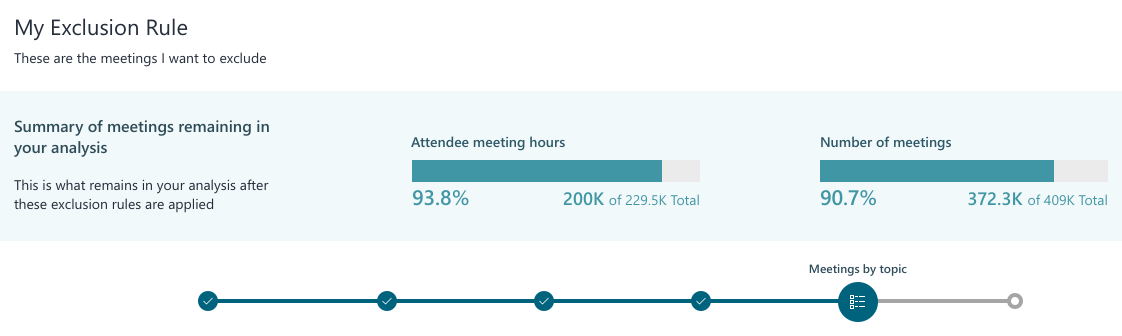
The following summary lists which exclusions were applied, which ones were not applied, and the effects that each exclusion has. It also shows the individual impact of each rule, so the total will likely not add up to 100%:

Review and edit the rule - Confirm the list of exclusions retains the meetings that you want to keep and excludes the ones that you don't want in your analysis. If you want to change the settings of an exclusion, select the Edit (pencil) icon to re-open and edit it. For example, you could re-open the long-meetings exclusion to change the threshold from 8 hours to 6.
Important
When editing an exclusion, if you change the default filter value after you designate exceptions, the exceptions will be lost.
Publish or save the rule - After you have finished editing, select Update. Viva Insights re-calculates the meeting-exclusion rule. After it finishes, if you have no more edits, scroll to the bottom of the summary page and select Publish. If you want to return later to make more edits, do not select Publish; rather, select Save as draft.
Important
- Your exclusion rule is not saved by default. It is saved only when you select Publish or Save as draft.
- After you select Publish, you can no longer edit the exclusion rule.
After Viva Insights publishes your new rule, it shows a read-only summary of the rule's exclusions. After you save a rule as a draft, you can select Edit to view an editable summary of the rule. See Edit a draft rule for details.
Edit a draft rule
You might have started to define a rule and then saved it as a draft. Now, you’d like to work on it more, and possibly complete it.
- In Analyst settings, select Active.
- In the table of meeting exclusion rules, find the draft rule that you want to edit Draft rules are labeled as such in the State column.
- Select the Edit (pencil) icon in that rule’s row to see a summary list of existing exclusions.
- To edit an exclusion, select Edit, identify exceptions, and then select Update. The summary of exclusions is updated to reflect the change you made.
- Continue editing individual exclusions. When you are finished, select Save as draft to save the rule as unfinished, or select Publish to finalize the rule, which makes it ready for use.
Select which rule to use
When you first start using Viva Insights, data in Explore the stats and Plans use the predefined, default meeting exclusion rule. However, you can change this to a different "preferred" rule, as described in the following steps.
To learn how to select a rule to use in a query, see Use rules with queries.
Select the preferred rule
In Analyst settings, select Active.
In the table of meeting exclusion rules, find the rule that you want to use in Explore the stats, Plans, and Query designer.
In the row for that rule, select the More options (ellipsis) icon to show the available actions:
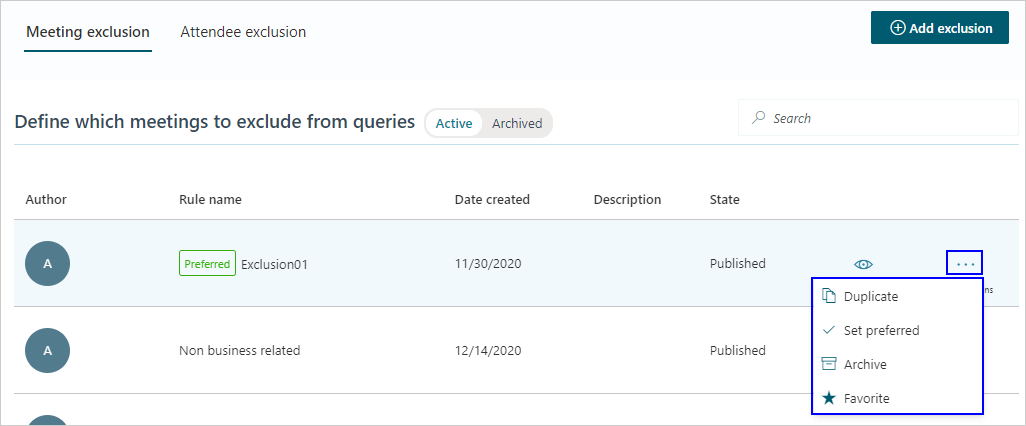
Select Set preferred. When prompted, select Set preferred again to confirm.
Note
If you select a new rule, the change won't take effect until after the next refresh of your organization's Microsoft 365 data. The reason for this delay is that meeting exclusion rules are applied to data before it's processed; after the data is uploaded and processed, rules can no longer be applied to it. Microsoft 365 data is typically refreshed weekly, so it might take up to two weeks to see your rule in place, depending on when you changed the preferred rule.
Use rules with queries
You can apply a meeting exclusion rule to a query while you create the query in Viva Insights. Each query can use a different meeting exclusion rule.
Note
When you set a preferred rule on the Meeting exclusions page, it will be the default rule when you create and run queries.
To apply a rule to a query
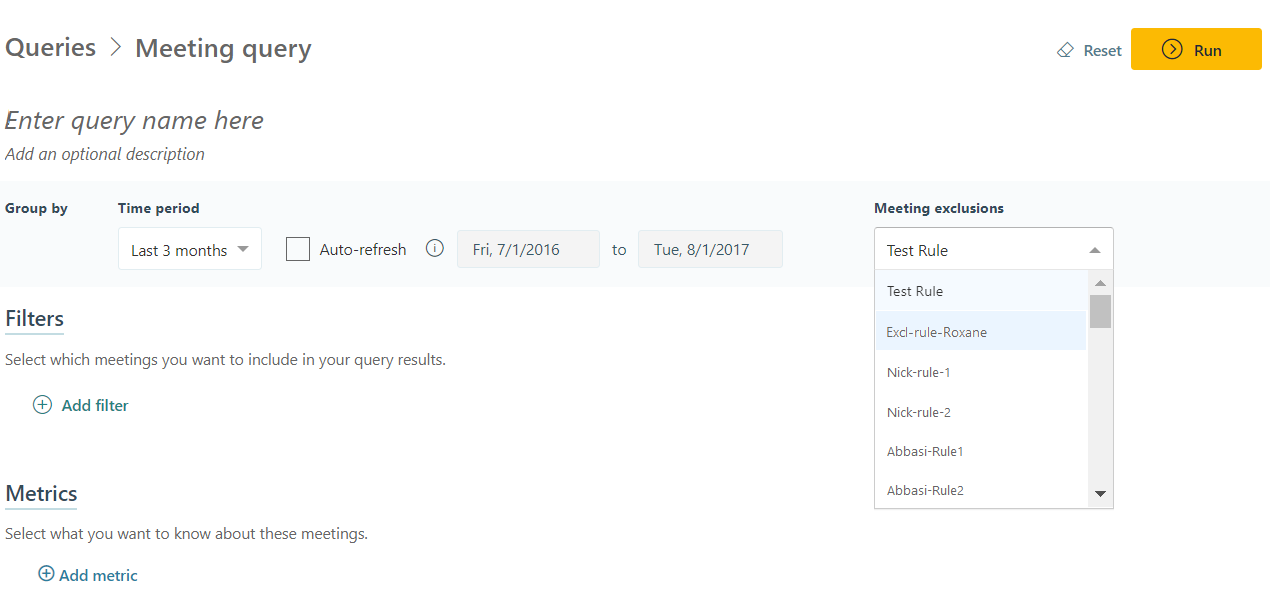
In Viva Insights, select Analyze > Query designer.
After you select the type of query that you want to create, select the rule for this query in Meeting exclusions, as shown in the following example:
Duplicate a rule
You can make an exact copy of any active rule. You can duplicate both published rules and draft rules. The copy you create is editable.
In Analyst settings, select Active.
In the table of meeting exclusion rules, find the rule that you want to duplicate. This can be a published rule or a draft rule.
In that rule’s row, select the More options (ellipsis) icon, and then select Duplicate. A copy of the rule is created, given the name “Copy of <original rule name>”, and then opened for editing.
You can now edit the rule’s exclusions, description, and name.
Select Publish to publish the rule for use or Save as draft to save an editable copy.
Archive a rule
You might have built and used a rule in a past project that you no longer use. However, you might want to keep it for later reference. In this case, you can archive it.
In Analyst settings, select Active.
In the table of meeting exclusion rules, find the rule that you want to archive. Note that you can archive only published rules.
In that rule’s row, select the More options (ellipsis) icon, and then select Archive. The rule will be moved to the list of archived rules, which you can see by selecting Archived.