View and remediate findings from vulnerability assessment solutions on your VMs
Caution
This article references CentOS, a Linux distribution that is nearing End Of Life (EOL) status. Please consider your use and planning accordingly. For more information, see the CentOS End Of Life guidance.
When your vulnerability assessment tool reports vulnerabilities to Defender for Cloud, Defender for Cloud presents the findings and related information as recommendations. In addition, the findings include related information such as remediation steps, relevant common vulnerabilities and exposures (CVEs), CVSS scores, and more. You can view the identified vulnerabilities for one or more subscriptions, or for a specific VM.
View findings from the scans of your virtual machines
To view vulnerability assessment findings (from all of your configured scanners) and remediate identified vulnerabilities:
From Defender for Cloud's menu, open the Recommendations page.
Select the recommendation Machines should have vulnerability findings resolved.
Defender for Cloud shows you all the findings for all VMs in the currently selected subscriptions. The findings are ordered by severity.
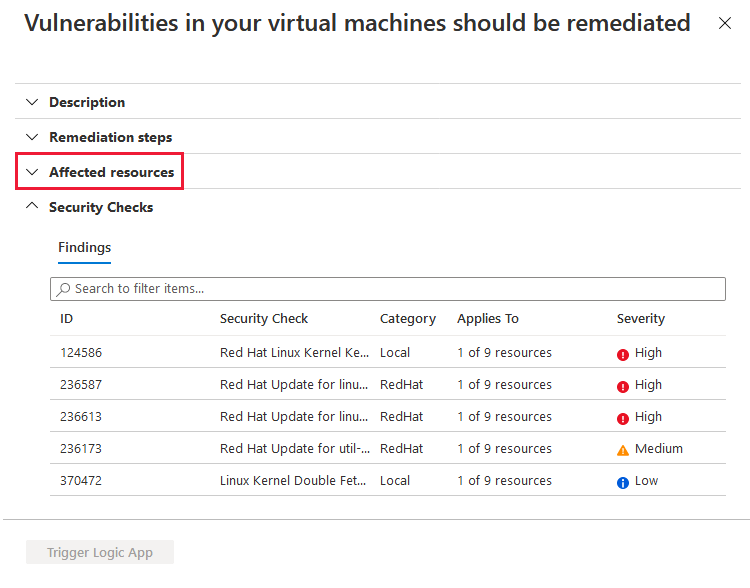
To filter the findings by a specific VM, open the "Affected resources" section and select the VM that interests you. Or you can select a VM from the resource health view, and view all relevant recommendations for that resource.
Defender for Cloud shows the findings for that VM, ordered by severity.
To learn more about a specific vulnerability, select it.
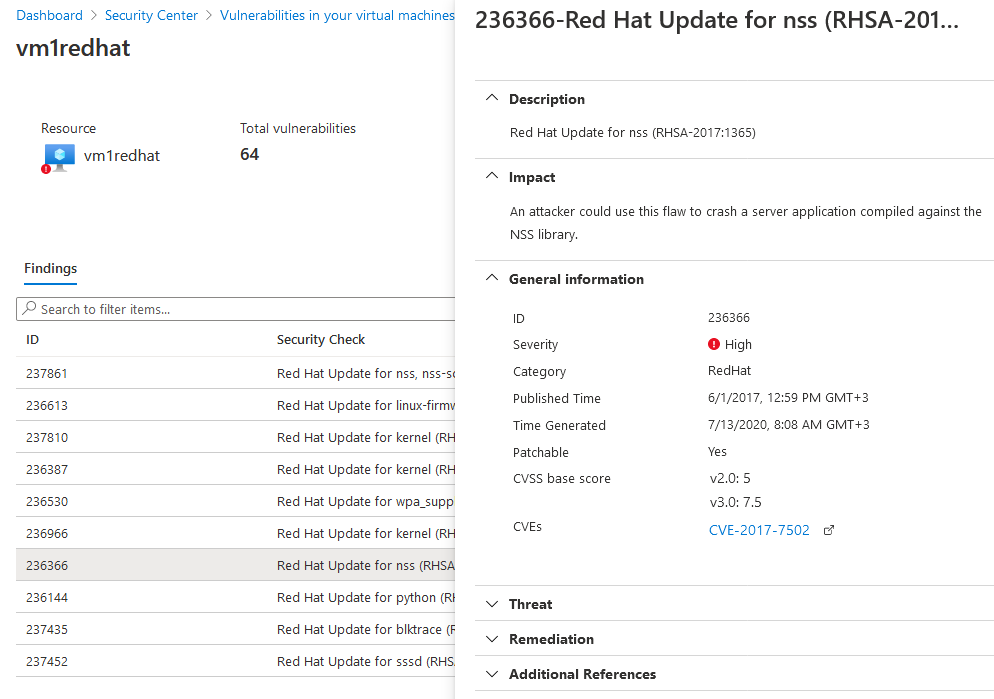
The details pane that appears contains extensive information about the vulnerability, including:
- Links to all relevant CVEs (where available)
- Remediation steps
- Any more reference pages
To remediate a finding, follow the remediation steps from this details pane.


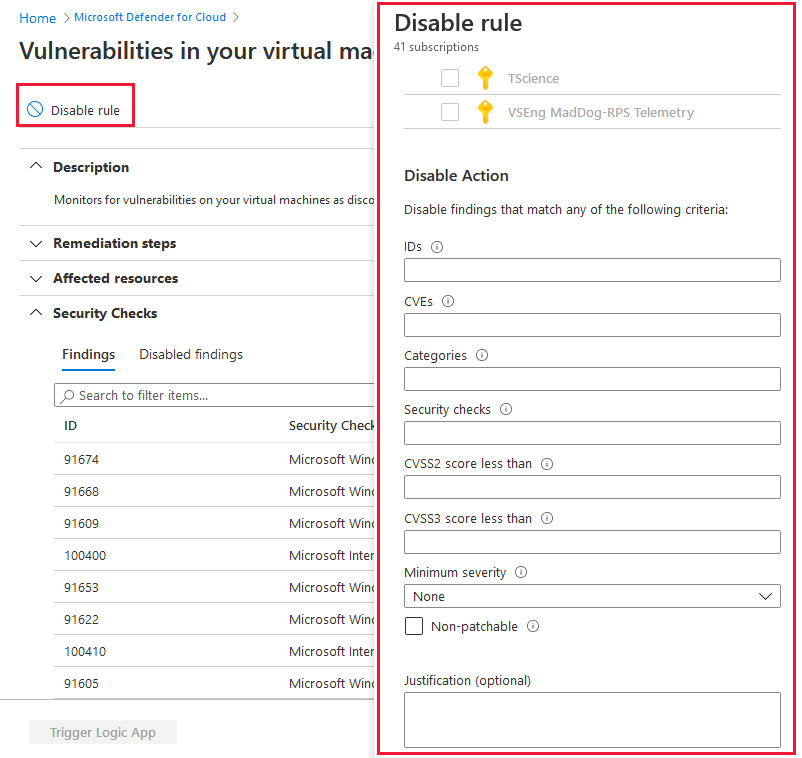
Disable specific findings
If you have an organizational need to ignore a finding, rather than remediate it, you can optionally disable it. Disabled findings don't affect your secure score or generate unwanted noise.
When a finding matches the criteria you defined in your disable rules, it doesn't appear in the list of findings. Typical scenarios include:
- Disable findings with severity less than medium
- Disable findings that are non-patchable
- Disable findings with CVSS score less than 6.5
- Disable findings with specific text in the security check or category (for example, “RedHat”, “CentOS Security Update for sudo”)
Important
To create a rule, you need permissions to edit a policy in Azure Policy. Learn more in Azure RBAC permissions in Azure Policy.
To create a rule:
From the recommendations detail page for Machines should have vulnerability findings resolved, select Disable rule.
Select the relevant scope.
Define your criteria. You can use any of the following criteria:
- Finding ID
- Category
- Security check
- CVSS scores (v2, v3)
- Severity
- Patchable status
Select Apply rule.
Important
Changes might take up to 24 hours to take effect.
To view, override, or delete a rule:
Select Disable rule.
From the scope list, subscriptions with active rules show as Rule applied.
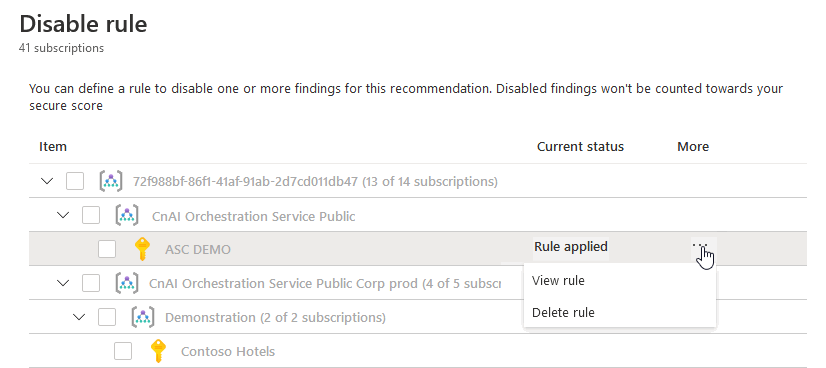
To view or delete the rule, select the ellipsis menu ("...").


Export the results
To export vulnerability assessment results, you need to use Azure Resource Graph (ARG). This tool provides instant access to resource information across your cloud environments with robust filtering, grouping, and sorting capabilities. It's a quick and efficient way to query information across Azure subscriptions programmatically or from within the Azure portal.
For full instructions and a sample ARG query, see the following Tech Community post: Exporting vulnerability assessment results in Microsoft Defender for Cloud.
Next steps
This article described the Microsoft Defender for Cloud vulnerability assessment extension (powered by Qualys) for scanning your VMs. For related material, see the following articles:
Pripomienky
Pripravujeme: V priebehu roka 2024 postupne zrušíme službu Problémy v službe GitHub ako mechanizmus pripomienok týkajúcich sa obsahu a nahradíme ju novým systémom pripomienok. Ďalšie informácie nájdete na stránke: https://aka.ms/ContentUserFeedback.
Odoslať a zobraziť pripomienky pre