Assign Microsoft Entra roles in Privileged Identity Management
With Microsoft Entra ID, a Global administrator can make permanent Microsoft Entra admin role assignments. These role assignments can be created using the Microsoft Entra admin center or using PowerShell commands.
The Microsoft Entra Privileged Identity Management (PIM) service also allows Privileged role administrators to make permanent admin role assignments. Additionally, Privileged role administrators can make users eligible for Microsoft Entra admin roles. An eligible administrator can activate the role when they need it, and then their permissions expire once they're done.
Privileged Identity Management support both built-in and custom Microsoft Entra roles. For more information on Microsoft Entra custom roles, see Role-based access control in Microsoft Entra ID.
Note
When a role is assigned, the assignment:
- Can't be assigned for a duration of less than five minutes
- Can't be removed within five minutes of it being assigned
Assign a role
Follow these steps to make a user eligible for a Microsoft Entra admin role.
Sign in to the Microsoft Entra admin center as at least a Privileged Role Administrator.
Browse to Identity governance > Privileged Identity Management > Microsoft Entra roles.
Select Roles to see the list of roles for Microsoft Entra permissions.

Select Add assignments to open the Add assignments page.
Select Select a role to open the Select a role page.
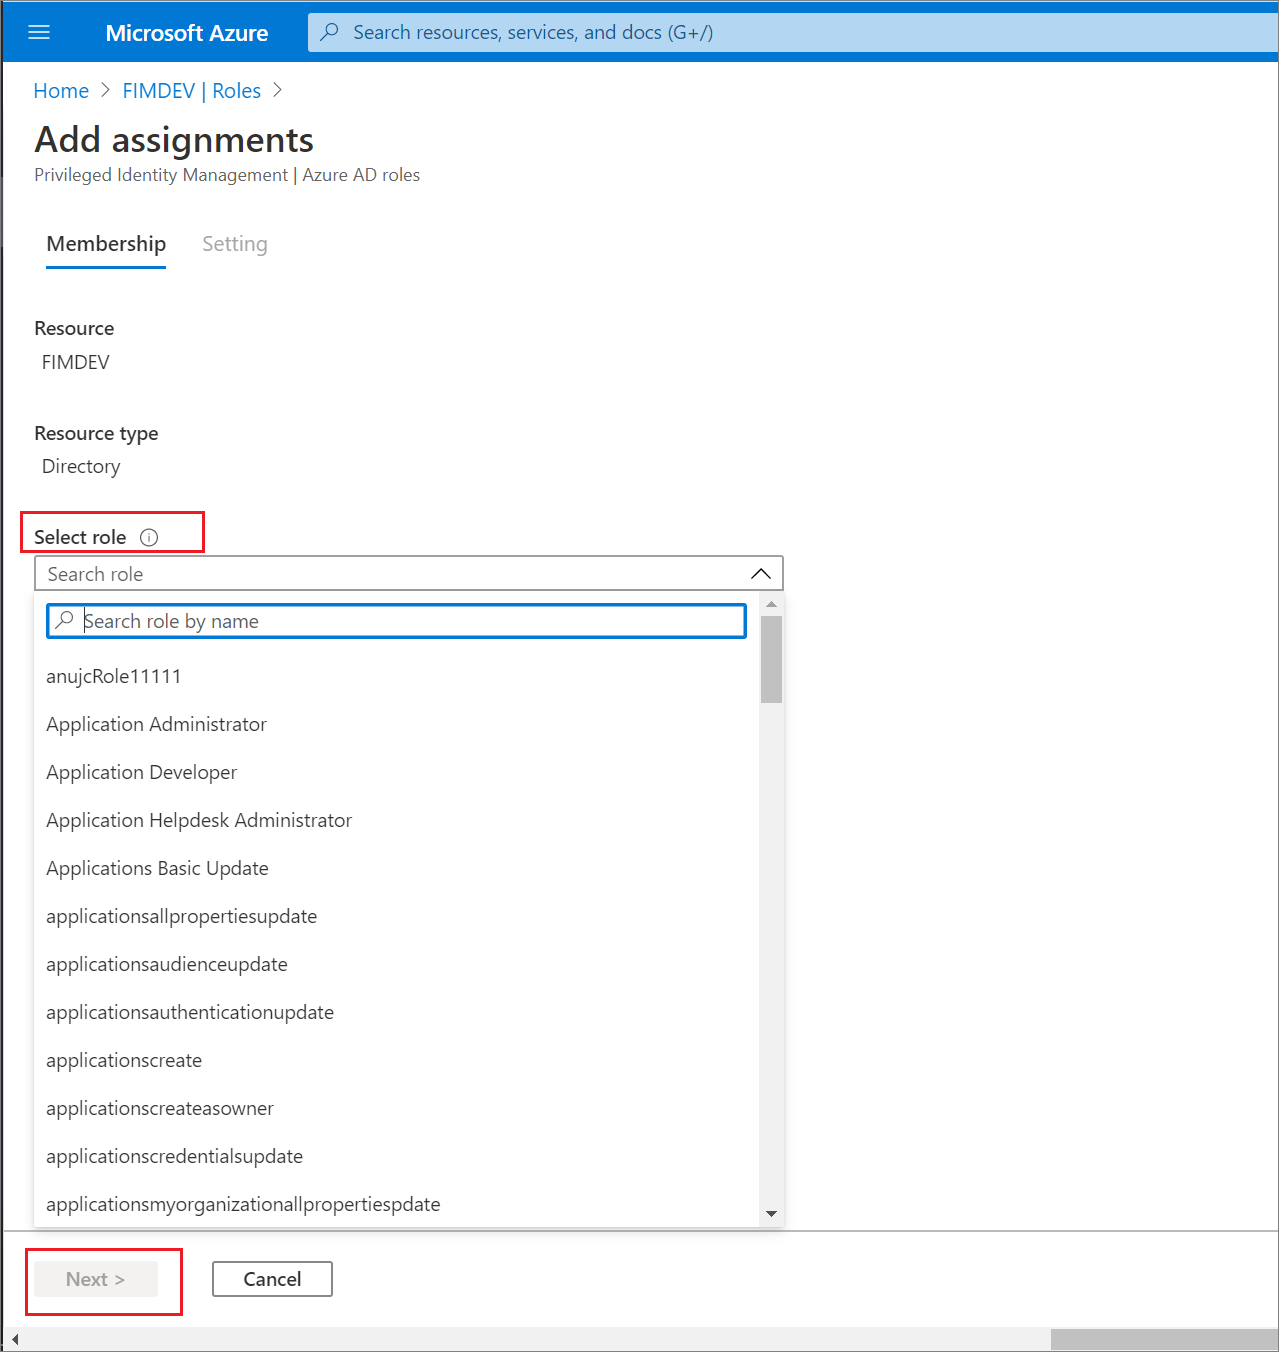
Select a role you want to assign, select a member to whom you want to assign to the role, and then select Next.
Note
If you assign a Microsoft Entra built-in role to a guest user, the guest user will be elevated to have the same permissions as a member user. For information about member and guest user default permissions, see What are the default user permissions in Microsoft Entra ID?
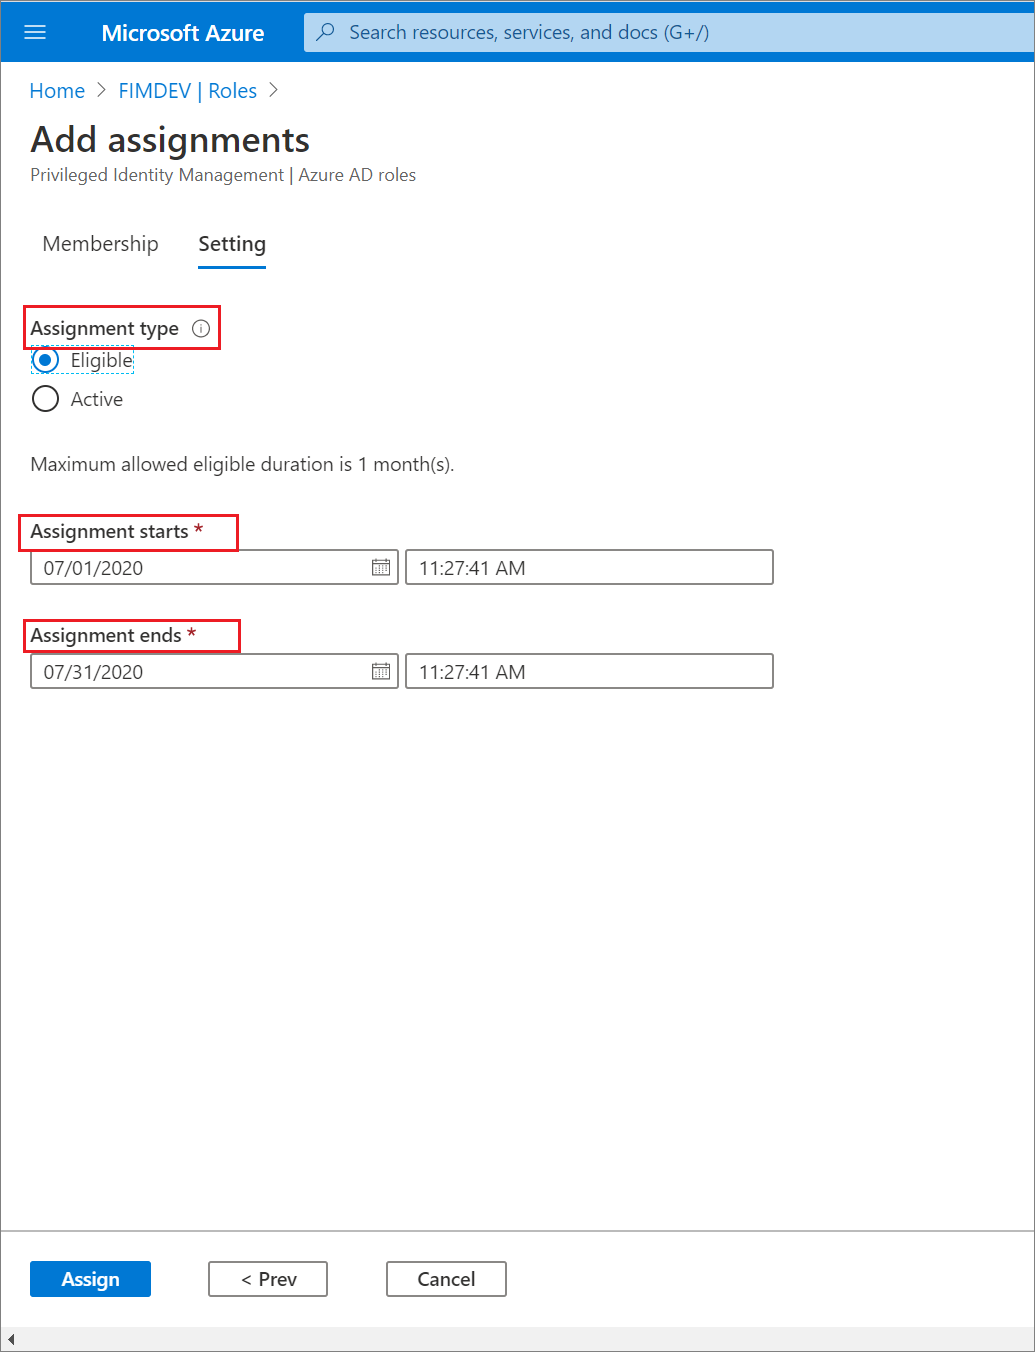
In the Assignment type list on the Membership settings pane, select Eligible or Active.
Eligible assignments require the member of the role to perform an action to use the role. Actions might include performing a multifactor authentication (MFA) check, providing a business justification, or requesting approval from designated approvers.
Active assignments don't require the member to perform any action to use the role. Members assigned as active have the privileges assigned to the role at all times.
To specify a specific assignment duration, add a start and end date and time boxes. When finished, select Assign to create the new role assignment.
Permanent assignments have no expiration date. Use this option for permanent workers who frequently need the role permissions.
Time-bound assignments will expire at the end of a specified period. Use this option with temporary or contract workers, for example, whose project end date and time are known.
After the role is assigned, an assignment status notification is displayed.

Assign a role with restricted scope
For certain roles, the scope of the granted permissions can be restricted to a single admin unit, service principal, or application. This procedure is an example if assigning a role that has the scope of an administrative unit. For a list of roles that support scope via administrative unit, see Assign scoped roles to an administrative unit. This feature is currently being rolled out to Microsoft Entra organizations.
Sign in to the Microsoft Entra admin center as at least a Privileged Role Administrator.
Browse to Identity > Roles & admins > Roles & admins.
Select the User Administrator.
Select Add assignments.
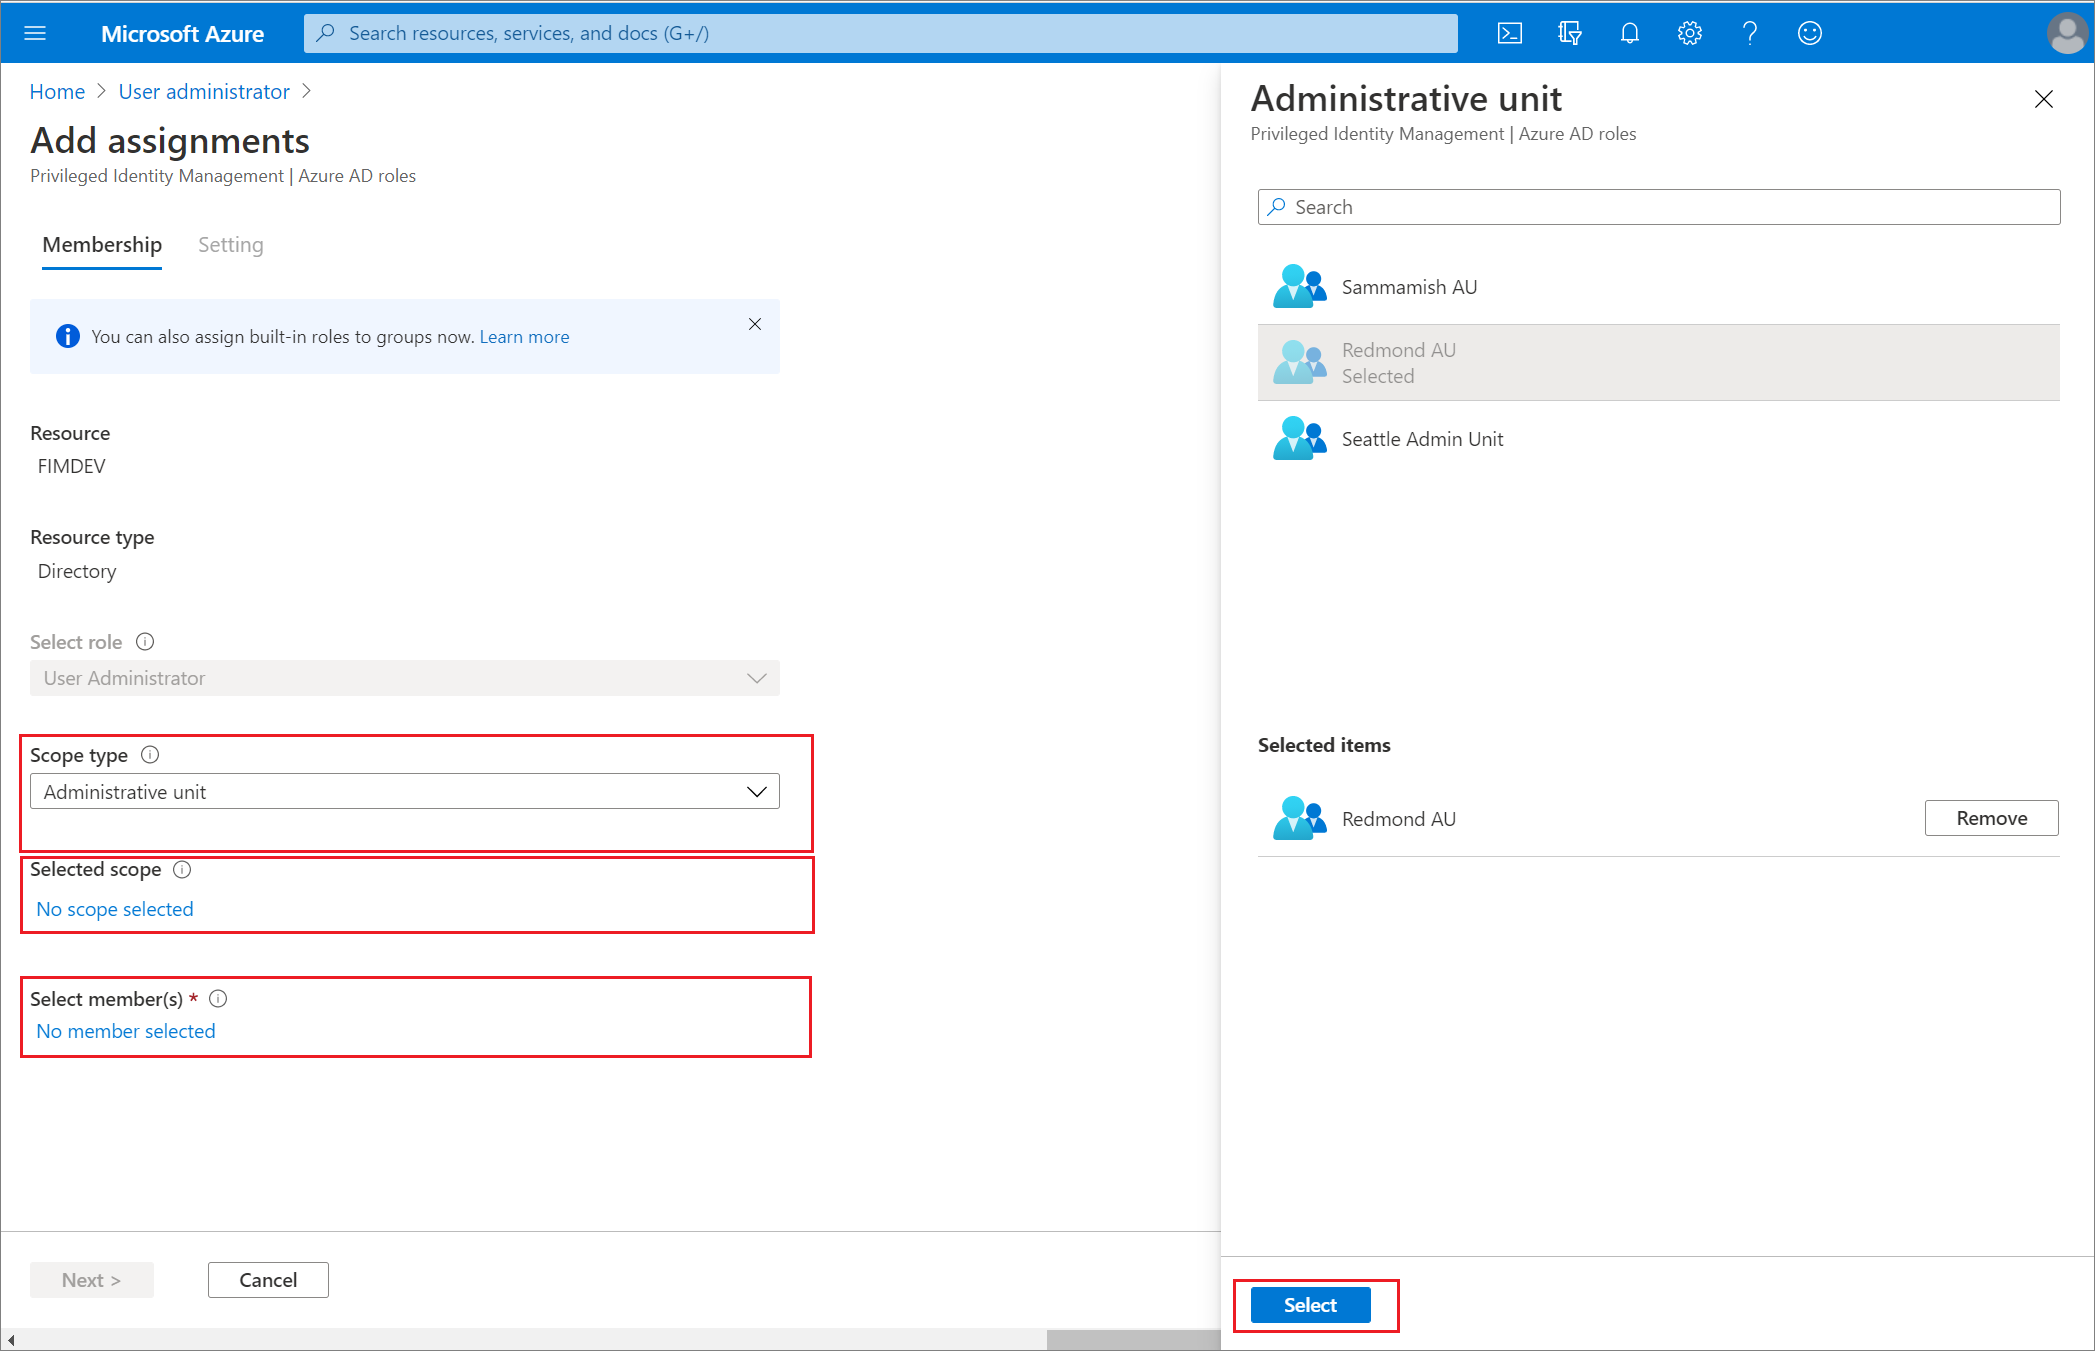
On the Add assignments page, you can:
- Select a user or group to be assigned to the role
- Select the role scope (in this case, administrative units)
- Select an administrative unit for the scope
For more information about creating administrative units, see Add and remove administrative units.
Assign a role using Microsoft Graph API
For more information about Microsoft Graph APIs for PIM, see Overview of role management through the privileged identity management (PIM) API.
For permissions required to use the PIM API, see Understand the Privileged Identity Management APIs.
Eligible with no end date
The following is a sample HTTP request to create an eligible assignment with no end date. For details on the API commands including request samples in languages such as C# and JavaScript, see Create roleEligibilityScheduleRequests.
HTTP request
POST https://graph.microsoft.com/v1.0/roleManagement/directory/roleEligibilityScheduleRequests
Content-Type: application/json

{
    "action": "adminAssign",
    "justification": "Permanently assign the Global Reader to the auditor",
    "roleDefinitionId": "f2ef992c-3afb-46b9-b7cf-a126ee74c451",
    "directoryScopeId": "/",
    "principalId": "071cc716-8147-4397-a5ba-b2105951cc0b",
    "scheduleInfo": {
        "startDateTime": "2022-04-10T00:00:00Z",
        "expiration": {
            "type": "noExpiration"
        }
    }
}
HTTP response
The following is an example of the response. The response object shown here might be shortened for readability.
HTTP/1.1 201 Created
Content-Type: application/json

{
    "@odata.context": "https://graph.microsoft.com/v1.0/$metadata#roleManagement/directory/roleEligibilityScheduleRequests/$entity",
    "id": "42159c11-45a9-4631-97e4-b64abdd42c25",
    "status": "Provisioned",
    "createdDateTime": "2022-05-13T13:40:33.2364309Z",
    "completedDateTime": "2022-05-13T13:40:34.6270851Z",
    "approvalId": null,
    "customData": null,
    "action": "adminAssign",
    "principalId": "071cc716-8147-4397-a5ba-b2105951cc0b",
    "roleDefinitionId": "f2ef992c-3afb-46b9-b7cf-a126ee74c451",
    "directoryScopeId": "/",
    "appScopeId": null,
    "isValidationOnly": false,
    "targetScheduleId": "42159c11-45a9-4631-97e4-b64abdd42c25",
    "justification": "Permanently assign the Global Reader to the auditor",
    "createdBy": {
        "application": null,
        "device": null,
        "user": {
            "displayName": null,
            "id": "3fbd929d-8c56-4462-851e-0eb9a7b3a2a5"
        }
    },
    "scheduleInfo": {
        "startDateTime": "2022-05-13T13:40:34.6270851Z",
        "recurrence": null,
        "expiration": {
            "type": "noExpiration",
            "endDateTime": null,
            "duration": null
        }
    },
    "ticketInfo": {
        "ticketNumber": null,
        "ticketSystem": null
    }
}
Active and time-bound
The following is a sample HTTP request to create an active assignment that's time-bound. For details on the API commands including request samples in languages such as C# and JavaScript, see Create roleAssignmentScheduleRequests.
HTTP request
POST https://graph.microsoft.com/v1.0/roleManagement/directory/roleAssignmentScheduleRequests

{
    "action": "adminAssign",
    "justification": "Assign the Exchange Recipient Administrator to the mail admin",
    "roleDefinitionId": "31392ffb-586c-42d1-9346-e59415a2cc4e",
    "directoryScopeId": "/",
    "principalId": "071cc716-8147-4397-a5ba-b2105951cc0b",
    "scheduleInfo": {
        "startDateTime": "2022-04-10T00:00:00Z",
        "expiration": {
            "type": "afterDuration",
            "duration": "PT3H"
        }
    }
}
HTTP response
The following is an example of the response. The response object shown here might be shortened for readability.
{
    "@odata.context": "https://graph.microsoft.com/v1.0/$metadata#roleManagement/directory/roleAssignmentScheduleRequests/$entity",
    "id": "ac643e37-e75c-4b42-960a-b0fc3fbdf4b3",
    "status": "Provisioned",
    "createdDateTime": "2022-05-13T14:01:48.0145711Z",
    "completedDateTime": "2022-05-13T14:01:49.8589701Z",
    "approvalId": null,
    "customData": null,
    "action": "adminAssign",
    "principalId": "071cc716-8147-4397-a5ba-b2105951cc0b",
    "roleDefinitionId": "31392ffb-586c-42d1-9346-e59415a2cc4e",
    "directoryScopeId": "/",
    "appScopeId": null,
    "isValidationOnly": false,
    "targetScheduleId": "ac643e37-e75c-4b42-960a-b0fc3fbdf4b3",
    "justification": "Assign the Exchange Recipient Administrator to the mail admin",
    "createdBy": {
        "application": null,
        "device": null,
        "user": {
            "displayName": null,
            "id": "3fbd929d-8c56-4462-851e-0eb9a7b3a2a5"
        }
    },
    "scheduleInfo": {
        "startDateTime": "2022-05-13T14:01:49.8589701Z",
        "recurrence": null,
        "expiration": {
            "type": "afterDuration",
            "endDateTime": null,
            "duration": "PT3H"
        }
    },
    "ticketInfo": {
        "ticketNumber": null,
        "ticketSystem": null
    }
}
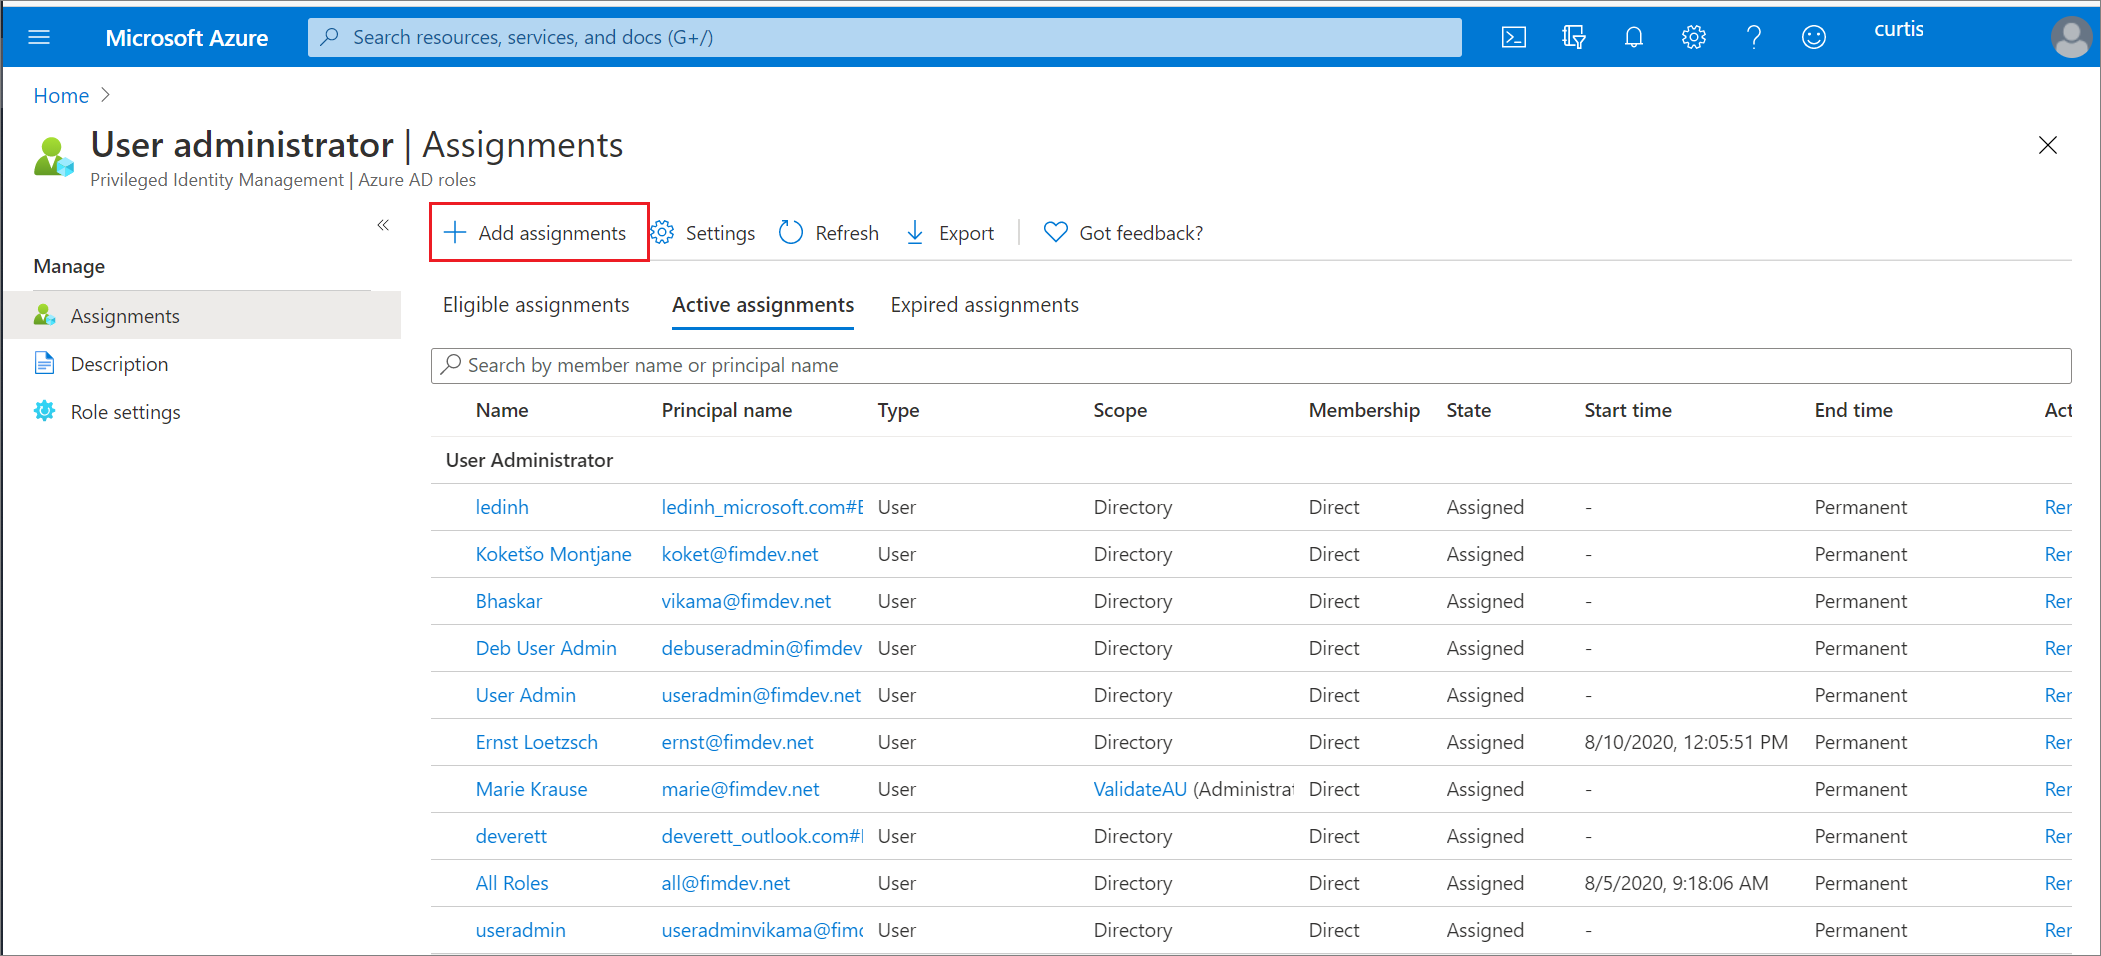
Update or remove an existing role assignment
Follow these steps to update or remove an existing role assignment. Microsoft Entra ID P2 or Microsoft Entra ID Governance licensed customers only: Don't assign a group as Active to a role through both Microsoft Entra ID and Privileged Identity Management (PIM). For a detailed explanation, see Known issues.
Sign in to the Microsoft Entra admin center as at least a Privileged Role Administrator.
Browse to Identity governance > Privileged Identity Management > Microsoft Entra roles.
Select Roles to see the list of roles for Microsoft Entra ID.
Select the role that you want to update or remove.
Find the role assignment on the Eligible roles or Active roles tabs.
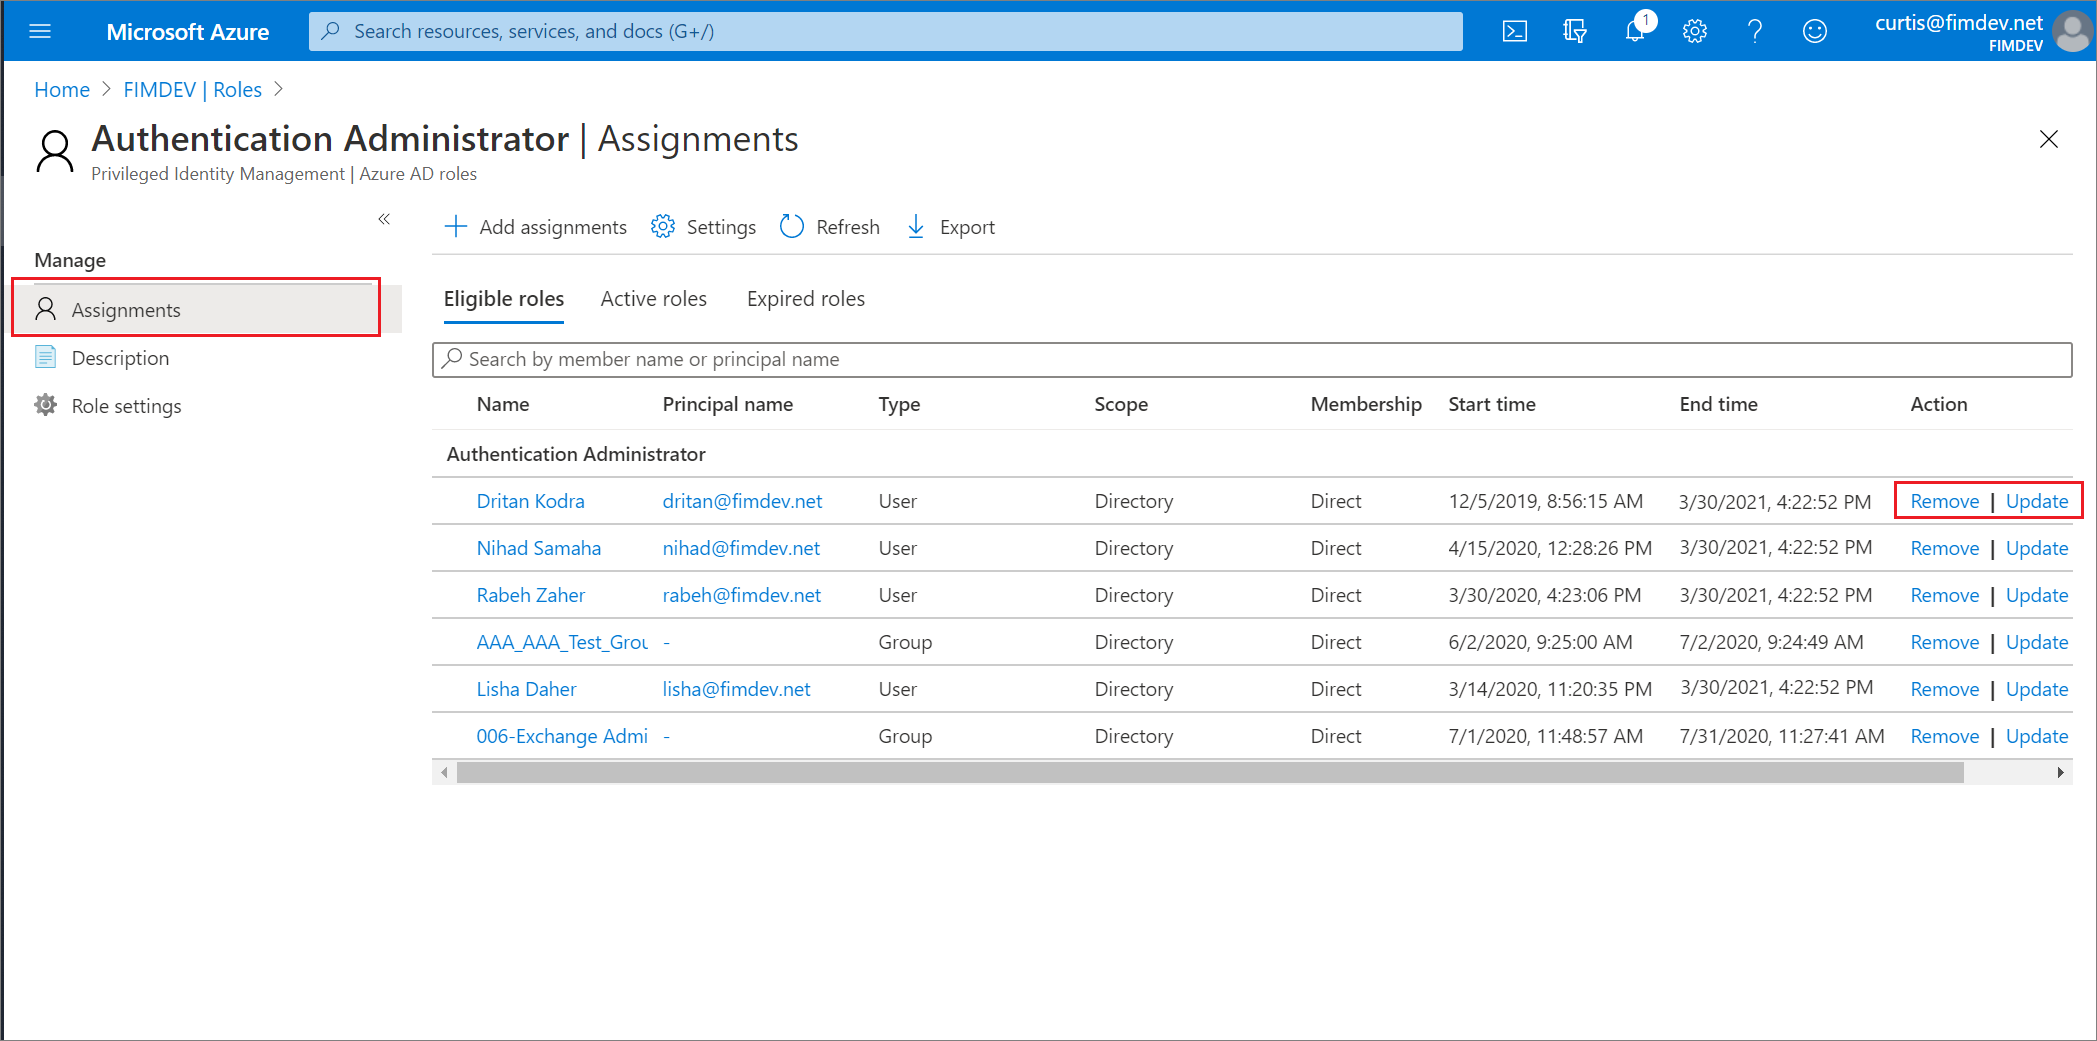
Select Update or Remove to update or remove the role assignment.
Remove eligible assignment via Microsoft Graph API
The following is a sample HTTP request to revoke an eligible assignment to a role from a principal. For details on the API commands including request samples in languages such as C# and JavaScript, see Create roleEligibilityScheduleRequests.
Request
POST https://graph.microsoft.com/v1.0/roleManagement/directory/roleEligibilityScheduleRequests

{
    "action": "AdminRemove",
    "justification": "abcde",
    "directoryScopeId": "/",
    "principalId": "d96ea738-3b95-4ae7-9e19-78a083066d5b",
    "roleDefinitionId": "88d8e3e3-8f55-4a1e-953a-9b9898b8876b"
}
Response
{
    "@odata.context": "https://graph.microsoft.com/v1.0/$metadata#roleManagement/directory/roleEligibilityScheduleRequests/$entity",
    "id": "fc7bb2ca-b505-4ca7-ad2a-576d152633de",
    "status": "Revoked",
    "createdDateTime": "2021-07-15T20:23:23.85453Z",
    "completedDateTime": null,
    "approvalId": null,
    "customData": null,
    "action": "AdminRemove",
    "principalId": "d96ea738-3b95-4ae7-9e19-78a083066d5b",
    "roleDefinitionId": "88d8e3e3-8f55-4a1e-953a-9b9898b8876b",
    "directoryScopeId": "/",
    "appScopeId": null,
    "isValidationOnly": false,
    "targetScheduleId": null,
    "justification": "test",
    "scheduleInfo": null,
    "createdBy": {
        "application": null,
        "device": null,
        "user": {
            "displayName": null,
            "id": "5d851eeb-b593-4d43-a78d-c8bd2f5144d2"
        }
    },
    "ticketInfo": {
        "ticketNumber": null,
        "ticketSystem": null
    }
}
Next steps
Pripomienky
Pripravujeme: V priebehu roka 2024 postupne zrušíme službu Problémy v GitHube ako mechanizmus pripomienok týkajúcich sa obsahu a nahradíme ju novým systémom pripomienok. Ďalšie informácie nájdete na stránke: https://aka.ms/ContentUserFeedback.
Odoslať a zobraziť pripomienky pre