Snabbstart: Skapa en virtuell Linux-serverdator med hjälp av PowerShell i Azure Stack Hub
Du kan skapa en virtuell Ubuntu Server 20.04 LTS-dator (VM) med hjälp av Azure Stack Hub PowerShell. I den här artikeln skapar och använder du en virtuell dator. Den här artikeln visar också hur du:
- Anslut till den virtuella datorn med en fjärrklient.
- Installera en NGINX-webbserver och visa standardstartsidan.
- Rensa oanvända resurser.
Förutsättningar
En Linux-avbildning på Azure Stack Hub Marketplace. Azure Stack Hub Marketplace har ingen Linux-avbildning som standard. Be Azure Stack Hub-operatorn tillhandahålla den Ubuntu Server 20.04 LTS-avbildning som du behöver. Operatorn kan använda anvisningarna i Ladda ned Marketplace-objekt från Azure till Azure Stack Hub.
Azure Stack Hub kräver en specifik version av Azure CLI för att skapa och hantera dess resurser.
- Om du inte har konfigurerat PowerShell för Azure Stack Hub läser du Installera PowerShell för Azure Stack Hub.
- När Azure Stack Hub PowerShell har konfigurerats ansluter du till din Azure Stack Hub-miljö. Anvisningar finns i Ansluta till Azure Stack Hub med PowerShell som användare.
En offentlig SSH-nyckel (Secure Shell) med namnet id_rsa.pub sparat i .ssh-katalogen för din Windows-användarprofil. Detaljerad information om hur du skapar SSH-nycklar finns i Använda ett SSH-nyckelpar med Azure Stack Hub.
Skapa en resursgrupp
En resursgrupp är en logisk container där du kan distribuera och hantera Azure Stack Hub-resurser. Om du vill skapa en resursgrupp kör du följande kodblock:
Anteckning
Vi har tilldelat värden för alla variabler i följande kodexempel. Du kan dock tilldela dina egna värden.
# Create variables to store the location and resource group names.
$location = "local"
$ResourceGroupName = "myResourceGroup"

New-AzResourceGroup `
  -Name $ResourceGroupName `
  -Location $location
Skapa lagringsresurser
Skapa ett lagringskonto som ska användas för att lagra startdiagnostikutdata.
# Create variables to store the storage account name and the storage account SKU information
$StorageAccountName = "mystorageaccount"
$SkuName = "Standard_LRS"

# Create a new storage account
$StorageAccount = New-AzStorageAccount `
  -Location $location `
  -ResourceGroupName $ResourceGroupName `
  -Type $SkuName `
  -Name $StorageAccountName

Set-AzCurrentStorageAccount `
  -StorageAccountName $storageAccountName `
  -ResourceGroupName $resourceGroupName
Skapa nätverksresurser
Skapa ett virtuellt nätverk, ett undernät och en offentlig IP-adress. Dessa resurser används för att tillhandahålla nätverksanslutning till den virtuella datorn.
# Create a subnet configuration
$subnetConfig = New-AzVirtualNetworkSubnetConfig `
  -Name mySubnet `
  -AddressPrefix 192.168.1.0/24

# Create a virtual network
$vnet = New-AzVirtualNetwork `
  -ResourceGroupName $ResourceGroupName `
  -Location $location `
  -Name MyVnet `
  -AddressPrefix 192.168.0.0/16 `
  -Subnet $subnetConfig

# Create a public IP address and specify a DNS name
$pip = New-AzPublicIpAddress `
  -ResourceGroupName $ResourceGroupName `
  -Location $location `
  -AllocationMethod Static `
  -IdleTimeoutInMinutes 4 `
  -Name "mypublicdns$(Get-Random)"
Skapa en nätverkssäkerhetsgrupp och en regel för nätverkssäkerhetsgrupp
Nätverkssäkerhetsgruppen skyddar den virtuella datorn med hjälp av regler för inkommande och utgående trafik. Skapa en regel för inkommande trafik för port 3389 för att tillåta inkommande fjärrskrivbordsanslutningar och en inkommande regel för port 80 för att tillåta inkommande webbtrafik.
# Create variables to store the network security group and rules names.
$nsgName = "myNetworkSecurityGroup"
$nsgRuleSSHName = "myNetworkSecurityGroupRuleSSH"
$nsgRuleWebName = "myNetworkSecurityGroupRuleWeb"


# Create an inbound network security group rule for port 22
$nsgRuleSSH = New-AzNetworkSecurityRuleConfig -Name $nsgRuleSSHName -Protocol Tcp `
-Direction Inbound -Priority 1000 -SourceAddressPrefix * -SourcePortRange * -DestinationAddressPrefix * `
-DestinationPortRange 22 -Access Allow

# Create an inbound network security group rule for port 80
$nsgRuleWeb = New-AzNetworkSecurityRuleConfig -Name $nsgRuleWebName -Protocol Tcp `
-Direction Inbound -Priority 1001 -SourceAddressPrefix * -SourcePortRange * -DestinationAddressPrefix * `
-DestinationPortRange 80 -Access Allow

# Create a network security group
$nsg = New-AzNetworkSecurityGroup -ResourceGroupName $ResourceGroupName -Location $location `
-Name $nsgName -SecurityRules $nsgRuleSSH,$nsgRuleWeb
Skapa ett nätverkskort för den virtuella datorn
Nätverkskortet ansluter den virtuella datorn till ett undernät, en nätverkssäkerhetsgrupp och en offentlig IP-adress.
# Create a virtual network card and associate it with public IP address and NSG
$nic = New-AzNetworkInterface `
  -Name myNic `
  -ResourceGroupName $ResourceGroupName `
  -Location $location `
  -SubnetId $vnet.Subnets[0].Id `
  -PublicIpAddressId $pip.Id `
  -NetworkSecurityGroupId $nsg.Id
Skapa en virtuell dator
Skapa en vm-konfiguration. Den här konfigurationen innehåller de inställningar som ska användas när du distribuerar den virtuella datorn (till exempel användarautentiseringsuppgifter, storlek och VM-avbildning).
# Define a credential object
$UserName='demouser'
$securePassword = ConvertTo-SecureString ' ' -AsPlainText -Force
$cred = New-Object System.Management.Automation.PSCredential ($UserName, $securePassword)

# Create the VM configuration object
$VmName = "VirtualMachinelatest"
$VmSize = "Standard_D1"
$VirtualMachine = New-AzVMConfig `
  -VMName $VmName `
  -VMSize $VmSize

$VirtualMachine = Set-AzVMOperatingSystem `
  -VM $VirtualMachine `
  -Linux `
  -ComputerName "MainComputer" `
  -Credential $cred

$VirtualMachine = Set-AzVMSourceImage `
  -VM $VirtualMachine `
  -PublisherName "Canonical" `
  -Offer "UbuntuServer" `
  -Skus "20.04-LTS" `
  -Version "latest"

# Set the operating system disk properties on a VM
$VirtualMachine = Set-AzVMOSDisk `
  -VM $VirtualMachine `
  -CreateOption FromImage | `
  Set-AzVMBootDiagnostic -ResourceGroupName $ResourceGroupName `
  -StorageAccountName $StorageAccountName -Enable |`
  Add-AzVMNetworkInterface -Id $nic.Id

# Configure SSH keys
$sshPublicKey = Get-Content "$env:USERPROFILE\.ssh\id_rsa.pub"

# Add the SSH key to the VM
Add-AzVMSshPublicKey -VM $VirtualMachine `
 -KeyData $sshPublicKey `
 -Path "/home/$UserName/.ssh/authorized_keys"

# Create the VM
New-AzVM `
  -ResourceGroupName $ResourceGroupName `
 -Location $location `
  -VM $VirtualMachine
Snabbregistrering av virtuell dator: Fullständigt skript
Anteckning
Det här steget är i princip den föregående koden som sammanfogas, men med ett lösenord snarare än en SSH-nyckel för autentisering.
## Create a resource group

<#
A resource group is a logical container where you can deploy and manage Azure Stack Hub resources. From your development kit or the Azure Stack Hub integrated system, run the following code block to create a resource group. Though we've assigned values for all the variables in this article, you can use these values or assign new ones.
#>

# Edit your variables, if required

# Create variables to store the location and resource group names
$location = "local"
$ResourceGroupName = "myResourceGroup"

# Create variables to store the storage account name and the storage account SKU information
$StorageAccountName = "mystorageaccount"
$SkuName = "Standard_LRS"

# Create variables to store the network security group and rules names
$nsgName = "myNetworkSecurityGroup"
$nsgRuleSSHName = "myNetworkSecurityGroupRuleSSH"
$nsgRuleWebName = "myNetworkSecurityGroupRuleWeb"

# Create variable for VM password
$VMPassword = 'Password123!'

# End of variables - no need to edit anything past that point to deploy a single VM

# Create a resource group
New-AzResourceGroup `
  -Name $ResourceGroupName `
  -Location $location

## Create storage resources

# Create a storage account, and then create a storage container for the Ubuntu Server 20.04 LTS image

# Create a new storage account
$StorageAccount = New-AzStorageAccount `
  -Location $location `
  -ResourceGroupName $ResourceGroupName `
  -Type $SkuName `
  -Name $StorageAccountName

Set-AzCurrentStorageAccount `
  -StorageAccountName $storageAccountName `
  -ResourceGroupName $resourceGroupName

# Create a storage container to store the VM image
$containerName = 'osdisks'
$container = New-AzureStorageContainer `
  -Name $containerName `
  -Permission Blob


## Create networking resources

# Create a virtual network, a subnet, and a public IP address, resources that are used provide network connectivity to the VM

# Create a subnet configuration
$subnetConfig = New-AzVirtualNetworkSubnetConfig `
  -Name mySubnet `
  -AddressPrefix 192.168.1.0/24

# Create a virtual network
$vnet = New-AzVirtualNetwork `
  -ResourceGroupName $ResourceGroupName `
  -Location $location `
  -Name MyVnet `
  -AddressPrefix 192.168.0.0/16 `
  -Subnet $subnetConfig

# Create a public IP address and specify a DNS name
$pip = New-AzPublicIpAddress `
  -ResourceGroupName $ResourceGroupName `
  -Location $location `
  -AllocationMethod Static `
  -IdleTimeoutInMinutes 4 `
  -Name "mypublicdns$(Get-Random)"


### Create a network security group and a network security group rule

<#
The network security group secures the VM by using inbound and outbound rules. Create an inbound rule for port 3389 to allow incoming Remote Desktop connections and an inbound rule for port 80 to allow incoming web traffic.
#>

# Create an inbound network security group rule for port 22
$nsgRuleSSH = New-AzNetworkSecurityRuleConfig -Name $nsgRuleSSHName -Protocol Tcp `
-Direction Inbound -Priority 1000 -SourceAddressPrefix * -SourcePortRange * -DestinationAddressPrefix * `
-DestinationPortRange 22 -Access Allow

# Create an inbound network security group rule for port 80
$nsgRuleWeb = New-AzNetworkSecurityRuleConfig -Name $nsgRuleWebName -Protocol Tcp `
-Direction Inbound -Priority 1001 -SourceAddressPrefix * -SourcePortRange * -DestinationAddressPrefix * `
-DestinationPortRange 80 -Access Allow

# Create a network security group
$nsg = New-AzNetworkSecurityGroup -ResourceGroupName $ResourceGroupName -Location $location `
-Name $nsgName -SecurityRules $nsgRuleSSH,$nsgRuleWeb

### Create a network card for the VM

# The network card connects the VM to a subnet, network security group, and public IP address.

# Create a virtual network card and associate it with public IP address and NSG
$nic = New-AzNetworkInterface `
  -Name myNic `
  -ResourceGroupName $ResourceGroupName `
  -Location $location `
  -SubnetId $vnet.Subnets[0].Id `
  -PublicIpAddressId $pip.Id `
  -NetworkSecurityGroupId $nsg.Id

## Create a VM
<#
Create a VM configuration. This configuration includes the settings used when deploying the VM. For example: user credentials, size, and the VM image.
#>

# Define a credential object
$UserName='demouser'
$securePassword = ConvertTo-SecureString $VMPassword -AsPlainText -Force
$cred = New-Object System.Management.Automation.PSCredential ($UserName, $securePassword)

# Create the VM configuration object
$VmName = "VirtualMachinelatest"
$VmSize = "Standard_D1"
$VirtualMachine = New-AzVMConfig `
  -VMName $VmName `
  -VMSize $VmSize

$VirtualMachine = Set-AzVMOperatingSystem `
  -VM $VirtualMachine `
  -Linux `
  -ComputerName "MainComputer" `
  -Credential $cred

$VirtualMachine = Set-AzVMSourceImage `
  -VM $VirtualMachine `
  -PublisherName "Canonical" `
  -Offer "UbuntuServer" `
  -Skus "20.04-LTS" `
  -Version "latest"

$osDiskName = "OsDisk"
$osDiskUri = '{0}vhds/{1}-{2}.vhd' -f `
  $StorageAccount.PrimaryEndpoints.Blob.ToString(),`
  $vmName.ToLower(), `
  $osDiskName

# Set the operating system disk properties on a VM
$VirtualMachine = Set-AzVMOSDisk `
  -VM $VirtualMachine `
  -Name $osDiskName `
  -VhdUri $OsDiskUri `
  -CreateOption FromImage | `
  Add-AzVMNetworkInterface -Id $nic.Id

# Create the VM
New-AzVM `
  -ResourceGroupName $ResourceGroupName `
 -Location $location `
  -VM $VirtualMachine
Anslut till VM:en
När du har distribuerat den virtuella datorn konfigurerar du en SSH-anslutning för den. Om du vill hämta den virtuella datorns offentliga IP-adress använder du kommandot Get-AzPublicIpAddress :
Get-AzPublicIpAddress -ResourceGroupName myResourceGroup | Select IpAddress
Från ett klientsystem med SSH installerat använder du följande kommando för att ansluta till den virtuella datorn. Om du arbetar med Windows kan du använda PuTTY för att skapa anslutningen.
ssh <Public IP Address>
Logga in som azureuser när du uppmanas till det. Om du använde en lösenfras när du skapade SSH-nycklarna måste du ange lösenfrasen.
Installera NGINX-webbservern
Om du vill uppdatera paketresurser och installera det senaste NGINX-paketet kör du följande skript:
#!/bin/bash

# update package source
apt-get -y update

# install NGINX
apt-get -y install nginx
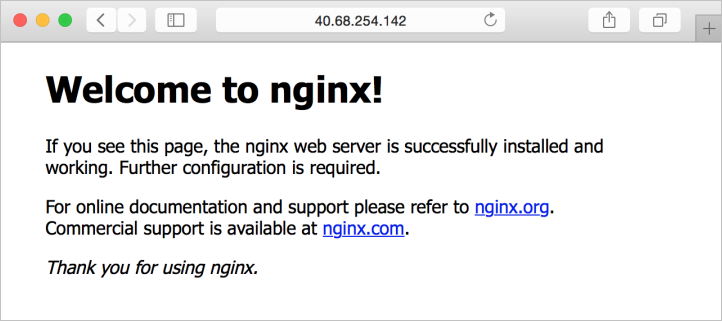
Visa NGINX-välkomstsidan
När NGINX-webbservern är installerad och port 80 är öppen på den virtuella datorn kan du komma åt webbservern med hjälp av den virtuella datorns offentliga IP-adress. Öppna en webbläsare och gå till http://<public IP address>.
Rensa resurser
Du kan rensa de resurser som du inte behöver längre med kommandot Remove-AzResourceGroup . Om du vill ta bort resursgruppen och alla dess resurser kör du följande kommando:
Remove-AzResourceGroup -Name myResourceGroup
Nästa steg
I den här snabbstarten distribuerade du en grundläggande virtuell Linux-serverdator. Mer information om virtuella Azure Stack Hub-datorer finns i Överväganden för virtuella datorer i Azure Stack Hub.
Feedback
Kommer snart: Under hela 2024 kommer vi att fasa ut GitHub-problem som feedbackmekanism för innehåll och ersätta det med ett nytt feedbacksystem. Mer information finns i: https://aka.ms/ContentUserFeedback.
Skicka och visa feedback för