Connect to and manage an Azure SQL Managed Instance in Microsoft Purview
This article outlines how to register and Azure SQL Managed Instance, as well as how to authenticate and interact with the Azure SQL Managed Instance in Microsoft Purview. For more information about Microsoft Purview, read the introductory article.
Supported capabilities
| Metadata Extraction | Full Scan | Incremental Scan | Scoped Scan | Classification | Labeling | Access Policy | Lineage | Data Sharing | Live view |
|---|---|---|---|---|---|---|---|---|---|
| Yes | Yes | Yes | Yes | Yes | Yes | Yes | Limited** | No | No |
** Lineage is supported if dataset is used as a source/sink in Data Factory Copy activity
Prerequisites
An Azure account with an active subscription. Create an account for free.
An active Microsoft Purview account.
You'll need to be a Data Source Administrator and Data Reader to register a source and manage it in the Microsoft Purview governance portal. See our Microsoft Purview Permissions page for details.
Configure public endpoint in Azure SQL Managed Instance
Note
We now support scanning Azure SQL Managed Instances over the private connection using Microsoft Purview ingestion private endpoints and a self-hosted integration runtime VM. For more information related to prerequisites, see Connect to your Microsoft Purview and scan data sources privately and securely
Register
This section describes how to register an Azure SQL Managed Instance in Microsoft Purview using the Microsoft Purview governance portal.
Authentication for registration
If you need to create new authentication, you need to authorize database access to SQL Database SQL Managed Instance. There are three authentication methods that Microsoft Purview supports today:
System or user assigned managed identity to register
You can use either your Microsoft Purview system-assigned managed identity (SAMI), or a user-assigned managed identity (UAMI) to authenticate. Both options allow you to assign authentication directly to Microsoft Purview, like you would for any other user, group, or service principal. The Microsoft Purview system-assigned managed identity is created automatically when the account is created and has the same name as your Microsoft Purview account. A user-assigned managed identity is a resource that can be created independently. To create one, you can follow our user-assigned managed identity guide.
You can find your managed identity Object ID in the Azure portal by following these steps:
For Microsoft Purview account’s system-assigned managed identity:
- Open the Azure portal, and navigate to your Microsoft Purview account.
- Select the Properties tab on the left side menu.
- Select the Managed identity object ID value and copy it.
For user-assigned managed identity (preview):
- Open the Azure portal, and navigate to your Microsoft Purview account.
- Select the Managed identities tab on the left side menu
- Select the user assigned managed identities, select the intended identity to view the details.
- The object (principal) ID is displayed in the overview essential section.
Either managed identity will need permission to get metadata for the database, schemas and tables, and to query the tables for classification.
- Create a Microsoft Entra user in Azure SQL Managed Instance by following the prerequisites and tutorial on Create contained users mapped to Microsoft Entra identities
- Assign
db_datareaderpermission to the identity.
Service Principal to register
There are several steps to allow Microsoft Purview to use service principal to scan your Azure SQL Managed Instance.
Create or use an existing service principal
To use a service principal, you can use an existing one or create a new one. If you're going to use an existing service principal, skip to the next step. If you have to create a new Service Principal, follow these steps:
- Navigate to the Azure portal.
- Select Microsoft Entra ID from the left-hand side menu.
- Select App registrations.
- Select + New application registration.
- Enter a name for the application (the service principal name).
- Select Accounts in this organizational directory only.
- For Redirect URI, select Web and enter any URL you want; it doesn't have to be real or work.
- Then select Register.
Configure Microsoft Entra authentication in the database account
The service principal must have permission to get metadata for the database, schemas, and tables. It must also be able to query the tables to sample for classification.
- Configure and manage Microsoft Entra authentication with Azure SQL
- Create a Microsoft Entra user in Azure SQL Managed Instance by following the prerequisites and tutorial on Create contained users mapped to Microsoft Entra identities
- Assign
db_datareaderpermission to the identity.
Add service principal to key vault and Microsoft Purview's credential
It's required to get the service principal's application ID and secret:
- Navigate to your Service Principal in the Azure portal
- Copy the values the Application (client) ID from Overview and Client secret from Certificates & secrets.
- Navigate to your key vault
- Select Settings > Secrets
- Select + Generate/Import and enter the Name of your choice and Value as the Client secret from your Service Principal
- Select Create to complete
- If your key vault isn't connected to Microsoft Purview yet, you'll need to create a new key vault connection
- Finally, create a new credential using the Service Principal to set up your scan.
SQL authentication to register
Note
Only the server-level principal login (created by the provisioning process) or members of the loginmanager database role in the master database can create new logins. It takes about 15 minutes after granting permission, the Microsoft Purview account should have the appropriate permissions to be able to scan the resource(s).
You can follow the instructions in CREATE LOGIN to create a login for Azure SQL Managed Instance if you don't have this login available. You'll need username and password for the next steps.
- Navigate to your key vault in the Azure portal
- Select Settings > Secrets
- Select + Generate/Import and enter the Name and Value as the password from your Azure SQL Managed Instance
- Select Create to complete
- If your key vault isn't connected to Microsoft Purview yet, you'll need to create a new key vault connection
- Finally, create a new credential using the username and password to set up your scan.
Steps to register
Open the Microsoft Purview governance portal by:
- Browsing directly to https://web.purview.azure.com and selecting your Microsoft Purview account.
- Opening the Azure portal, searching for and selecting the Microsoft Purview account. Select the the Microsoft Purview governance portal button.
Navigate to the Data Map.
Select Register
Select Azure SQL Managed Instance and then Continue.
Select From Azure subscription, select the appropriate subscription from the Azure subscription drop-down box and the appropriate server from the Server name drop-down box.
Provide the public endpoint fully qualified domain name and port number. Then select Register to register the data source.

For Example:
foobar.public.123.database.windows.net,3342
Scan
Follow the steps below to scan an Azure SQL Managed Instance to automatically identify assets and classify your data. For more information about scanning in general, see our introduction to scans and ingestion.
Create and run scan
To create and run a new scan, complete the following steps:
Select the Data Map tab on the left pane in the Microsoft Purview governance portal.
Select the Azure SQL Managed Instance source that you registered.
Select New scan
Choose either the Azure integration runtime if your source is publicly accessible, a managed virtual network integration runtime if using a managed virtual network, or a self-hosted integration runtime if your source is in a private virtual network. For more information about which integration runtime to use, see the choose the right integration runtime configuration article.
Select the credential to connect to your data source.

You can scope your scan to specific tables by choosing the appropriate items in the list.

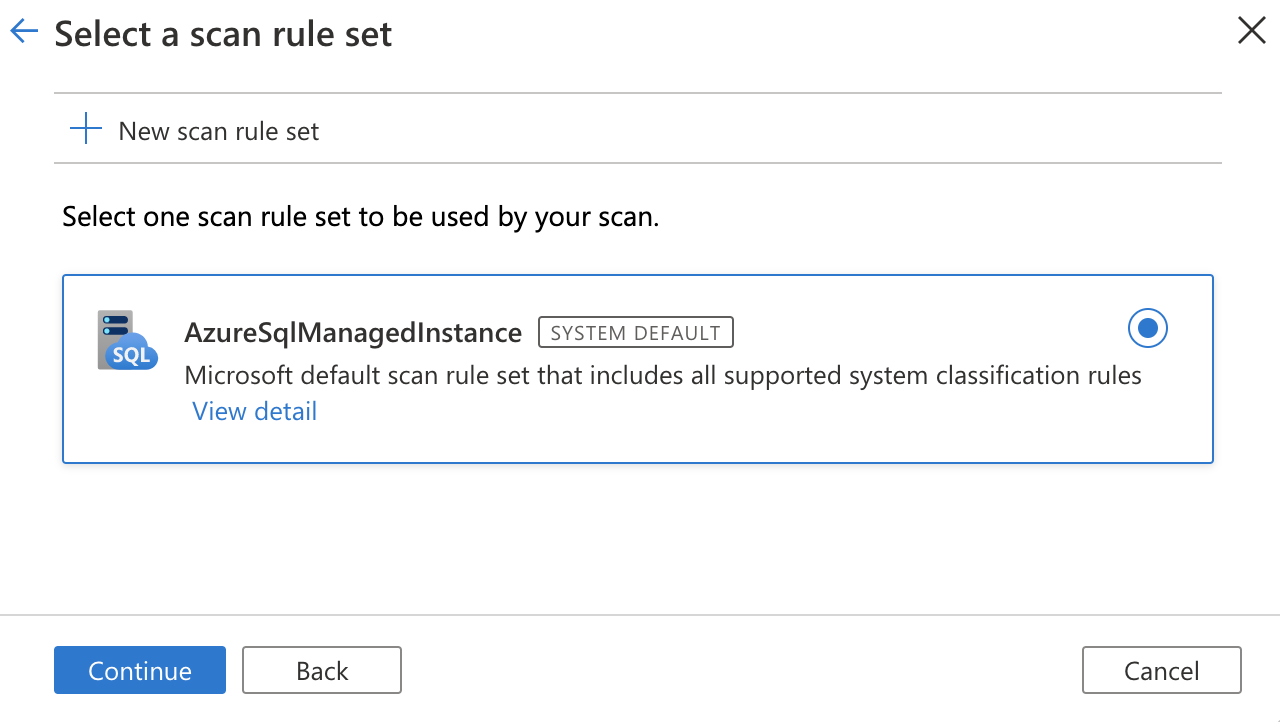
Then select a scan rule set. You can choose between the system default, existing custom rule sets, or create a new rule set inline.
Choose your scan trigger. You can set up a schedule or run the scan once.

Review your scan and select Save and run.
If you're having trouble connecting to your data source, or running your scan, you scan see our troubleshooting guide for scans and connections.
View your scans and scan runs
To view existing scans:
- Go to the Microsoft Purview portal. On the left pane, select Data map.
- Select the data source. You can view a list of existing scans on that data source under Recent scans, or you can view all scans on the Scans tab.
- Select the scan that has results you want to view. The pane shows you all the previous scan runs, along with the status and metrics for each scan run.
- Select the run ID to check the scan run details.
Manage your scans
To edit, cancel, or delete a scan:
Go to the Microsoft Purview portal. On the left pane, select Data Map.
Select the data source. You can view a list of existing scans on that data source under Recent scans, or you can view all scans on the Scans tab.
Select the scan that you want to manage. You can then:
- Edit the scan by selecting Edit scan.
- Cancel an in-progress scan by selecting Cancel scan run.
- Delete your scan by selecting Delete scan.
Note
- Deleting your scan does not delete catalog assets created from previous scans.
Set up access policies
The following types of Microsoft Purview policies are supported on this data resource:
Access policy prerequisites on Azure SQL MI
- Create a new Azure SQL MI or use an existing one in one of the currently available regions for this feature. You can follow this guide to create a new Azure SQL MI.
Region support
All Microsoft Purview regions are supported.
Enforcement of Microsoft Purview policies is available only in the following regions for Azure SQL MI:
Public cloud:
- East US
- East US2
- South Central US
- West Central US
- West US3
- Canada Central
- Brazil South
- West Europe
- North Europe
- France Central
- UK South
- South Africa North
- Central India
- South East Asia
- East Asia
- Australia East
Azure SQL MI configuration
This section explains how you can set up Azure SQL MI to honor policies from Microsoft Purview. Check first whether Azure SQL MI is configured for public or private endpoint. This guide explains how to do so.
Configuration for SQL MI public endpoint
If Azure SQL MI is configured for public endpoint, follow these steps:
Configure a Microsoft Entra Admin. In Azure portal navigate to the Azure SQL MI then navigate to Microsoft Entra ID on the side menu (formerly called Active Directory admin). Set an Admin name and then select Save. See screenshot:

Then navigate to Identity on the side menu. Under System assigned managed identity check status to On and then select Save. See screenshot:


Configuration for SQL MI private endpoint
If Azure SQL MI is configured to use private endpoint, execute the same steps outlined in the configuration for public endpoint, and in addition, do the following:
Navigate to the Network Security Group (NSG) associated to your Azure SQL MI.
Add an outbound security rule similar to the one in the following screenshot. Destination = Service Tag, Destination service tag = MicrosoftPurviewPolicyDistribution, Service = HTTPS, Action = Allow. Ensure also that this rule's priority is lower than the one for the deny_all_outbound rule.

Configure the Microsoft Purview account for policies
Register the data source in Microsoft Purview
Before a policy can be created in Microsoft Purview for a data resource, you must register that data resource in Microsoft Purview Studio. You will find the instructions related to registering the data resource later in this guide.
Note
Microsoft Purview policies rely on the data resource ARM path. If a data resource is moved to a new resource group or subscription it will need to be de-registered and then registered again in Microsoft Purview.
Configure permissions to enable Data policy enforcement on the data source
Once a resource is registered, but before a policy can be created in Microsoft Purview for that resource, you must configure permissions. A set of permissions are needed to enable the Data policy enforcement. This applies to data sources, resource groups, or subscriptions. To enable Data policy enforcement, you must have both specific Identity and Access Management (IAM) privileges on the resource as well as specific Microsoft Purview privileges:
You must have either one of the following IAM role combinations on the resource's Azure Resource Manager path or any parent of it (that is, using IAM permission inheritance):
- IAM Owner
- Both IAM Contributor and IAM User Access Administrator
To configure Azure role-based access control (RBAC) permissions, follow this guide. The following screenshot shows how to access the Access Control section in the Azure portal for the data resource to add a role assignment.

Note
The IAM Owner role for a data resource can be inherited from a parent resource group, a subscription, or a subscription management group. Check which Microsoft Entra users, groups, and service principals hold or are inheriting the IAM Owner role for the resource.
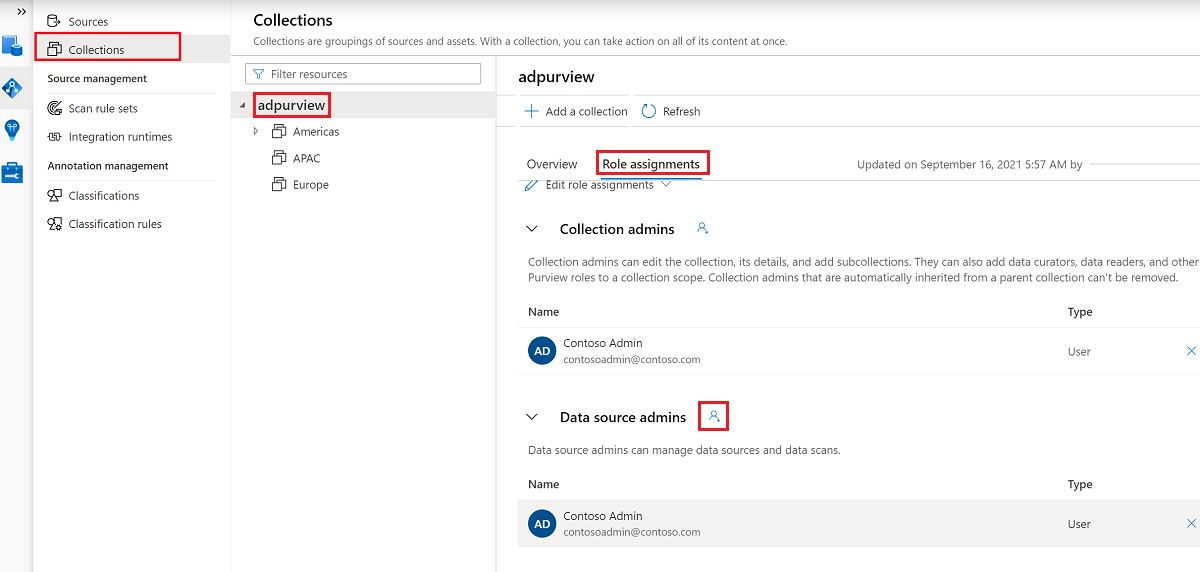
You also need to have the Microsoft Purview Data source admin role for the collection or a parent collection (if inheritance is enabled). For more information, see the guide on managing Microsoft Purview role assignments.
The following screenshot shows how to assign the Data source admin role at the root collection level.


Configure Microsoft Purview permissions to create, update, or delete access policies
To create, update or delete policies, you need to get the Policy author role in Microsoft Purview at root collection level:
- The Policy author role can create, update, and delete DevOps and Data Owner policies.
- The Policy author role can delete self-service access policies.
For more information about managing Microsoft Purview role assignments, see Create and manage collections in the Microsoft Purview Data Map.
Note
Policy author role must be configured at the root collection level.
In addition, to easily search Microsoft Entra users or groups when creating or updating the subject of a policy, you can greatly benefit from getting the Directory Readers permission in Microsoft Entra ID. This is a common permission for users in an Azure tenant. Without the Directory Reader permission, the Policy Author will have to type the complete username or email for all the principals included in the subject of a data policy.
Configure Microsoft Purview permissions for publishing Data Owner policies
Data Owner policies allow for checks and balances if you assign the Microsoft Purview Policy author and Data source admin roles to different people in the organization. Before a Data owner policy takes effect, a second person (Data source admin) must review it and explicitly approve it by publishing it. This does not apply to DevOps or Self-service access policies as publishing is automatic for them when those policies are created or updated.
To publish a Data owner policy you need to get the Data source admin role in Microsoft Purview at root collection level.
For more information about managing Microsoft Purview role assignments, see Create and manage collections in the Microsoft Purview Data Map.
Note
To publish Data owner policies, the Data source admin role must be configured at the root collection level.
Delegate access provisioning responsibility to roles in Microsoft Purview
After a resource has been enabled for Data policy enforcement, any Microsoft Purview user with the Policy author role at the root collection level can provision access to that data source from Microsoft Purview.
Note
Any Microsoft Purview root Collection admin can assign new users to root Policy author roles. Any Collection admin can assign new users to a Data source admin role under the collection. Minimize and carefully vet the users who hold Microsoft Purview Collection admin, Data source admin, or Policy author roles.
If a Microsoft Purview account with published policies is deleted, such policies will stop being enforced within an amount of time that depends on the specific data source. This change can have implications on both security and data access availability. The Contributor and Owner roles in IAM can delete Microsoft Purview accounts. You can check these permissions by going to the Access control (IAM) section for your Microsoft Purview account and selecting Role Assignments. You can also use a lock to prevent the Microsoft Purview account from being deleted through Resource Manager locks.
Register the data sources in Microsoft Purview
The Azure SQL Managed Instance data source needs to be registered first with Microsoft Purview, before you can create access policies. You can follow the "Prerequisites" and "Register the data source" sections in this guide:
Register and scan Azure SQL MI
After you've registered your resources, you'll need to enable data policy enforcement (formerly Data Use Management). Data policy enforcement needs certain permissions and can affect the security of your data, as it delegates to certain Microsoft Purview roles the ability to manage access to data sources. Go through the secure practices related to data policy enforcement in this guide: How to enable data policy enforcement
Once your data source has the Data policy enforcement toggle Enabled, it will look like this screenshot. This will enable the access policies to be used with the given data source

Return to the Azure portal for Azure SQL Database to verify it's now governed by Microsoft Purview:
Sign in to the Azure portal through this link
Select the Azure SQL Server that you want to configure.
Go to Microsoft Entra ID on the left pane.
Scroll down to Microsoft Purview access policies.
Select the button to Check for Microsoft Purview Governance. Wait while the request is processed. It could take a few minutes.

Confirm that the Microsoft Purview Governance Status shows
Governed. Note that it could take a few minutes after you enable Data policy enforcement in Microsoft Purview for the correct status to be reflected.

Note
If you disable Data policy enforcement for this Azure SQL Database data source, it might take up to 24 hours for the Microsoft Purview Governance Status to be updated automatically to Not Governed. This can be accelerated by selecting Check for Microsoft Purview Governance. Before you enable Data policy enforcement for the data source in another Microsoft Purview account, ensure that the Purview Governance Status shows as Not Governed. Then repeat the steps above with the new Microsoft Purview account.
Create a policy
To create access policies for Azure SQL MI, follow these guides:
- To create a DevOps policy on a single Azure SQL MI see Provision access to system health, performance and audit information in Azure SQL MI.
- To create policies that cover all data sources inside a resource group or Azure subscription, see Discover and govern multiple Azure sources in Microsoft Purview.
Next steps
Now that you've registered your source, follow the below guides to learn more about Microsoft Purview and your data.
Feedback
Kommer snart: Under hela 2024 kommer vi att fasa ut GitHub-problem som feedbackmekanism för innehåll och ersätta det med ett nytt feedbacksystem. Mer information finns i: https://aka.ms/ContentUserFeedback.
Skicka och visa feedback för