Mark as Date Table
Applies to:  SQL Server 2019 and later Analysis Services
Azure Analysis Services
Fabric/Power BI Premium
SQL Server 2019 and later Analysis Services
Azure Analysis Services
Fabric/Power BI Premium
In Lesson 2: Get data, you imported a dimension table named DimDate. While in your model this table is named DimDate, it can also be known as a Date table, in that it contains date and time data.
Whenever you use DAX time intelligence functions, like when you create measures later, you must specify properties which include a Date table and a unique identifier Date column in that table.
In this lesson, you mark the DimDate table as the Date table and the Date column (in the Date table) as the Date column (unique identifier).
Before you mark the date table and date column, it's a good time to do a little housekeeping to make your model easier to understand. Notice in the DimDate table a column named FullDateAlternateKey. This column contains one row for every day in each calendar year included in the table. You use this column a lot in measure formulas and in reports. But, FullDateAlternateKey isn't really a good identifier for this column. You rename it to Date, making it easier to identify and include in formulas. Whenever possible, it's a good idea to rename objects like tables and columns to make them easier to identify in tools and client reporting applications.
Estimated time to complete this lesson: Three minutes
Prerequisites
This article is part of a tabular modeling tutorial, which should be completed in order. Before performing the tasks in this lesson, you should have completed the previous lesson: Lesson 2: Get data.
To rename the FullDateAlternateKey column
In the model designer, click the DimDate table.
Double-click the header for the FullDateAlternateKey column, and then rename it to Date.
To set Mark as Date Table
Select the Date column, and then in the Properties window, under Data Type, make sure Date is selected.
Click Extensions > Table > Date > Mark as Date Table.
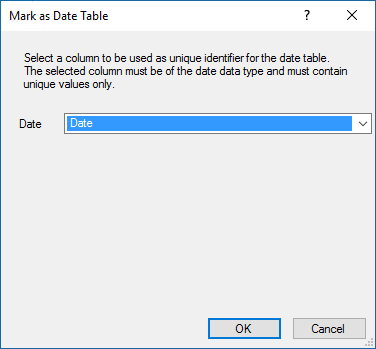
In the Mark as Date Table dialog box, in the Date listbox, select the Date column as the unique identifier. It's usually selected by default. Click OK.
Save.
Next step
คำติชม
เร็วๆ นี้: ตลอดปี 2024 เราจะขจัดปัญหา GitHub เพื่อเป็นกลไกคำติชมสำหรับเนื้อหา และแทนที่ด้วยระบบคำติชมใหม่ สำหรับข้อมูลเพิ่มเติม ให้ดู: https://aka.ms/ContentUserFeedback
ส่งและดูข้อคิดเห็นสำหรับ